This page is dedicated to helping you quickly find the answers you need, at the same time, it also contains the Forum entry, leave your thoughts in the Forum.
Wondershare PDFelement is a powerful PDF tool that helps make working with PDF files easier, allows you to produce great-looking PDF documents and forms quickly, affordably, and securely. With this application, you can:
Open, save, print and markup PDFs;
Add, remove, move, re-size and rotate any graphical element within your PDF;
Secure your PDFs with password protection;
Convert PDF documents into Word, PowerPoint, Excel, HTML, text and image files;
Create interactive form field and recognize form field automatically;
Extract data from interactive PDF forms and export in CSV format;
Insert page numbers, bates number, and page elements;
Approve and sign documents digitally;
Unlock text within images using OCR;
Perform partial OCR on specific user-defined fields in scanned PDFs;
Batch process to convert, create, optimize, data extract, bates number, and watermark.
A good way to get up to speed in using PDFelement is by familiarizing yourself with its workspace. PDFelement provides an intuitive user interface with a menu bar, a toolbar, a navigation panel, and work area.
Download and Install
1System Requirement
The minimum required specifications to run Wondershare PDFelement Pro are as follows:
Double click the executable installation file and follow the on-screen instructions to finish the installation.
Register and Remove Trial Watermark
1Trial Version Limitations
After downloading and installing, you will receive the trial version of PDFelement. The trial version does contain the following limitations:
Places a watermark on your PDF files when you save after editing or commenting on the file. (It is recommended that you click the "Save As" button in "File" menu to save it to a new copy with the watermark, then it will not affect your original PDF.)
Will only convert half of your PDF pages and only convert 5 pages at most when your PDF file has more than 10 pages.
When using the batch process to extract data, it will process two files only.
When using the batch process to add a watermark or bates number, it will process all the files you load but will still add the trial watermark in each file.
2Purchase PDFelement
To get the full version of Wondershare PDFelement, you need to purchase the license to activate it. Please follow the below steps to purchase the license:
Find the "Buy Now" button on the top right corner of the trial version product window and click it. Alternatively, you can visit the Wondershare Official Store purchase page.
Follow the on-screen instructions to complete the purchase process.
The process of how to activate the software will be displayed on the website after paying successfully. And please go to your email inbox to find the download link and activation process.
(Note: Sometimes, you may find the activation email located in the junk/spam mail box.)
3Register PDFelement
To be able to have access to the full features of the registered version, ensure that you have taken the time to use the registration information submitted to you to fully activate the software after purchase. Without registration, the product will remain as the trial version even though you have paid for it. Here is how to register PDFelement after you have purchased the product.
Launch PDFelement and click the "Log In" button in the top right corner.
A Login window will popup, you can log in with your Wondershare ID account to activate it.
If you do not have an account, click "Create account" under the "Next" button.
Video of how to activate PDFelement
4Remove Trial Watermark
Once registered, the registered full version product does not have any limitation to save or convert your PDF files. If your PDF file has a watermark added by the free trial version, you can use the registered full version product to remove this watermark directly. So after opening the watermarked PDF file in the registered full version product, the watermark will be removed automatically, and you just need to save the file again.
Toolbar
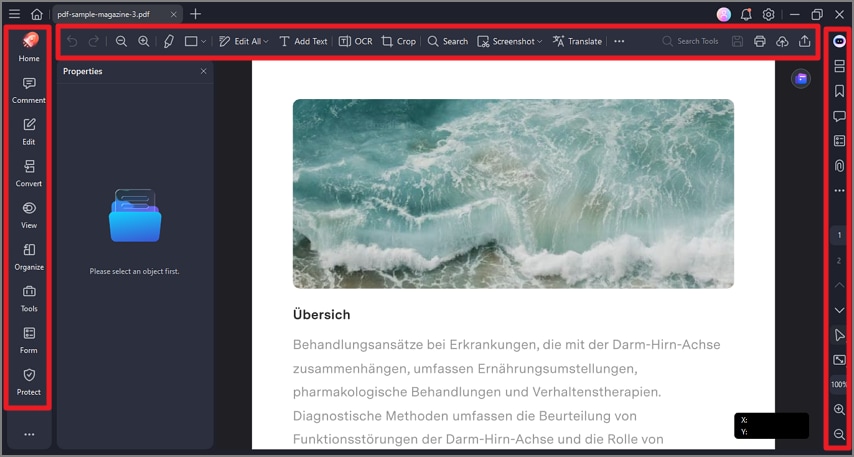
The toolbar displays different tabs with different tools. This is the toolbar on the center of the screen. Note: Position the pointer over a button to see the description of the button.
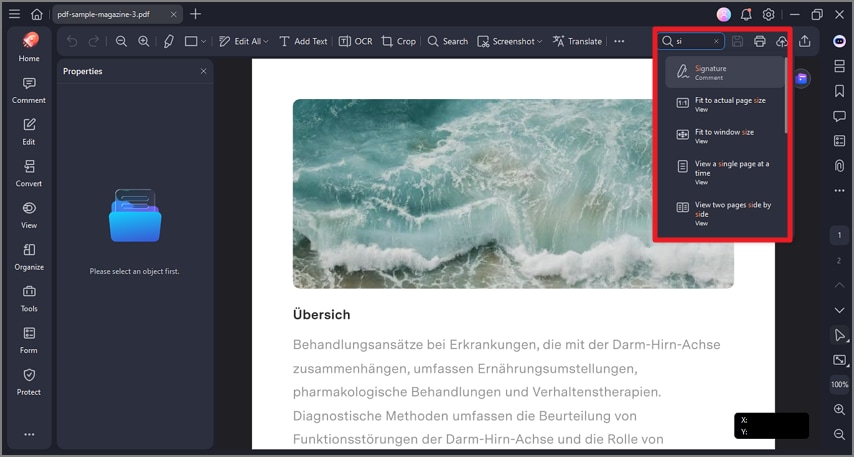
File Menu
Click "File" tab to view more menu options.
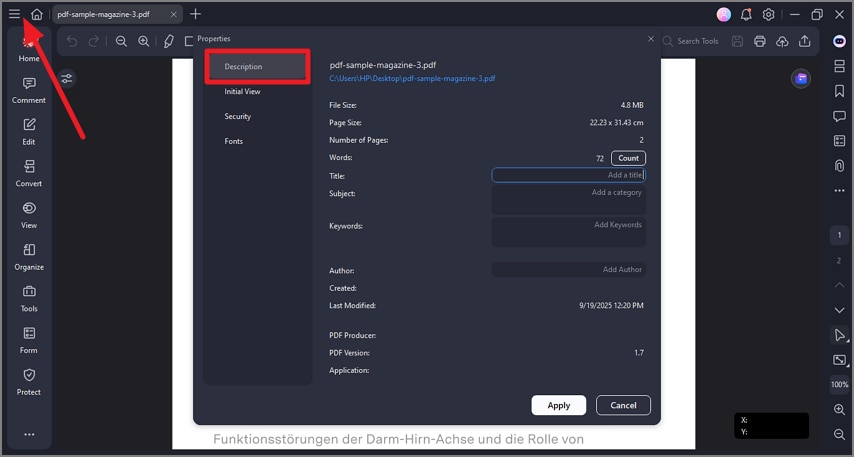
1File Properties
In "File">"Properties">"Description", you can check the file properties, you can also edit the data of "Title", "Subject", "Keywords" and "Author" that are marked by the pencil symbol.
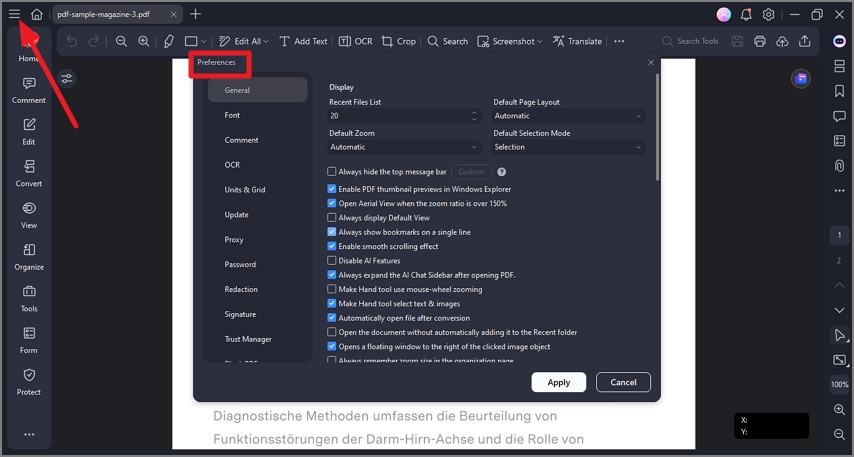
2File Preferences
In "File">"Preferences", you will get more settings about "General", "Font", "OCR", "OCR", "Update" , "Proxy", "Password", "Redaction" and “Shortcut”.
General: You can set the quantity for the recent file list, the display mode, automatic save time and measurement units.
Font: You can set Default Textbox Font for comments and Default Text Font.
OCR: You can set the default language to use in Document Language list.
Update: You can set the frequency to check updates.
Proxy: You can select the proxy settings.
Password: You can set the password to open the encrypted documents.
Redaction: You can set redaction to black out the sensitive text.
Shortcut: You can find shortcuts for main functions.
Shortcut Keys
There are many shortcut keys for you to better operate PDFelement and be more efficient. After opening the program, you can refer to the following instructions to work. Also, you can find the shortcuts in “File” > “Preferences” > “Shortcuts”.
General Operations
F1: Open the "Online Help" page by your browser.
Alt + Shift + F11: Know the version number of this program and it only works when you do not open any file in the program.
Ctrl + O: Pop up the window to select a file to open.
Ctrl + F: Open the "Find and Replace" box after opening a searchable file.
Alt: Display the tooltips for all the buttons in the ribbon bar.
Ctrl + F1: Display or hide the ribbon bar.
Ctrl + Tab: Change to the next file tab when you open multiple PDF files in the program.
Ctrl + Shift + Tab: Change to the previous file tab when you open multiple PDF files in the program.
File Management
Ctrl + W: Close the currently opened PDF document.
Ctrl + S: Save the currently opened PDF document.
Ctrl + Shift + S: Save the current opened PDF document as a new file.
Ctrl + Z: Undo your last step.
Ctrl + Y: Redo your last step.
ESC: Close the "File" menu after clicking it.
Ctrl + N: Open a blank PDF document.
Ctrl + P: Print the currently opened PDF document.
Ctrl + F10: Change to a maximum or original window size after opening a document.
File View
Ctrl + 1: Fit to the actual page size for viewing the opened PDF document.
Ctrl + 2: Fit to window width for viewing the opened PDF document.
Ctrl + 3: Fit page to the window for viewing the opened PDF document.
Ctrl + +: Zoom in for viewing the opened PDF document.
Ctrl + -: Zoom out for viewing the opened PDF document.
F11: Exit the full-screen mode.
Ctrl + 4: Open a new PDF document.
Ctrl + 5: View pages continuously with scrolling enabled.
Ctrl + 6: View two pages side by side.
Ctrl +7: View two pages side by side with continuous scrolling enabled.
↑: Scroll up or go to the previous page.
↓: Scroll down or go to the next page.
←: Move to the left when there is a slider at the bottom of the document view.
→: Move to right when there is a slider at the bottom of the document view.
Alt + ←: Go to the previous view.
Alt + →: Go to next the view.
Side Panel
Ctrl + Shift + 1: Hide the side panel when it is opened on the left side.
Ctrl + Shift + 2: Display the thumbnail panel.
Ctrl + Shift + 3: Display the bookmark panel.
Ctrl + Shift + 4: Display the search panel.
Ctrl + Shift + 5: Display the annotation panel.
Annotate
Ctrl + H: Change to hand mode.
Ctrl + T: Change to select mode.
Ctrl + U: Enable the underline feature, you can start to select text to add underline.
Ctrl + L: Enable the link feature, you can start to select the area to add hyperlinks.
Shift + Alt + 1: Add sticky note.
Shift + Alt+ 2: Add text box.
Shift + Alt+ 3: Add lines.
Shift + Alt+ 4: Add arrows.
Shift + Alt+ 5: Add ovals.
Shift + Alt+ 6: Add rectangles.
Shift + Alt+ 7: Add polygon.
Shift + Alt+ 8: Add cloud shapes.
Shift + Alt+ 9: Add connected lines.
Shift + Alt+ P: Use a pencil to draw.
Shift + Alt+ E: Use an eraser to erase the pencil drawings.
Shift + Alt+ P: Use a pencil to draw.
Edit
Ctrl + E: Change to edit mode, you can start to edit text or objects.
Ctrl + B: Change the selected text to be bold.
Ctrl + I: Change the selected text to be italic.
Ctrl + [: Change the font size to be bigger for the selected text.
Ctrl + ]: Change the font size to be smaller for the selected text.
Ctrl+ A: Select all the text or objects.
Page Management
Ctrl + Shift + D: Pop up the window to delete pages.
Ctrl + Shift + Q: Pop up the window to insert blank pages.
Ctrl + B: Start to add new bookmarks when you are in the select mode.
Different Ways to Open PDF
Once you have become familiar with the program and basic tools, you can begin reading and working with your PDF files. You can open a PDF file, reach a specific page easily, adjust the view of the document, and more. You can open PDFs by PDFelement in many different ways.
Drag and drop a PDF file into the PDFelement window after opening it.
Click the "Open File" button in the Home window to browse the PDF files on your computer to open or choose from the "Recent" list to open directly.
Click the "Create PDF" box on the Home Page to select your PDF file to open. ( It is the same for other options of "Combine PDF", "Optimize PDF", "OCR PDF", "Convert PDF" and "Batch PDF")
Right-click the PDF file on your computer to choose "Open with", then select PDFelement to open.
Open a Secured PDF
To ensure the security of data, some PDF’s will have a password to protect it. If you have received a PDF that is protected with a password, you just need to enter the correct password to view the file.
Some protected PDF files have other restrictions to prevent from printing, editing, copying, etc. When you try to print or edit this secured PDF file, you will be notified that you are prohibited to do so without the permission password. You can click the "Enable Editing" button to enter the permission password to edit it.
Page View Mode
1Document Layout
You can find some settings about the layout of your PDF document under the "View" tab option. Or you can select the page view mode in the bottom floating bar that automatically appears when you move your cursor to the bottom.
Continuous: Arrange the pages in the document panel in a continuous vertical column and scrolling enabled.
Single: View one page in the document panel at a time.
Facing: Arrange the pages side by side, displaying only two pages at a time.
Facing Continuous: Arrange the pages side by side in a continuous vertical column and scrolling enabled.
2Zoom
With the zoom tool, you can enlarge the view of a PDF to see more details. You can zoom in to a minimum of 10% and a maximum of 6400%.
Click the "View">"+" (Zoom In) or "–" (Zoom Out) button under the "View" tab option or in the bottom floating bar to change the zoom level of the PDF page.
Choose a level in the "Zoom" box, the zoom level ranges from 10% to 6400% as you need.
Hold the "Ctrl" key on your keyboard and scroll your mouse wheel to zoom in or zoom out.
3Page Layout
You can find the settings to change the page layout of the pages in the "View" tab too.
Fit Width: To resize the page to fit the width of the window. Part of the page may be out of the view.
Full Screen: Arrange the pages to fill the entire screen, with Menu Bar, Toolbar, Status Bar, and Thumbnail panel hidden behind. Press Esc or F11 key to exit full-screen mode.
Fit Height: To resize the page to fit the height of the window. Part of the page may be out of the view.
Fit Page: To resize the page to fit entirely in the document panel.
Actual Size: To resize the page to its actual size of 100% zoom level.
4Multi-tab Viewing
PDFelement allows you to open up to 15 documents in a single application window, and will arrange them into different tabs in that window for you. This allows you to keep all of your documents readily available to work with, or review as needed.
5Preference of Viewing
To assist in keeping all of your PDFs in the same viewing format, you can set a viewing preference from the PDFelement software file menu. To do this, please click on "File>Preferences>General" and set the "Default Page Layout" and "Default Zoom" as preferred.
Initial View
For a file that you will be reviewed frequently, it is possible to adjust how it opens every time for you in PDFelement. To do this, go to "File>Properties>Initial View" and change the settings as you prefer. Once you have finalized your settings, click on "File>Save" or "Save As" to make the changes. Once you have done this, the file will always open with the settings you have chosen.
Navigation tab: You can set whether to open the bookmark panel and thumbnail panel automatically when you open this document to view
Layout: You can set the layout mode to view this document.
View: You can set the view mode for this document.
Open To Page: You can set the open page for this document. For example, if you set to open page 2, then it will open page 2 automatically when you open this document every time.
Navigate PDF
1Page Navigation
You can navigate through the pages of your active document in the "View" tab or in the bottom floating bar.
Click the "Previous Page" button to navigate to the previous page of the current document.
Click the "Next Page" button to navigate to the next page of the current document.
Enter the page number and press Enter key to navigate to the page immediately.
2Thumbnail Panel
The Thumbnail Panel allows you to quickly scroll through pages in your document using the mouse wheel, or by dragging the slider in the panel. Right-click on a page in the thumbnail panel, and you can adjust the size of the thumbnails by choosing “Enlarge Page Thumbnails” as well as “Reduce Page Thumbnails”.
3Bookmark Panel
A bookmark is a link with specific text in the Bookmark panel. Use the bookmarks to go to different pages in the document. PDFelement allows you to navigate through bookmarks. Simply goes to the Bookmark panel and click on the bookmark of your choice go to there.
4Annotation Panel
If you've annotated the PDF document, you can find all the annotations list here. The annotations can be sorted by pages, date, author, and type. You can navigate to a specific page by clicking on the annotation.
5Search Panel
PDFelement has a powerful built-in search tool that allows you to navigate through your document, looking for specific text in the active document. There are different ways to perform a search:
Click the Search panel in the left navigation column to enter the keyword in the box and press Enter key to start the search process.
Click “Home” Tab > “Find” and enter a keyword in the search box and press Enter key to start the search process.
6Show/Hide/Adjust Navigation Panel
The buttons on the left side of the Navigation panel provide easy access to various panels, such as Bookmark panel and Annotation panel, etc.
To hide the navigation panel, click the to hide.
To show the navigation panel again, click on one of the icons (Thumbnail, Bookmark, etc.) to show the panel again.
To adjust the size of the navigation panel, place your mouse cursor on the edge of the panel, and once it turns into a double arrow, click to adjust the size as needed then release the mouse to set it.
Multiple Windows for Multiple PDFs
Since version 6.3.0 of PDFelement, we support to open multiple PDF files in different program windows, so that you can better view or compare among different files.
Open multiple PDF files in the program first, then click the "View" > "Tile" button.
Choose to tile the windows Horizontally or Vertically.
Alternatively, you can open multiple PDFs first, and reduce the window size, then drag the tab of the file to create other windows for each file directly, then adjust the window size as you want by dragging the edge of the window again.
After tiling to multiple windows, drag the tab of the file back to one window one by one, you will get all the opened files back into one window.
Bookmarks
1Add Bookmarks
Navigate to the page in which you want to insert a bookmark. Then click the Bookmark panel and select the "Add" button to insert the bookmark.
Open one file and click the "Bookmark" button at the left side panel, and it will open the Bookmark panel to create the bookmark for the current page directly.
2Edit Bookmarks
Right-click the bookmark in the Bookmark panel to choose "Rename Bookmark" to change the name.
Right-click the bookmark in the Bookmark panel to choose "Add Child" to add a child bookmark.
Right-click "Set Destination" to change the bookmark to the current page.
Right-click "Expand All Bookmarks" to expand all the bookmarks including the child bookmark.
Right-click "Collapse All Bookmarks" to collapse the child bookmark.
Snapshot
To create a snapshot of your PDF file, click on the "Tool" > "Capture" button and then you will want to click and drag the mouse to the desired area. Once you release the mouse button, the following options will appear:
Click to undo the snapshot, you can use the mouse click to drag a new area for the snapshot.
Click to save the snapshot on your computer.
Click to exit the snapshot.
Click to copy the snapshot, you can paste it somewhere else.
Attachment (Only available in PDFelement Pro)
PDFelement Pro allows you to attach PDFs and other types of files to a PDF. If you move the PDF to a new location, the attachments move with it together.
Click the "Attachment" panel in the left column and then tap on the "Add attachment file" button.
Browse and select a file that you want to attach.
Click the attachment, the other buttons will be enabled, such as "Open attachment file", "Save attachment" and "Delete attachment". Or you can right-click the attachment to choose these functions from the menu.
(Optional) To add a description to the attachment that helps differentiate between similar files in the Attachments panel, select the attached file, choose "Edit Description" to edit the text of the description, and then save the file.
One-click PDF Creation From Any File
You can use PDFelement to create a PDF from any type of printable files. Simply drag the file into the program window if it is open, or convert quickly from within Windows Explorer.
Drag the document you want to convert on to the PDFelement desktop icon.
If the PDFelement is opened, drag the file directly into the application window.
Create in PDFelement Window
You can create a PDF from Office files, email, a website, or from any files that are printable. Here are two ways to create:
1Create a PDF from a File
Launch PDFelement, click "Create PDF" box, select files to open. Then the file will be opened in the application window, you can click "File" > "Save As" button to save it to a PDF file directly.
Note: If you select multiple files to create, it will open each file in a separate tab so that you can save each as a separate PDF file.
2Create a PDF from Multiple Files
You can easily combine different formats files into a single PDF file.
Launch PDFelement and click the "Combine PDF" box, "Choose File" button, and "+ Add file" option to select multiple files you want to combine or drag these files into this window directly, you can click the "..." button to change the output folder. Adjust the order of files as desired by dragging the file up or down to change the file order. Click the "Apply" button, the final created single PDF file will be opened in the application window. If you want to change the page order, you can drag the page on the left Thumbnail panel to move the page up or down, then you can click the "File">"Save As" button to save again.
3Create a PDF From a Blank Page
You can create a PDF from a blank page rather than beginning with a file, image, or scanning. Click the "File" > "Create" button, set the "Blank PDF" button to create directly. Then you can click the "Edit">"Add Text" button or "Comment">"Typewriter" button to add text on the page, or click other buttons to do what you want to this PDF. Click the "File" > "Save" button to save it on your computer.
4Create PDF Files from a Batch
PDFelement allows you to create PDFs from a batch at once. You can click the "Batch PDF" button on the Home menu. Then a window pops up and you need to select the "Create" option, and you can add the files that you need. In addition, you can choose the folder options by clicking on the "..." button. Finally, you can click on the "Apply" button to achieve this process.
Video of Creating PDF
Right Click to Create PDF
PDFelement is compatible with the Windows system and enables users to create PDF files directly by right-clicking the other formats of documents, including Word, Excel, PowerPoint, text, and images.
Right click the target document.
Click the "Create to PDF" button on the menu.
This will start the creation process. Within a few minutes, the document will be created to PDF. Click the "Finish" button.
The created PDF file will be open in PDFelement and you can press "Ctrl + S" to save it.
Create PDF Files Using Print Command
PDFelement printer works like a standard printer, so you can use it to print your files from any Windows applications (such as Notepad, Outlook Express, and Internet Explorer) as if you would print to a real printer.
Open the file in its authoring application.
Click the "File">"Print" button in the file.
Select the printer named as PDFelement, and click the "Print" button.
The file will be opened in our application window, click the "File">"Save" button to save it to a PDF file on your computer.
Create PDF Files from Scanners (Only available in PDFelement Pro)
PDFelement Pro supports to create PDF files from scanners or your mobile devices directly.
After opening the program, click the "File">"Create">"From Scanner" button.
Select your scanner or your device, and click the "Scan" button to start creating.
Select the scanned image to create as a PDF, or continue to scan more pages to create as one PDF.
The created PDF file will be opened in the program directly, you can start to work with it or save it on your computer.
Video of Creating from Scanners
Combine to PDF by Right-Clicking
You can combine two or more PDF files into one and you can also combine different types of documents into one PDF (the file formats including Word, Excel, PowerPoint, Text, images).
Press the "Ctrl" key and select the documents you want to combine to PDF.
Right click the selected documents and choose the "Combine to PDF" option.
Once you click the "Combine to PDF" option, PDFelement will pop up a "Combine Files" window.
In this window, you can set the "Page Range" for combination. Click the "..." button to select the output folder for the combined PDF file.
Finally, click the "Next" button to start the combination process.
Combine Files in PDFelement Window
PDFelement supports to generate a new catalog page from bookmarks when combining files.
1Combine PDFs
Launch PDFelement, click the "Combine PDF" box in the main interface.
In the new "Combine" Window, click the "Choose file" and then "+ Add file" button to select the import the PDF files on your computer. Or simply drag and drop your files into the window.
Click "..." to set an output folder for the combined PDF file.
Click the "Apply" button. PDFelement will combine the PDF files you add within a few seconds. Besides, the combined PDF will be automatically open in PDFelement and you can now edit or manage it as your requirements.
More importantly, PDFelement supports to generate a new catalog page from bookmarks when combining files. So there is a new catalog page in your combined PDF, helping you find the target page quickly.
2Combine to PDF from Different Format Files
You can easily combine different formats files into a single PDF file.
Click the "Combine Files" button under the "Tool" tab.
Click the "Choose file" and then "+ Add file" button to import the files you want to combine, and you can choose different formats files from your computer.
Click the "Apply" button. All the files you add will be combined into a single PDF document.
Add Comments
A comment is a written note intended as an opinion, an example, an illustration, or a statement of fact or opinion, especially a remark that expresses a personal reaction or attitude. You can also edit, delete, and move the comments with ease.
1Add Notes/Typewriter/Text Box/Area Highlight
Note: To add a note comment, please click the "Comment">"Note" button, and click where you want to place the note and make comments in the box.
Typewriter: To add a typewriter comment, please click the "Comment">"Typewriter" button, and click where you want to place it and double click it to type comments as you want.
Text Box: To add a text box, please click the "Comment">"Text Box" button, and click where you want to place the text box and double click the box to type comments in the box. A textbox is a rectangle of any size, possibly with a border that separates the text box from the rest of the interface, allowing the user to input text information. A text box usually remains visible on the document page, it does not close like a pop-up note.
Area Highlight: To highlight an area, please click the "Comment">"Area Highlight" button, drag the mouse click to select the area to highlight.
2Add Comments Continuously
You can continuously add Notes/Typewriter/Text Box/Area Highlight rather than clicking these options one at a time. For example, if you want to continuously add text boxes, simply click the "Text Box" button firstly and then click the "Keep tool selected" button. After that, you can click any places on your page where you want to add these boxes. After adding all the text boxes as you want, then click the "Keep tool selected" button again to type the comments you want as you need to fill them in.
3Move/Copy/Paste comments
After adding the Stick Notes/Text Box/Typewriter comment, please click the "Select" button, it will go into a select mode, please click the Stick Notes/Text Box/Typewriter comment that you add, drag it to move to the place where you want. In the select mode, after clicking the Stick Notes/Text Box/Typewriter comment that you add, you can press Ctrl+C keys to copy and press Ctrl+V keys to paste as many as you want. Or you can right-click the Stick Notes/Text Box/Typewriter comment to choose "Copy" and "Paste" to duplicate.
Note: The Stick Notes/Text Box/Typewriter comment can only be moved, copied, and pasted within the same page, you cannot do this across different pages.
Text Markups
You can go to the "Comment" tab to find the text Markup tools. Or you can click the "Select" button, select the text as you want, the mini toolbar of "Highlight", "Underline" and "Strikeout" will appear for your quick access. Holding the Alt key, or holding the mouse button, allows you to select a region of text to work with. After selection, you can right-click the selected text to get more options.
Highlight: To mark important passages of text with a fluorescent marker as a means of memory retention or for later reference.
Underline: To draw a line under to indicate emphasis.
Squiggly: To draw a squiggly line under.
Strikeout: To draw a line to cross out text, making others know the text is deleted.
Caret: A proofreading symbol used to indicate where something is to be inserted in a line.
If you want to change the color of the Text Markups, please click the "Select" button, right-click the highlight or underline to choose "Properties". In the right side Properties panel, you can change the color and opacity in "Appearance" options, and you can also click the "Use as Default" button to set it as default for future use.
Drawing
Drawing tools allow you to add different graphic elements into your PDF, such as rectangles, polygons, ovals, and other images. It is useful when you need to use an image to bring attention to a section of your document.
Rectangle: A proofreading symbol used to indicate where something is to be inserted in a line.
Oval: To draw an oval or a circle with pressing the Shift key.
Cloud: To draw cloud shapes.
Polygon: To draw a closed plane figure bounded by three or more lines segments.
Connected Lines: To draw an open plan figure with three or more line segments.
Line: To mark with a line.
Arrow: To draw something, such as a direction symbol, that is similar to an arrow in form or function.
Pencil: To draw free-form shapes.
Eraser: To erase the pencil markups only, it cannot be used to erase other markings.
Video of How to Draw on PDF Files
Stamps
The Stamp tools in PDFelement are a group of advanced tools that enable you to stamp content into a PDF document. PDFelement supports image stamps with various image formats (jpeg, png, bmp, etc). You can either use our predefined stamps or create your own stamps. Stamping PDF files is a very useful feature especially when you need to give reviews or explain the document’s status or sensitivity.
1Stamp a PDF
Click the "Comment" > " Add Stamps" button, and click one predefined stamp from the types of "Standard Business", "Sign Here" and "Dynamic", then click on the position where you want to place it.
2Create/Manage Stamps
You can create custom image stamps, and manage all your created stamps, however, it does not support the creation of customized dynamic stamps.
Click the "Comment" > "Custom Stamp" > "Create" button, click the "Select Image" button to browse the picture as you want to, you can also name the stamp. Then click the "OK" button, it will be added in the Custom type under the "Stamp" button.
Click the "Comment" > "Custom Stamp" > "Manage Stamps" button, select the customized stamp to "Create", "Edit" and "Delete".
Add Attachments as Comments (Only available in PDFelement Pro)
Use the "Add Attachment" tool to embed a file at a selected location in a PDF, so that the reader can open it for viewing. By adding attachments as comments, you can reference longer documents that can't easily be pasted into a pop-up note or text box. If you move the PDF to a new location, the embedded file attachments automatically go with it. To view an attachment, the reader must have an application installed that can open the attachment.
Click the "Comment" > "Add Attachment" button, and click on the page where you want to add this comment.
A pop-up dialog will open, and you can browse to select a file to attach.
Right-click this comment to open attachment/save attachment/cut/copy/delete/open properties,etc.
You can change the icon style/color/opacity in its properties.
The attachment comment will also be listed in the Annotation panel. Click one of the attachments in the panel, and it will lead you to that page.
Undo/Redo/Delete/Hide Annotations
Undo/Redo: When you annotate PDF documents, like adding text boxes, adding drawings or highlights, etc, you can click the "Undo" button in the top Quick Access Toolbar to undo the last operation. Click the "Redo" button in the top Quick Access Toolbar to redo the last undo operation.
Delete: After adding annotations, or if you open a PDF document with annotations in it, please move your cursor to the bootom of the page, and then click the "Select" button in the floating bar to go into select mode, then right-click the annotation to choose "Delete". Alternatively, click the annotation and press the Delete key on your keyboard. Another option is to click the Annotation panel on the left side, right-click the annotation to choose "Delete".
Hide: If there are too many annotations on your PDF page to affect the reading of your text content, you can click the "Comment">"Hide Annotations" button to hide annotations for current PDF reading. You can then click the "Hide Annotations" button again to display all the annotations in the document again.
Note: Display changes for annotations will not be saved and when you re-open the page, they will display as normal again.
Comments Properties
You can change the appearance of all the comments. Click the "Select" button to go into select mode, right-click the comment to choose "Properties", then the "Properties" panel on the right side will be opened. You can change its "Info", "Appearance" or "Font" settings. You can also click the "Use as Default" button to set the properties as default when you add this type of comment again. For example, it shows the Text Box properties as follows:
Tips: You can change properties for multiple comments in a batch. In the "Select" mode, you just need to hold the Ctrl key and click all the comments one by one, they will be selected at the same time. Right-click one comment to choose "Properties", then set as you want. All the selected comments will be changed.
Edit Text
1Edit with Different Modes: Line Mode and Paragraph Mode
With PDFelement, you can edit texts in a paragraph as well as changing their font, font size, and color. To edit texts in a paragraph, please do the following:
Select the "Edit" button on the top right, and click the Edit mode icon to choose the edit mode. There are two modes for you to edit the text: "Paragraph Mode" and "Line Mode". When you use the "Paragraph Mode", the whole text will appear in one complete block. When you use "Line Mode", each line of the text will be a separate block. Then you can edit the desired text to start editing by typing new text and deleting text.
Click the "Edit" > "Add Text" button to add new text on the position that you want.
Choosing the text will allow you to change its font, font size, bold, italic and color, etc., as you want.
Note: If you want to edit a scanned or image-based PDF, you will get a grey highlighted notice in the application window, so please click the "Perform OCR" button in the grey notice or click the "OCR" button in the Ribbon, then select the “Change Language” button to set the correct language of the PDF. Please refer to the chapter of "Perform OCR" to review how to run that feature. After performing OCR, click the "Edit">"Edit Text" button to edit the text then. (The OCR function is only available in PDFelement Pro)
2Create and Edit Superscript and Subscript Text
The program allows you to create and edit your superscript or subscript text now. Please do the following:
After opening the PDF file in the program, please click the "Edit" button and click the text where you want to the superscript or subscript text first.
Select the text and click the "Superscript" or "Subscript" button, then the text will change to be superscript or subscript.
3Find and Replace
The program can help you find the keyword in your document, and also supports to replace any word to another one at one time.
After opening the PDF file in the program, press Ctrl+F keys to open the window, enter the keyword that you want to find.
And you can click the "Replace with" button to enter a new word that you want to replace with.
Video of Editing Texts
Spelling Check
PDFelement allows users to check the spelling of PDF files and provides suggestions to correct misspelled words. This feature is useful when users want to proofread the text. You can check for possible mistakes and then confirm each correction.
By default, PDFelement automatically checks the spelling when you use the "Edit" or "Add Text" tool. You can disable the automatic spelling check by unchecking the "Enable word spell check" option in the "File" >"Preferences" >"General" menu.
To check spelling within a document, please do the following:
Make sure the option of "Enable word spell check" in the "File" > "Preferences" > "General" menu has been checked.
Click the "Edit">"Edit Text" button, then highlight the section you wish to check. When there is an error, a red wavy line will appear under the suspect word.
Right-click the words, you will get the suggestions for correction. Click on one of the suggested spellings to update the spelling or to insert the proper word.
If the incorrect text is an acronym or a special term, you can choose the "Ignore All" option, then this acronym or the term in this file will be cognized as correct when you do spell-check. When you reopen this file, the acronym or special term will be recognized as incorrect again.
If you want some words to be cognized as correct all the time, then you can add these words to the dictionary. Selecting the "Add to Dictionary" option, this word will be recognized as correct no matter which PDF file you open. Alternatively, you can go to "File">"Preferences">"General", click the "Custom Dictionary" button and add or remove the word as you want.
Video of Checking Spelling
Edit Object
When reading a PDF, you may also need to edit an image, shape, or other objects in the PDF file. With PDFelement, you can add and edit the objects as well as text content. To edit an object, please do the following:
Click the "Edit" button, then click the image or object to select, then you can drag to move. When moving the object, you will also notice there is an alignment grid line, to allow you to keep your documents alignment set. Alternatively, you can click the object and press the arrow keys in your keyboard to move it to the desired location.
Placing the mouse cursor on the edge of the blue box to drag will allow you to resize the image. Right-click it to choose "Rotate Left", "Rotate Right", "Overturn Horizontal", "Overturn Vertical", "Replace Image", Extract Image" and other options. These options are also accessible in the right-side panel.
Click the "Edit" > "Add Image" button to select the image you as you want to add in the PDF.
Tips: After clicking the "Edit" button on the top-right corner, you can copy/paste an image from your clipboard into the PDF directly.
You can rotate the image as you want, hover the mouse click over the green round button, holding the mouse click to rotate at any degree.
Video of Rotating Image
Edit Link
1Add Link
This function helps you to lead the readers to related pages or an intended webpage. To add a link, please choose the "Edit" > "Link" button, then there are three options of link action you can select. After clicking one of them, position the cursor on the place you want to add the link, hold and drag your mouse button to draw a rectangle. It will pop up a dialog box for you to set the link action and appearance.
Appearance
Link Type: You can select a visible or invisible rectangle.
Highlight Style: The effect when you click the rectangle link, there are three types: invert, push, and outline.
Color: The border color of the rectangle.
Link Thickness: The thickness of the four sides of the rectangle. The higher the value, the thicker of the sides.
Link Style: The style of the rectangle's border, there are three types of the border: solid, dashed, and underline.
Link Action
Go to a page view: After selecting the option “Go to a page view”, please click on the “Set Link” button which will bring up the following message. Follow the message to scroll through the pages in the work area, or in the thumbnail panel to select the target page. Once you have selected the target page, click the “Set Link” button to complete the action.
Open a web page: Designate the link to open a web page. Select this option to enter the URL of the destination web page.
Open a file: Designate the link to open another file on the computer. Select this option and click the button of "..." to browse the target file.
2Edit Link
You can move, resize, delete and edit the link after you have created it. Click the "Edit">"Link" button, drag the link to move to the desired position. Or drag the rectangle around the link to resize it. Alternatively, right-click the link you create to choose "Delete" or "Edit Link" to reset. After clicking the "Select" or "Hand" button, when you click the link in your file, it will execute the link to go to the target that you set.
Video of Adding Links
Keep the Same Aspect Ratio When Resize the Image
After selecting the “Edit” button, select the target image, and click and drag the corner of the image. Holding the Shift key while dragging will allow you to resize the image and maintain the aspect ratio.
Crop Pages
After clicking the "Tool">"Crop" button, you will get the new "Set Crop Box" dialog. Here you can drag the eight blue squares in the dashed box to resize the box keeping the area inside the blue dashed box after cropping. You can also enter the accurate parameters as you want in the Crop Margin area. Then select the Page Range that you want to crop, and finally, choose the "OK" button to crop.
PDF Watermark
1Add Watermark for a Single PDF
After opening your PDF file in the program, please click the "Edit" > "Watermark" > "Add Watermark" button.
In the "Add Watermark" window, you can click the "+" box to select watermark type. If you choose the Text option, you can input the text as the watermark and choose the font, size, color, and position or add an image as the watermark from your computer via clicking the "Image" > "..." button. If you choose another file as the watermark, you can set the "Absolute Scale" of the watermark. In this way, the watermark size will not change no matter what is the size of your PDF page.
You can set the rotation degree and opacity by clicking the "<>" button. If you choose "Looks behind the page" in the "Location" option, the page content will obstruct your view of some part of the watermark. If you choose "Looks above the page", the watermark will cover some content, however, you can adjust it via the setting of the opacity of the watermark.
Set the vertical and horizontal distance between the target page and the watermark.
Choose the page range and appearance to apply the watermark.
Click the "Save" button to save a watermark template for your future use. Next time, you can click the "Add Watermark" button to choose the one you want to apply directly without setting again.
2Add/Remove Watermark for a Batch (Only available in PDFelement Pro)
PDFelement Pro supports to add the same watermark into multiple PDF documents at the same time. Also, it supports to remove watermarks from PDF in batch.
After opening the program, please click the "Tool" > "Batch Process" button.
Click on the "Watermark" tab to drag and drop the selected PDF files for the operation.
If you have not saved any watermark template yet, you cannot do the batch process. So you can click the " + " button on the bottom of the pop-up window to set and save one template first. On the other hand, if you want to remove the watermarks, you can click the "Remove Watermark" option.
Click the "Apply" button to begin the process.
Video of Adding Watermark
PDF Background
To add a new background, you can choose the "Edit" > "Background" > "Add Background" button. In the “Add Background” dialog box, you can click the "+" button to set a background template first. Then there are three options of background type, including color, image, and PDF, and you choose one of them to set a template.
If you choose to set a color as the background, you can just select a color you like to set in the "Create Background Template" window. If you want to make an image or PDF file as the background, you need to click the "..." button to select the file as you desired.
Click the "<>" button to set the appearance by choosing the rotation degree and the opacity. You also can choose to make the scale relative to the target page or not.
Choose the page range to display the background. You can select all pages or specify the page range.
PDF Header and Footer--Page Number
You can add header and footer for the PDF pages by clicking the "Edit" > "Header and Footer" button. You can also add "Page Number" using this function. You choose “Page Number” by clicking the "<>" button, then you can set the Page Number under the Macro tab. You can also set the font and position for the page number.
PDF Bates Numbering
Bates Numbering is used to label a page, allowing for ease of searching and accounting for pages in a PDF. The Bates numbering tool in PDFelement allows you to create a unique number to PDF pages and you also can remove the un-wanted bates numbers.
1Add Bates Number for a Single PDF
After opening your PDF file in the program, please click the "Edit" > "Bates Numbering" > "Add Bates Numbering" button.
In the Bates Number dialog box, you are able to set a Prefix, Start At, and Suffix for your pages. Also, you can set the font for the Bates number.
Set appearance, position, and page range to apply the Bates number.
Click the "Save" button to create a Bates number template for your future use. Next time, you can click the "Add Bates Numbering" button to choose the one you want to apply directly without setting again.
2Add Bates Number for Batch
PDFelement supports adding the same bates number for multiple PDF files at the same time.
After opening your PDF file in the program, please click the "Tool" > "Batch Process" button.
Click the "Bates Numbering" tab, drag and drop a batch of PDF files in it.
Select a template you previously set. If you have not create any bates numbering tempalte yet, you cannot do the batch process. So please click the "+" button to create a template first.
Click the "Apply" button to begin the process.
Video of Adding Bates Number
Flatten PDF
To flatten a PDF, you can find the "Flatten File" button on the "Tool" tab. Click it and the program will flatten the annotations, form fields, and layers in PDF.
The flattened PDF file will be automatically open in PDFelement and you need to save it on your computer.
Organize Pages
PDFelement has a streamlined user experience that has been created to make operations such as crop, extract, insert, split, replace, rotate, and deleting pages more intuitive. To allow for multiple pages to receiving the same process, hold the Ctrl key, and click on multiple thumbnails to apply the operation you need. Another key feature is the ability to drag a thumbnail to change its placement in the document.
You can right-click the page in the Thumbnail panel to get these functions menu as well.
Video of Rearranging Pages in PDF
Page Boxes
You can adjust the visible page area using the Page Boxes tool and the Set Page Box dialog. Cropping pages can help you create consistency within a PDF composed of pages of different sizes.
Click the "Page" menu first.
Select the "Page Boxes" button, the Set Page Box dialog opens, indicating the margin measurements of the cropping rectangle and the page to be cropped. You can override the crop area you defined, making new selections in the dialog box before clicking the "Apply" button.
To apply these settings to additional pages, click "<>" to set the page range or click "All" under Page Range.
Click "OK" to crop the page or pages.
Note: Cropping does not reduce file size because the information is merely hidden, not discarded.
Margin Control options in the Set Page Boxes dialog box
The Set Page Box dialog box contains options for cropping pages. The Margin Control options are as follows:
CropBox: Defines the boundary for the contents of a page when it’s displayed or printed.
ArtBox: Defines the meaningful content of the page, including white space.
TrimBox: Defines the finished dimensions of the page after trimming.
BleedBox: Defines the clipping path when the page is printed professionally to allow for paper trimming and folding. Printing marks may fall outside the bleed area.
Extract Pages
Extraction is the process of reusing selected pages of one PDF in a different PDF. You can set the page range to extract, the extracted pages will be generated as a new PDF file and be opened in PDFelement automatically.
Click the "Page" menu first.
Select the "Extract" button, then set the page range as you want. Or click the page thumbnails below first (you can press Ctrl key and click multiples pages to select), then click the "Extract" button.
Click the "File" > "Save" button to save it as a new PDF on the computer.
Insert Pages
Insert Blank Page: You can go to the "Page" > "Insert" button and choose "Blank Pages". In the dialog box, you can set as many blank pages as you need to insert. By default, the new blank pages will be inserted after the current page in the document. If you want to change the order of the pages, you can drag and move the page to change the order.
Insert From PDF:
A. Choose the "Insert" > "From PDF" button to select the PDF document you wish to insert. Here you can choose the page range that you need from the target PDF, then select the location for the inserted pages.
B. If you have opened multiple PDF files in the application window, you can drag a page from one PDF Thumbnail panel and drop at the place where you want to insert in another PDF's Thumbnail panel.
Video of Inserting Pages to PDF Files
Split Pages
Choose the "Page" > "Split" button, then enter the maximum number of pages in the dialog box, it will split the PDF file according to the number you enter. Another option is that you can choose to split by top-level bookmarks. Click the "..." button to choose the output folder you want to save the split files.
Tips: If you want to split each page to a separate PDF file, then you can enter 1 in the box of "Split by number of pages" to split. In this way, you will get each page as an individual PDF file.
Video of Spliting a PDF into Separate Files
Replace Pages
In the "Replace" dialog box, you can set the page range of the current PDF file, click the "..." button to browse and select the replacement PDF, and set the page range of the replacement PDF.
Page Labels
The page numbers on the document pages do not always match the page numbers that appear below the page thumbnails. Pages are numbered with integers, starting with page 1 for the first page of the document. Because some PDFs may contain front matter, such as a copyright page and table of contents, their body pages may not follow the numbering shown in the Page Navigation toolbar.
You can number the pages in your document in a variety of ways. You can specify a different numbering style for a group of pages, such as 1, 2, 3, or i, ii, iii, or a, b, c. You can also customize the numbering system by adding a prefix. For example, the numbering for chapter 1 could be 1-1, 1-2, 1-3, and so on, and for chapter 2, it could be 2-1, 2-2, 2-3, and so on.
Note: Using the Page Labels tool affects only the page thumbnails on the Pages panel. You can physically add new page numbers to a PDF using the Header&Footer feature.
Click the "Page" menu.
Select the "Page Labels" button, then set the page range and page number style/prefix as you want.
Click the "Apply" button to add the page labels.
Rotate Pages
Click the page thumbnail or enter the page number in the box to select a single page, then you can click the button to rotate to left or rotate to right.
Keep pressing the Ctrl key and click multiple page thumbnails, then you can click the button to rotate to left or rotate to right.
Click the "File" > "Save" or "Save As" button to save the changes.
Video of Rotating Pages
Delete Pages
Click the page thumbnail or enter the page number in the box to select a single page, then you can click the "Delete" button to remove the page.
Keep pressing the Ctrl key and click multiple page thumbnails to select, then you can click the "Delete" button to delete them.
Click the "File" > "Save" or "Save As" button to save the changes.
Video of Deleting Pages
Duplicate Pages
There are two methods to duplicate the page(s) as you want in the program.
1. In the page thumbnail panel, click the page or hold the Ctrl key and click multiple pages to be selected at the same time, then press Ctrl+C and Ctrl+V to copy/paste the selected page(s).
2. In the "Page" menu, please click the page or hold the Ctrl key and click multiple pages to be selected at the same time, then press Ctrl+C and Ctrl+V to copy/paste the selected page(s).
What is OCR? (Only available in PDFelement Pro)
OCR stands for Optical Character Recognition, which enables images or printed text to be translated into machine-readable text. OCR must be used when scanning paper documents to create electronic copies, but can also be performed on existing electronic documents (eg. PDF). In order to edit the scanned PDF files or image-based PDF files directly or convert them to the editable other format files (such as Word, Excel, PowerPoint, etc) you need to perform OCR first before editing or converting it.
Download and Install OCR (Only available in PDFelement Pro)
The OCR is a plugin that needs to be downloaded and installed separately. If you have not downloaded the OCR plugin yet, when you click the "Tool" > "OCR" button or click "Perform OCR" in the notice bar, you will get the following message to download OCR.
Choose the button of "Download", and the program will help you download and install the OCR plugin automatically.
If you have already purchased the program PDFelement Pro, you will receive an email with its download URL and registration code as well. After installing and registering the program PDFelement Pro (Please refer to Chapter 2 about the "Download and Install" part), you just need to download and install the OCR plugin, then you can start to use it.
If you purchased the program of PDFelement Standard version, which does not include the OCR function, so you can click the "Upgrade" button in the program to upgrade or go to the link below to upgrade to PDFelement Pro version. "https://pdf.wondershare.com/upgrade7.html"
Perform OCR (Only available in PDFelement Pro)
OCR feature is available in the trial version of PDFelement Pro to try before purchase as well. Please refer to the last chapter of "Download and Install OCR" to install it first. PDFelement can detect whether a PDF file is scanned or image-based and make corresponding suggestions to initiate OCR when opening a scanned or image-based PDF as below, in the grey highlighted notice.
1Searchable OCR
Since version 6.3.0 of PDFelement Pro, we support the Searchable OCR mode, which allows you to search/select/copy the text.
After clicking the "Tool">"OCR" button in the Ribbon bar, select "Scan to searchable text in image" mode, click the "Change Language" button to choose the correct languages of your PDF content to perform OCR.
The newly created PDF file will be searchable, you can press Ctrl+F keys to search the keywords. Or select the text to copy, then paste in another document as you want, such as a Word file.
2Editable OCR
To edit or convert the scanned PDF files, perform the following steps:
Click the "Tool">"OCR" button in the Ribbon bar, select the "Scan to editable text" mode.
Then click the "Change Language" button to choose the correct language of your PDF content (PDFelement Pro supports over 20 OCR languages) from the OCR language list. You can also click "Range" to choose an individual page or a set of pages for OCR.
Now click "Apply" to perform OCR. Here you will see a progress bar to indicate the state of the operation, and let you know when it has completed.
When the process is completed, it will open the newly created editable PDF file in the program. Once this is completed, click the "Edit" button to modify the text of the PDF file.
Video of Performing OCR
Convert PDF Files to Other Formats Files
PDFelement supports to export PDF to MS Office, Image, HTML, and RTF format files (PDFelement Standard version only supports to convert PDF to MS Office, Image). Here are two methods for you to convert a single PDF file.
1View and Convert
After opening your PDF file in PDFelement, click "Convert" > "To Word", "To Excel", "To PPT", "To Image", etc. to convert the file to the format you need.
In the new dialog box, you will be able to choose the output folder to save the converted file. Here you will have another chance to change the output format by changing the “Save as type” option.
After conversion, you can go to the output folder to find the converted file on your computer. Or click the link in our dialog box, it will lead you to the output folder directly.
2Convert Directly
After opening the program PDFelement, you can click the "Convert PDF" box on the welcome page.
In the new dialog box, please select the PDF file that you want to convert.
In the second pop up dialog window, please select the output folder where you want to save the converted file and select the output format as you want.
After conversion, you can go to the output folder to find the converted file on your computer. Or click the link in our dialog box, it will lead you to the output folder directly.
3Right Click to Convert
Select the PDF file you want to convert to other file formats.
In the reviewed menu, choose "Convert to...".
Then PDFelement will start and pop up the convert window. In this window, you need to select the "Output Format". There are many options available in the drop-down menu.
After you select the output format, just hit the "Apply" button.
Within a few seconds, the PDF file will be converted to other formats. You can click the "Finished" button and this will open the output folder for you.
Video of Converting PDF Files to Word
Convert PDF Files to PDF/A(Only available in PDFelement Pro)
PDF/A is an ISO-standardized version of the Portable Document Format (PDF) specialized for use in the archiving and long-term preservation of electronic documents. PDF/A differs from PDF by prohibiting features ill-suited to long-term archiving, such as font linking (as opposed to font embedding) and encryption. The ISO requirements for PDF/A file viewers include color management guidelines, support for embedded fonts, and a user interface for reading embedded annotations.
After editing or working with your PDF file in the program, please click the "Convert" > "PDF/A" button.
Now, the "Save as" window pops up, and then in the "Save as type" box, there are many options of PDF/A you can choose, such as PDF/A-1a, PDF/A-1b, PDF/A-2a, PDF/A-2b, PDF/A-2u, PDF/A-3a, PDF/A-3b, and PDF/A-3u. After selecting one of them, click the "Save button.
Video of Converting PDF Files to PDF/A
Batch Convert (Only available in PDFelement Pro)
If you want to convert a batch of PDF files to the same output format files, you can use the batch process.
After opening the program PDFelement, please click the "Convert" > "Batch Process" button to open.
Load multiple PDF files in the window, select the output format as you want, and choose the output folder to save the converted files.
Click the "Apply" button to begin the process. After conversion, you can go to the output folder to find the converted files.
Convert Scanned PDF Files to Editable Files (Only available in PDFelement Pro)
If your PDF file is the scanned PDF or the image-based PDF, you need to perform OCR first before converting it to the editable word file (Please refer to the part of "Perform OCR" for information). After opening your scanned or image-based PDF file in PDFelement, you will get the grey highlighted notice to inform you to perform OCR.
You can click the "Perform OCR" button or the "Tool" > "OCR" button in the ribbon to open the OCR window.
In the OCR window, please click the "Change Language" button to select the correct language of your PDF content in the list. If the PDF you are working with contains many different languages, be sure to select all of the needed languages in the list.
Click the "Apply" button to start the performing OCR process. When it completes, the newly created editable PDF file will be opened in the program automatically.
Click the "Convert">"To Word" or Others formats to convert it to the word file or other format file.
Video of Converting Scanned file to Editle Files
Modify Conversion Settings
Before converting, please click the "Convert > "Convert Setting" button. In the “Setting” window, you will find more settings for different output format conversions. You can set to convert "Combine all pages into a single Excel sheet" in the "Excel" tab, etc.
Convert PDF Files to Image Files
1Convert Each Page as One Image File
When you click the "Convert" > "To Image" button to convert the PDF file to an image file, it will convert each page to a separate image file by default. Therefore, if your PDF file has multiple pages, you will get multiple images.
2Convert all Pages as One Image File
If you want to get only one image file for all the PDF pages, there are two methods to do so:
1. After opening the PDF file in PDFelement, please right-click the "Convert" > "Convert Setting" > "PDF To Image" button. Then you can choose "Adjoin all pages into one single image", you can choose the "Zoom", "Frame" and "Page Range" in the new open dialog box to convert. Then you will get the dialog to choose the output folder to save the converted image, and you can type the output format, .jpg, .jpg, .bmp, etc. in the file name to convert as you want.
Fill In Forms
There are two kinds of form files. One is a PDF file with fillable fields, which enables you to fill the form directly by clicking the form fields without using other features. This is called an Interactive PDF Form. The other kind of form is a plain PDF file with lines and texts, which cannot be filled directly. This is called a Non-interactive PDF form.
If a PDF form contains interactive form fields, you can fill in the form with the Hand Tool. You will see a blue highlighted notice appear as follows. It informs you that this document contains fillable forms.
When you place the pointer over an interactive form field, the pointer icon changes to one of the following:
Hand iconappears when hovering over a text field, radio button, or check box.
I-cursor iconappears when you click the text field, you can type text into the field.
Video of Filling Out a PDF form
Create Interactive Forms Automatically (Only available in PDFelement Pro)
PDFelement supports to create interactive forms automatically with one click, which can dramatically improve your efficiency. If your non-interactive PDF form contains the blank lines and tables. For example, this application form is not fillable.
After opening it in our program, you can click the "Form" > "More" > "Form Recognition" button to recognize the blanks and tables automatically, then you will get the fillable fields created. All the corresponding types of form fields will be automatically named with the text near the form fields.
Click the "Form Edit" button, then place the cursor in the field that you wish to fill in, and enter the information requested.
Video of creating interactive forms automatically
Create Interactive Forms Manually (Only available in PDFelement Pro)
If the file you are working with is unable to be recognized to automatically create the fillable fields, PDFelement offers the ability to create a fillable form manually. PDFelement uses a group of buttons that can be used to create and design form fields in interactive forms. You are able to add text fields, check boxes, radio buttons, combo boxes, list boxes and buttons to create an interactive PDF form.
Open the PDF file in PDFelement and click the "Form" > "Add Text" button or other buttons.
Select the location for the filed you need, and the text field or check box will be added.
Click the "Form Edit" button, click the text field, and start to type directly.
Click the "Keep tool select" button to add form fields continuously without clicking the tool buttons again.
There are basic buttons to add form fields for you to create an interactive PDF form:
Text Field: Lets the user type in a text, such as name, email address, phone number, etc.
Check Box: Presents yes-or-no choices for individual items. If the form contains multiple check boxes, users can select what they want.
Radio Button: Presents a group of choices from which the user can select only one item in the same group.
Combo Box: Lets the user either choose an item from a drop-down list.
List Box: Displays a list of options the user can select.
Button: Creates an interactive form element to initiate certain predefined actions, such as opening a file, opening a website, or submit a form to a web server. This button appearance can also be customized.
Signature Field: Creates a blank digital signature field for reviewers to sign the document.
Video of Creating PDF Forms
Form Alignment (Only available in PDFelement Pro)
You can align the selected form fields left, right, top, bottom, vertically or horizontally. Please do the following steps to align the fields:
Click the "Form" > "Form Edit" button after opening the interactive form PDF file in PDFelement.
Hold the "Ctrl" key on the keyboard, select all of the fields that you need at the same time. Alternatively, you can right-click one field to choose "Select All", then all the fields within this page will be selected.
The "Alignment" tab will appear, please click it to choose the alignment you want to do for the selected fields. Upon selecting at least three files, the “Distribute” option will be enabled for you. (Note: Please select at least three fields, otherwise the distribute option will be disabled.)
Form Properties (Only available in PDFelement Pro)
When you add the text field, check box or radio button, etc, you can drag the edge of the box to resize it. Or move it to the correct place where you want. Press the Delete key to delete it. When you open an interactive form in PDFelement, you can click the "Form" > "Form Edit" button to changes the properties of the form. Double click the box to open the Properties dialog box, or right-click the box to choose Properties to open it. For different fields or boxes, you will get different properties. Here is an example of the Text Field Properties:
(Note: You can hold the Ctrl key and select multiple fields or boxes to select the at the same time, right-click one to choose Properties, and the common properties will be enabled to change. Then the properties for all the selected fields or boxes will be changed)
General: You can set the field name and common properties.
Appearance: You can set borders and colors, and the font/size/color of the filled-in text.
Options: You can set the alignment of the filled-in text. Set multi-line, scroll long-text, or limit the characters available for that text field. It also has the spell check function of the filled-in text.
Actions: You can set the field actions. For example, you can choose "Open a web link" in the "Action", click the "Add" button to enter the website link in the new dialog box.
Format: Set the format category for this field.
Validate: Set the value of this field.
Calculate: Set the calculation of the fields. Choose the calculation as you want, click the "Pick" button to pick the fields that you want to calculate. For example, the following is the text field 3 properties, so it means text field 3=text field 1+text field 2.
Set Tab Order
You can set the tab order of the form you created. The order number will show on the top left corner in the purple box. By default, the tab order is the order of creating these fields and buttons. You can change to set the tab order as you want:
After opening the interactive form PDF file in PDFelement, please click the "Form">"Form Edit" button, then right-click one field to choose "Set Tab Order". The default order will show, then you can click the field or button one by one as the new order that you want. After setting, click the "Form Edit" button, fill in the field, or button using the Tab key as the order that you set.
Note: You can only set a tab order within one page.
Extract Data (Only available in PDFelement Pro)
PDFelement can assist you in extracting data from fillable form fields and other kinds of PDFs to CSV files, where you can manage the data that has been extracted.
1Extract Data from PDF Form Fields
If your PDF file is the fillable form, you can click the "Form" > "More" > "Data Extraction" button, then select the option of "Extract data from form fields in PDF", and click the "Apply" button. If your PDF file does not contain the fillable form, please refer to the chapters of "Create Interactive Forms Automatically" or "Create Interactive Forms Manually" to create the fillable forms first. (If you have not installed the OCR yet when you click the "Data Extraction" button, it will ask you to download OCR first.)
2Extract Data from Selected PDF Text
If your PDF file does not contain any form fields, you still can use our program to extract data from the marked areas no matter it is the scanned PDFs or the normal PDFs.
After opening your PDF file in the program, click the "Form">"More">"Data Extraction" button, and choose "Extract data based on selection".
Click the "Apply" button, then use your mouse click to draw the area in the pages that you want to extract. You can select as many areas as you want.
After selecting all the areas that you want to extract, please click the "Apply" button, then save the .csv file in your local folder.
3Extract Data for Batch Process
The batch process is an excellent tool to use if you have a form that has been filled in multiple times to collect different data, or if you have PDFs that you need to extract data from the same area.
After opening the program, please click the “Too" > "Batch Process" button to open.
Click the "Data Extract" tab to load multiple files in it, then choose the "Extract data from PDF form fileds" as you need to extract.
Click the "Apply" button to start the process. After completing, click the "Finish" button to open the extracted .csv file directly.
Video of Extracting Data
Import/Export Form Data
Importing and exporting form data is only available with PDFs that have interactive form fields. All the options for importing and exporting form data will be unavailable when you open ordinary PDFs or non-interactive forms. The import and export data can only be Form Data Format (.FDF).
Click the "Form" > "More" > "Data Export" button to choose the folder and rename the file, and it will export the data in a .fdf format.
Click the "Form" > "More" > "Data Import" button to select a .fdf format file to import for the same PDF file.
Click the "Form" > "Clear" button to clear all the filled-in data in the PDF form.
Password and Permissions
1Check PDF Permissions
Some PDF files may contain restrictions preventing actions such as printing, editing, copying, etc. To review the different permissions that have been listed on the file, click on "File "> "Properties" > ”Security” to review the listed permissions.
2Add Open/Permission Password
You can add a password to a PDF document to limit access and restrict certain features, such as printing, copying, and editing. There are two kinds of passwords that could be applied to a PDF file: Open Password and Permission Password. When you set the Open Password, anyone who tries to open the PDF file must type in the password that you specified. When you set a Permission Password, anyone who wants to change the restrictions must type the Permission Password. Please note that if a PDF is secured with both types of passwords, it can be opened with either password. Tip: There is no way to recover a password from the PDF if you forget it. We recommend that you keep a backup of the passwords that you have used to protect your PDFs.
Click the "Protect" > "Set Password" button to set the Open password or Permission password. In the new dialog box, you will get: Open Password settings:
Password—type the password as you want that users must type to open the document.
Permission Password settings:
Password—type the password as you want that users must type to change the permissions settings. If the file is opened in PDFelement, the user can view the file but must enter the permissions password to change the file's security and permissions settings.
Printing Permission—specified the level of printing in which users are allowed for the PDF document.
Changes Permission—defines which editing actions are allowed in the document.
Enable copying of text, image, and other content—defines whether copying of text, images, and other content is allowed.
3Remove Open/Permission Password
To remove the password from a PDF file by PDFelement, you must have the password and permission to do so. After opening the PDF file, click the "Protect" > "Set Password" button, type the permission password if requested, then uncheck all the options in the new dialog box to remove the password and permissions.
Digital Signature
A digital signature acts as a traditional handwritten signature that can be used to authenticate the identity of a user as well as the document content. It stores information about the signer along with the date, time, and state of the document when it was signed.
1 About Digital ID
Digital ID is the identity of a person/organization, which contains your name, email address, a serial number, expiration date, and the name of the company. A digital ID contains two keys, one is a public key (certificate) that is used to encrypt or lock data, and the other is a private key that is used to decrypt or unlock data that is encrypted.
You can distribute the certificate that contains the public key and other identifying information to those people who need to use it to verify your identity, validate your signature, or encrypt a document for you. Only your private key can unlock information that was encrypted using your certificate. For security purposes, make sure to store your digital ID in a safe place.
You can not only obtain a digital ID from a trusted third-party provider called a Certificate Authority (CA), however, you can also create a self-signed digital ID with PDFelement. Digital IDs are usually protected by a password, which you can store on a computer in PKCS#12 file format, or in the Windows Certificate Store.
2Sign a PDF
Open a PDF which already has the Signature field and click the "Protect" > "Sign Document" button, then choose your ID to sign.
3Create a Signature
If you do not already have an ID, click on the “New ID” button, and select the “A new digital ID I want to create now” button and then click the "Next" button.
New PKCS#12 digital ID file—Stores the digital ID information to a file with the extension .pfx on Windows and .p12 on Mac OS. You can use the files interchangeably across different operating systems.
Windows Certificate Store—Stores the digital ID to a common location. Other windows applications can also retrieve it.
4Validate and Clear Signature
To validate the signatures, please click the "Protect" > "Validate All Signatures" button, it will pop up a Signature Validation Status message box which describes the validity of the signature.
To remove the signatures, please click the "Protect" > "Clear All Signatures" button, which will assist you in removing all of the digital signatures within a PDF file.
Video of Signing Document
Redaction (Only available in PDFelement Pro)
1 Mark for Redaction
The Redaction feature allows you to remove sensitive information from your document prior to making it available to others. The following options will allow you to mark the text or graphics for redaction:
To mark the text or graphics for redaction, do the following:
Select the "Protect" > "Mark for Redaction" button (You will get a pop-up dialog window to provide the instructions, and you can check the option of "Don't show again" if you already know the instructions), and the hand tool changes into a Cross automatically.
(Optional) Double-click an image to mark an entire image which will be in a red rectangle.
(Optional) Hold the pointer over the text you want to redact and drag a rectangle around it.
Once you bring the pointer to the rectangle it will be filled with a black color. Once you move the pointer away, it will return to a red rectangle until you apply the redaction.
2 Set Redaction Properties
You can set redaction properties, such as the appearance and the author, and so forth. The properties can only be set before you apply the redaction to the document.
Right-click the marked area and choose "Properties" and the Redaction Properties panel will be opened on the right-side. You can change the Info and Appearance tabs.
3 Apply Redactions
You need to apply the redactions after marking the text or graphics you want to redact. To apply the redaction, do the following:
A warning will pop up to confirm that you indeed wish to apply the redaction, or if you wish to cancel.
A dialog box pops up to give a warning message and ask if you are sure to apply the redaction or not.
Select "Continue" after you have marked all content that you want to redact.
4 Search and Redact
You can redact multiple text using the Search and Redact tool.
Select "Protect" > "Search&Redact" button. Then type the text you wish to find and redact into the search box in the Search and Redact panel.
Check the item in the search result list, it will help you redact the text automatically.
Click the "Apply All Marks" button, you will get the warning message to ask you if you are sure to remove them permanently.
Click the "OK" button if you are sure to remove it.
Video of Redacting Sensitive Content in PDFs
Optimize PDF (Only available in PDFelement Pro)
PDFelement gives you the ability to shrink the size of PDF files significantly. To optimize a PDF file, please click the "Tool">"Optimize PDF" button, then choose your level of optimization, and click the "Apply" button.
Video of Compressing PDF Files
Print PDFs
1Print a PDF document
Printing is a process for reproducing text and images. When you have finished reading a helpful article or designing a PDF form, you may need to send it to an inkjet or laser printer and print it out. To print a PDF, please do the following:
Make sure you have installed the printer successfully.
Click the "File" > "Print" button.
Specify the "Printer", “Orientation”, "Color", "Page Size", "Page Range", “Print Mode” and other options.
Click the "Print" button.
2Print a portion of a page
To print a portion of a page, you need to use the "Crop" tool.
Select the "Crop" button by choosing "Tool">"Crop".
Use the mouse click to drag the area that you want to print.
Double click the selected area, you will get a new dialog window of more settings.
After setting the selected area, click the "OK" button to crop.
Click "File" > "Print" button print this cropped page as you want.
3Print multiple pages through page thumbnails
To perform a quick print, you can select multiple pages from a document from the thumbnail list.
Open the document that you want to print, and then click the Thumbnail panel on the left navigation panel.
Ctrl-click to select multiple pages from the document.
Select "Print Pages" from the right-click menu, and then do the settings to print.
Print Settings
The print settings dialog is the final step before printing. You can modify the printer in this dialog as well. Be aware that changing the printer may affect the page setup if the newly selected printer has a different paper size. For instance:
Copies: set the number of copies you need to print.
Orientation: choose Portrait or Landscape to print.
Color: select to print with colors or black and white.
Printer: choose the printer that you wish to print to.
Page Size: select A3, A4, A5, or other paper sizes to print.
Page Range: specify the page range you want to print.
Subset-Provides options for setting a non-contiguous page range.
"All Pages in range"- Prints all the pages within the specified range.
"All Odd pages in range"- Prints only pages with odd numbers within the specified range.
"All Even pages in range"- Prints only pages with even numbers within the specified range.
Print Option- "Reverse Pages" - Prints pages in the reverse order. If page ranges are entered, the pages print the opposite of the order in which they are entered. For example, if you select to print the document from page 5 to page 30, selecting the Reverse Pages option will print page 30 to page 5.
"Print as Image"- allows you to print the PDF pages as the image format.
Print Mode: choose to print in Size, Poster, Multiple, Booklet.
"Size"- choose Fit, Actual Size, and Custom Scale according to the page size of the PDFs when printing.
"Poster"- means to tile the pages that are larger than the selected paper size at a specified scale.
"Multiple"- it will be printed on the same sheet of paper. You can specify the settings like Pages per sheet, Page order, etc.
"Booklet"- enables us to print multiple pages on the same sheet of paper in the correct order if the pages are folded. This requires the printer to support double-sided printing.
Auto Rotate: adjusts the PDF document's orientation to match the orientation specified in the printer properties.
Auto Center: places the PDF pages in the center.
Print Content: specifies to print documents only, comments only, form only, or all of them.
"Document"- Prints the document contents without comments and forms.
"Comments"- Prints comments only.
"Form"- Prints forms only.
"Documents and Comments"- Prints document contents and comments.
Printer Properties
Clicking the "Printer Properties" button below the "Printer" option, you can set the page "Orientation" to be Portrait or Landscape, set "Page Order" and "Page Format". Clicking the "Advanced…" button, you can set the "Paper Size" to be A4, A3, or Letter. Set "Print Quality", "Scaling" etc.
Email Documents
PDFelement supports different methods to share PDF documents with others. Emailing a document is a very useful feature, and you can easily email your document to others with one click. Often times you may have a document that you need to send to a customer, or an interesting story that you would like to share with your friends. To email a PDF file, please do the following:
Click the "Send email" button on the top left bar, it will open your email application.
The PDF will be attached in the email automatically.
Type the subject and email address to send.
Upload to Dropbox
Click the "File" > "Share" > "Dropbox" button.
Select "Send PDF to Dropbox" or "Send All open PDF to Dropbox".
Log in to your Dropbox account to upload.
Upload to Google Drive
Click the "File" > "Share" > "Google Drive" button.
Select "Send PDF to Google Drive" or "Send All open PDF to Google Drive".
Log in to your Google Drive account to upload.
Upload to Wondershre Cloud
Click the "File" > "Share" > "Wondershre Cloud" button.