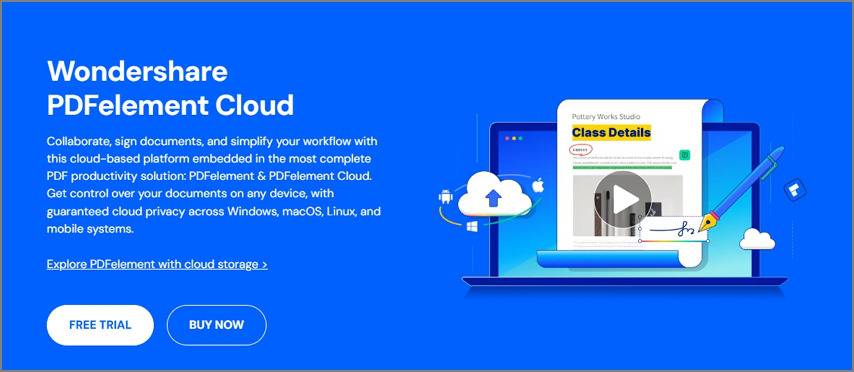
Product Introduction
Thank you for choosing Wondershare PDFelement Cloud – the perfect multi-terminal cloud experience. We dedicate to bring the best product and service for you and your team!
On the one hand, Wondershare PDFelement Cloud allows you to save documents to the cloud as you need. Then you can access and download them from any platform including Windows, macOS, Linux, Android and iOS, at anytime and from anywhere. As for the capacity, you will get up to 100GB of cloud storage.
On the other hand, Wondershare PDFelement Cloud supports sending documents for electronic signature regardless of whether it’s a contract or agreement. We provide some special team service for enterprise and business, including team administrator center, team template sharing, team analytics and reporting, etc.
Most importantly, your document security and privacy are guaranteed. We provide the highest level of privacy protection to keep your documents safe.
Note: In the near future, Wondershare PDFelement Cloud will connect with other systems of Wondershare PDFelement, including PDFelement for Mac and PDFelement for iOS, to simplify your workflow with the PDFelement Cloud for PDFelement.
Create Wondershare ID
To be able to access PDFelement Cloud, you will have to create a Wondershare ID to log in, then you can use the trial version of PDFelement Cloud. With your unique Wondershare ID, you are allowed to log in to most of Wondershare products. Following the three easy steps, you will learn how to create your own Wondershare ID:
1Visit Wondershare PDFelement Cloud official website and click the “ACCESS CLOUD” button on the top left corner.
2You can log in with the popup page if you have created a Wondershare ID before.
3Click the “Create account” button to create if you don’t have a Wondershare ID.
Free Trial/Full Feature
Trial Version Limitations
You can directly access PDFelement Cloud for free via the “ACCESS CLOUD” button on the homepage. The trial version contains the following limitations:
- Will only have 1GB cloud storage to save your documents. We will support all kinds of file formats in the near future.
- Will be only allowed to send 5 documents for electronic signature.
- Will not have team & business features. Only can experience individual features and templates.
Purchase PDFelement Cloud License
To experience the full-featured Wondershare PDFelement Cloud. You will have to purchase the license to authorize your Wondershare ID. Please follow the steps below to purchase the license:
1 Navigate to the top banner and find the “BUY NOW” button.
2 Follow the on-screen instructions and choose your favorite plan as you need.
3 Click the “BUY NOW” button and jump to the shopping cart. We will help you create a Wondershare ID automatically if the email you filled wasn’t used to create a Wondershare ID before.
4 Go to your email inbox and follow the instruction to activate your Wondershare ID and reset the password.
Toolbar
There are three different tabs on the top toolbar including "Home", "Document" and "Sign". Here is the interface of “Home”.
Tips: Clicking the icon, such as “Waiting for me”, "Waiting for others" and "Completed", will jump to the related tab.
In the drop-down toolbar, you can read the Privacy and EULA. Or click the contact us button if you have any questions, moreover, we will be really appreciated if you could give us feedback and your suggestions to our product.
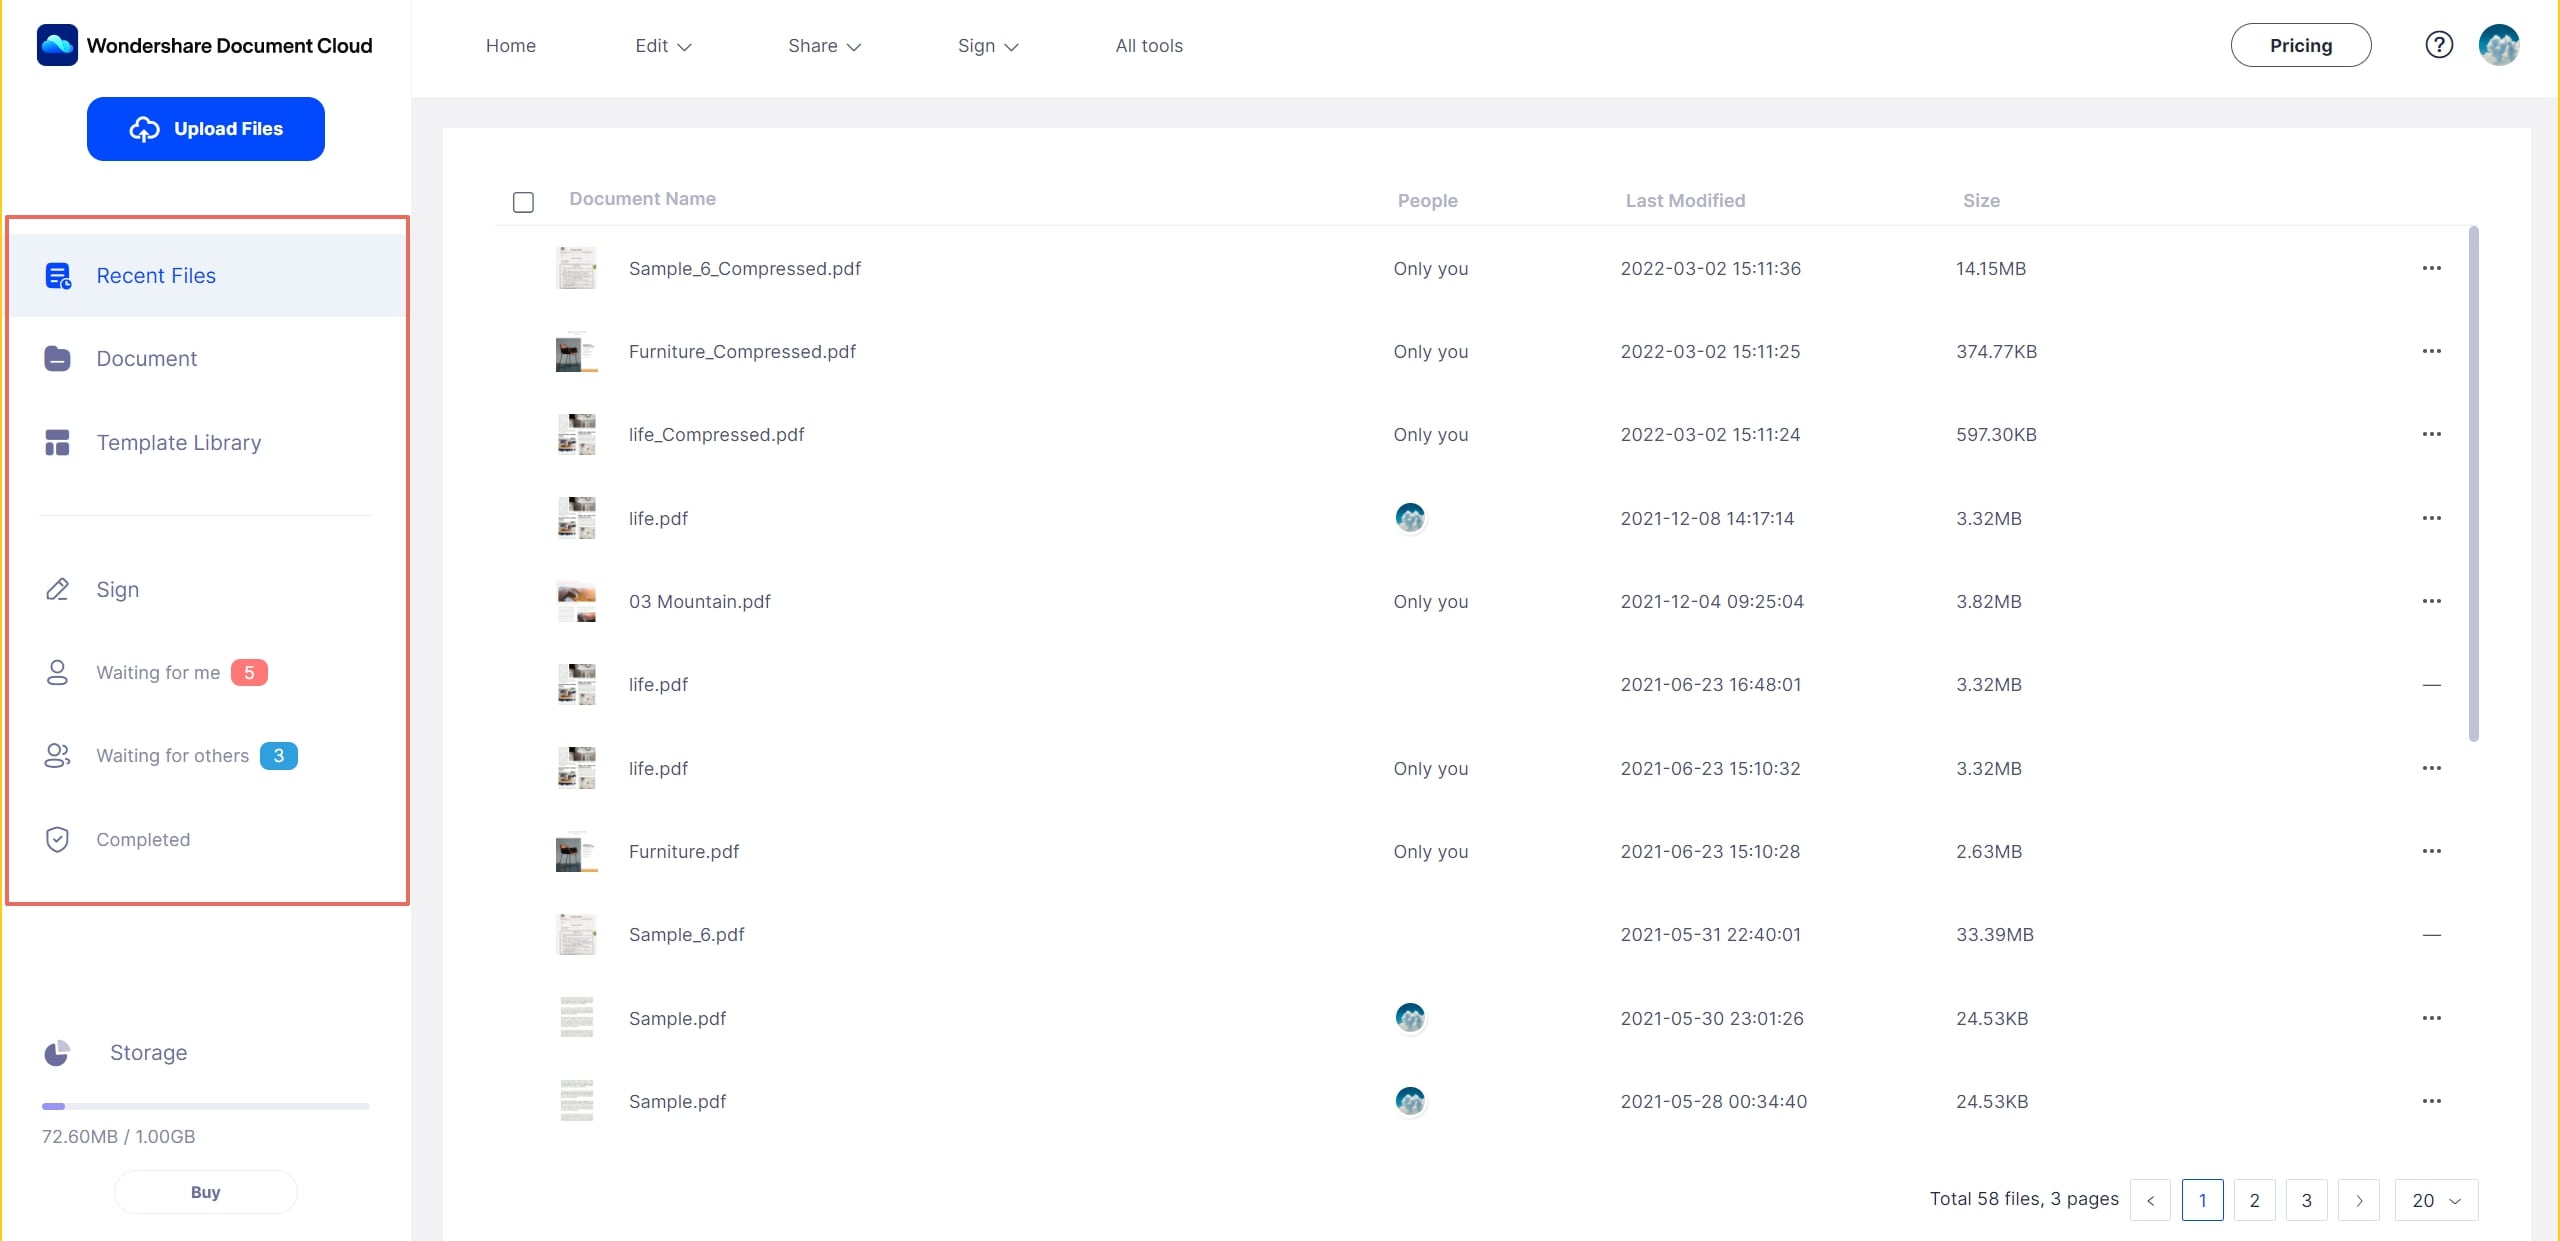
Document Menu
When you need to find a document in PDFelement Cloud, the best way is moving to the “Document” menu. But how to find the correct document quickly? You should understand the meaning of each tab:
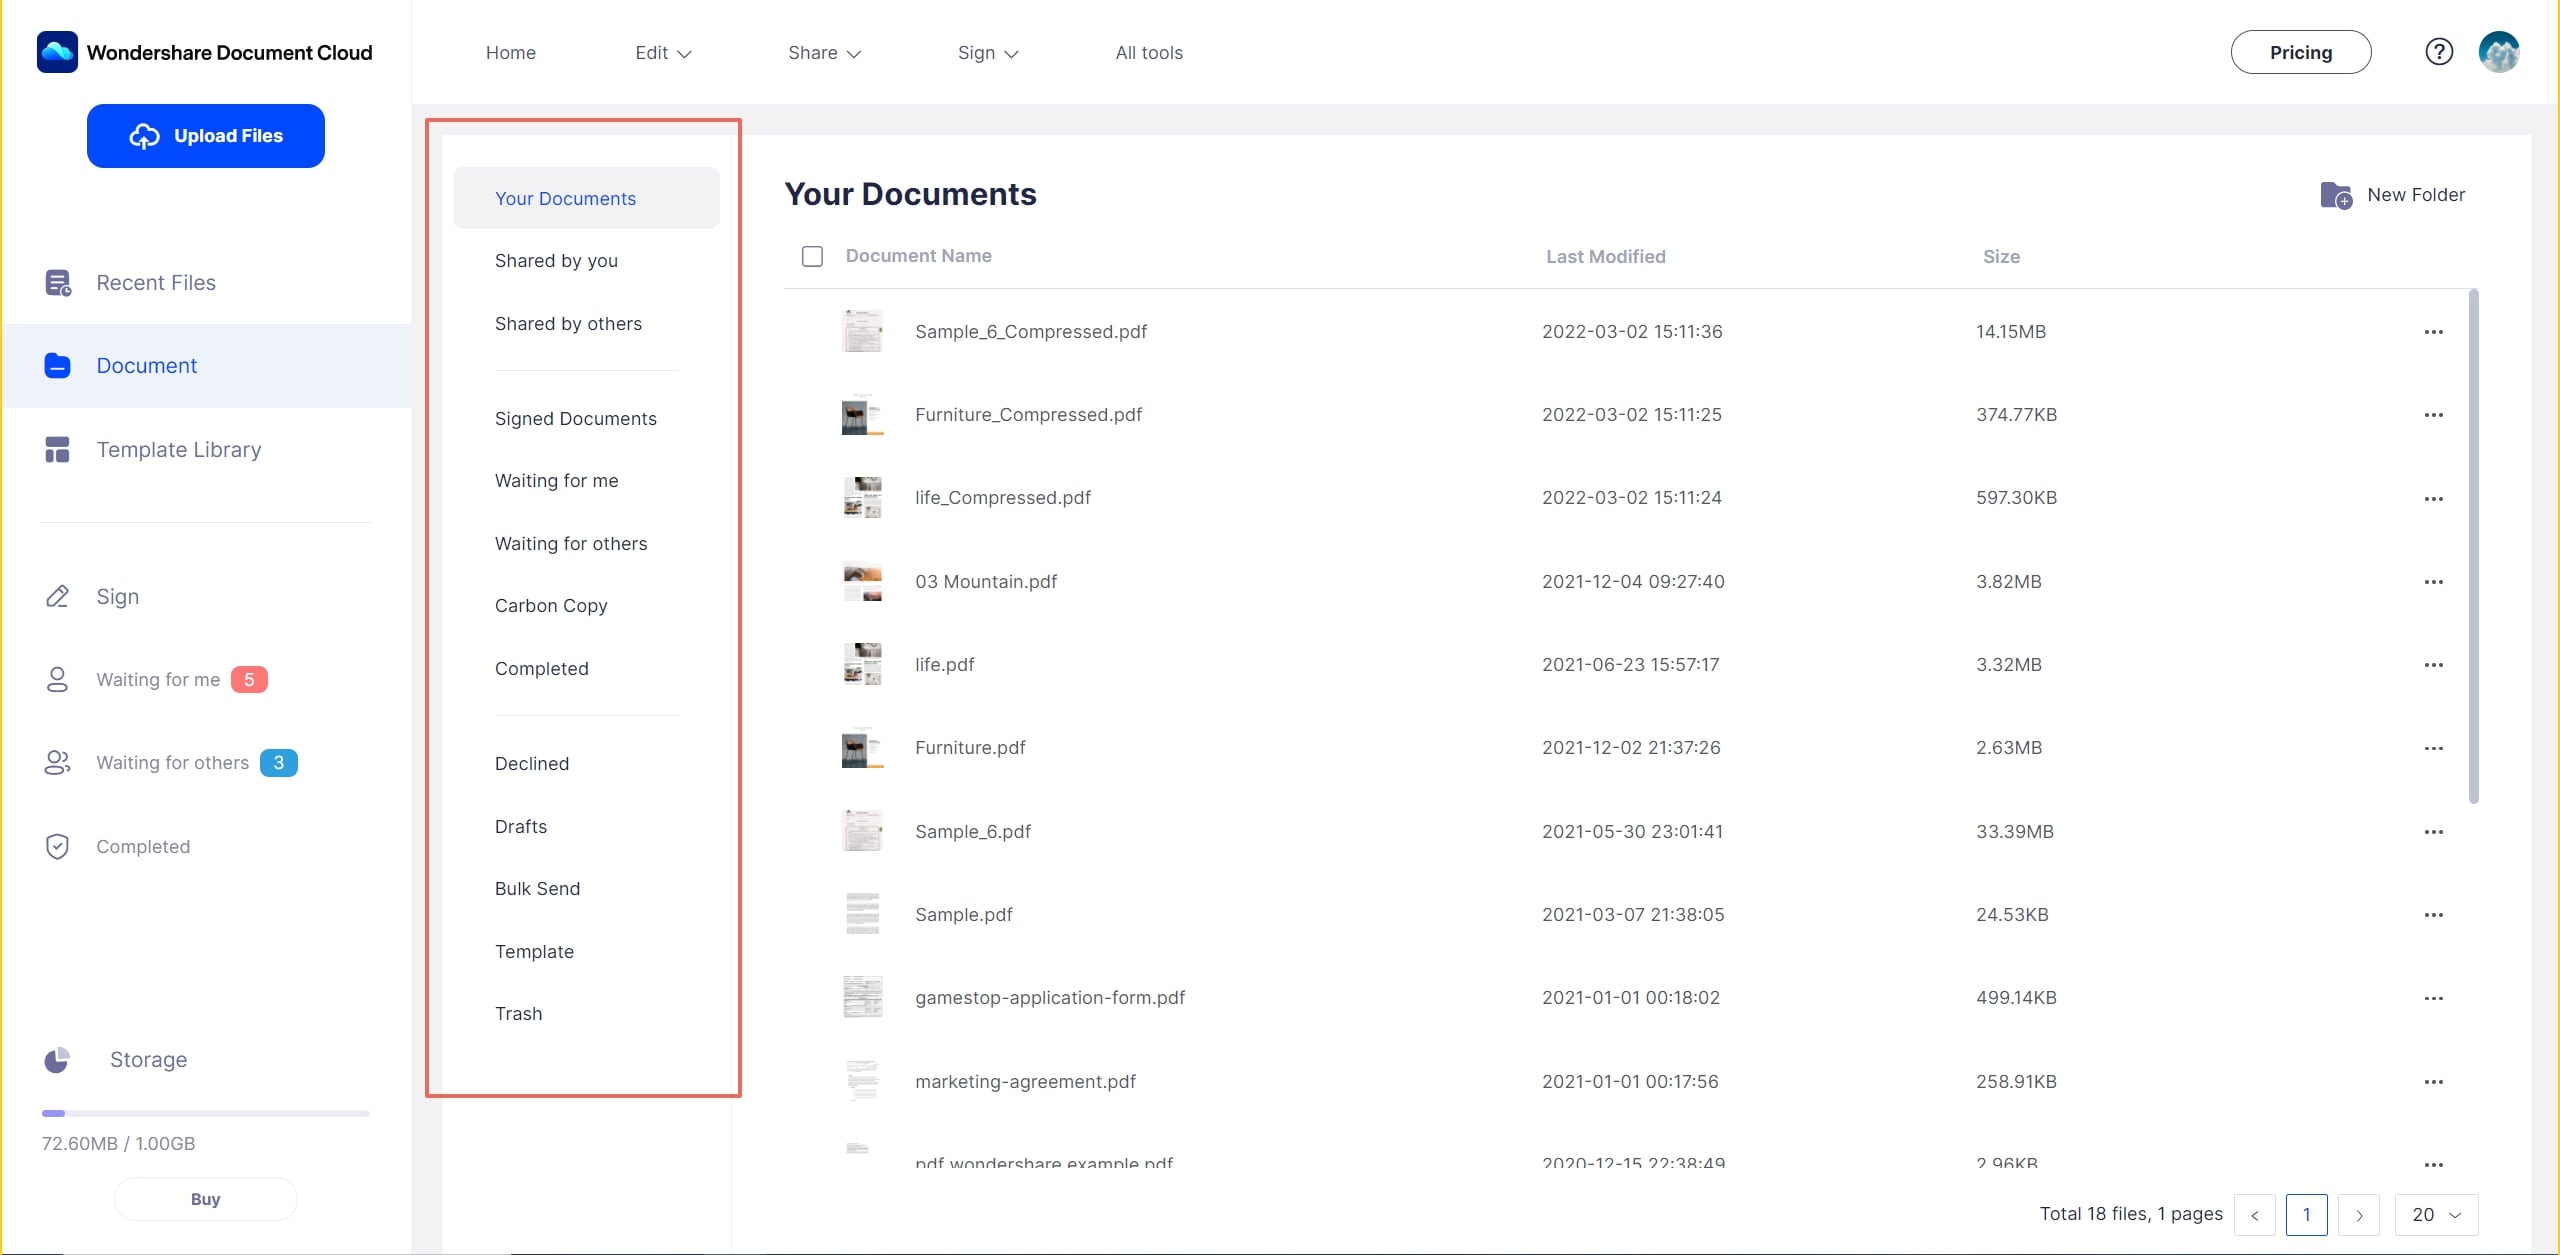
- All Documents: includes all the documents in “Your Documents” and “Signed Documents”.
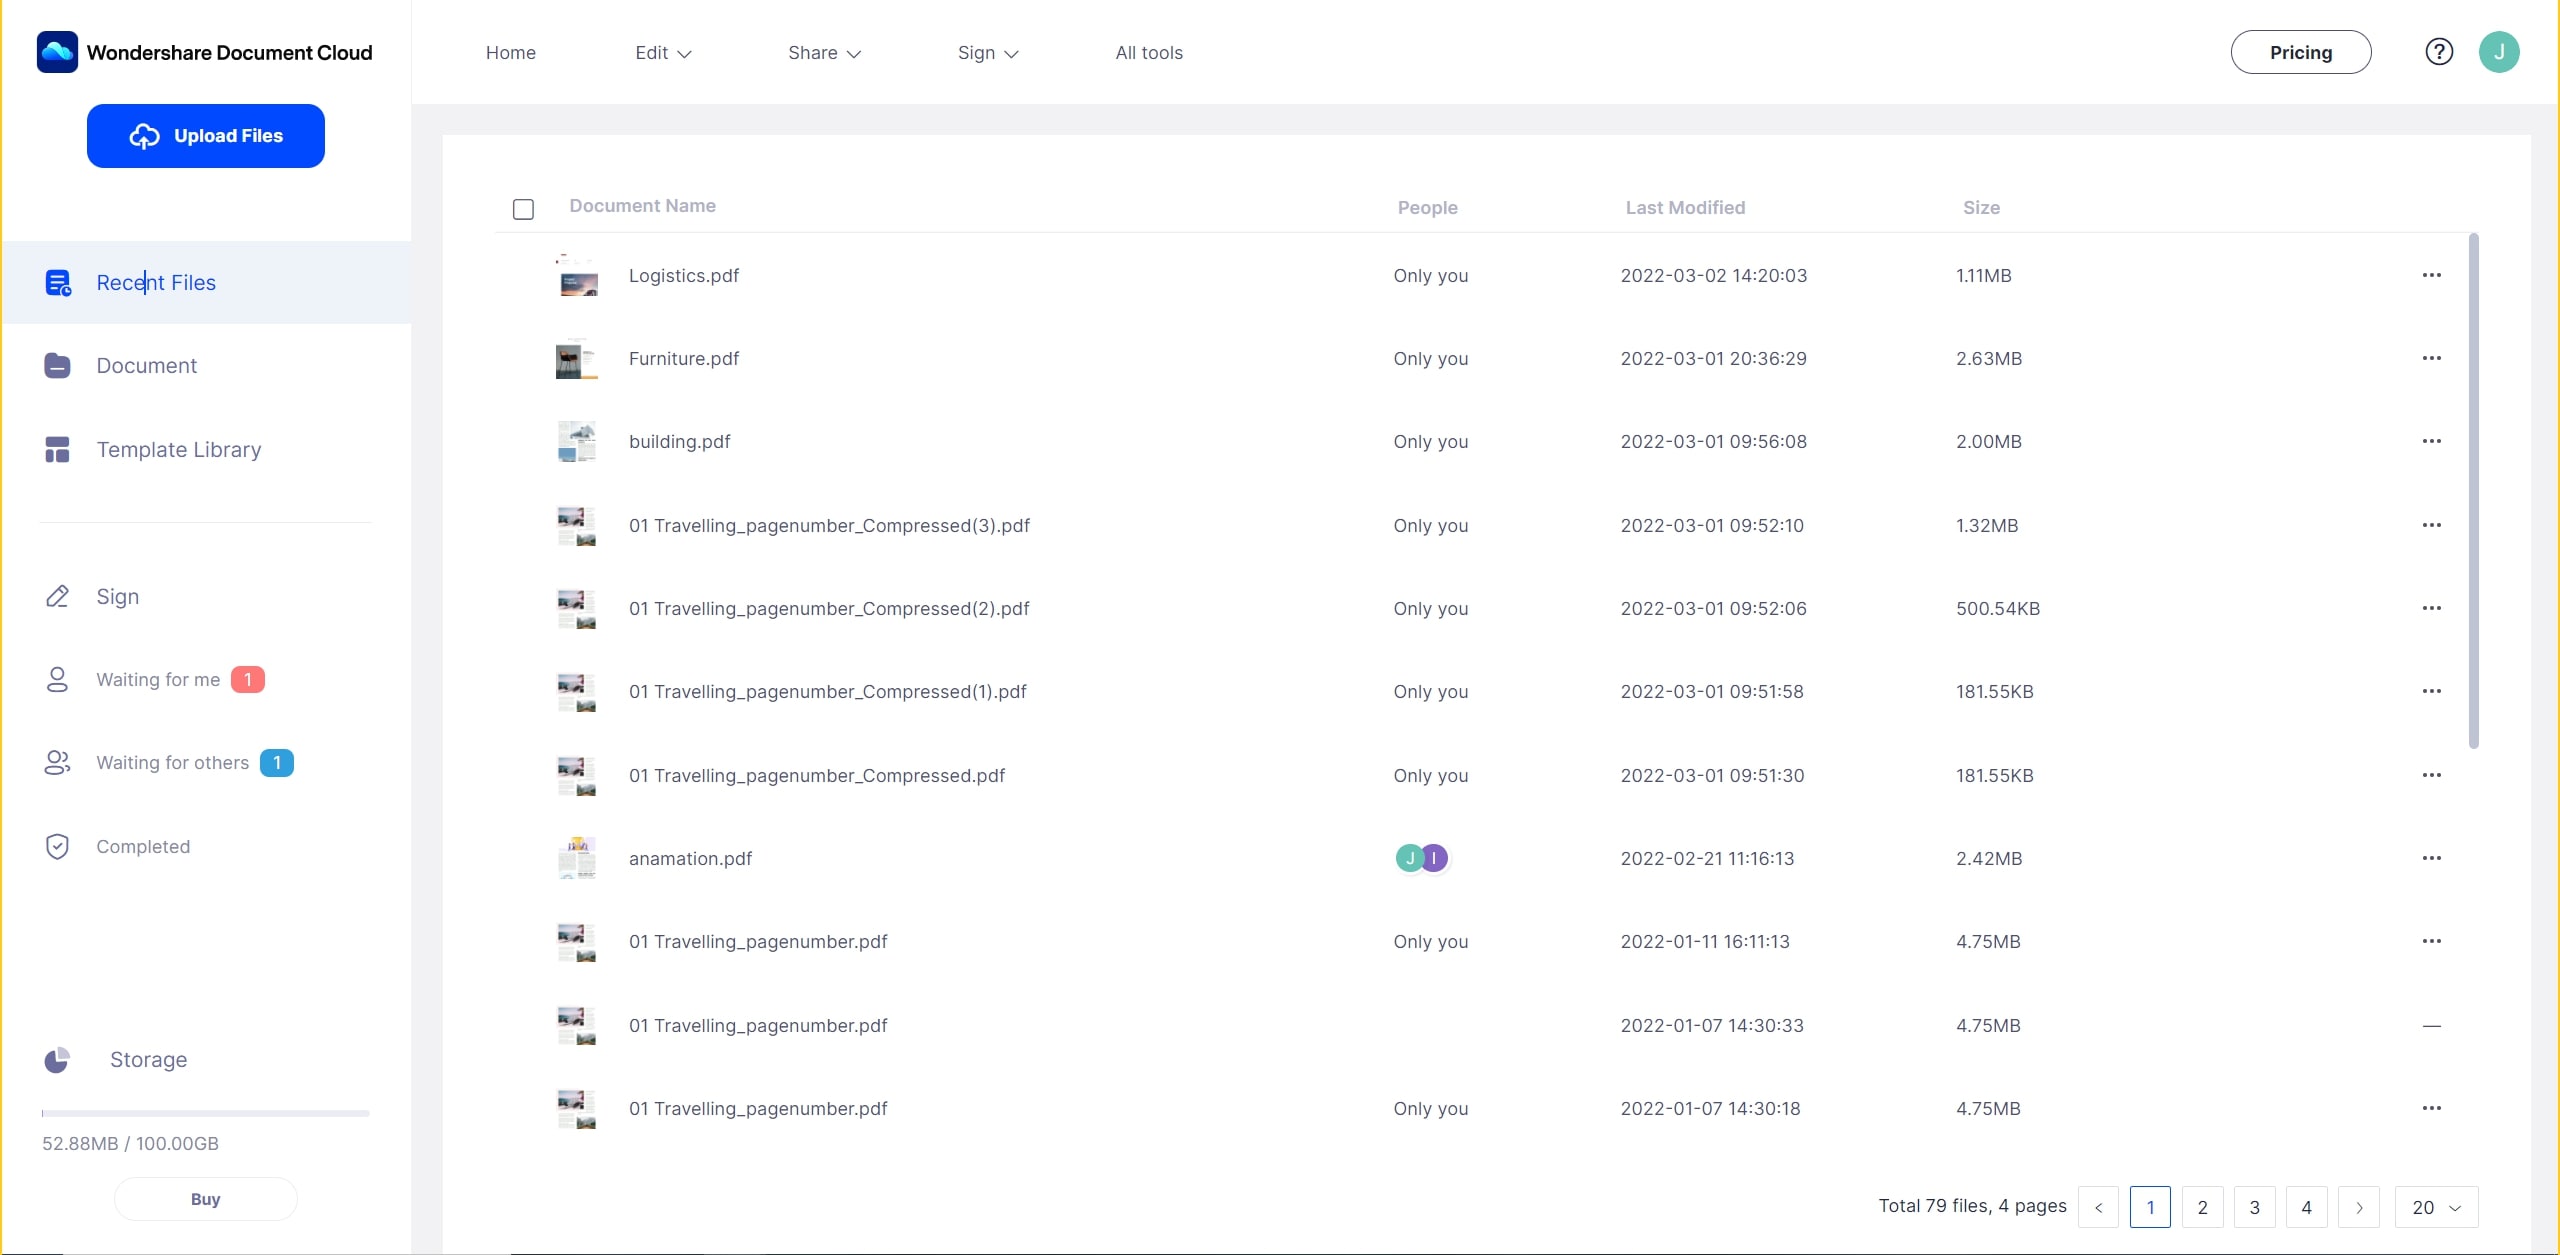
- Your Documents: includes all the documents you uploaded and saved to PDFelement Cloud, which will take up the cloud storage space.
- Signed Documents: includes all the documents related to electronic signature, which is saved in our server and won’t take up your cloud storage space.
- Waiting for me: the documents waiting for your signature.
- Waiting for others: the documents waiting for others to sign.
- Completed: the documents that have been signed.
- Declined: the documents that have been declined to sign by others.
- Draft: the documents with incomplete signature settings.
- Bulk send: the bulk sending documents that wait for your signature or wait for others to sign.
- Template: all templates you created and shared template.
Check Cloud Storage Capacity
For trial version, Wondershare PDFelement Cloud provides 1GB space for you to enjoy our best service. To check the remaining capacity, please navigate to the “Document” tab on the top toolbar, then click the “Your Document” tab. You’ll know the remaining capacity of cloud storage.
Note: If 1GB storage is not enough, you can
purchase a half-yearly or a yearly license to enlarge the cloud storage to 100GB!
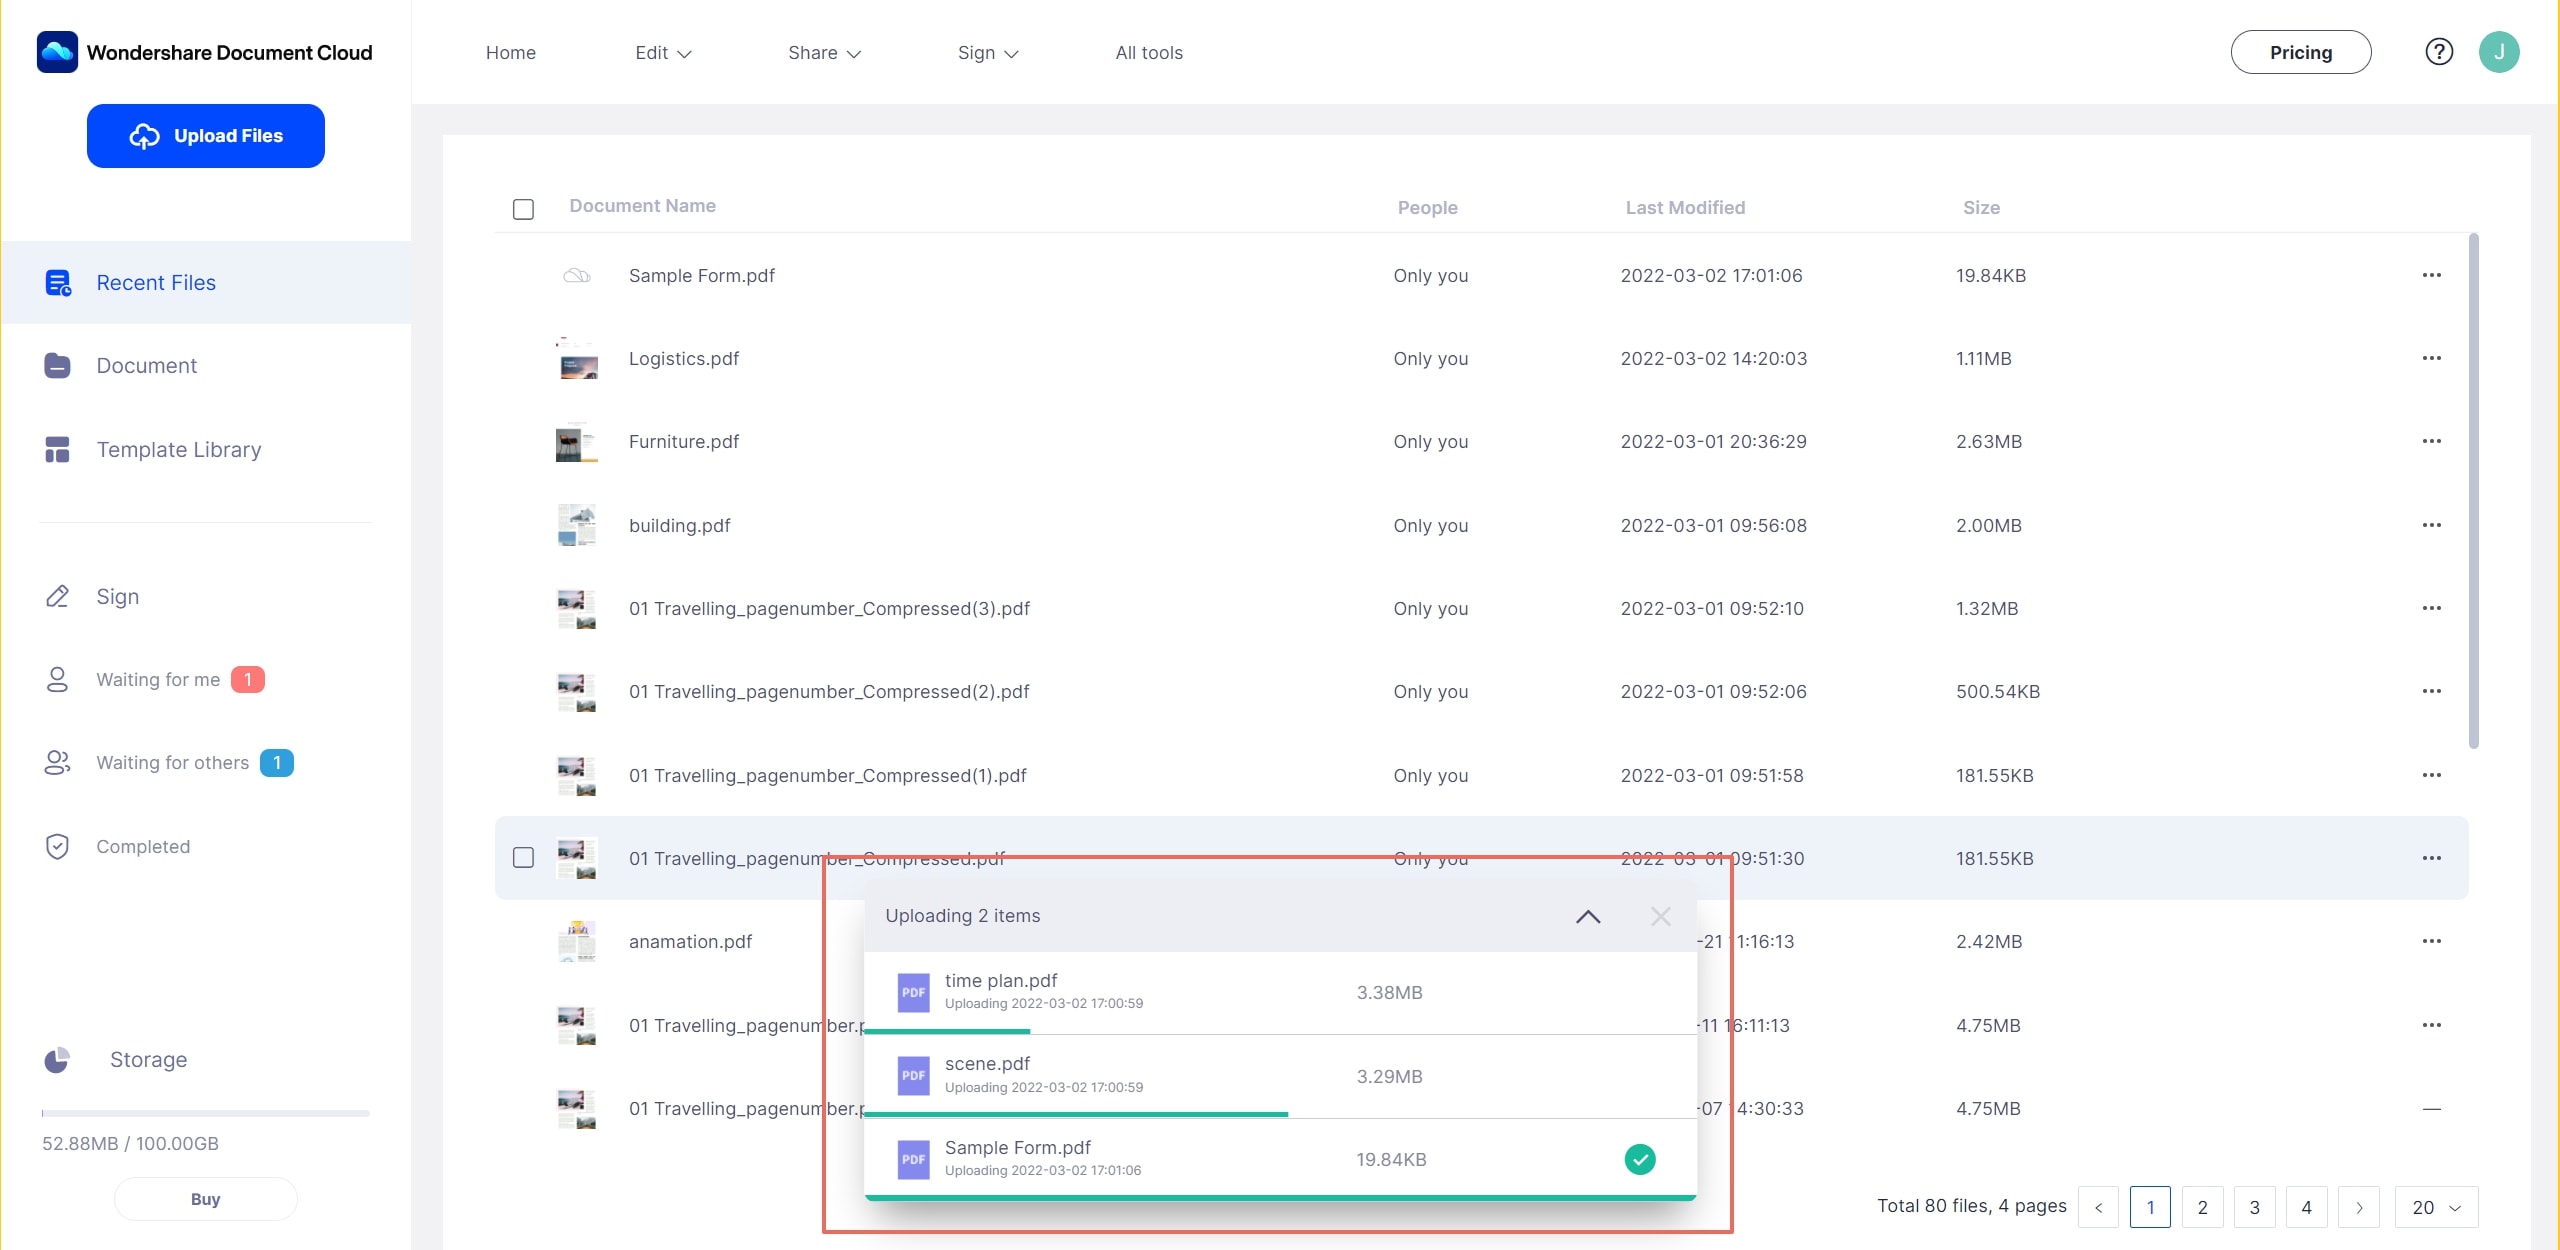
Upload and Save Documents
Wondershare PDFelement Cloud provides a large-capacity cloud storage for your document needs. You can easily save the important and confidential documents to the cloud without worries about the security, then download them from any platform including Windows, macOS, Android, iOS, etc. To save your documents to the cloud, just follow the three steps below:
1 Click the “Upload Files” button to choose the documents you want to save.
2 Finally, click the “Open” button and wait for the uploading process is completed.
If you want to check all the documents in the cloud, you need to navigate to the “Document” tab on the left, then click the “Your Documents” tab. You’ll find all the documents you uploaded here.
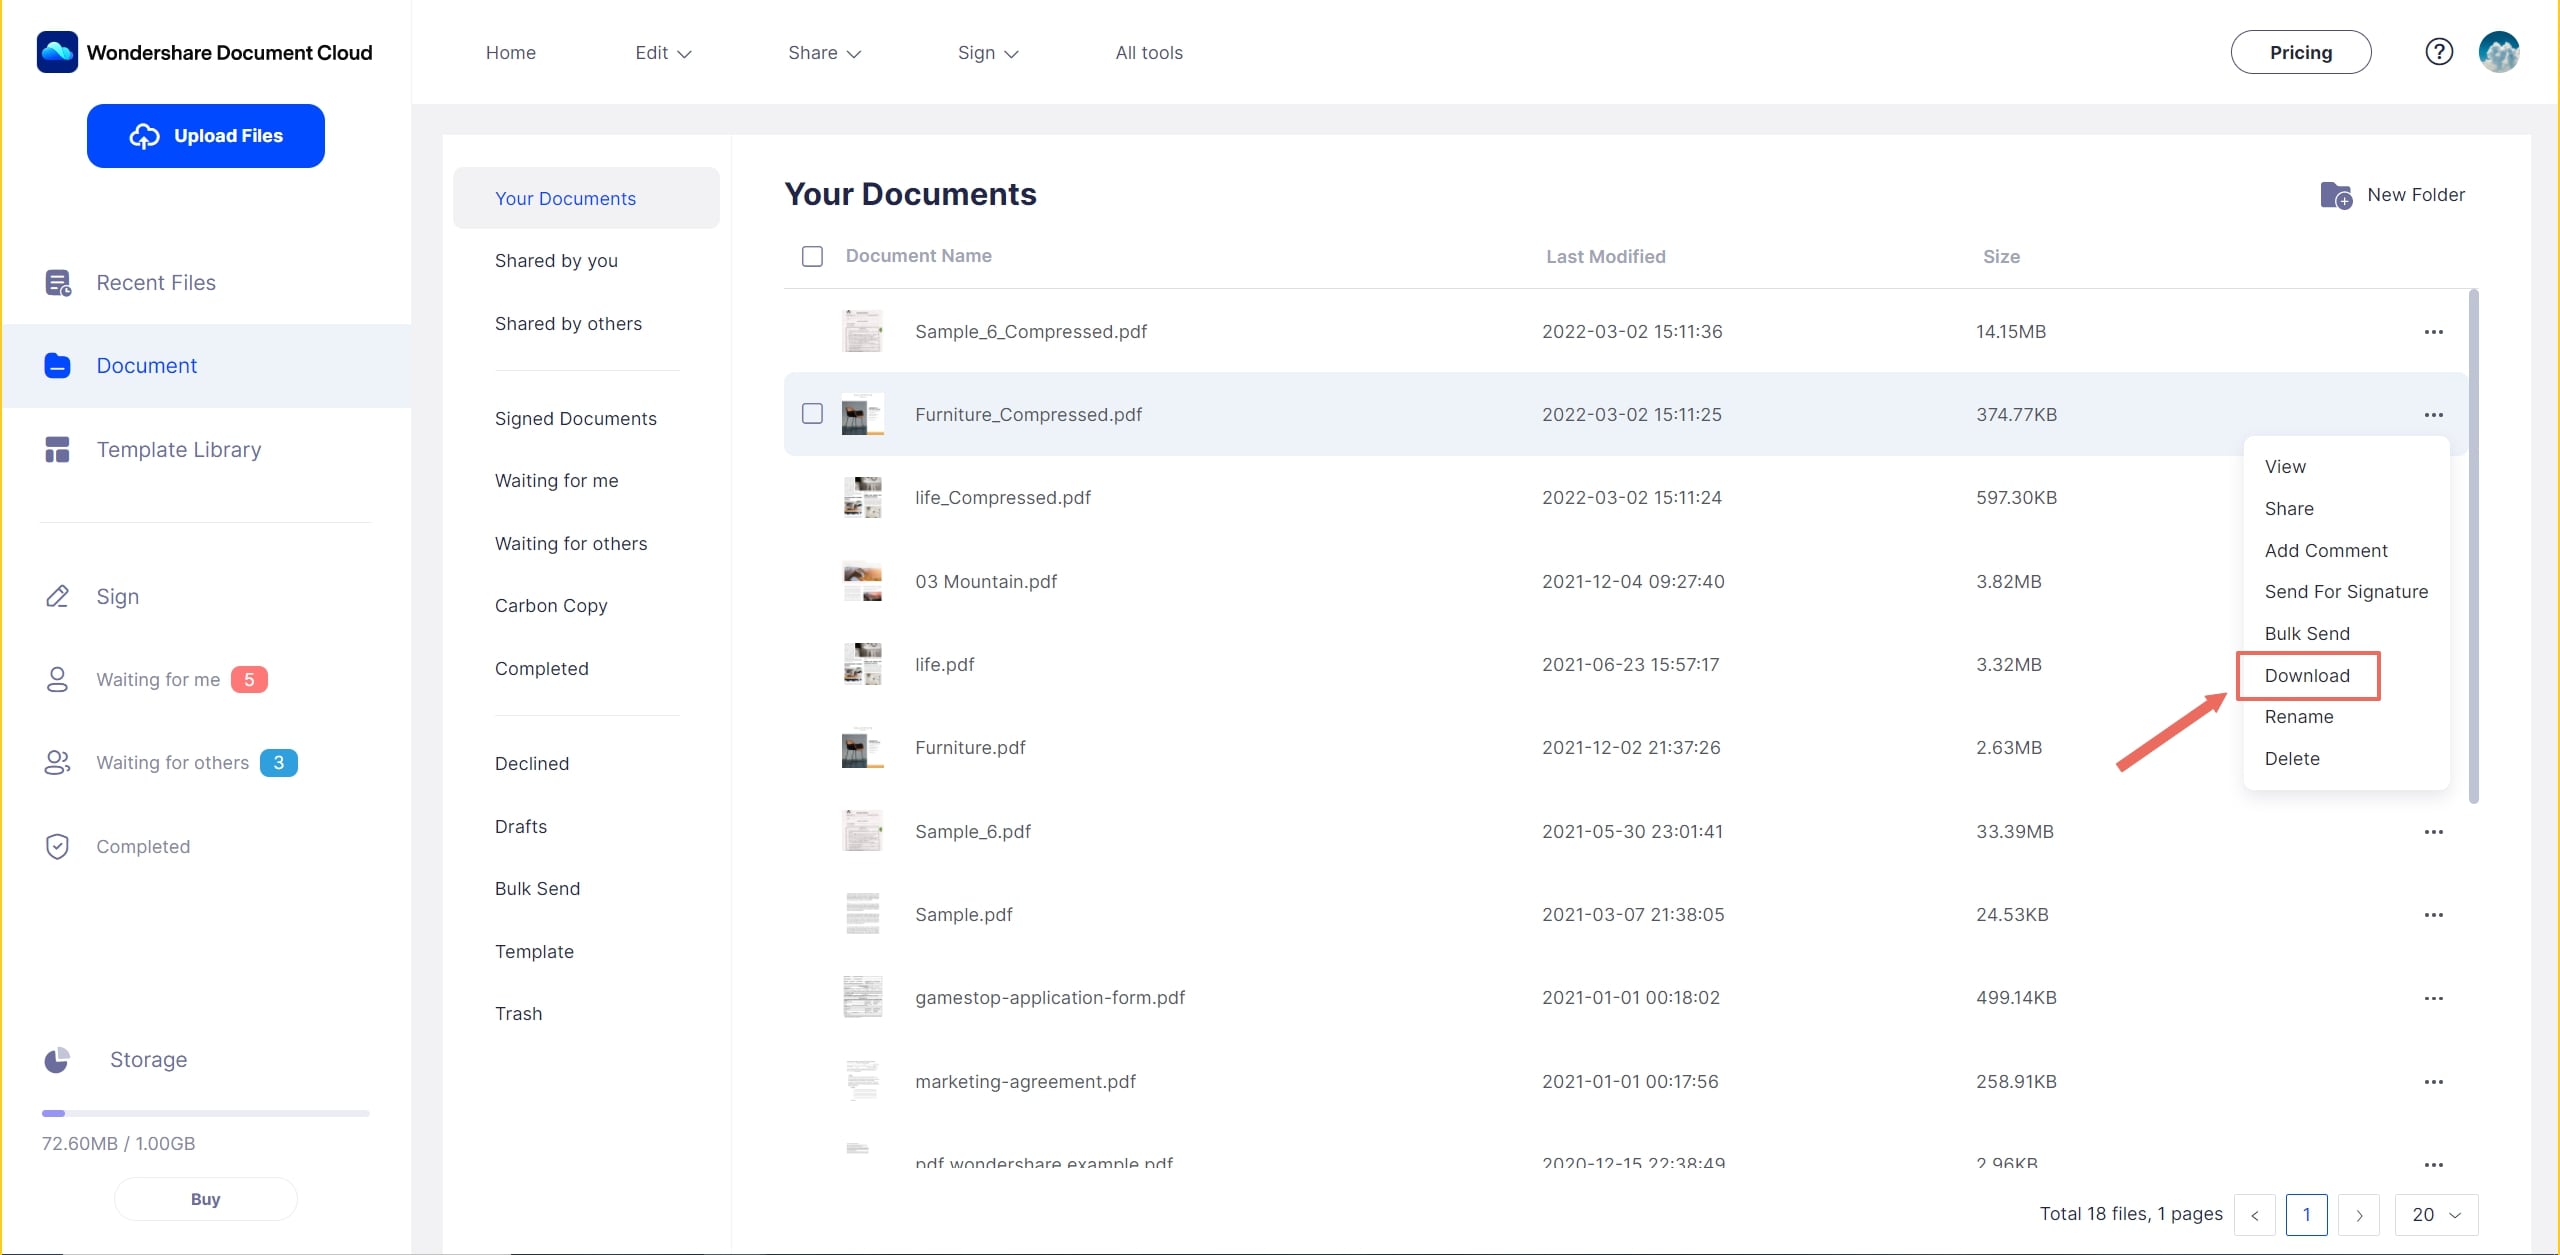
Download Files from Cloud
You’re allowed to download files from PDFelement Cloud on all operating systems, including Windows, macOS, Linux, iOS, and Android. No matter what devices you have, such as PC, Macbook, laptop, smartphone or tablet, all you need to do is to open a browser and access PDFelement Cloud, then you can download the documents you need from cloud quickly and easily.
To download files from cloud, you can click the ellipsis after the document, then click the “Download” button in the drop-down menu to export the document to your local storage.
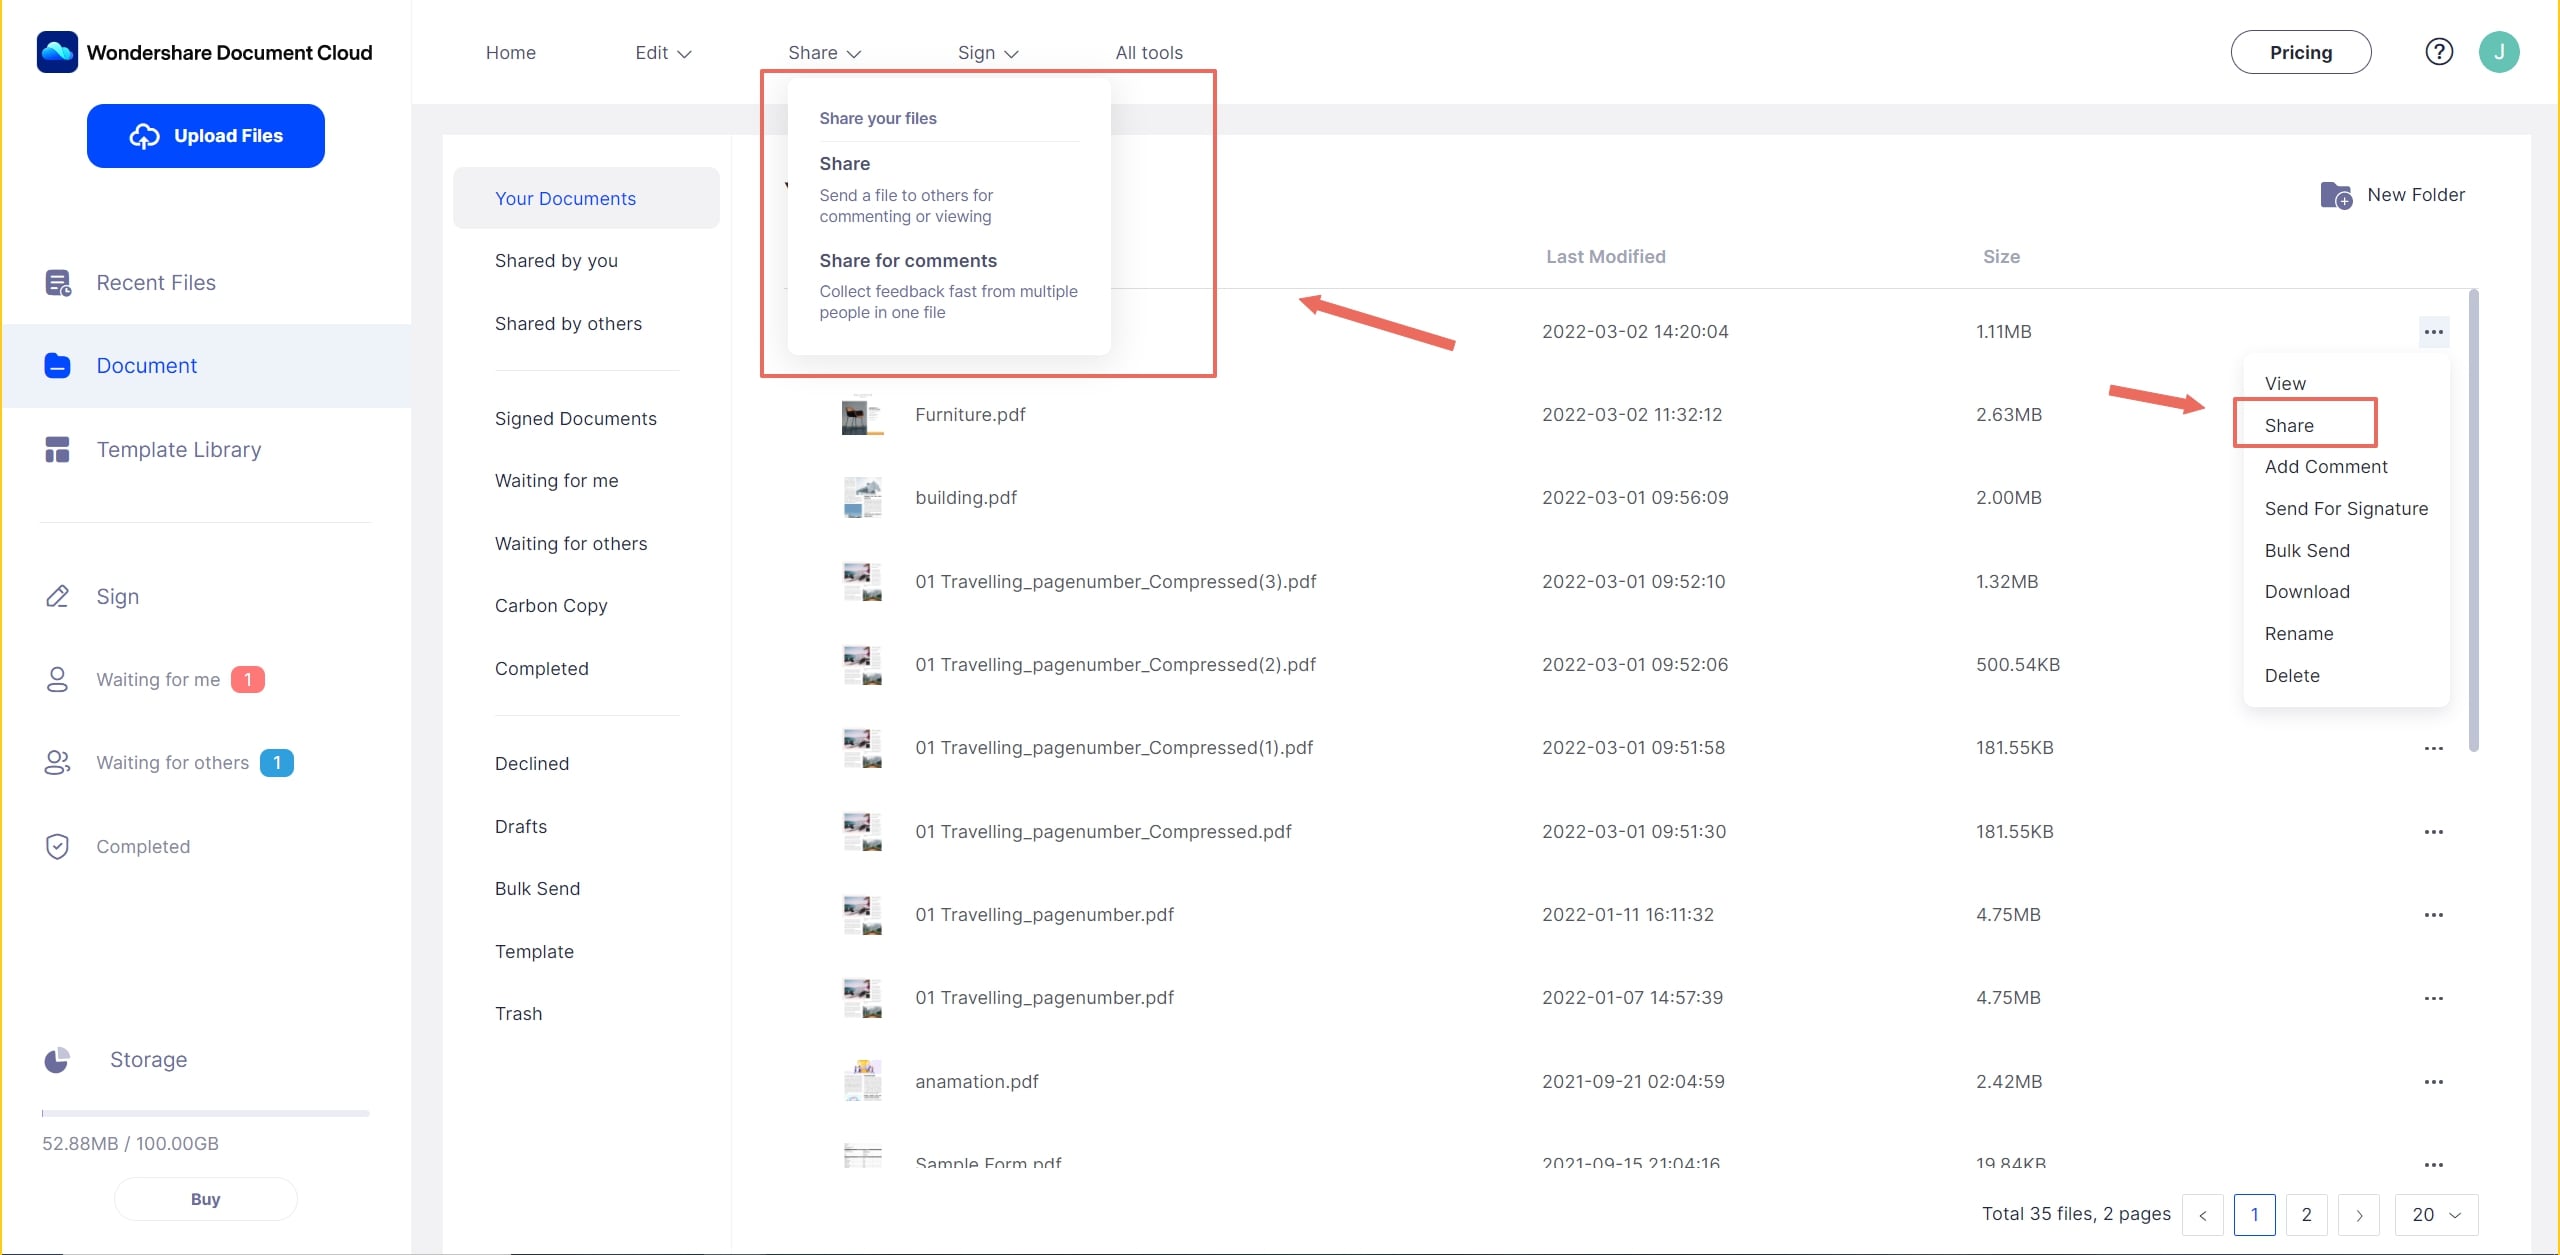
Share Files
You can share files directly with others using the "Share" button under the drop-down menu, which will bring a collaborative experience for you and your teammates.
Then with the pop-up windows, you're allowed to set the deadline and permissions for the shared link and email notification. Once the deadline expires, the shared document will be deleted immediately from our server permanently. So don't worry about your confidentials and privacy!
Note: Trial users can only share files 5 times a day, and no more than 10 people per time. Paid users have no limit on sharing files.
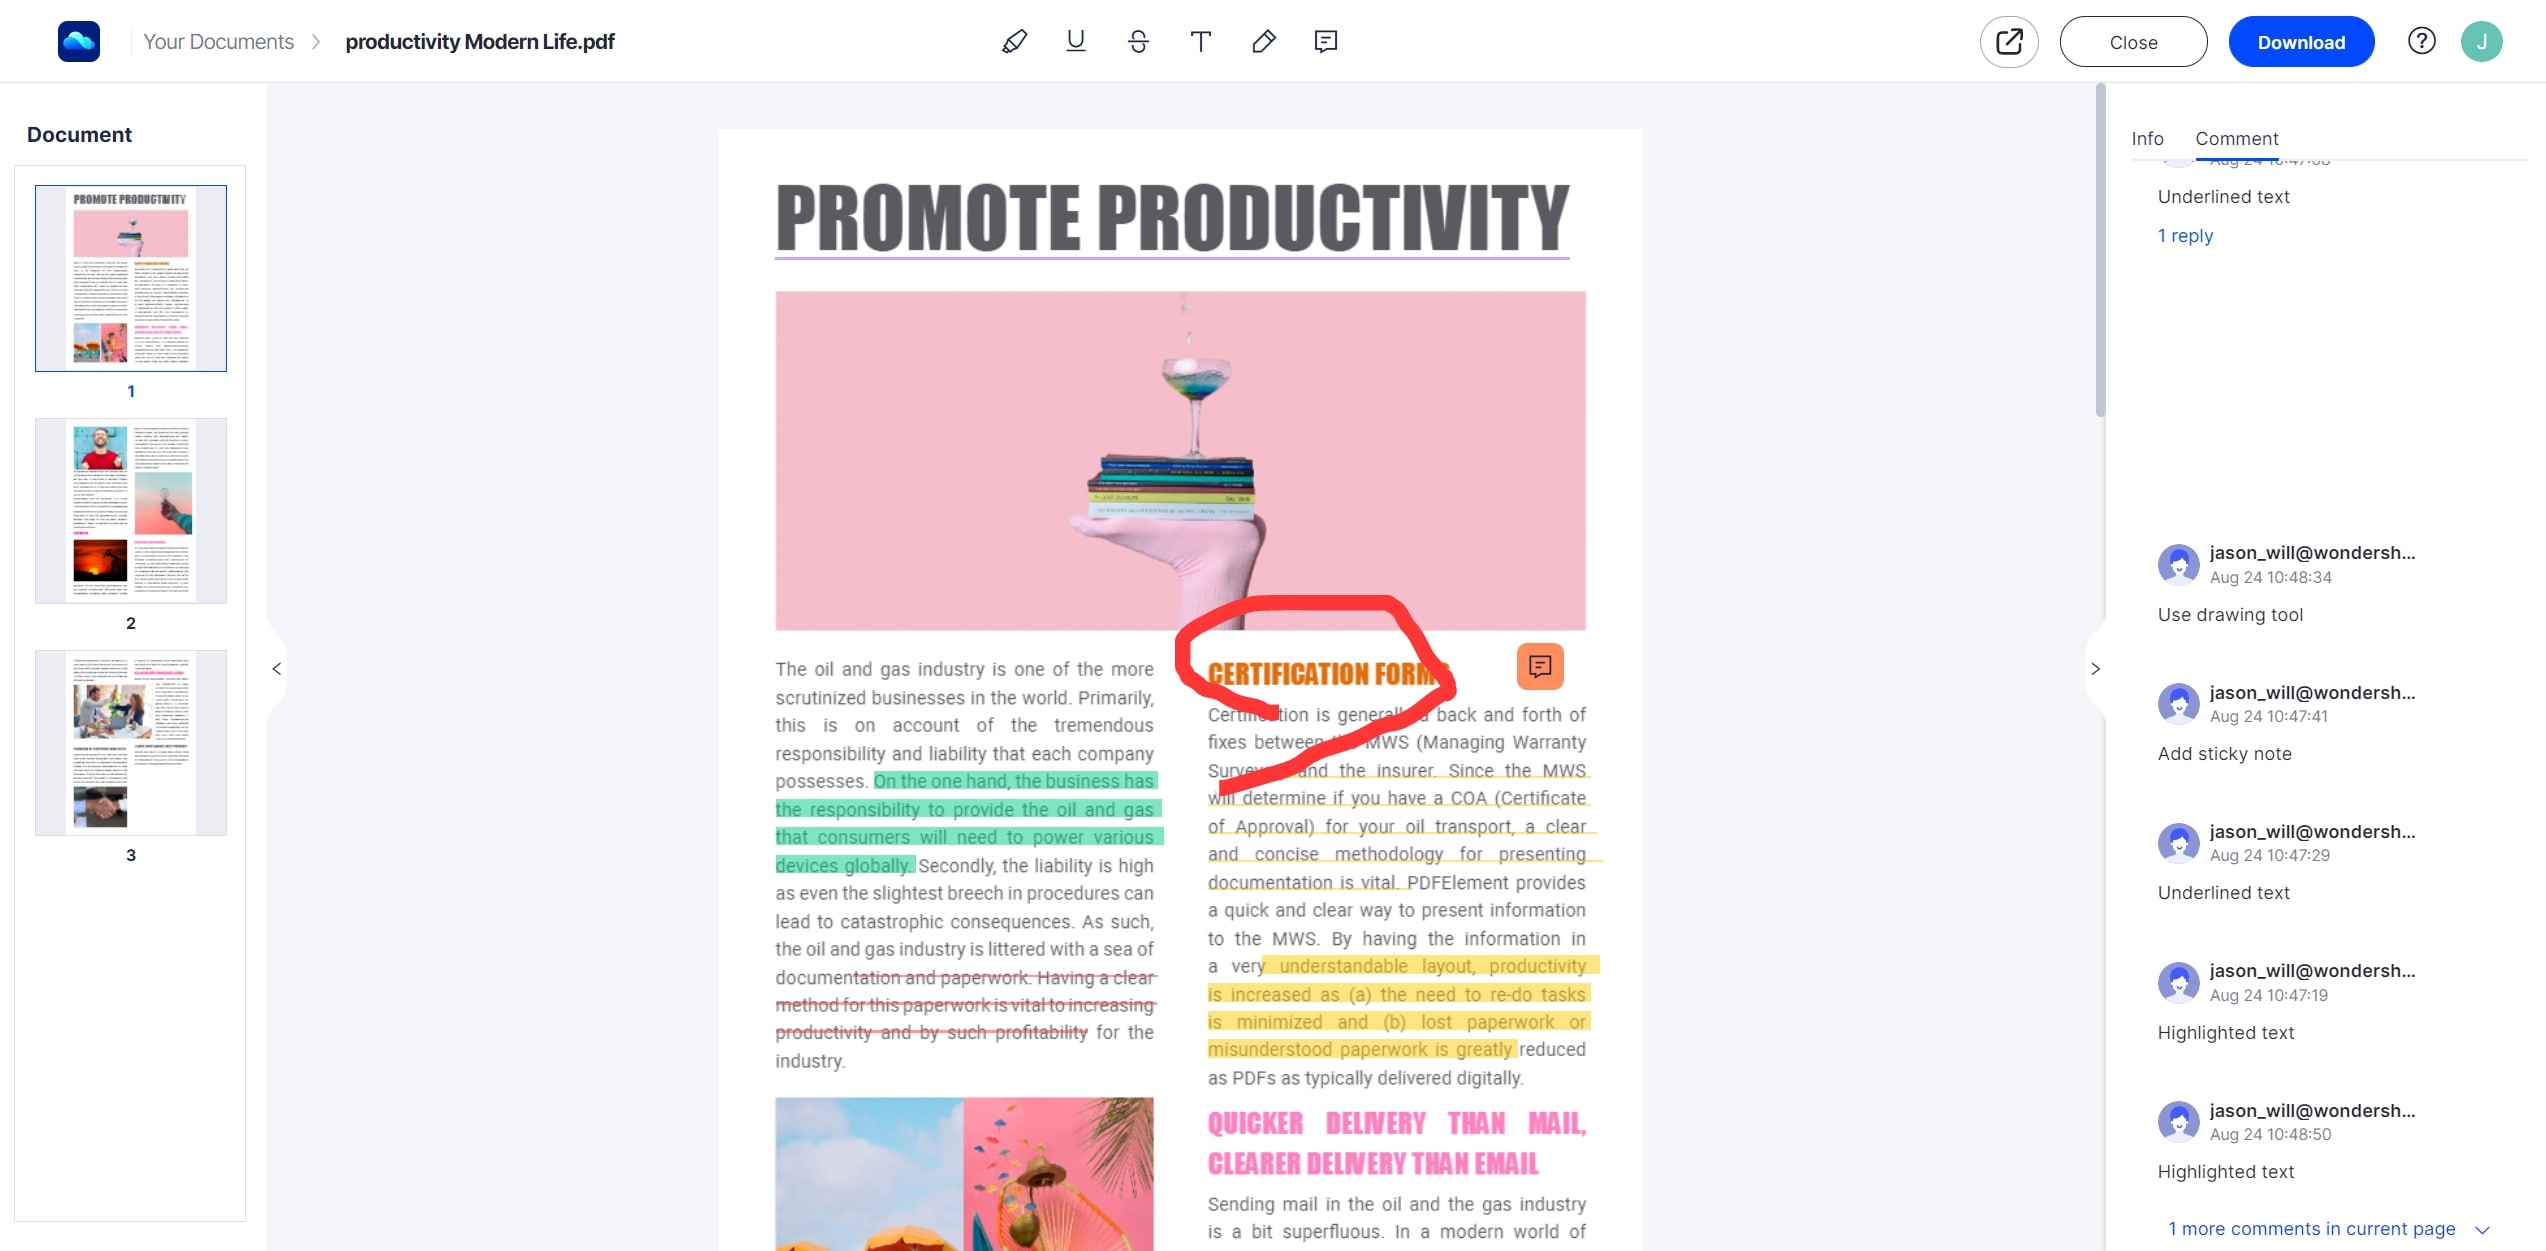
Personal Annotations
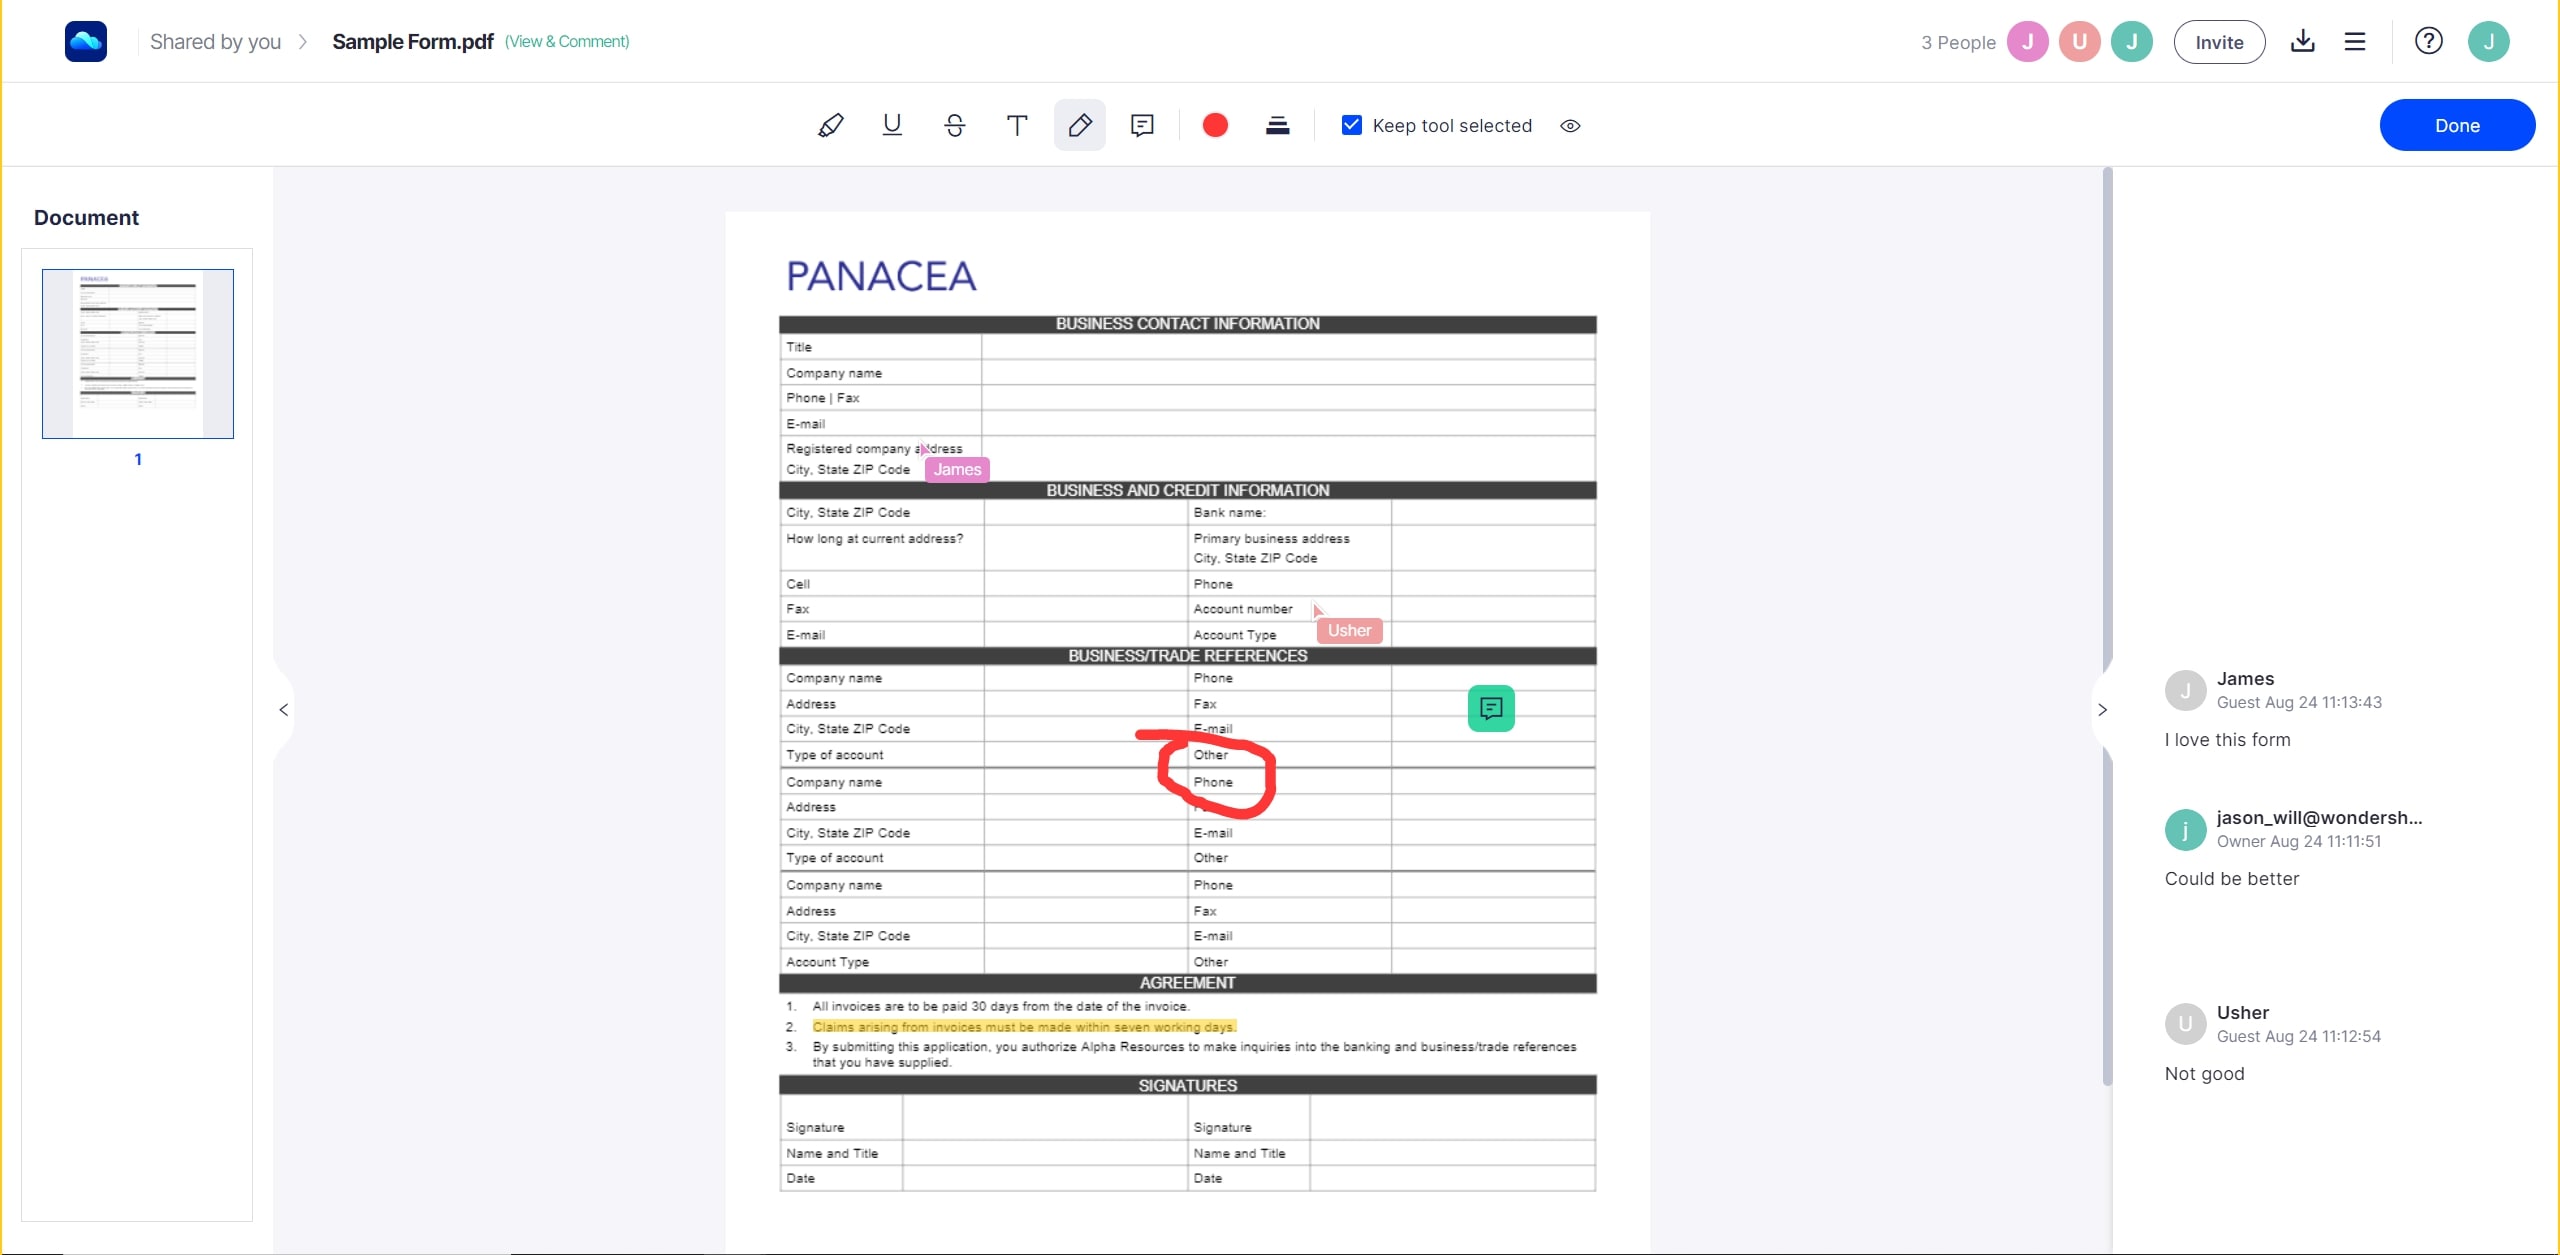
Online annotation and comment tools are important factors in collaborative workspaces. So far, Wondershare PDFelement Cloud supports annotation and comment to enhance your workflow and make your online document more productive!
Now we provides highlighted text, undelined text, strikethrough text, add text comment, drawing, add sticky note tools, you can easily find them on the top bar of preview page. In addition, you can comment something you need for every annotation.
If you need to collect comments and reviews for your document from others, you can share the document as a link or an email notification with others directly by clicking the sharing icon on the top. They can open the link to access the document on cloud easily, and annotate and comment in real-time for a collaborative experience!
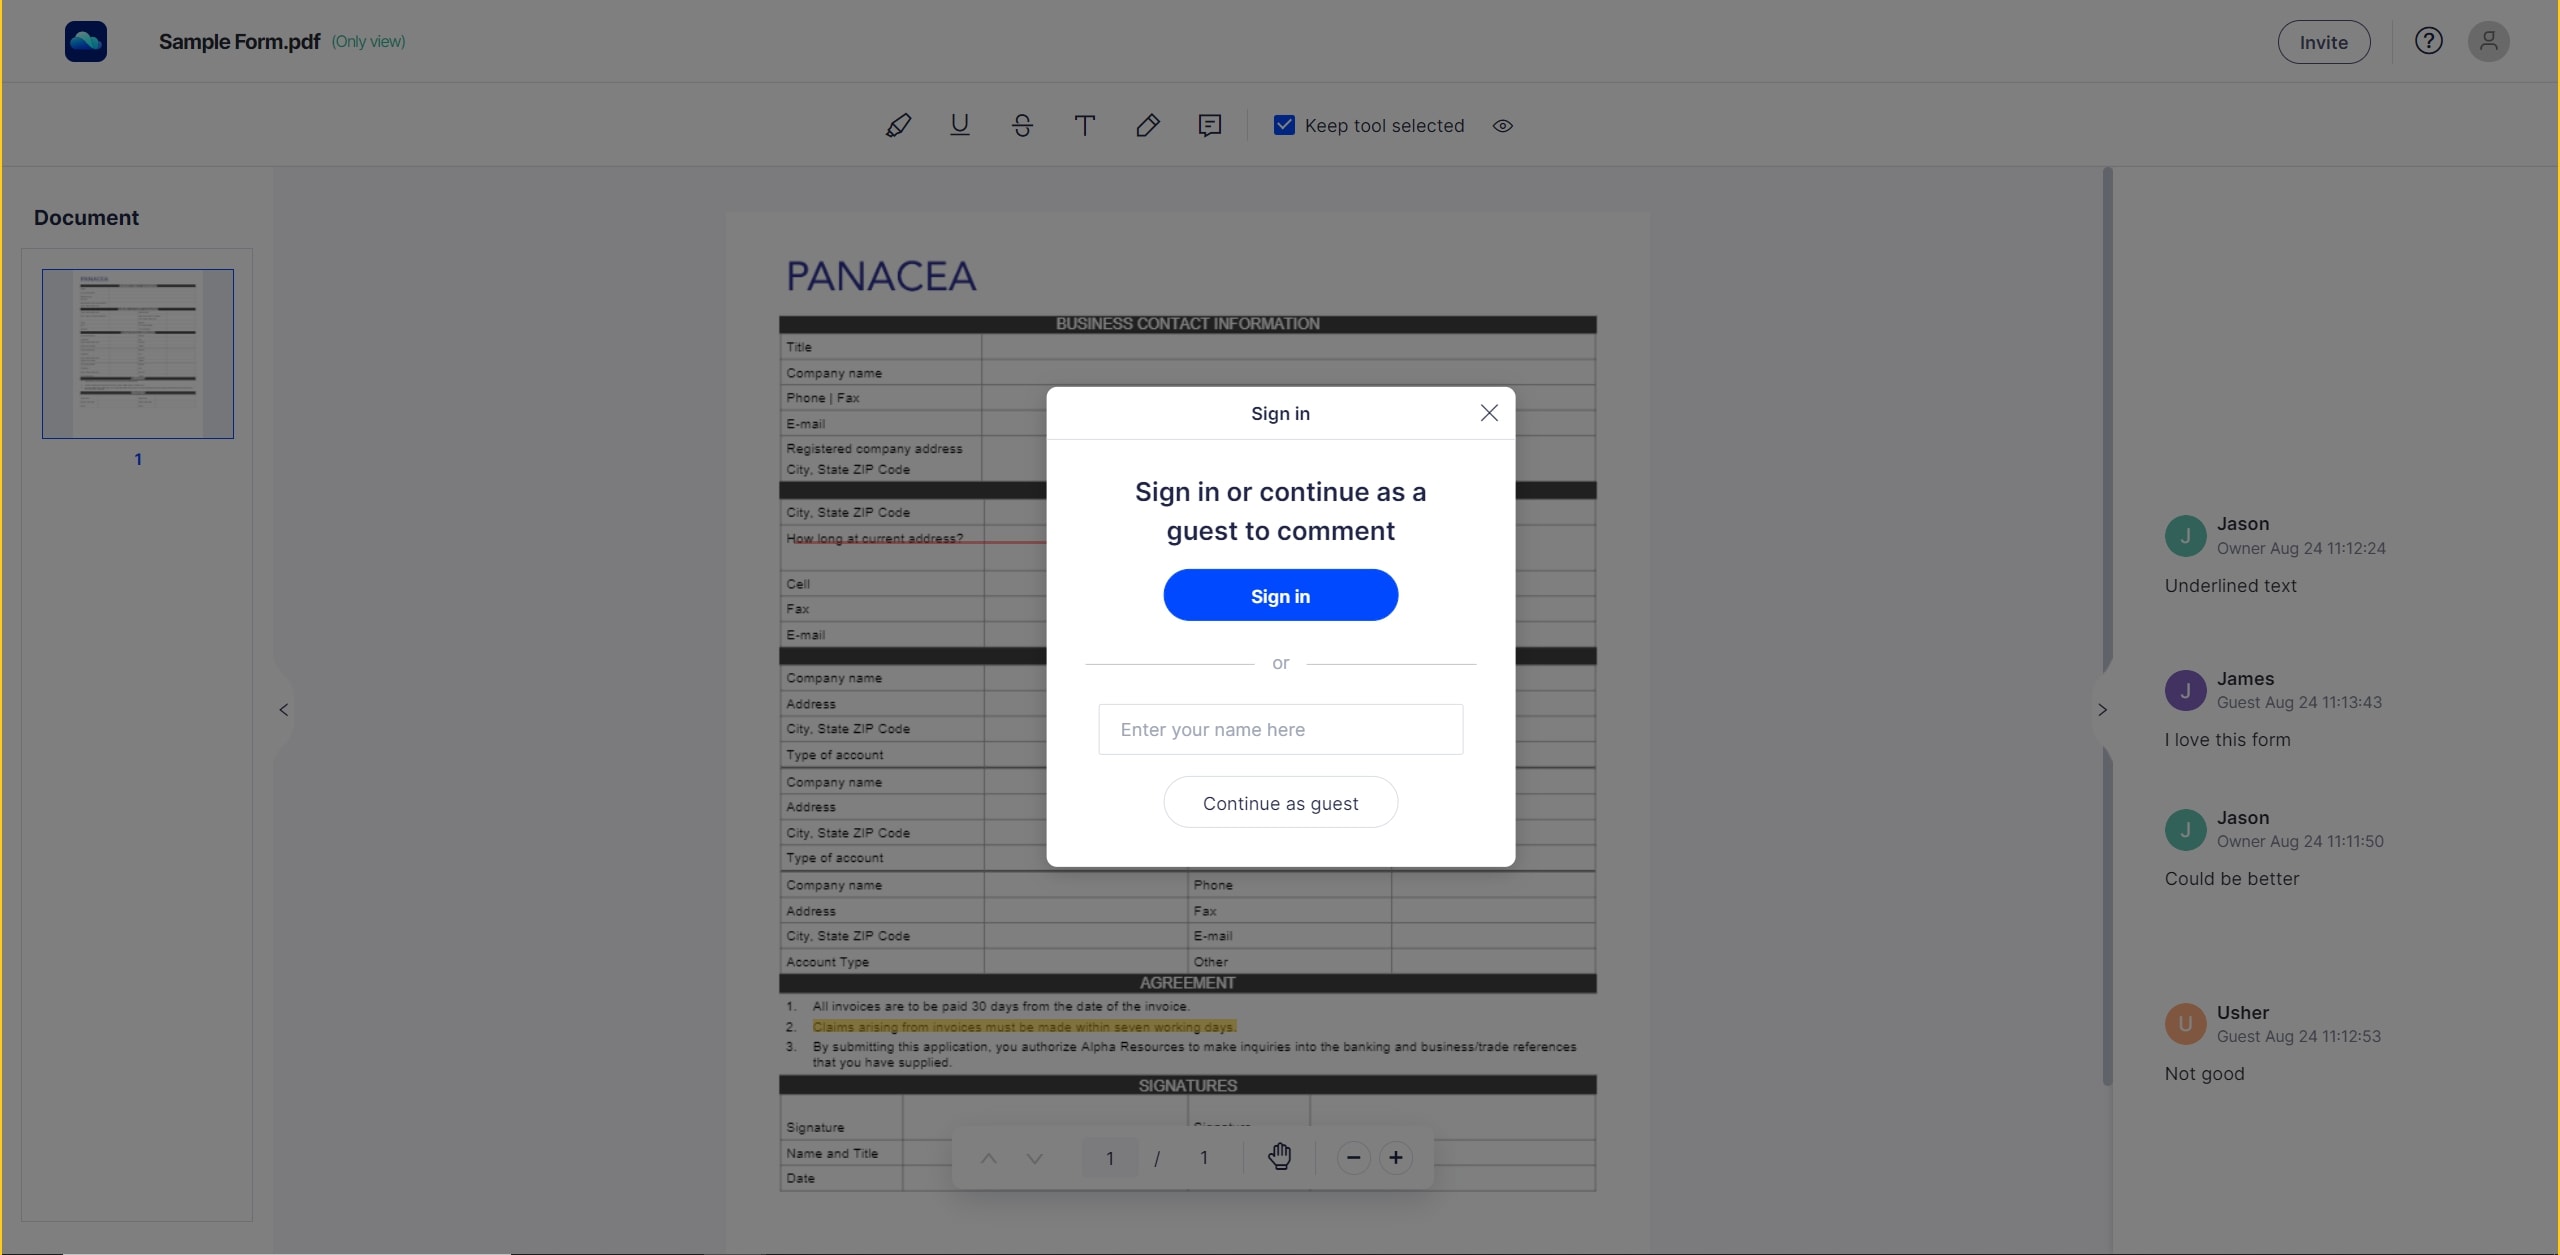
Collaborative Annotations
Collaborative work has become a popular working style nowadays. Wondershare PDFelement Cloud provides a smooth collaborative annotations tool for those who is working from home and want to collect live reviews and comments from multiple people in one worksheet or forms. To start a collaborative annotation workflow, all you need to do is to create a link or an email notification and then share your file by clicking the drop-down menu. In addition, you can add a vertification code and set a deadline for the shared documents.
When your workmates enter to the link, they can highlight, underline, strikethrough and add textbox as a guest without registration.
PDFelement Cloud supports 200+ people online to annotate documents together. You can see others' arrows in the screen and review the comments and feedback they added.
Send Documents
For Wondershare PDFelement Cloud, sending documents for collecting signatures is one of the core features. We dedicate to provide the best service when you need to sign a document or need signatures from multiple people. To initiate a signature request, you can follow this tutorial guide step by step:
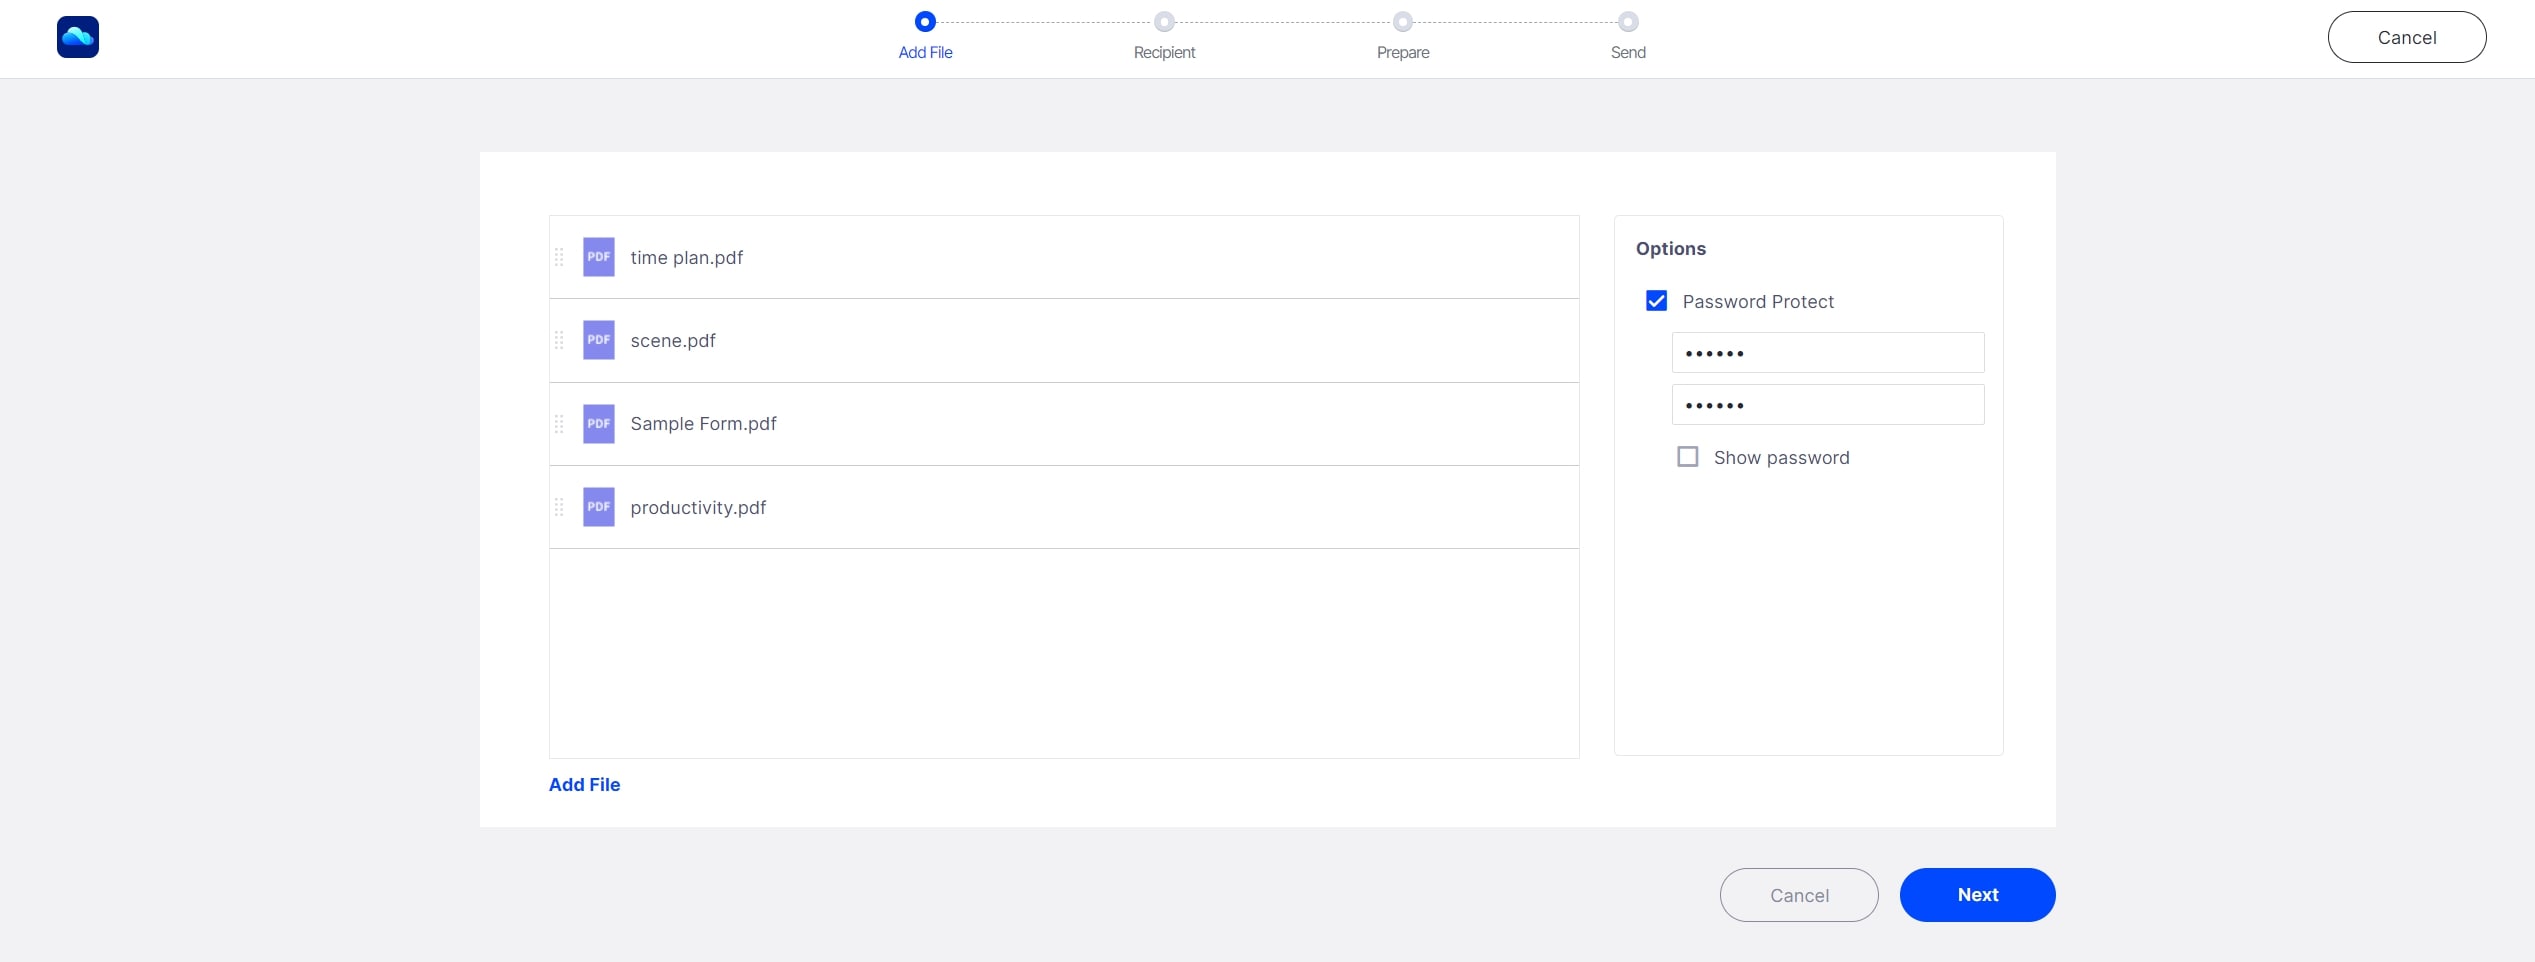
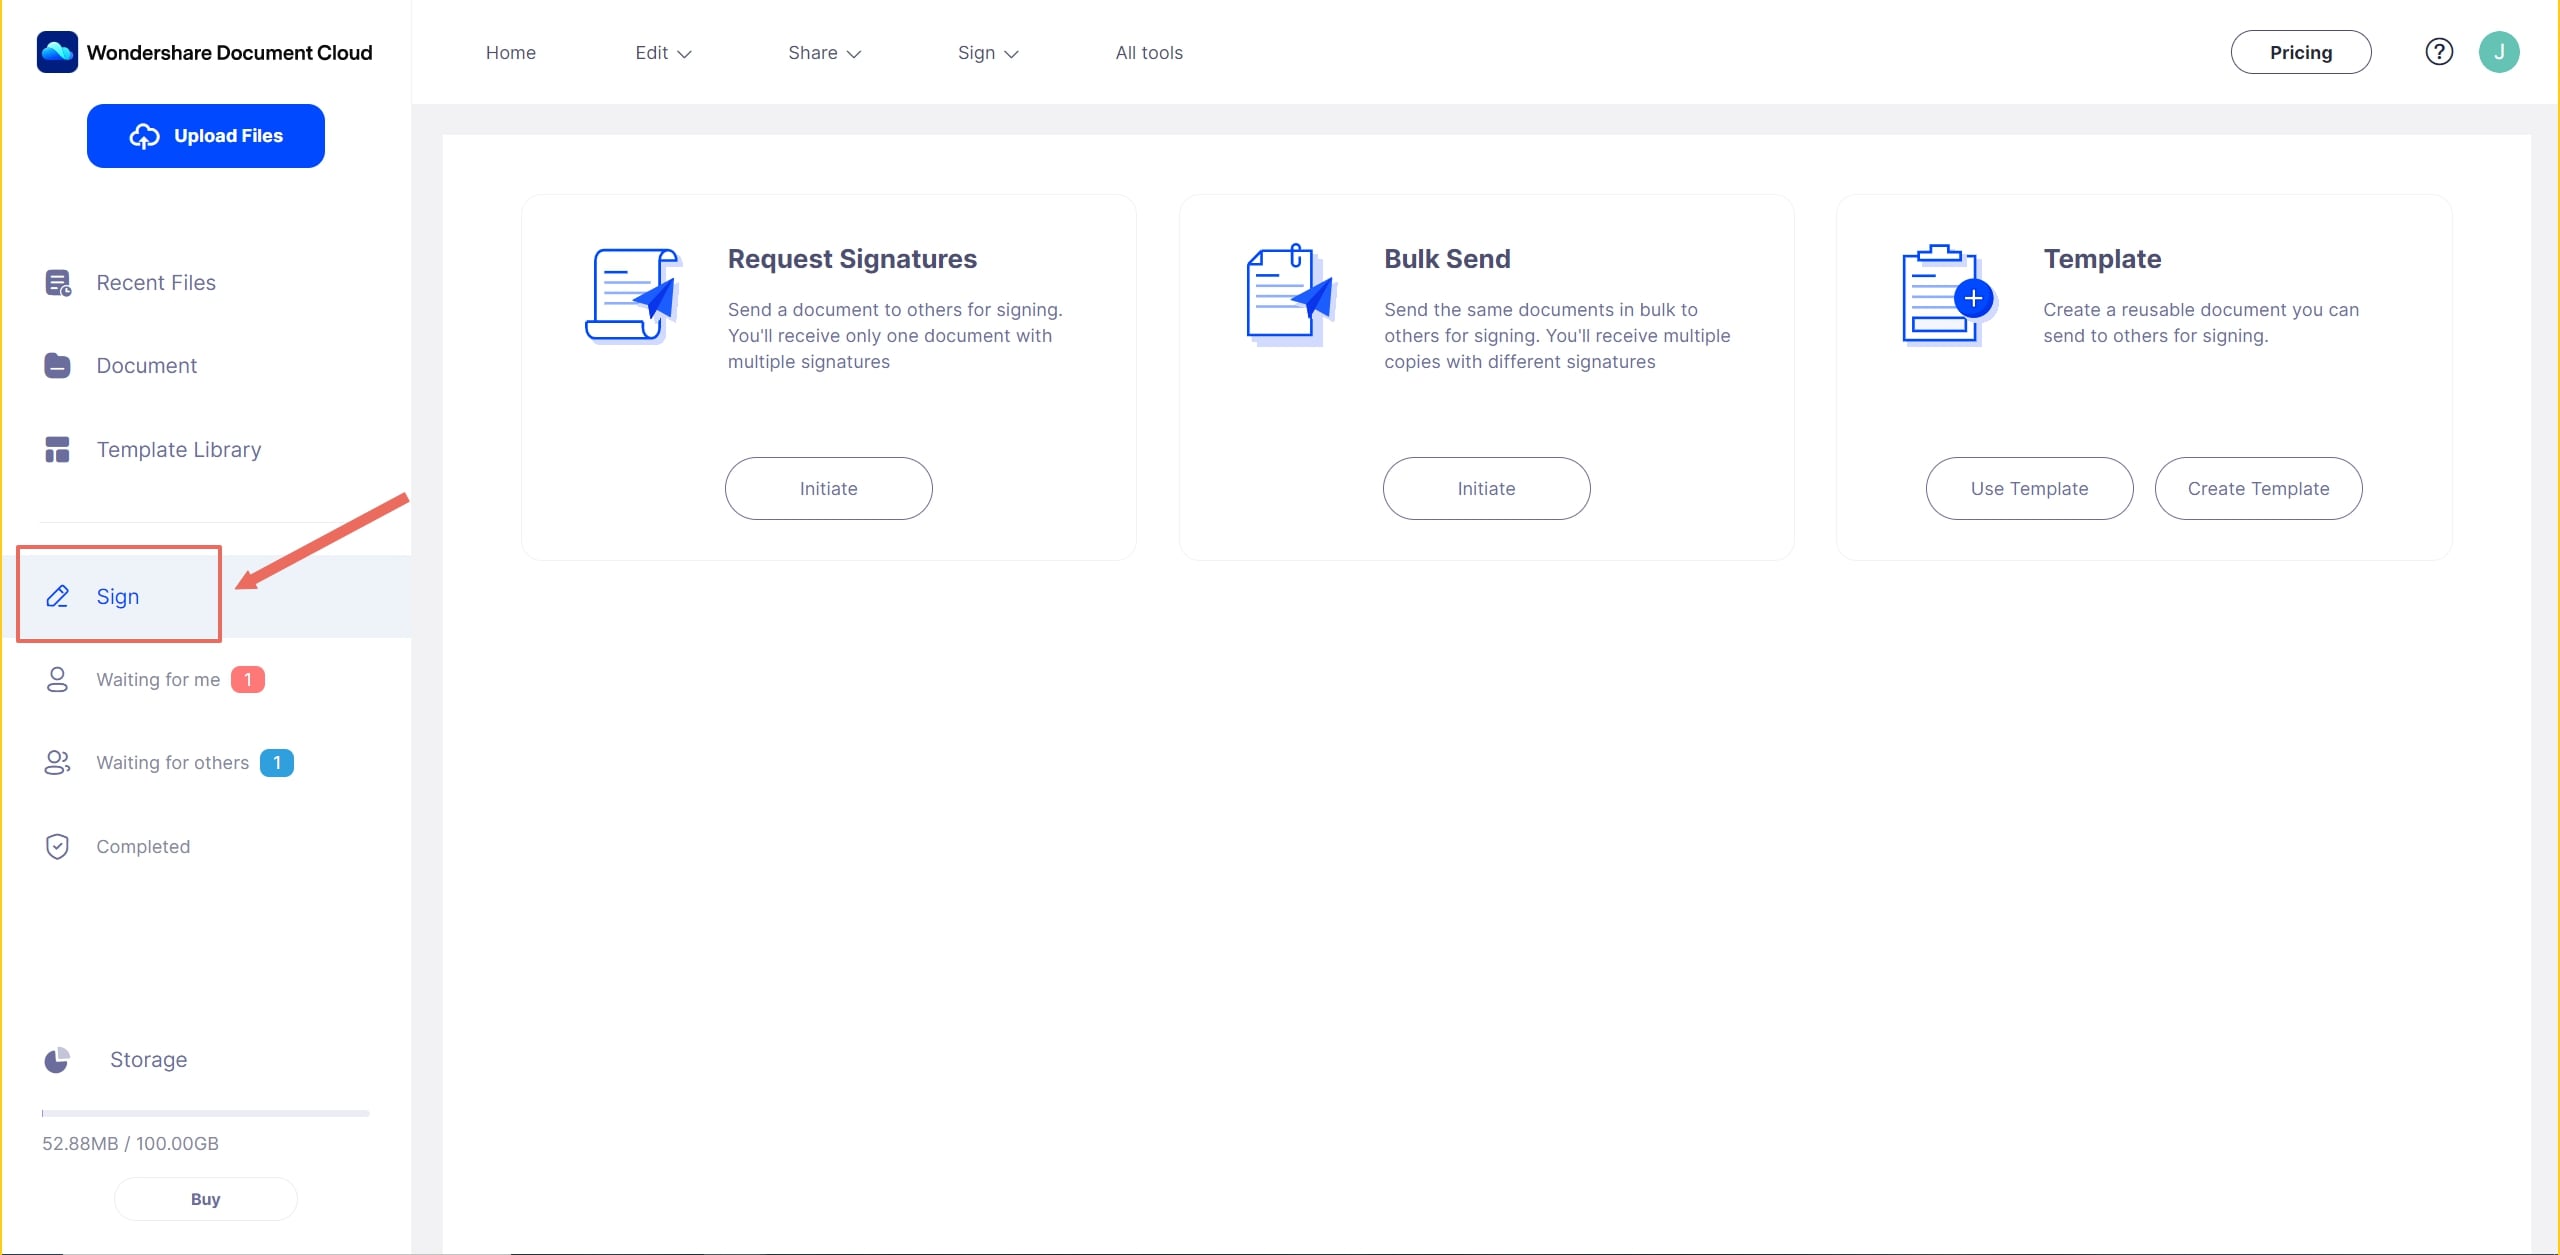
1 Navigate to the top toolbar and move to the “Sign” tab. There are three choices for you to initiate a new task for signatures, including Request Signatures, Bulk Send and Create Template.
- If you only want to receive one document with multiple signatures from your members, then select the “Request Signatures” to start the task.
- If you want to receive multiple copies with different signatures from your members, then select the “Bulk Send” to start.
Tips: You will only have 5 times to send documents for signature if you're on a free trial.
2 Choose the document you will send from your local storage or from our PDFelement Cloud. Then click the “Add Document” button. Moreover, you can set a access authentication for the signing request and recipients will have to input the correct password to finish the signing process.
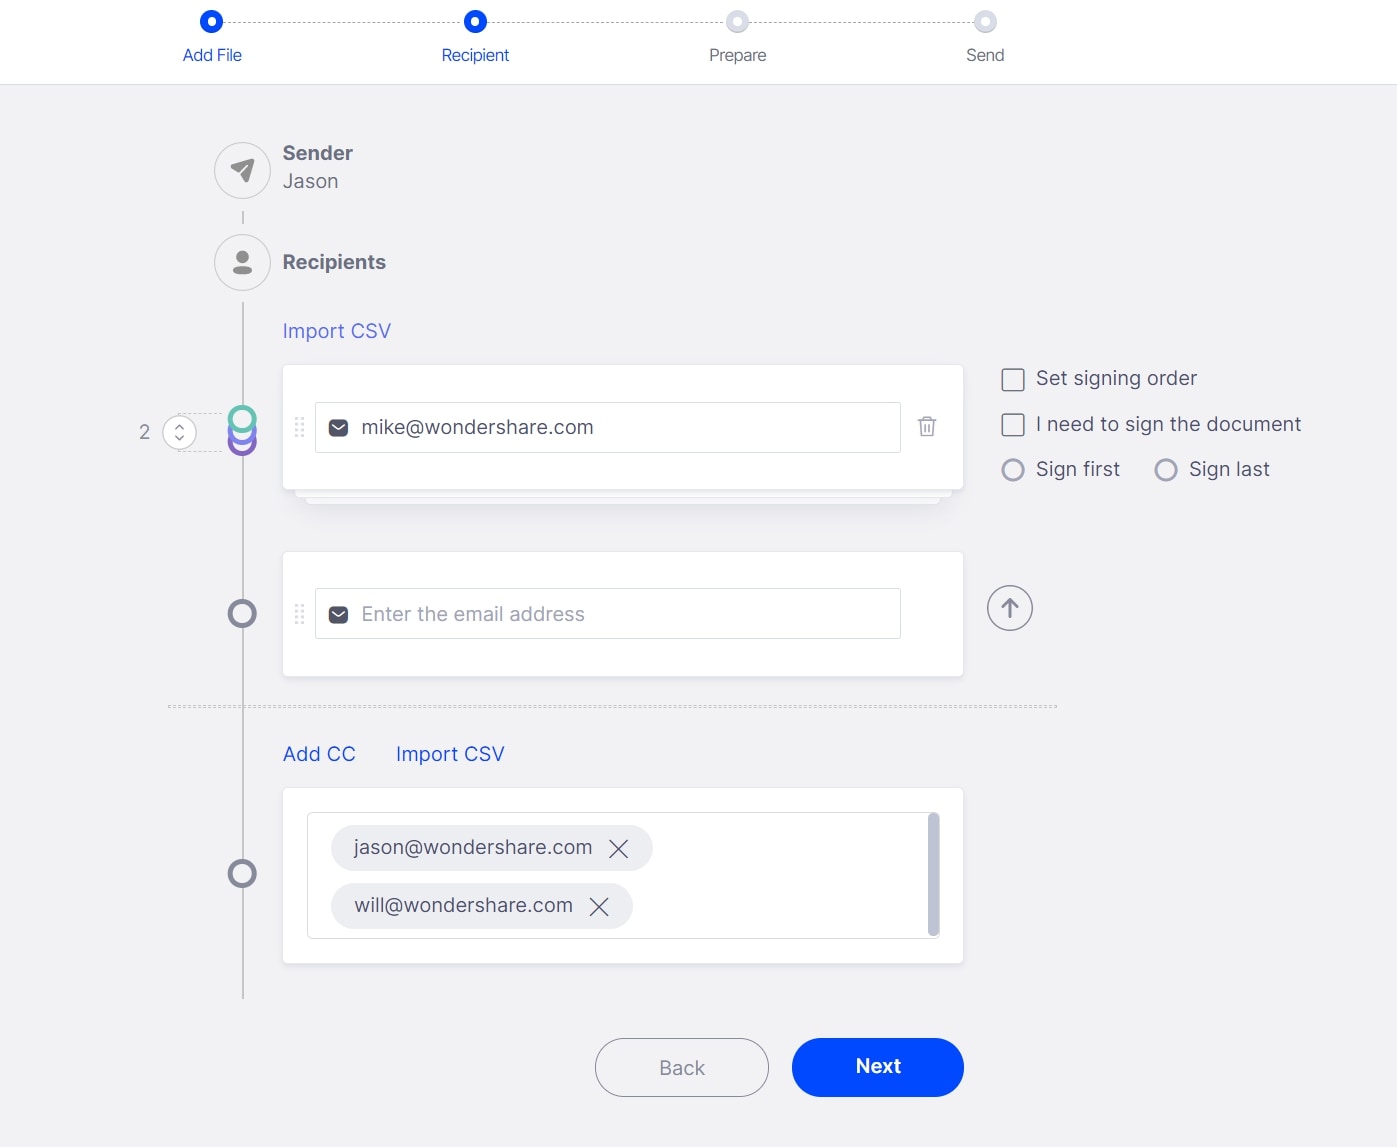
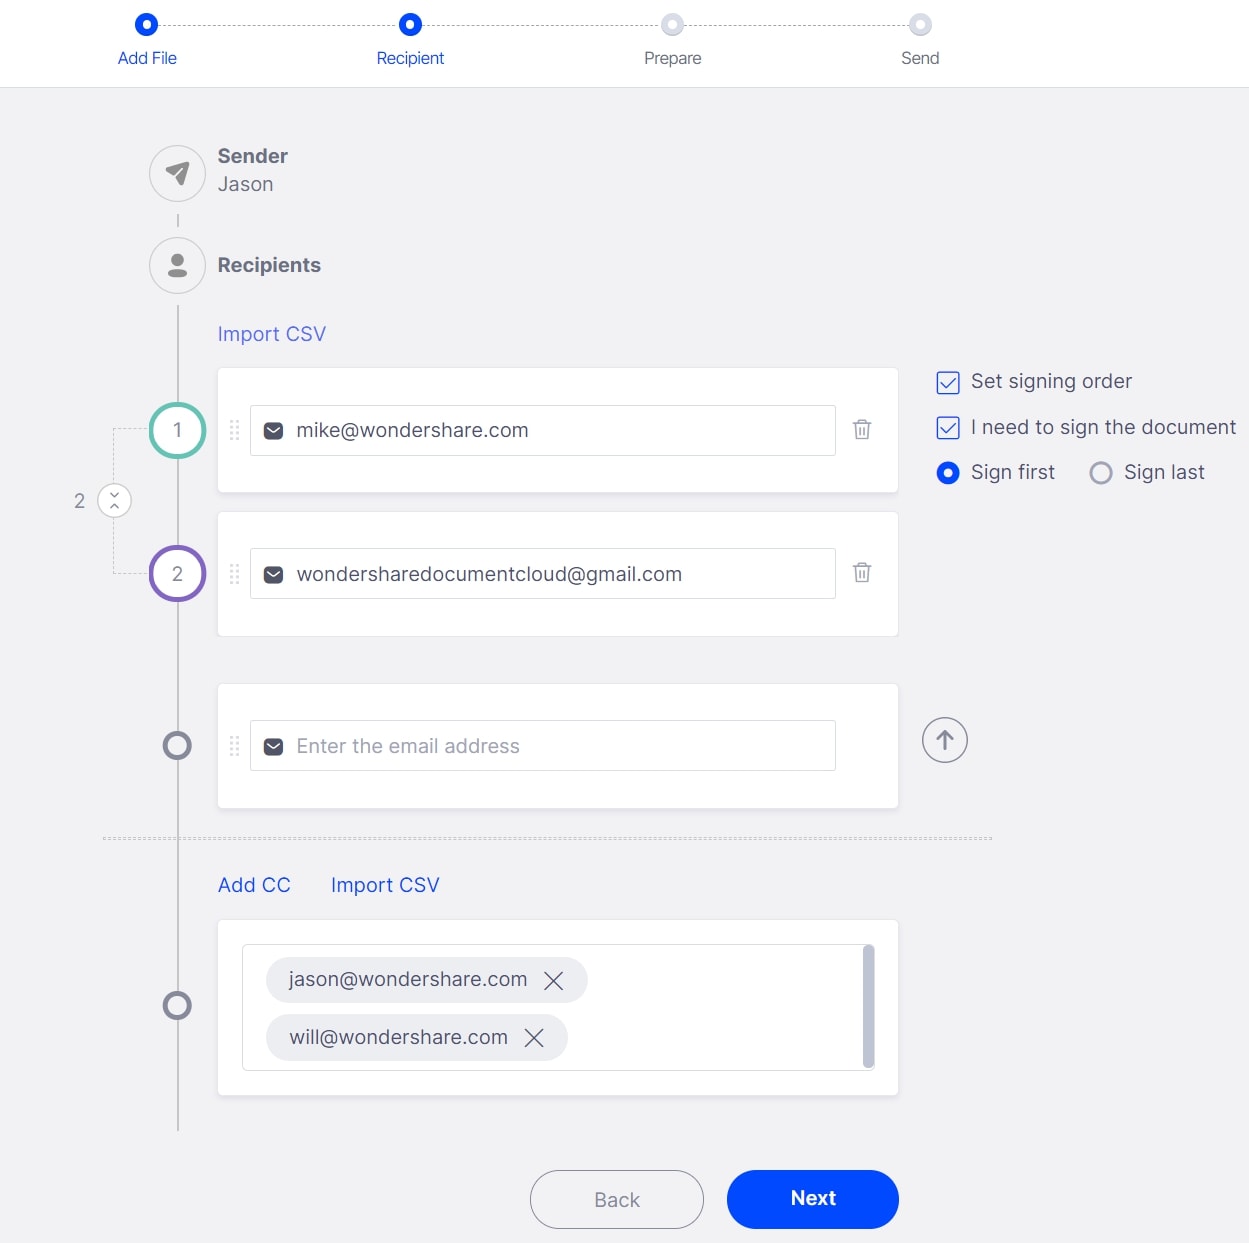
3 Input the correct signer’s email address, then click the “↑” button to add it to the signers group. You can also import a CSV file to add multiple email addresses in batch. Plus you can add CC and they can only review the documents.
4 If you need to set signing order, just confirm the checkbox and drag the icon to change sequence. If you need to sign the document, just click the checkbox and select “Sign first” or “Sign last”.
5 Drag and drop the Signature/Initial, Date, Title, Company fields for every signer as you need. You can also customize an area for signers to fill, such as Address, Gender, Age, etc. If you need to reuse this layout next time, you can save it as a template.
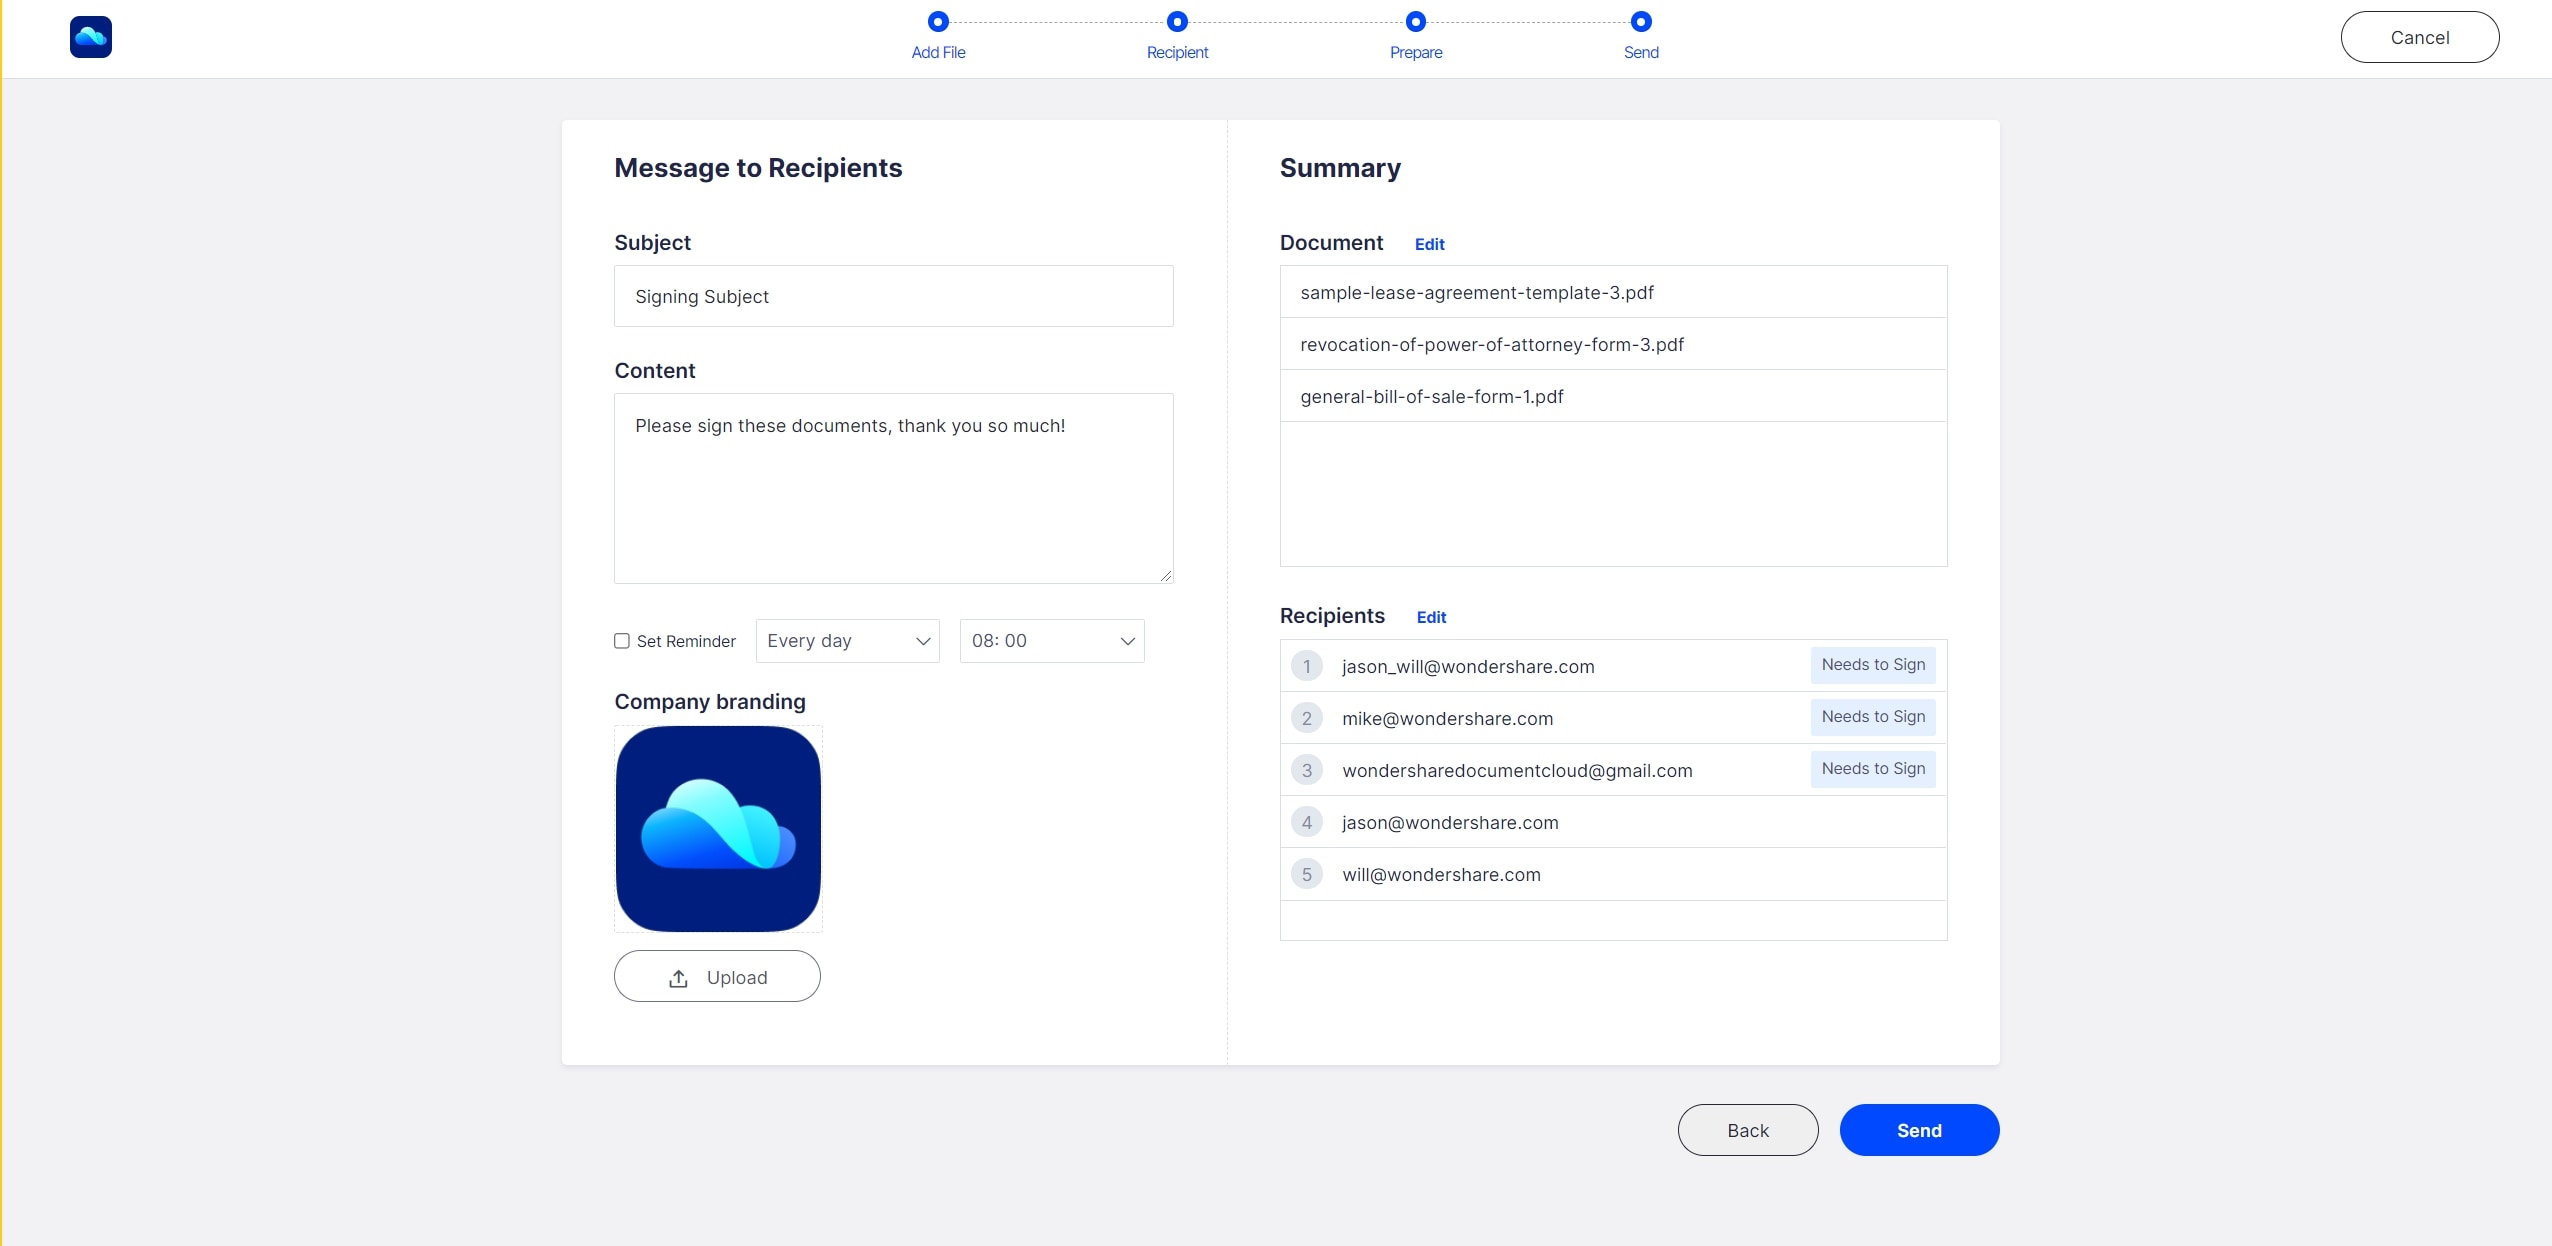
6 After you finish the email notification's subject and content, set a reminder and customize your branding logo, send the documents for collecting electronic signatures straight away! You can track the status and details as you need.
Sign Documents
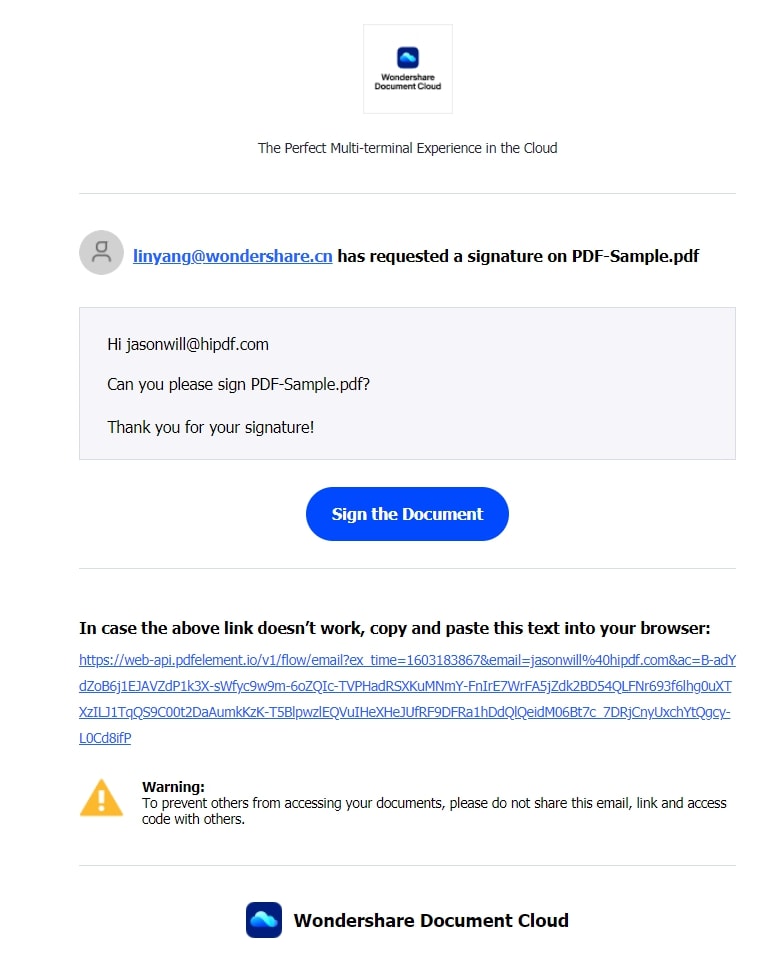
For electronic signature, signing documents is the last but the most important step in the progress. When you receive the email notification for signature request:
1 Open the message, you’ll see the following signature request. You’ll know who sends the request and what document you will sign. Click the “Sign the Document” button to jump to Wondershare PDFelement Cloud via the default browser on your computer directly. Or click the below link if the button doesn’t work.
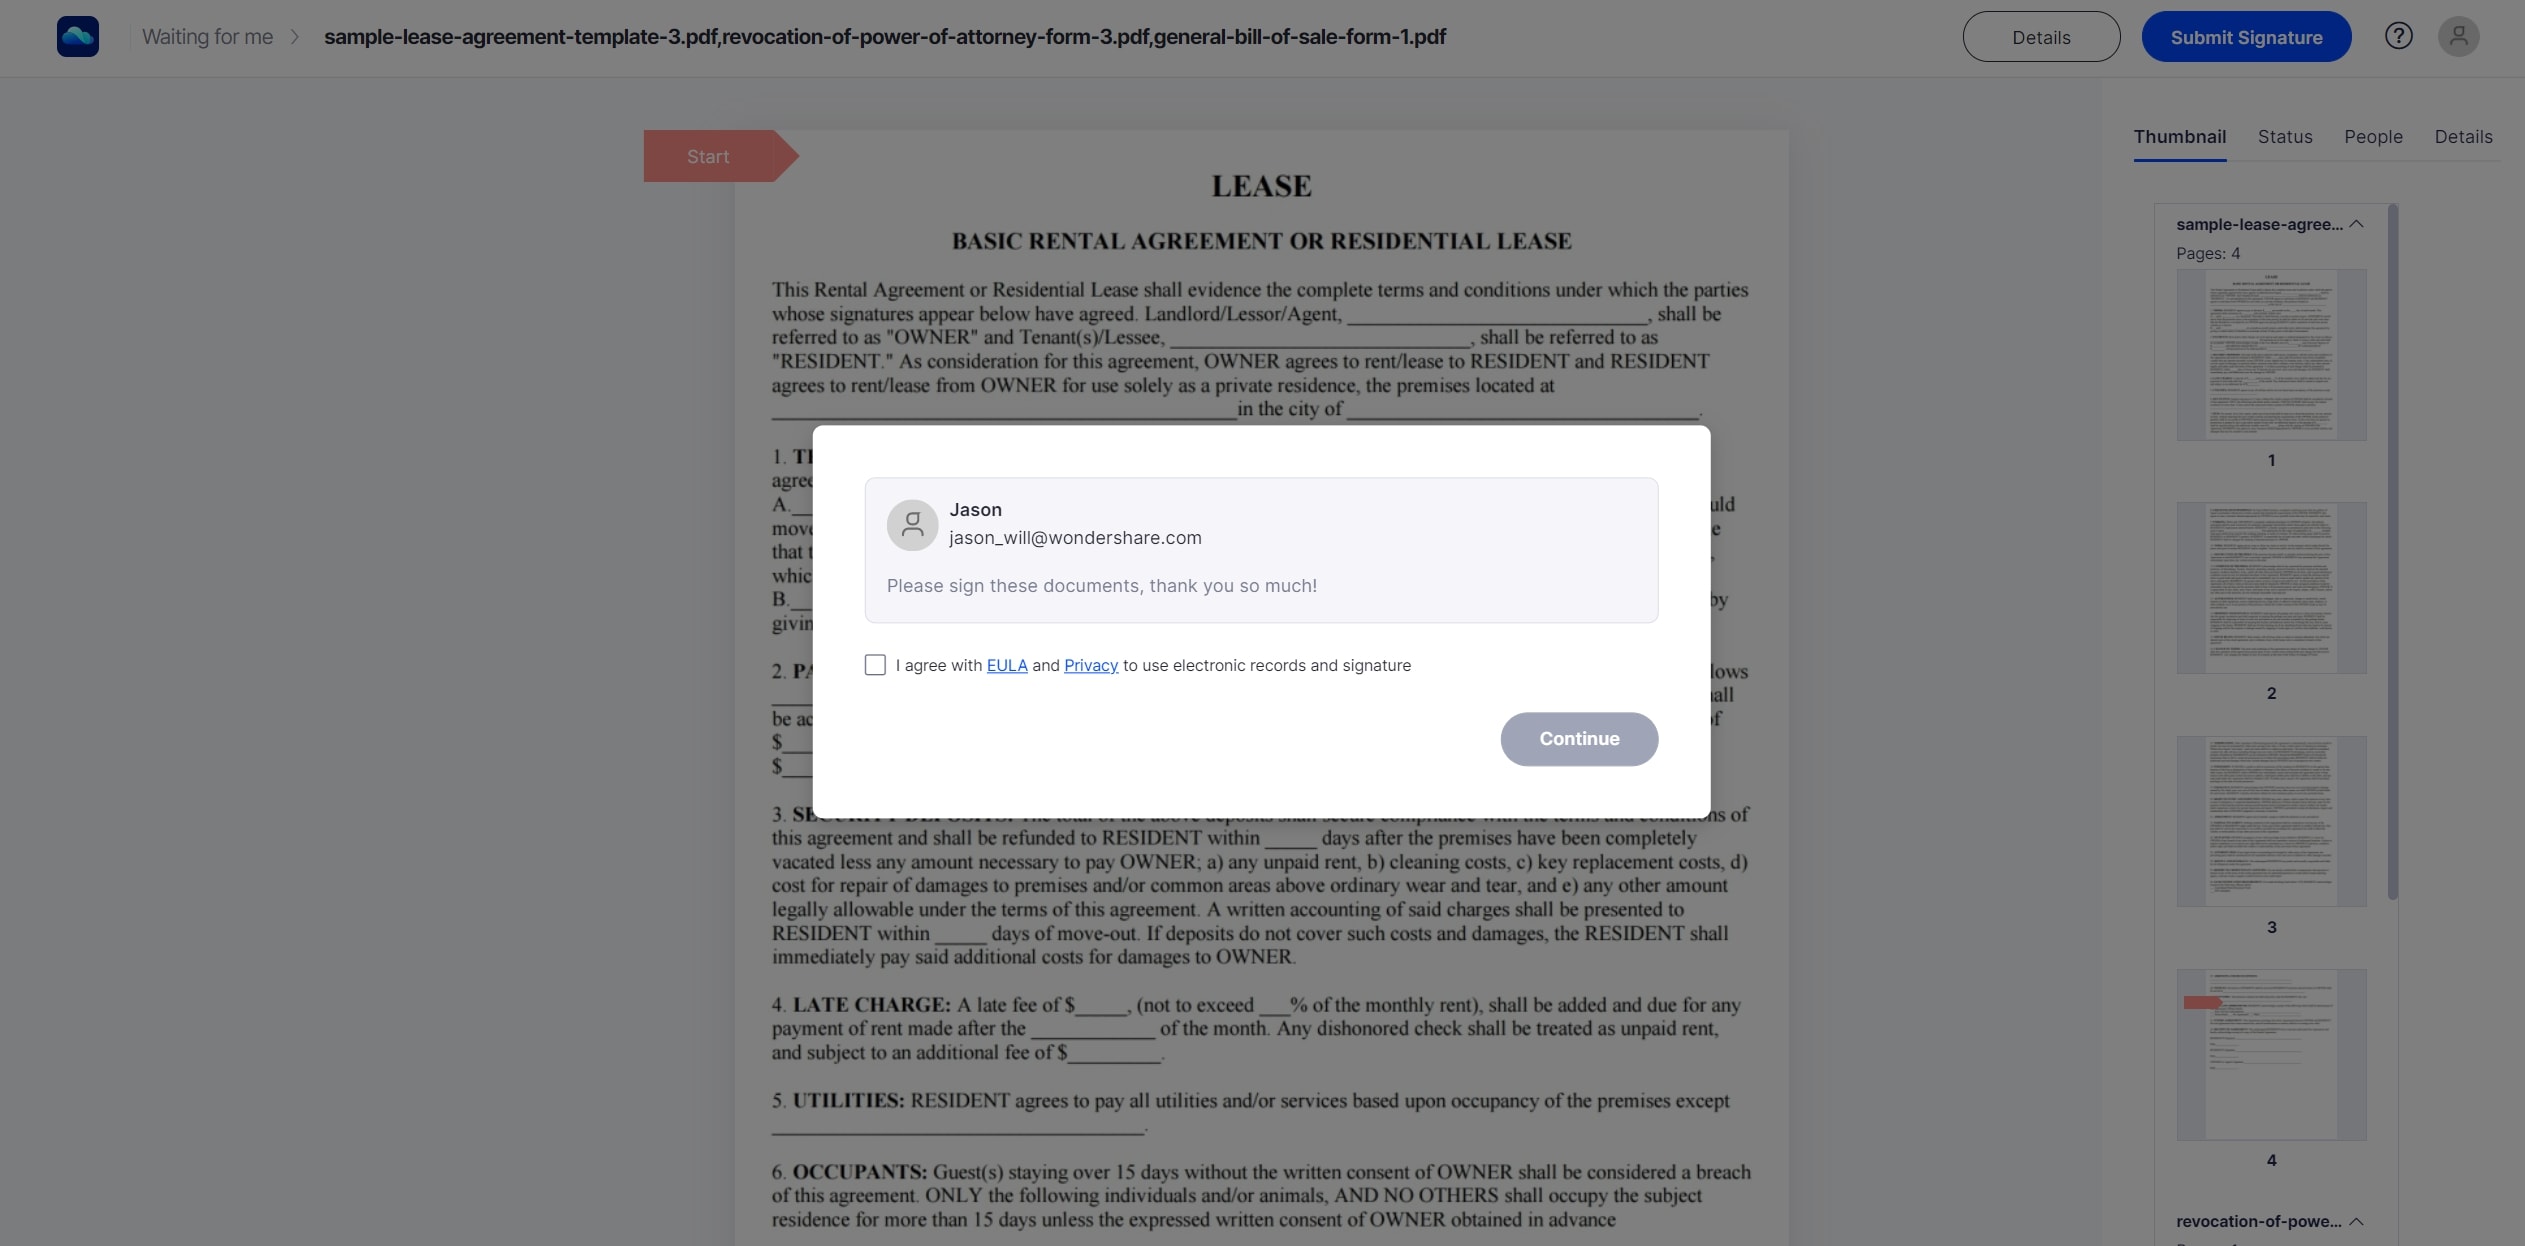
2 There will be a pop-up window for you to choose from. You can refuse to sign the document or agree with EULA and privacy policy to continue. Whether you refuse or agree, the signature initiator will receive an email notification about the status.
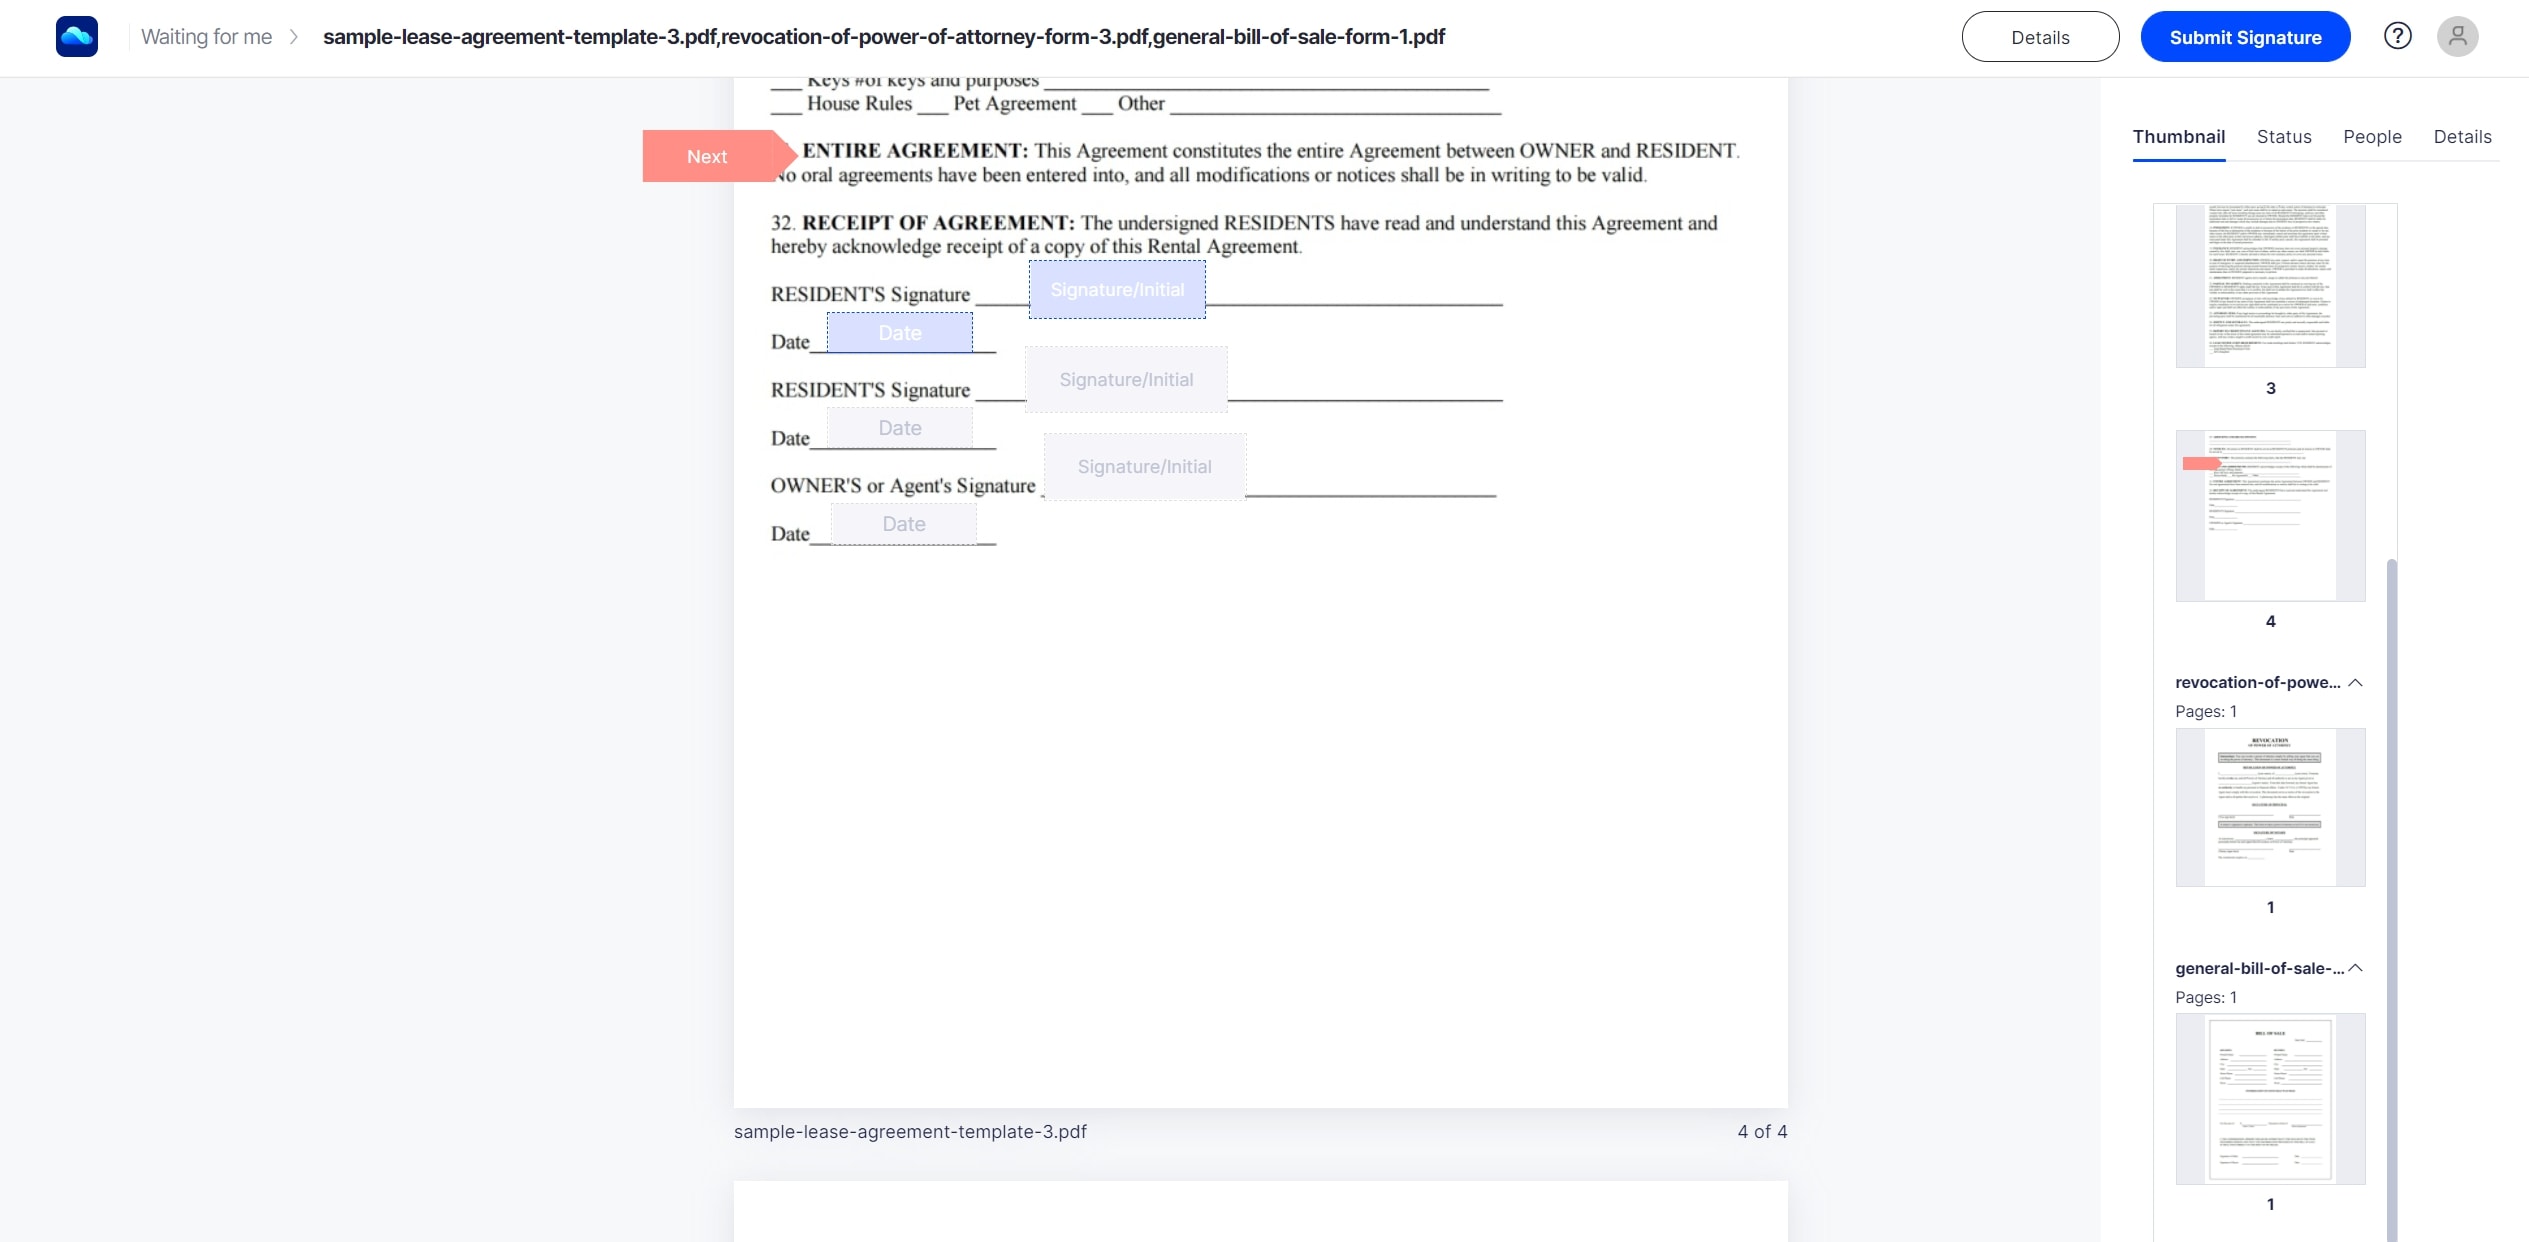
3 Once you agree to sign the document, you’ll find multiple fields the initiator requests. All you need to do is to click these fields and then fill in the related information.
4 Click the “Submit Signature” button on the top right corner after you confirm all the information you filled in. Then you can download and save the document to your local storage.
After all the recipients finish signing and submitting the document, they and you will receive an email notification to confirm that all the recipients have signed. You can click the "View the Document" button in your mailbox to view the signed PDF document in your browser online. You can also click the "Detail" button on the top to view more details, then click the "Download" button or the "Print" button as you need.
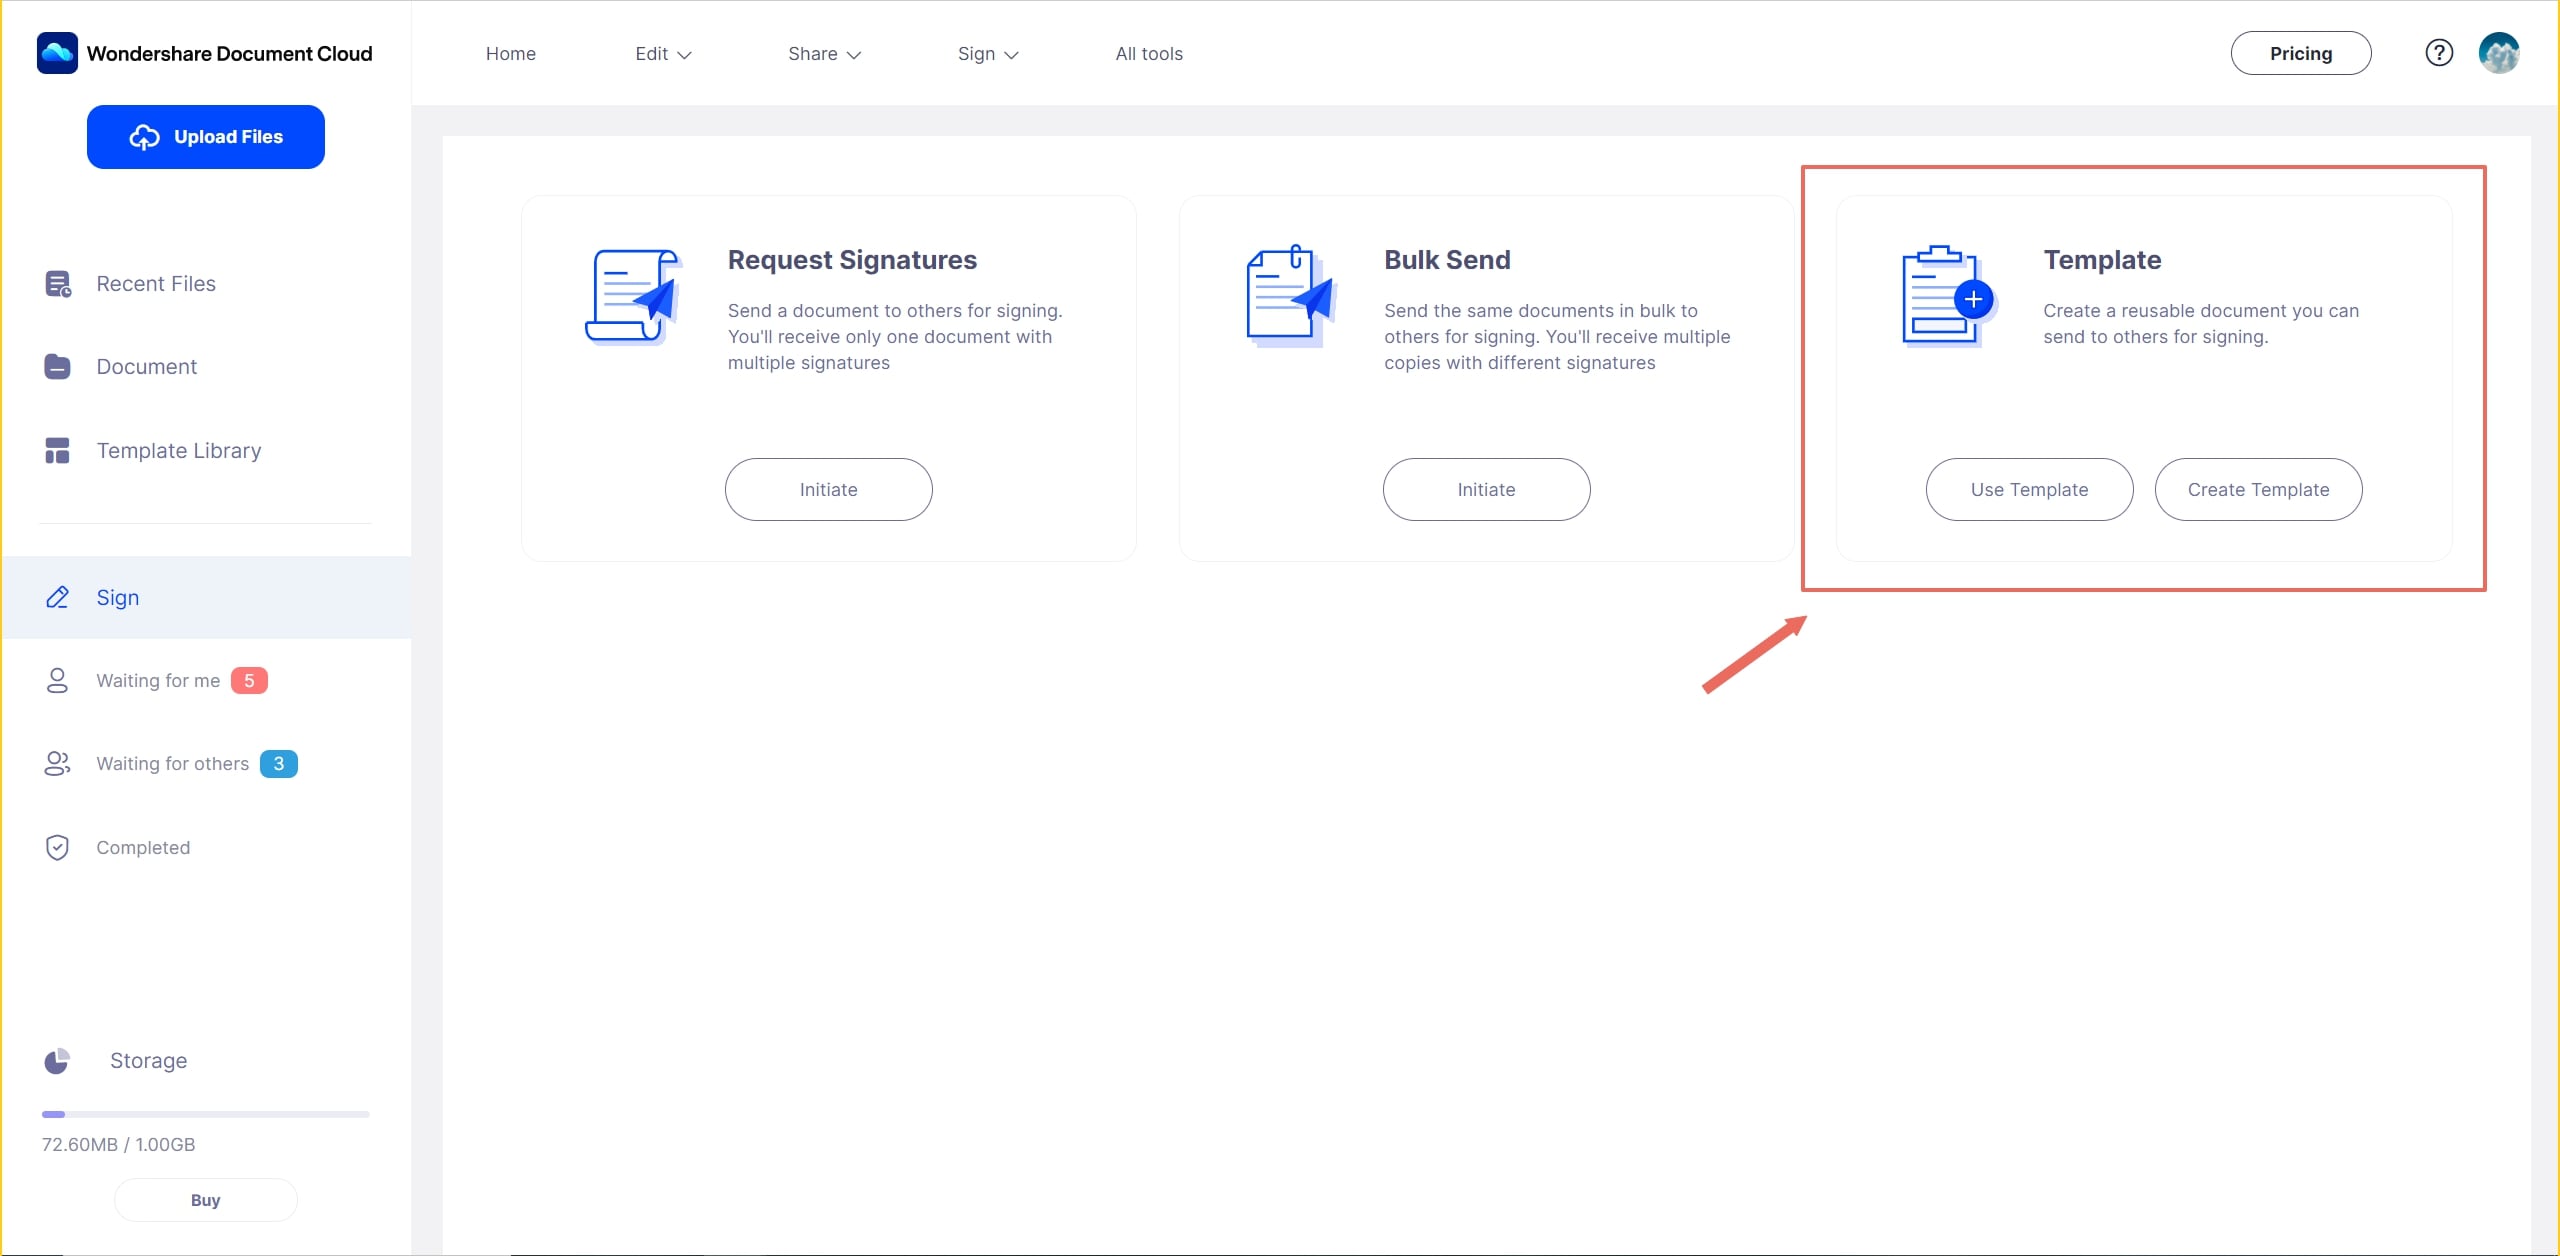
Create Templates
If you always need to send the same document for signature every time, you can create a reusable document as a template that can be used next time. Following this tutorial step by step, you’ll learn how to achieve it.
1 Log in to Wondershare PDFelement Cloud, then navigate to the “Sign” tab. You will find the “Template” feature.
2 Click the “Create Template” button to customize your own template, or reuse a current template if you have created before.
3 Select a document from your local storage or PDFelement Cloud. Then you can set a access authentication for the signing request and recipients will have to input the correct password to finish the signing process.
4 Click to add the number of signers for this template, and you can also set a signing order with the checkbox. If you need to sign the document, click the “I need to sign the document” checkbox and choose "Sign first" or "Sign last".
5 Drag and drop to add the signature/information fields for every signer one by one. Click the “Save” button when you get it done and the template will be created successfully.
Personalize Brand Logo
We provide a friendly service for you to customize your logo, company tagline and email signature, which will help recipients to understand the content quickly and directly.
All you need to do is to find the “Brands” button under the avatar drop-down menu, then upload your logo, personalize the company tagline and email signature as you need!
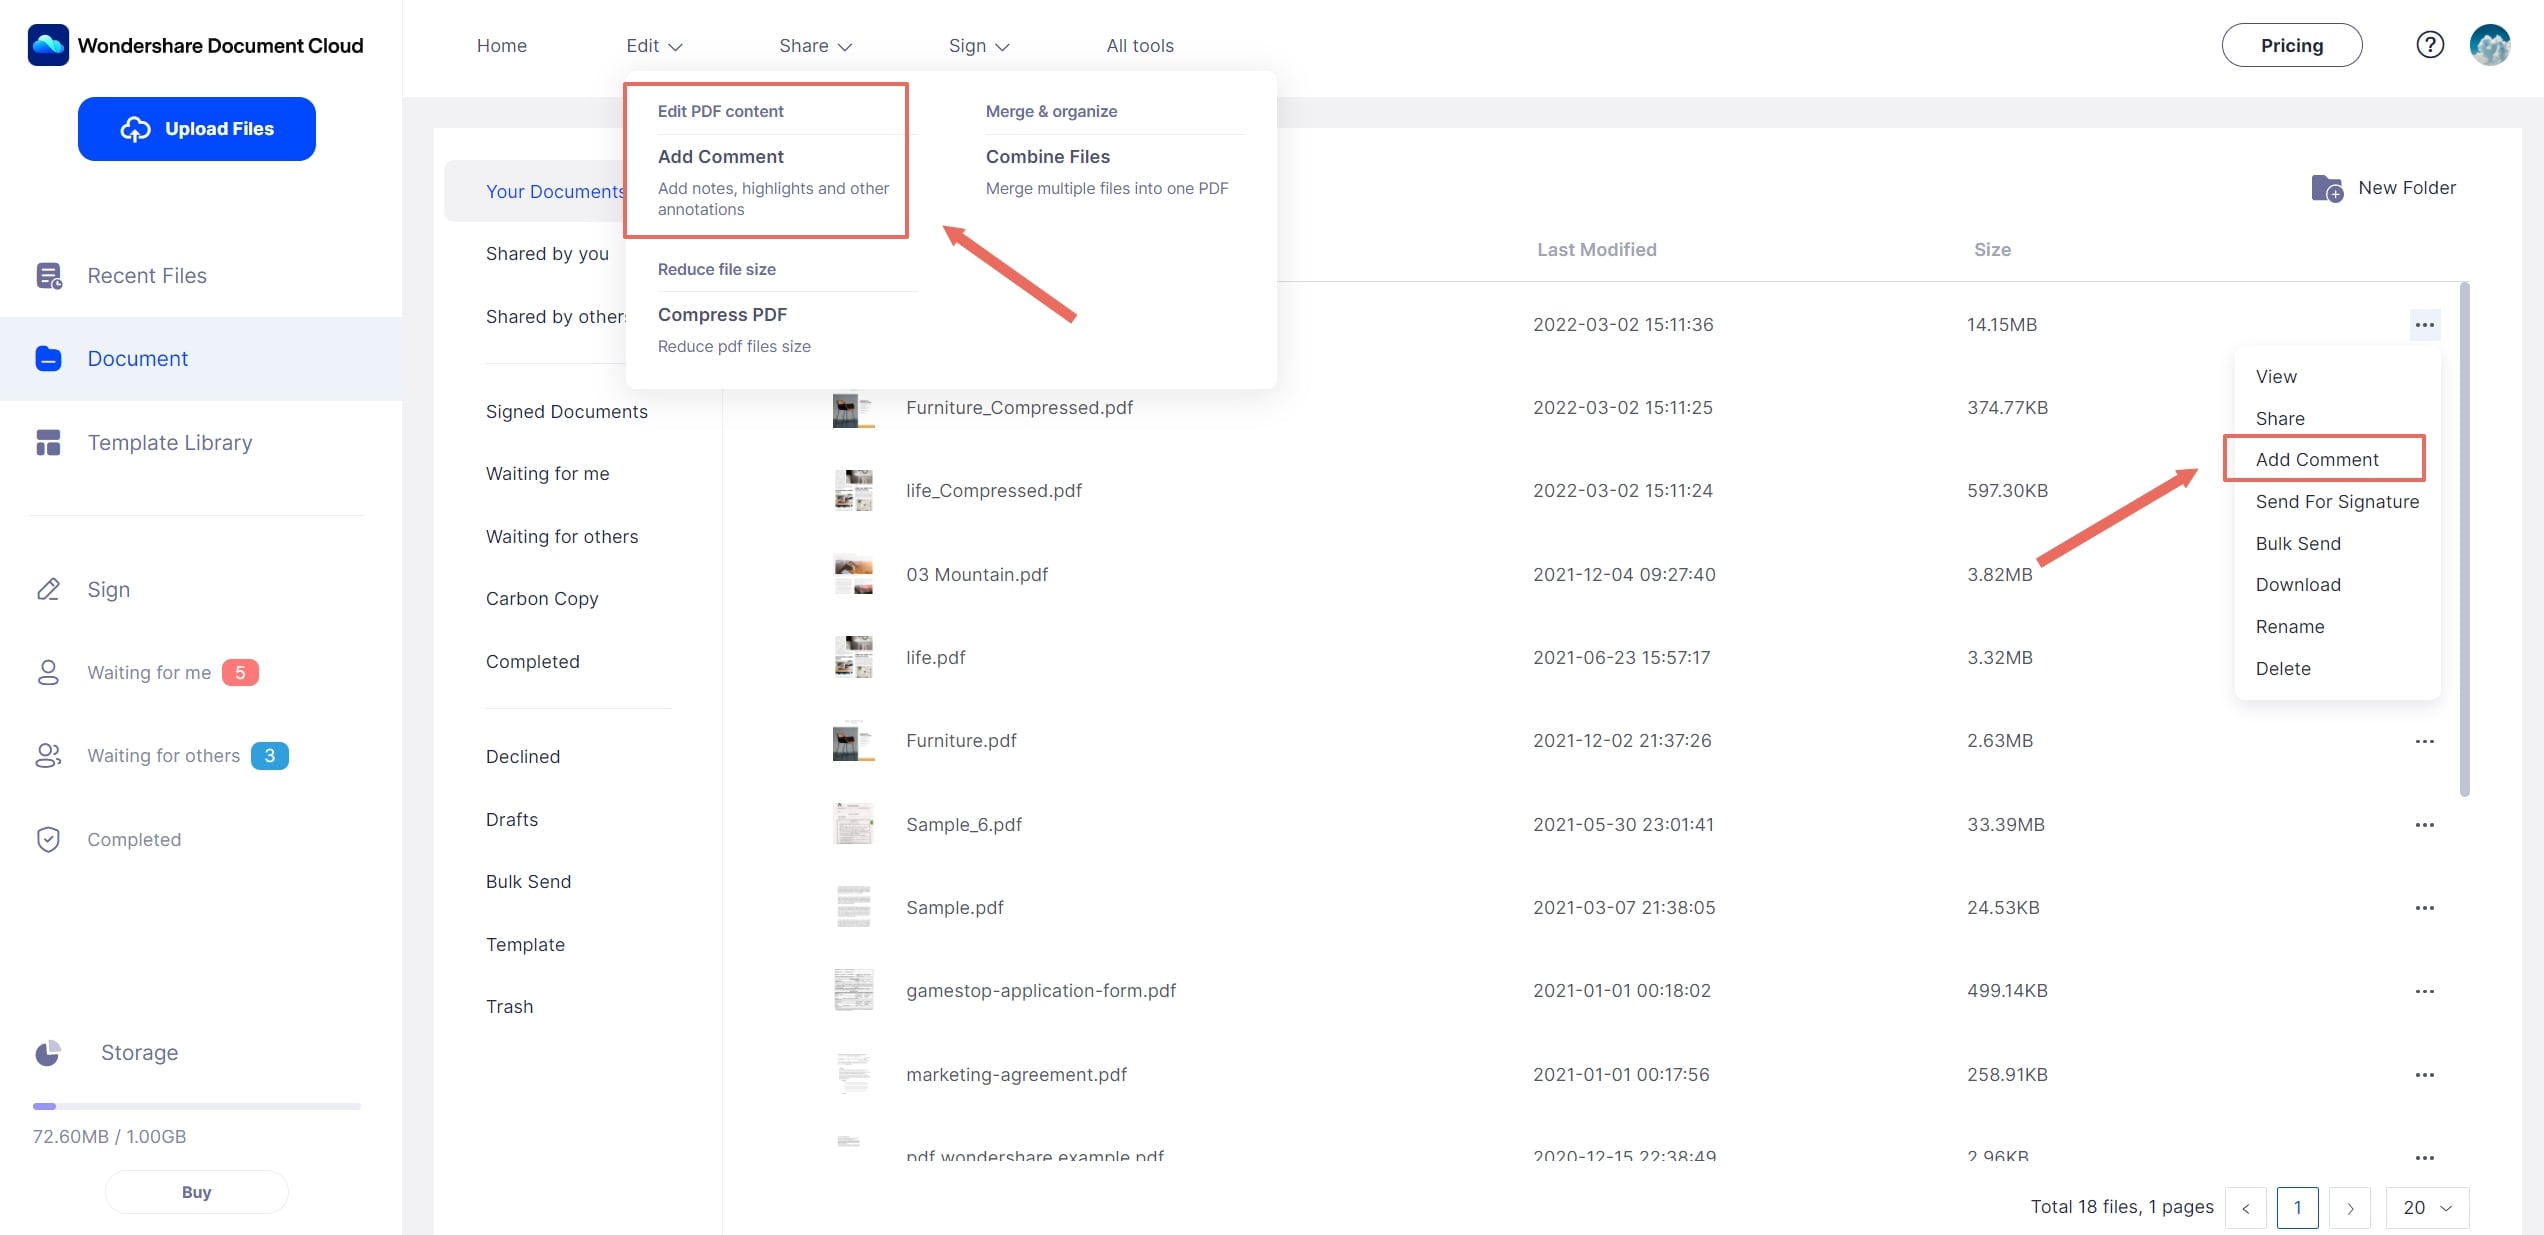
Combine PDF Files
To bring you a better-simplified workflow on the cloud, Wondershare PDFelement Cloud add some useful online tools for PDF documents to the top menu so far.
In your daily work, if you need to combine multiple PDF documents (agreements, papers, etc.) and then send the combined document for signatures or collecting feedback, you can follow the steps below directly:
1 Move to the top menu, then click the "Combine Files" button under the Edit tab.
2 On the Editing tools page, click the "Combine Files" area or drag and drop to import your PDF documents from PDFelement Cloud or local storage.
3 Rename the new file and click the "Combine" button to merge the documents imported into one. The new combined document will be saved to PDFelement Cloud if you select the "After combine save to Wondershare PDFelement Cloud" checkbox.
4 With the new tab, you can preview and download the final version directly. If you need further modifications, Wondershare PDFelement Cloud provides complete and powerful online tools in the right bar menu.
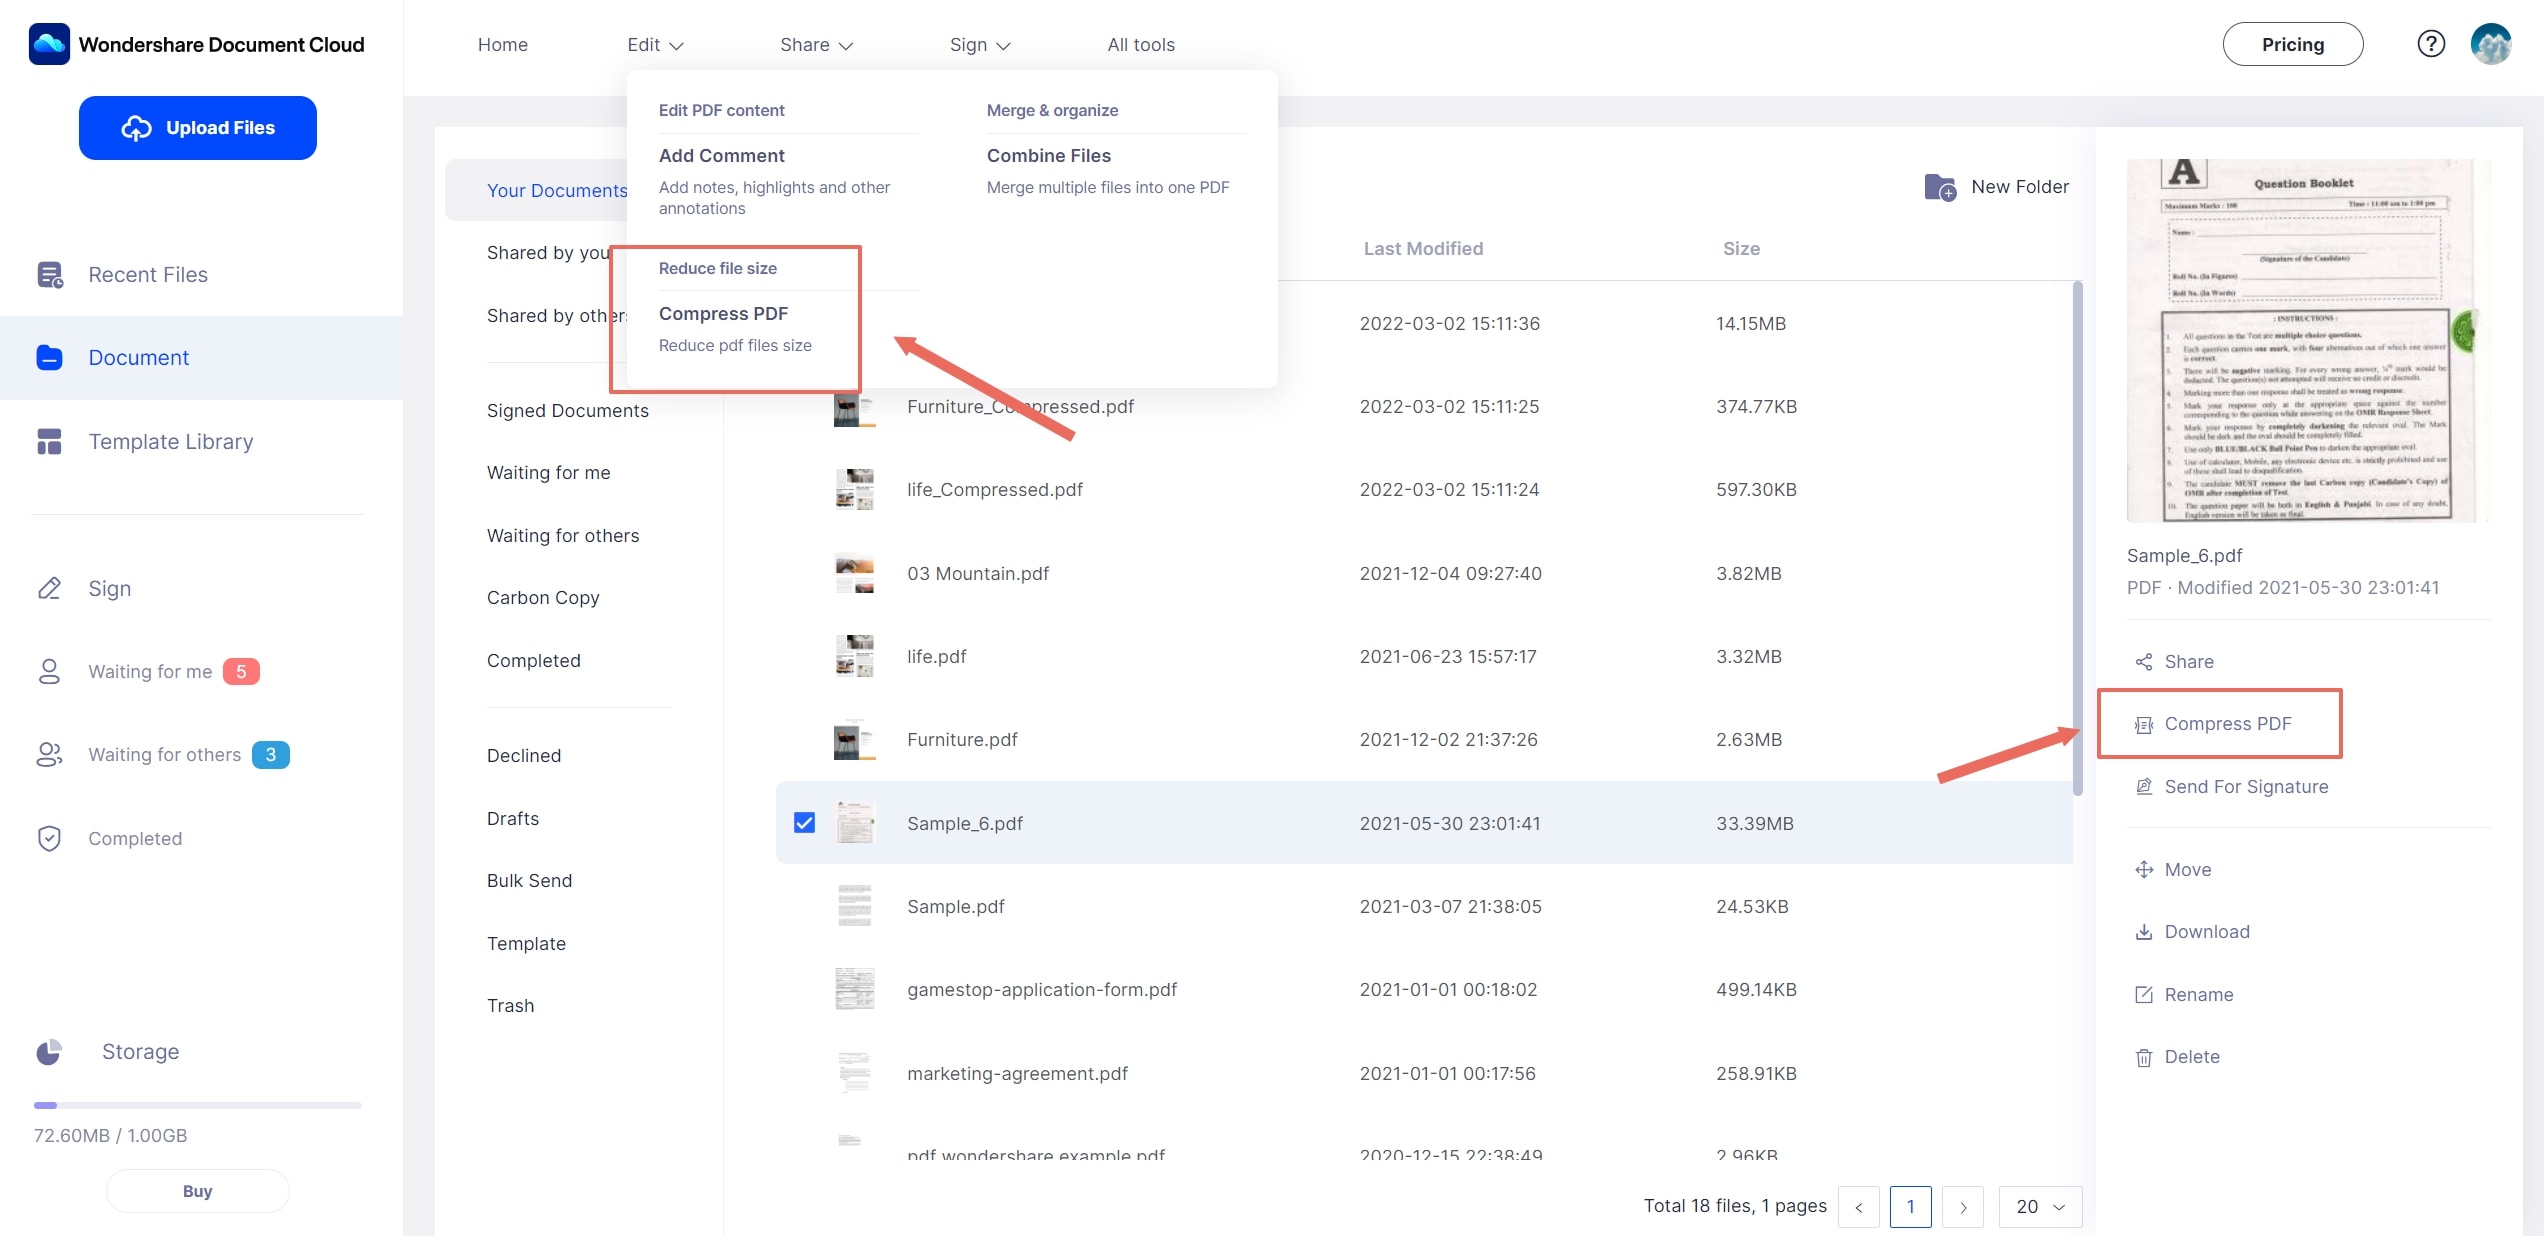
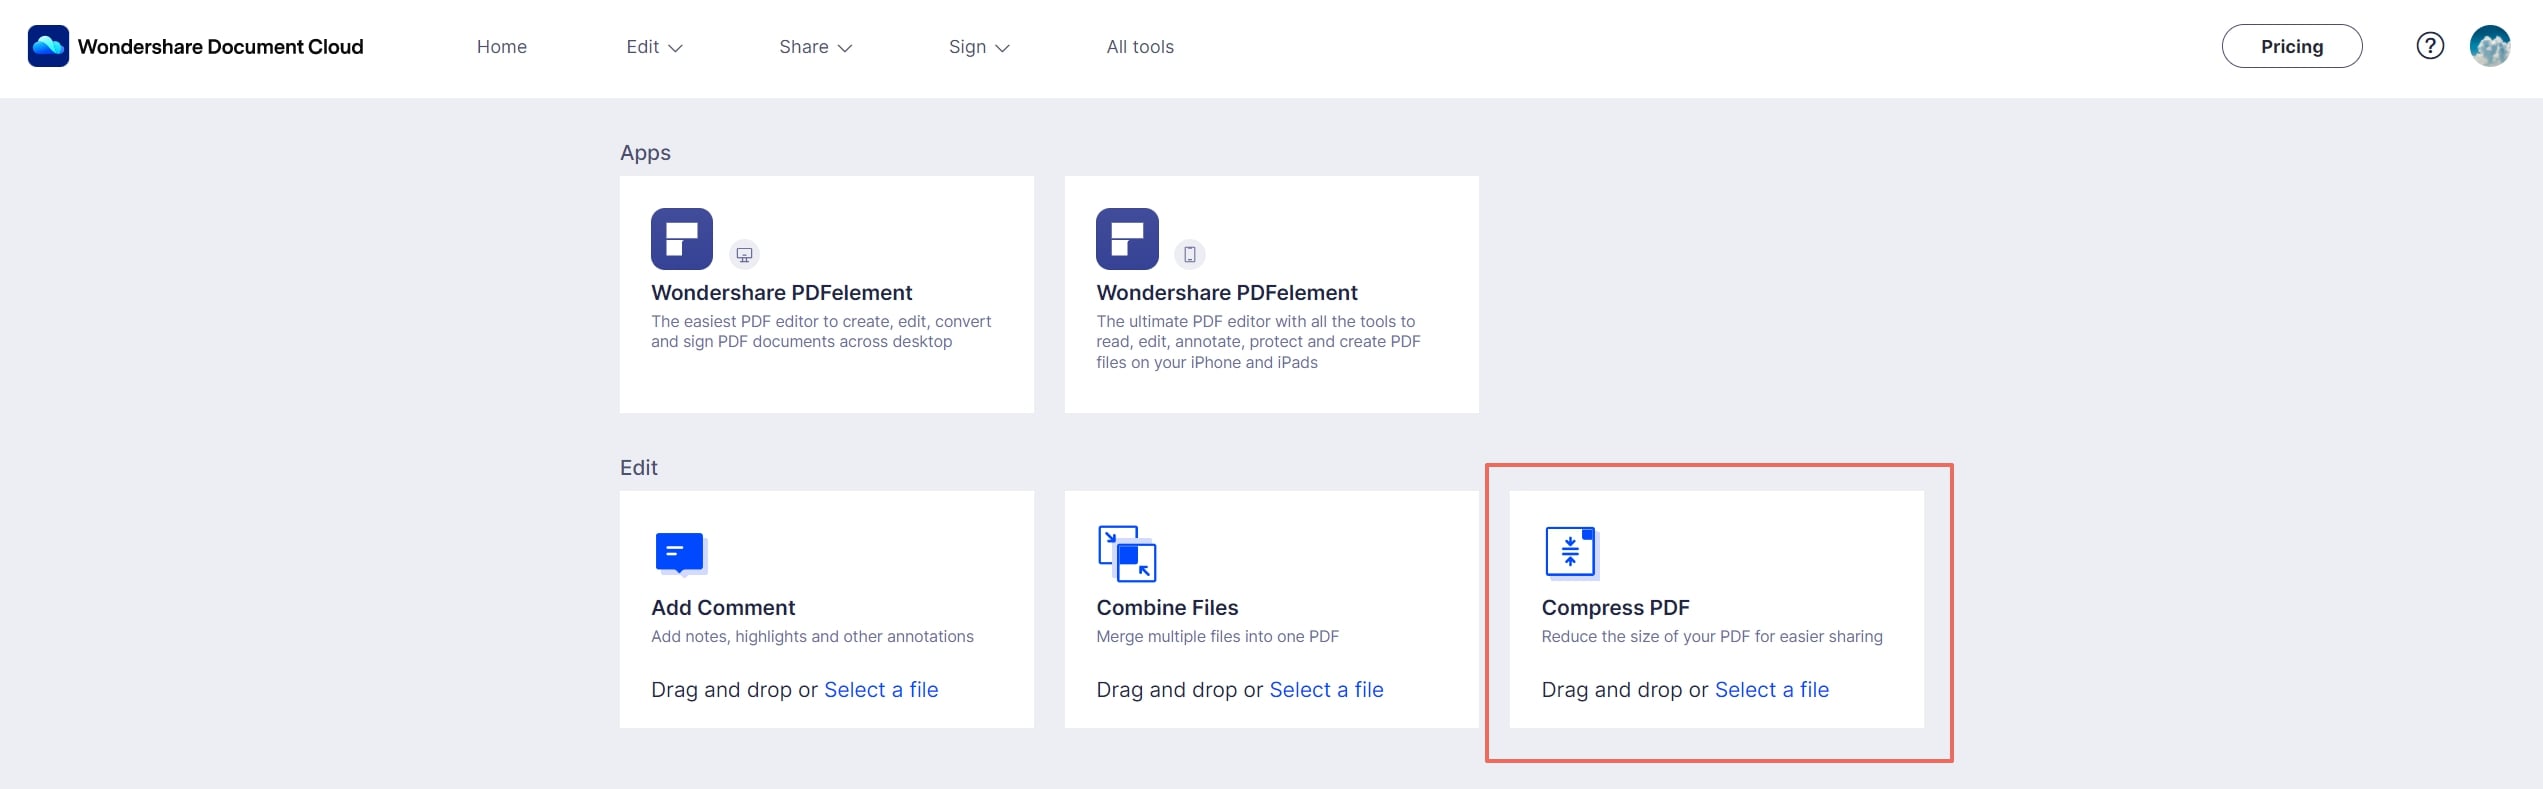
Compress PDF Files
Wondershare PDFelement Cloud can be an online PDF compressor as well when you need the same quality but smaller size documents.
1 Navigate to the top menu, then select the "Compress PDF" tool under the Edit drop-down menu.
2 Click the "Compress PDF" area or drag and drop to upload the PDF documents from PDFelement Cloud or local storage.
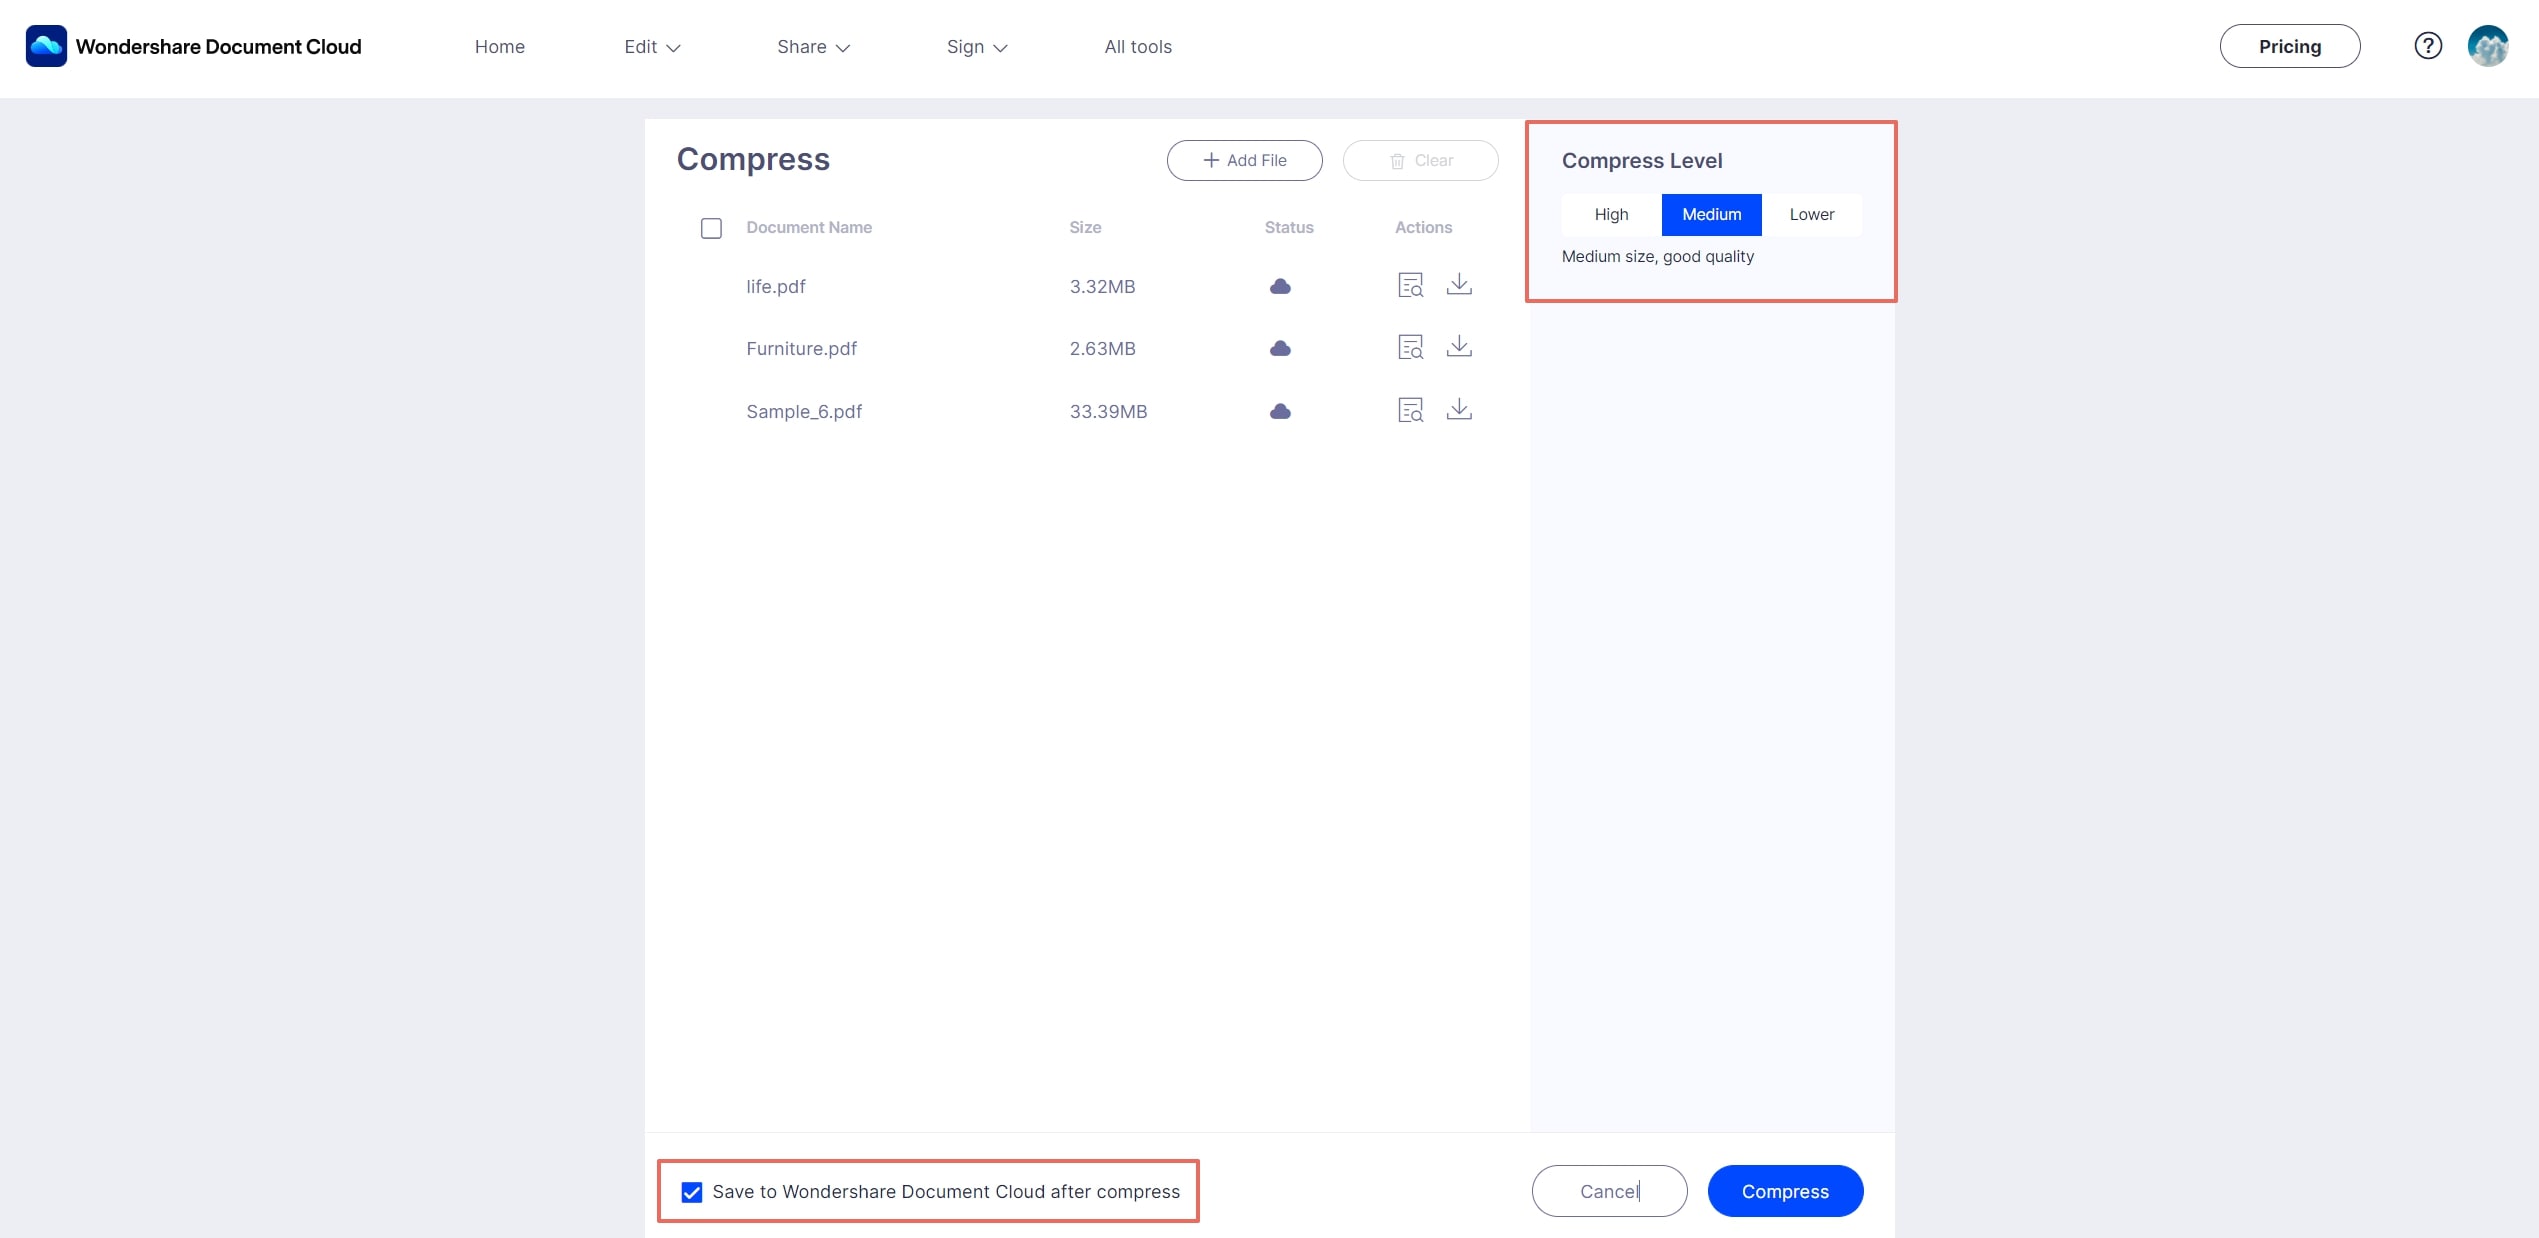
3 Select the compression degree options as you need (We recommend the Medium level), then click the "Compress" button to start. The compressed documents will be saved to PDFelement Cloud if you confirm the "After compress save to Wondershare PDFelement Cloud" checkbox.
4 When the compression process is done, you can click the Preview or Download icons under the Actions tab.
Purchase Team License
If you would like to create a team account to manage your team/group easily, we provide Team & Business service for our customers. To purchase a team license, there are following steps:
1 Navigate to “Pricing” page on the top banner, then move to the Team & Business tab.
2 Choose the number of user quantity to purchase. You can request pricing if you need a 20+ user license.
Add/Remove/Authorize Team Members
After purchasing the team license, the team owner is allowed to add team members to the team, delete team members or authorize team members as a normal user or administrator. Before we start the tutorial guide, please click the “Team” button under the avatar drop-down menu to jump to the team page. Then select the team ready to manage.
Now let’s learn how to achieve the goal one by one:
Add team members: click the “ADD USER” button at first, then fill in the member’s email address and select the roles. If the email has been created a Wondershare ID before, he or she can sign in directly. Otherwise, we will create a new Wondershare ID using this email, then the member can set a password in the email notification.
Remove team members: select the team members you would like to remove, then click the “Remove” or “Remove Select” button and confirm your choice.
Authorize team members: select the team members and click the “Edit” button to revise the roles into “User” or “Admin”.
Team Analytics and Reporting
If you would like to check team analytics and reporting data, you only need to click the “Reports” button under the avatar drop-down menu. Then you can view User Activity Report or Group Activity Report here.
Team Template Sharing
Team owner can
create a template to share with all team users to do business:
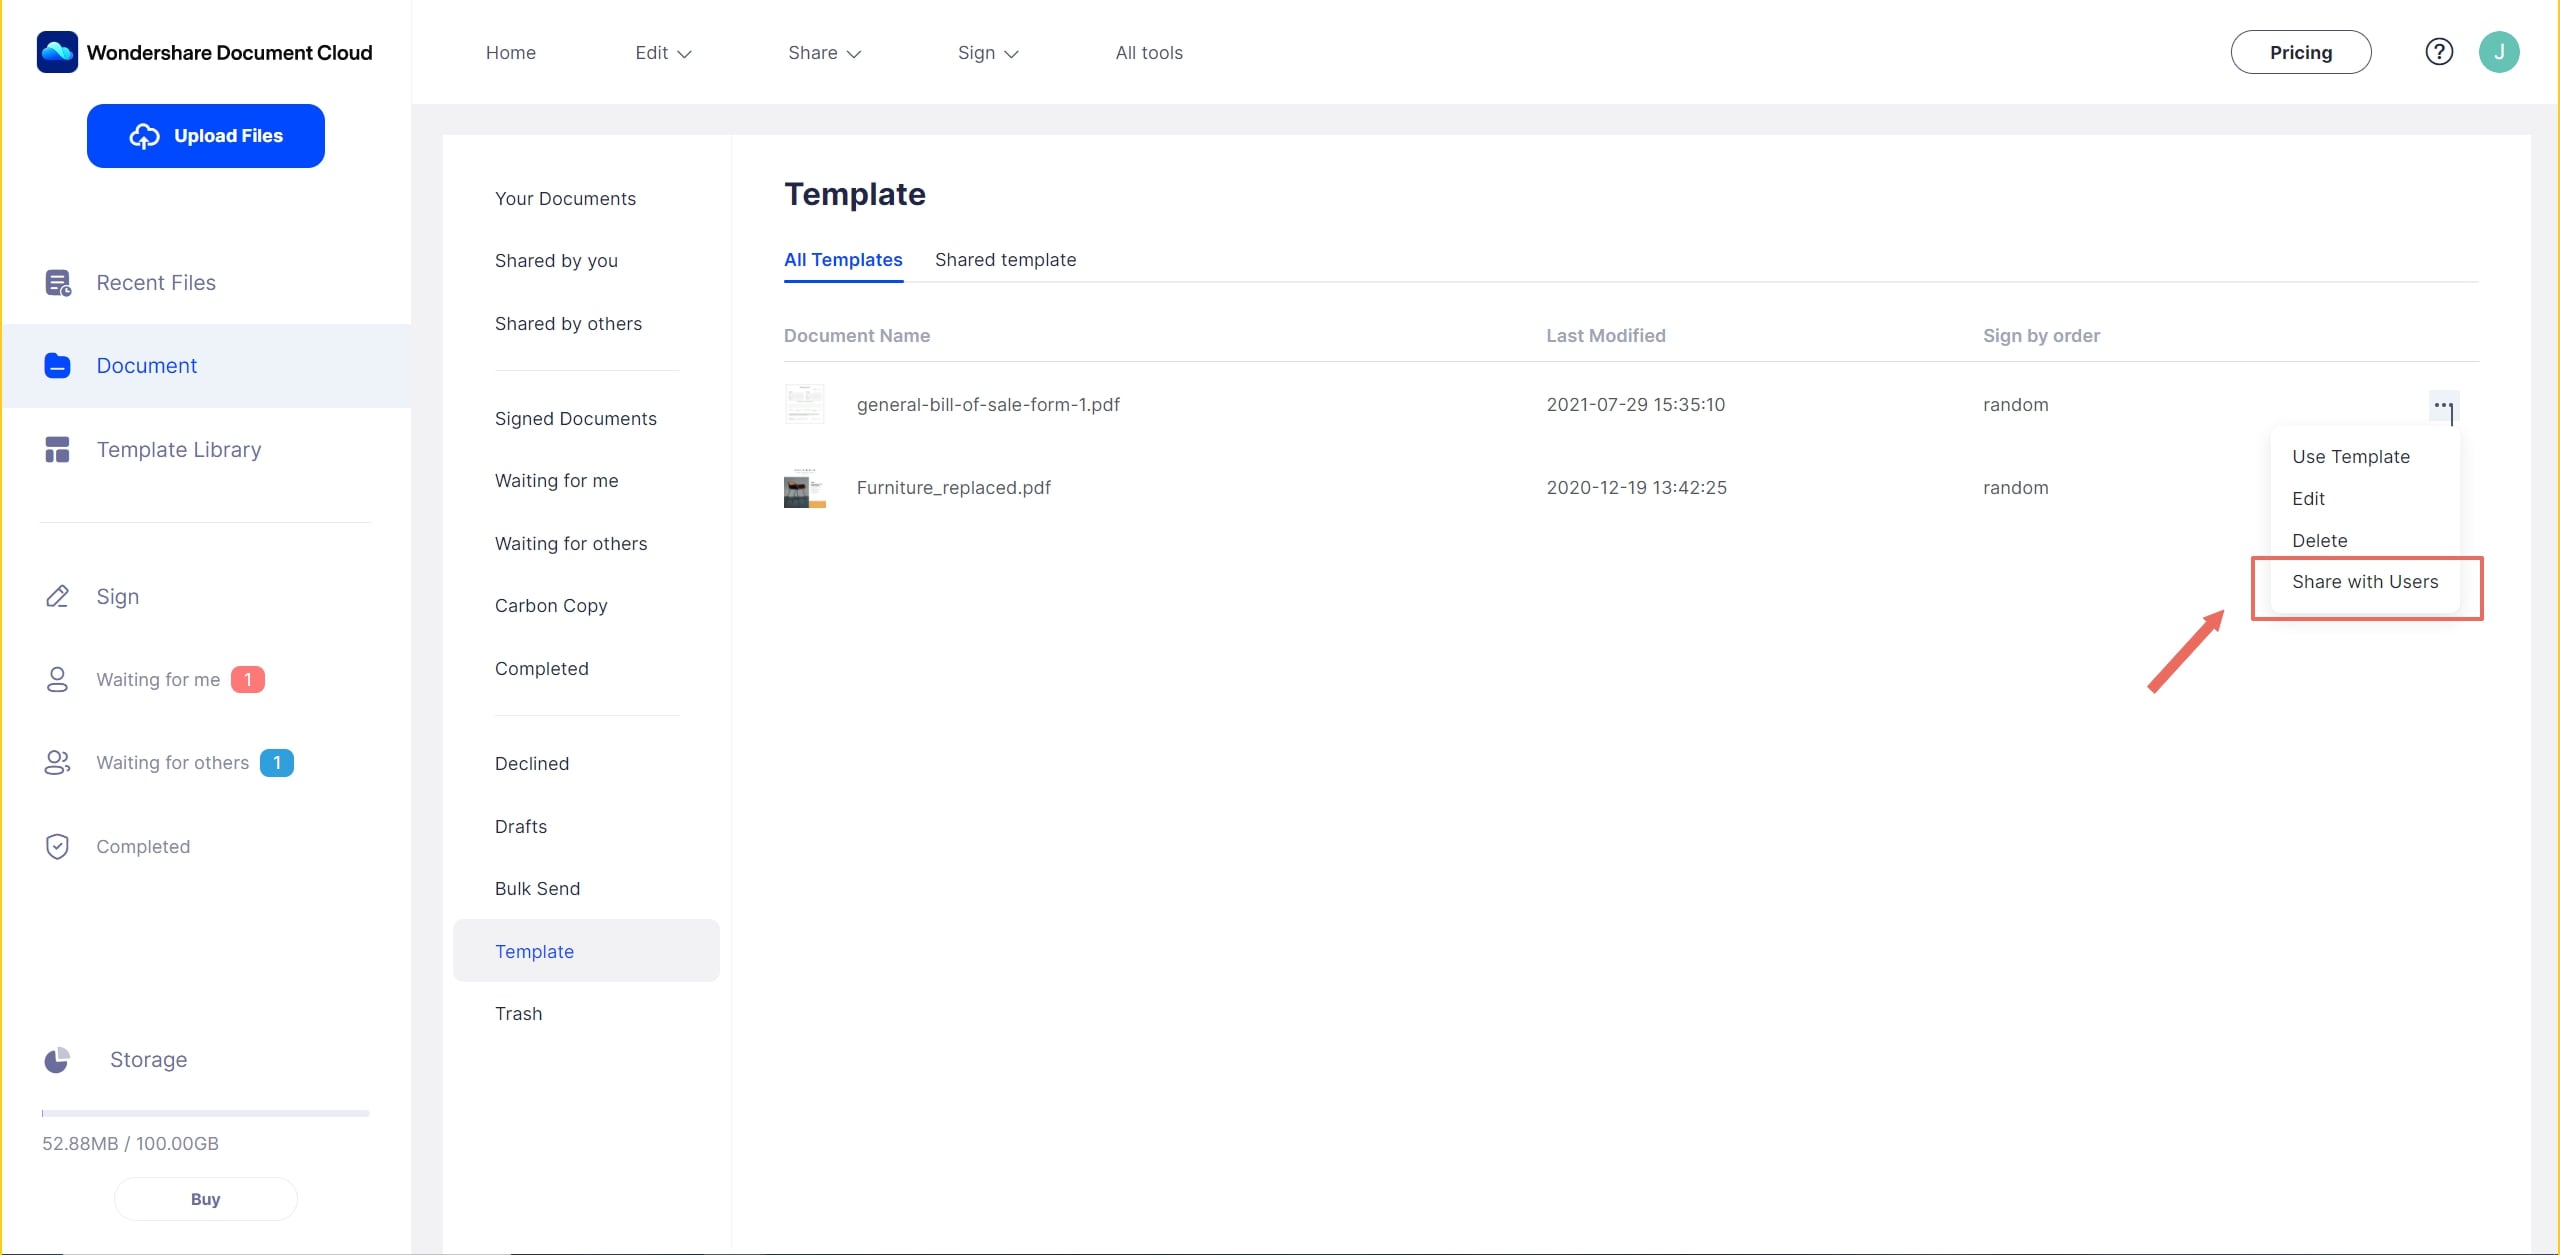
1 Move to the “Document” menu and select the “Template” tab.
2 Find the template you want to share and click “Share with Users” under the drop-down menu.
3 Select the users as you need and click the “arrow” button to add users. Then click the “Save” button to complete.
Free Download and Install
We dedicate to developing a creative PDFelement Cloud to supercharge your document productivity. Thus we pre-embed PDFelement Cloud in
Wondershare PDFelement, a powerful and robust all-in-one PDF editor & converter, to bring you a worry-free workflow.
You can
download PDFelement with Cloud for free. With PDFelement and PDFelement Cloud, you can easily edit, convert, merge PDFs on Windows and Mac, review and annotate PDFs on mobile devices, or turn manual document processes into efficient digital ones in your browser.
For Windows User
So far, we have embedded PDFelement Cloud in
PDFelement for Windows. Our developers will try as fast as they can to achieve the pre-built integration in other operating systems.
For PDFelement for desktop, if you want to directly access PDFelement Cloud, we provide 3 easy methods to connect PDFelement Cloud with PDFelement desktop:
Method 1: Open documents from PDFelement Cloud
Method 2: Upload documents to PDFelement Cloud
Method 3: Send documents for electronic signature using PDFelement Cloud
For Mac User
To bring Mac users a convenient and efficient experience, our developers have embedded PDFelement Cloud in
PDFelement for Mac. Like Windows Version, PDFelement for Mac supports accessing PDFelement Cloud directly in the application in multiple methods listed:
Method 1: Download/Open documents from PDFelement Cloud
Navigate to the top menu and click "Open Cloud" under the "File" tab. With the pop-up window, you will see all the documents saved in your PDFelement Cloud. You can click the documents to download and PDFelement will automatically open it when the process is done.
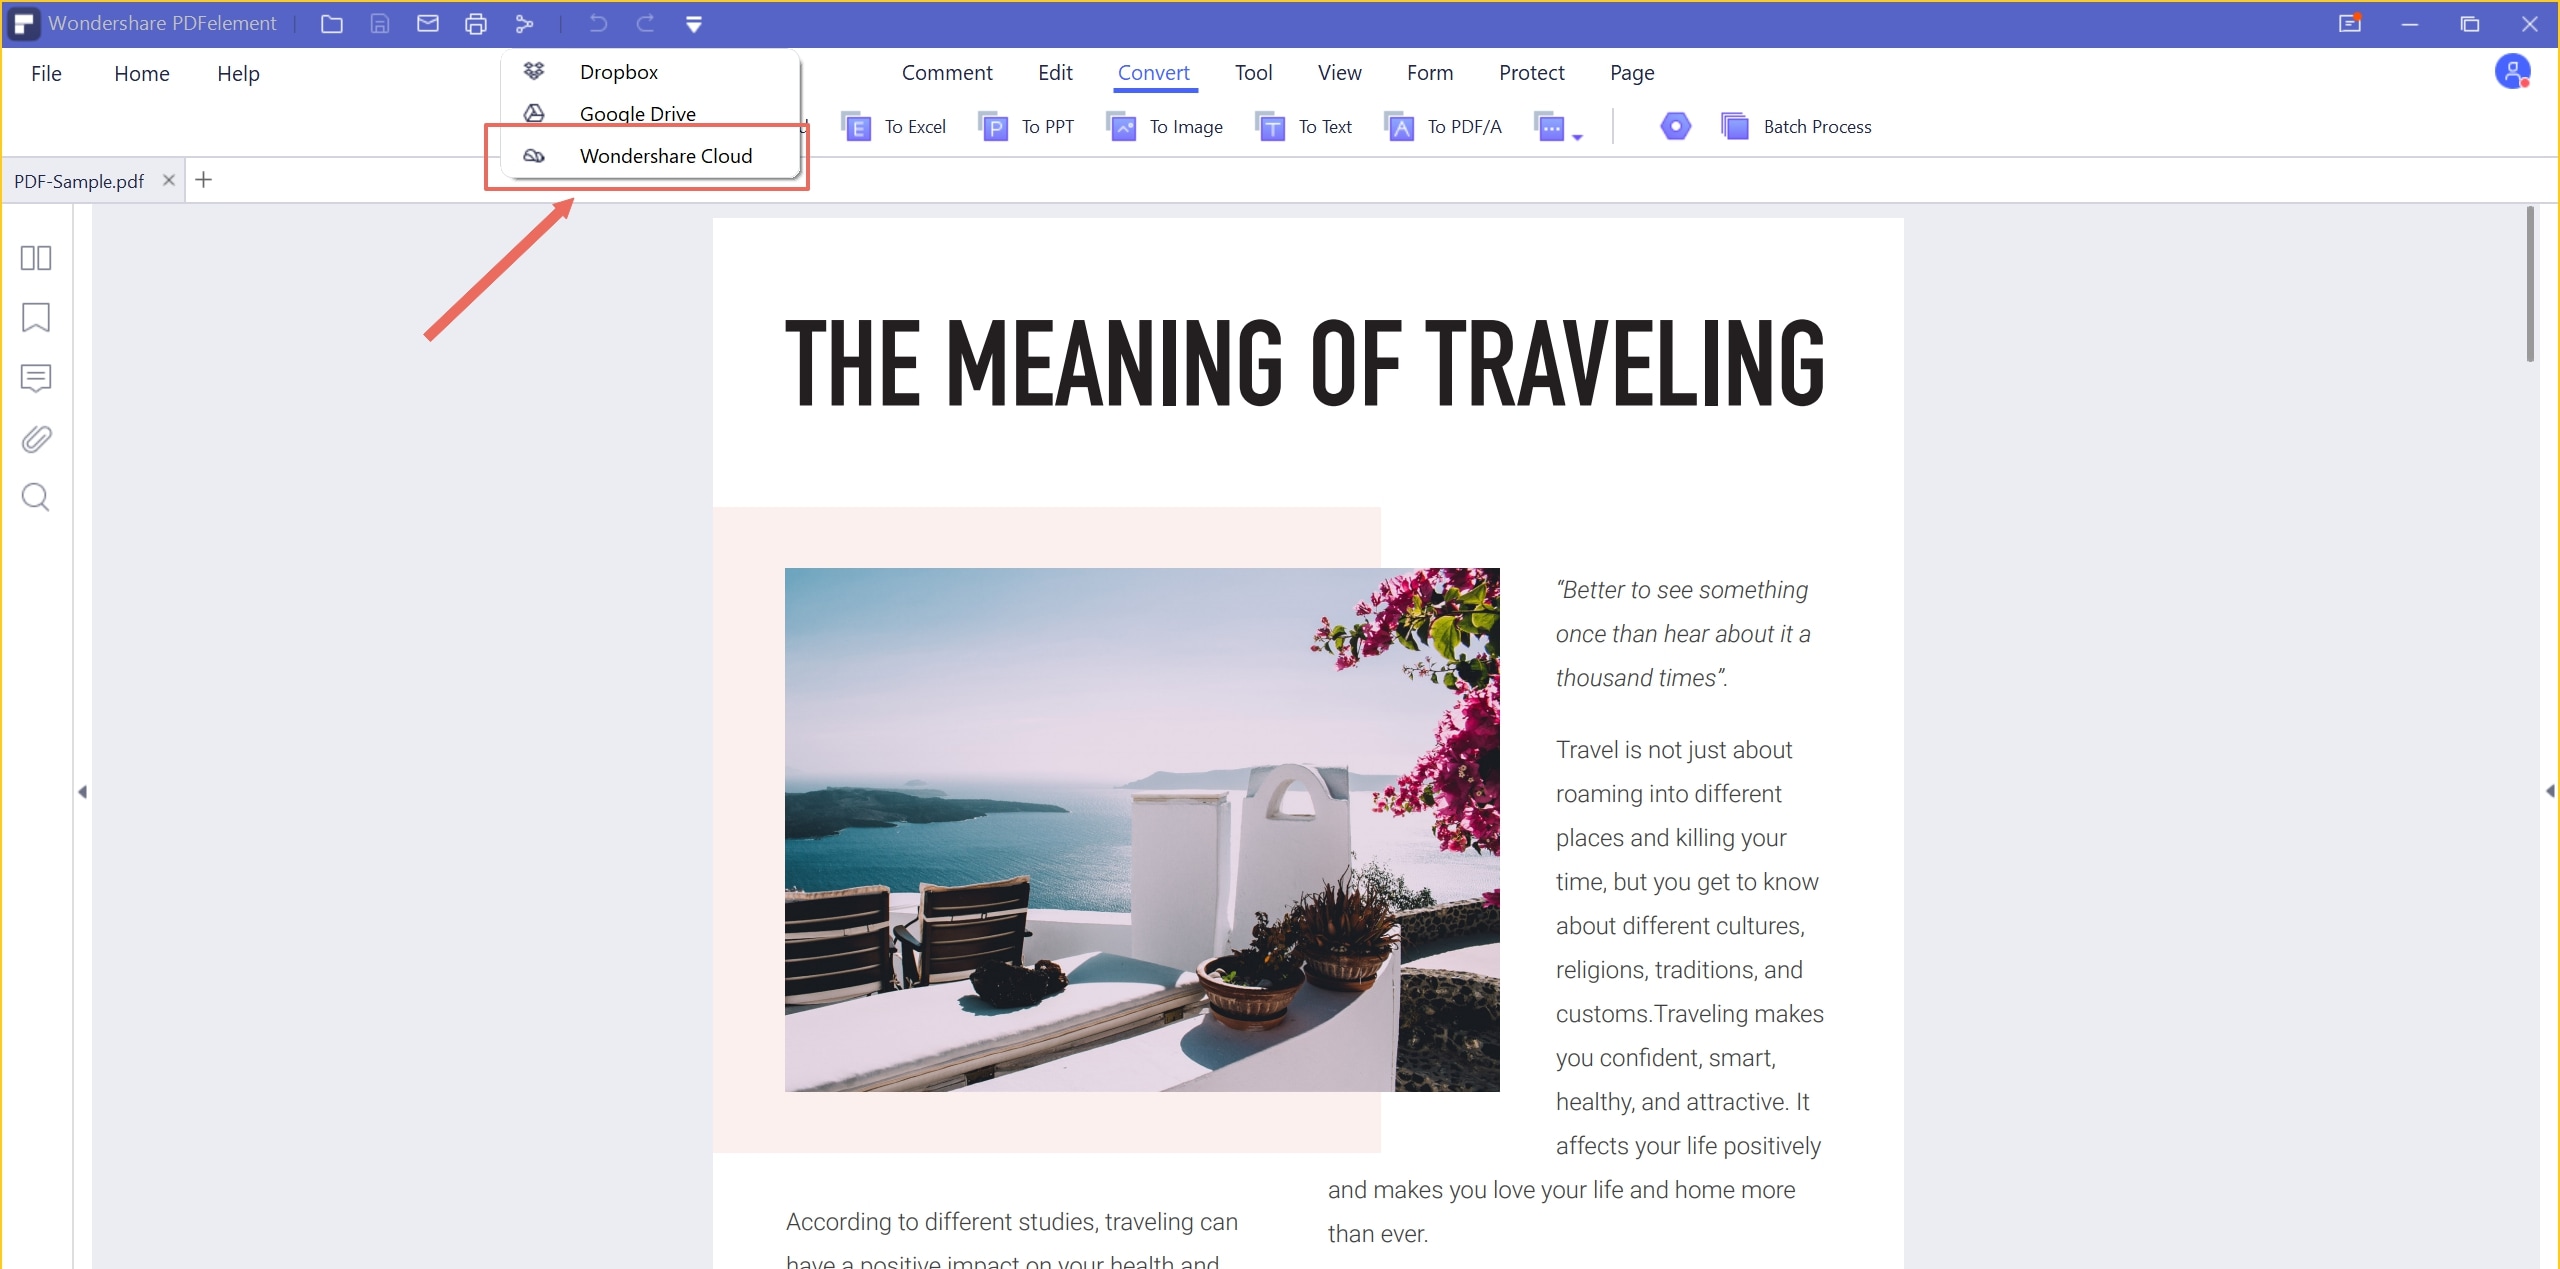
Method 2: Upload/Save documents to PDFelement Cloud
Move to the top menu, then click "File" → "Share" → "Wondershare Cloud". You will be able to upload the current PDF document to PDFelement Cloud easily and fast. When the process is done, you can click the "Cloud Details" to access PDFelement Cloud without login.

PDFelement Cloud for All Platforms
Your PDF workflow in the cloud - Sign, share, and collaborate.