
Table of Contents
Adding a checkbox in a Word document is simple once you know which kind of checkbox you need. A form that people will complete on their computer needs a clickable checkbox. A checklist that will be printed needs a checkbox symbol or checkbox bullet. A finished document may only need a checked box mark to show that something is complete.
Those options look similar on the page, but they behave very differently. This guide walks through the practical ways to add checkbox in Word, including clickable form boxes, printable checklist boxes, checked symbols, and a PDF workflow for forms that need to be shared or signed.


 G2 Rating: 4.5/5 |
 100% Secure
Before You Add a Checkbox in Word, Choose the Right Type
The most common mistake is using the wrong checkbox for the job. Word gives you several ways to create boxes, and each one is useful in a different situation.
Clickable checkbox for digital forms
Use a clickable checkbox if the document will be filled out in Microsoft Word. This is the best choice for application forms, policy acknowledgments, internal request forms, surveys, and templates where someone needs to click a box on screen.
Clickable checkboxes are added through Word’s Developer tab. They are called Check Box Content Controls. Once inserted, the user can click the box to mark or unmark it.
Microsoft’s own documentation for form controls is a useful reference if you want to understand the broader form-building tools in Word: Create forms that users complete or print in Word.
Printable checkbox for paper checklists
Use a printable checkbox if the document will be printed and completed by hand. In this case, the checkbox does not need to be interactive. It only needs to appear next to each item.
The fastest method is to create a custom bullet list using a square symbol from Wingdings, Wingdings 2, or another symbol font. This is ideal for packing lists, inspection sheets, classroom handouts, and simple task lists.
Checked box symbol for completed items
Sometimes you do not need a live form control at all. You may just want to show a checked box in a finished document. For example, a report might show selected options, completed requirements, or approved items.
For that, you can insert a checked box symbol such as ☑, replace an empty box with a checked one, or customize the checked state of a form control.
How To Add a Clickable Checkbox in a Word Document
If your goal is to learn how to add a checkbox in Word that people can click, use the Developer tab method. This creates an interactive checkbox in a Word document, not just a visual square.
The exact wording may vary slightly between Word versions, but the workflow is largely the same in recent desktop versions of Microsoft Word for Windows. Word for Mac also supports Developer tools, though the menu layout is slightly different.
Step 1: Enable the Developer tab
The Developer tab is hidden by default in many Word installations. You only need to enable it once.
In Word for Windows, open your document and select File > Options. In the Word Options window, choose Customize Ribbon. On the right side, under Main Tabs, check Developer, then click OK.
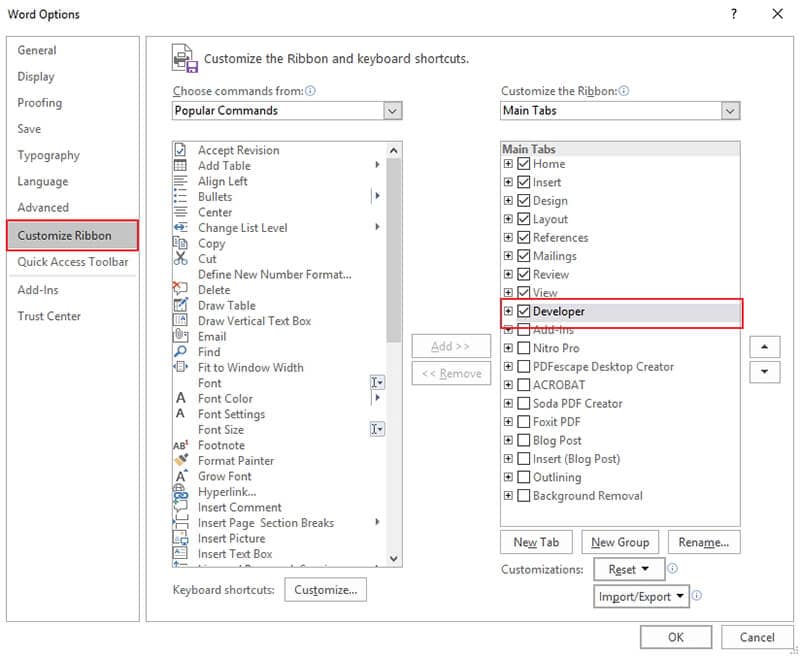
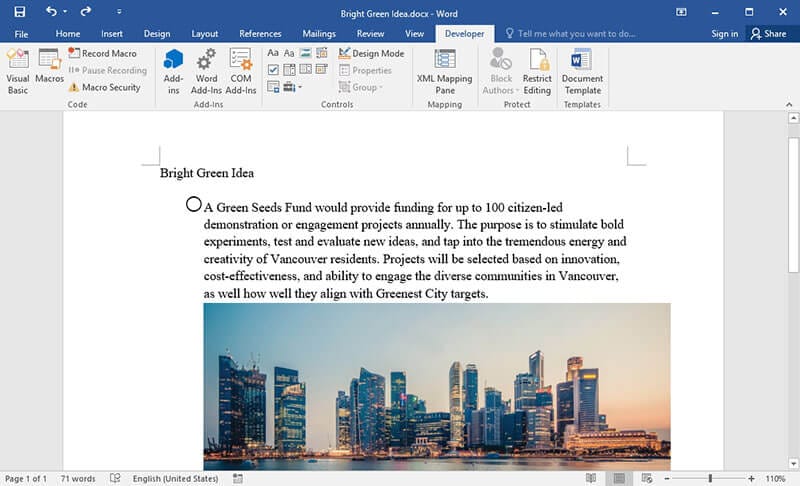
After that, you should see Developer on the ribbon alongside tabs such as Home, Insert, Design, Layout, and Review.
If you are using Word for Mac, go to Word > Preferences > Ribbon & Toolbar, then enable Developer in the list of main tabs.
Step 2: Place your cursor where the checkbox should appear
Click in the document where you want to insert checkbox in Word. This can be at the start of a line, inside a table cell, beside a label, or in a form section.
For example, you might place the cursor before text like:
I agree to the terms and conditions.
Or inside a table row such as:
Subscribe to email updates: [checkbox]
If you are building a form, tables often make alignment easier. A two-column table with labels on the left and checkboxes on the right keeps the layout stable, especially when the form includes several options.
Step 3: Insert the checkbox content control
Go to the Developer tab. In the Controls group, click the Check Box Content Control icon. It looks like a small square checkbox.
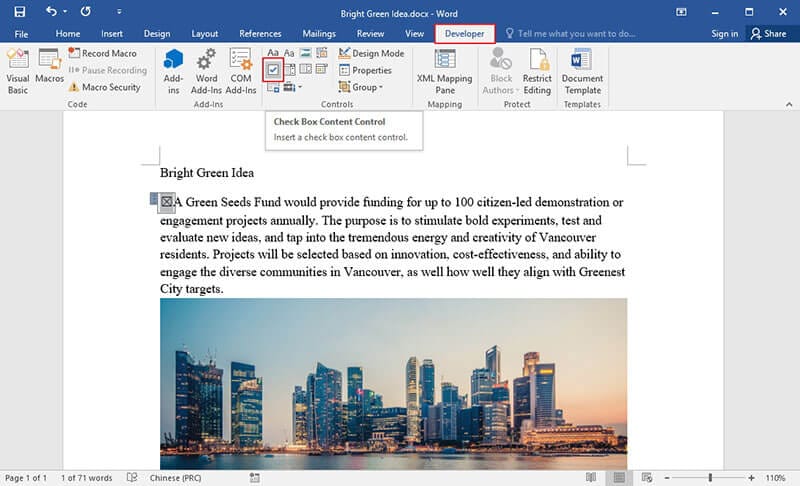
Word inserts a clickable checkbox at the cursor position. Click the box once to check it. Click it again to clear it.
This is the cleanest method if you are searching for how to insert a checkbox in Word for a digital form. Unlike a symbol, the checkbox has an actual checked and unchecked state.
Step 4: Add text beside the checkbox
After inserting the checkbox, type the option text beside it. For example:
☐ I confirm that the information above is accurate.
With a real content control, the box itself is clickable, while the surrounding text remains normal Word text. If you want users to select only one option from several choices, consider using radio buttons or a drop-down field instead. Checkboxes are best when multiple options can be selected.
Step 5: Copy and paste checkboxes for repeated options
Once you add a checkbox in Word, you can copy and paste it just like regular content. This is faster than returning to the Developer tab for every item.
For example, create one checkbox and label, then copy the whole line to build a list:
- ☐ New employee orientation completed
- ☐ IT account created
- ☐ Security badge issued
- ☐ Payroll form submitted
In the actual Word document, those boxes can be live controls rather than plain symbols. If alignment matters, use a table instead of spacing with tabs or repeated spaces. Tabs and spaces often shift when fonts, margins, or devices change.
Step 6: Restrict editing if you are creating a form
For a form that other people will complete, you may want to prevent accidental edits to the labels, instructions, or layout.
Go to Developer > Restrict Editing. In the panel that appears, you can allow only form filling and then start enforcement. Word may ask you to set a password. Use this carefully: if you forget the password, editing the protected sections later can become inconvenient.
This step is optional, but it is helpful for HR forms, compliance forms, and reusable templates. It lets users tick boxes and fill in fields without disturbing the form structure.
How To Insert Checkbox Symbols for Printable Word Documents
If the document will be printed, you do not need interactive form controls. A checkbox symbol is easier, cleaner, and more compatible. This method is often what people mean when they search for how to add checkboxes in Word for a checklist.
Method 1: Create a checkbox bullet list
A checkbox bullet list is the best option for a printable list with several items. It keeps the checkboxes aligned automatically and saves time.
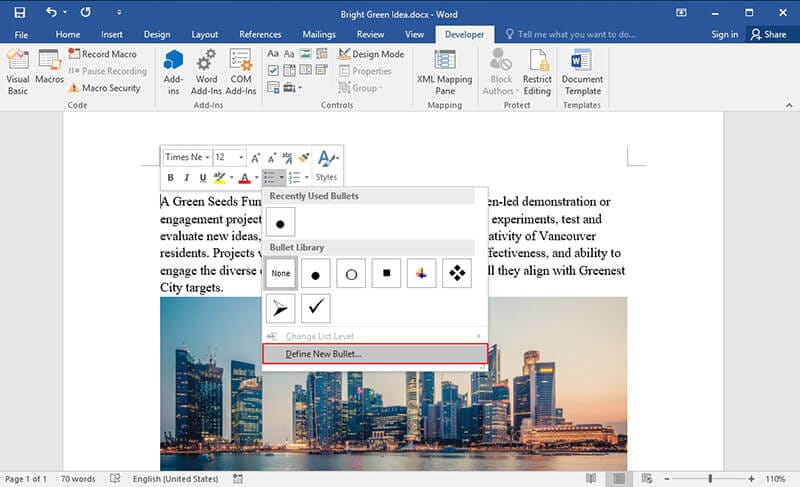
Start by selecting the lines you want to turn into a checklist. On the Home tab, click the small arrow beside the Bullets button. Choose Define New Bullet.
In the dialog box, select Symbol. Then choose a font such as Wingdings, Wingdings 2, or Segoe UI Symbol. Look for an empty square, checked square, or similar box symbol.
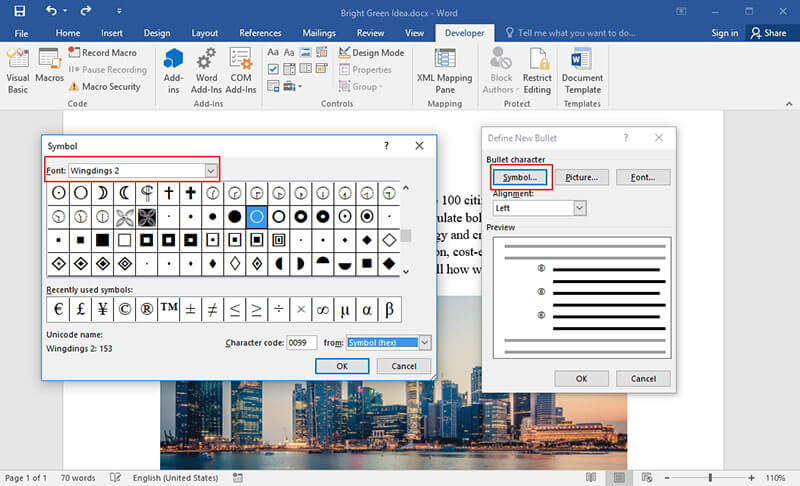
Click OK to confirm the symbol, then click OK again to apply it as a bullet style. Your selected lines now appear as a checkbox list.
This is the quickest answer to how to insert checkbox in Word when the final document is meant for paper. The boxes will not be clickable, but they print reliably.
Method 2: Insert one checkbox symbol
If you only need a single checkbox, insert it as a symbol.
Place your cursor where the box should appear. Go to Insert > Symbol > More Symbols. Change the font to Wingdings, Wingdings 2, or Segoe UI Symbol, then select a square checkbox symbol.
This method works well for one-off statements such as:
☐ Approved
☐ Rejected
☐ Requires revision
If you need to reuse the same symbol often, consider adding it to AutoCorrect or copying it into a template. That is faster than opening the Symbol window every time.
Method 3: Use a table for neat printed forms
For printed forms, layout is often as important as the checkbox itself. A table can keep labels and boxes aligned without visible borders.
For example, create a two-column table. Put the option text in the left column and the checkbox symbol in the right column. Then remove the borders or keep only the lines you want to print.
This method is especially useful for:
- Medical intake forms with many yes/no questions
- Inspection checklists
- Permission slips
- Sign-off sheets
- Training completion forms
A table also prevents long labels from pushing checkboxes out of position. That makes the document easier to scan after printing.
How To Tick a Box in Word
“How to tick a box in Word” can mean different things depending on the type of box in the document. The right method depends on whether the box is a clickable form control or just a symbol.
If it is a clickable checkbox
Move your pointer over the box and click it. A check mark should appear. Click again to remove the check mark.
If clicking does nothing, the box may not be a real checkbox control. It might be an inserted symbol, a shape, or part of an image. In that case, use one of the methods below.
If it is an empty checkbox symbol
If the box is just a symbol, you cannot “tick” it by clicking. You need to replace it with a checked symbol.
Select the empty box and insert a checked box symbol from Insert > Symbol > More Symbols. Common checked symbols include ☑ and ☒. You can also copy and paste a checked box symbol from another part of the document if one already exists.
This is common in forms that were made for printing but are later filled out digitally. The document looks like a form, but the boxes are not interactive.
If it is a shape or image
Some Word documents use square shapes as fake checkboxes. To mark one, you can insert a check mark symbol over it, use a text box, or replace the shape with a real checkbox content control.
For a cleaner result, delete the fake square and use either a Developer checkbox or a symbol checkbox. Layering a check mark over a shape can look fine on your screen but shift when the document is opened on another computer.
Change the checked symbol for a Word checkbox
Word also lets you customize what appears when a checkbox content control is checked.
Click the checkbox content control, then go to Developer > Properties. In the Content Control Properties window, look for the checked and unchecked symbol options. You can choose a different mark if you prefer a check, X, or another symbol.
This is useful when a company template needs a consistent style. For example, some forms use an X rather than a tick to show selected answers.
Formatting and Troubleshooting Word Checkboxes
Checkboxes in Word are usually easy to add, but a few small layout problems can make forms look messy. These fixes address the issues that come up most often.
The Developer tab is missing
If you do not see the Developer tab, it has not been enabled. Go to File > Options > Customize Ribbon and check Developer under Main Tabs.
In managed company environments, certain Office settings may be controlled by IT. If you cannot enable the tab, ask your administrator or use a printable checkbox symbol as a temporary workaround.
The checkbox is not clickable
A checkbox is only clickable if it is a content control inserted from the Developer tab. Symbols, shapes, and images will not respond to clicks.
To check what you have, click near the box. A real content control usually shows a boundary or control frame when selected. A symbol behaves like a regular text character. A shape shows shape handles.
If you need a fillable form, replace symbol boxes with Developer checkboxes.
The checkbox looks too large or too small
For checkbox symbols, change the font size just like normal text. Select the symbol and increase or decrease the font size on the Home tab.
For checkbox content controls, sizing can be less direct because the control follows the surrounding text and style. Try changing the font size of the paragraph or placing the checkbox in a table cell with consistent formatting.
The checkbox does not align with the text
Misalignment often happens when checkboxes are inserted beside text with mixed font sizes or manual spacing. Avoid using multiple spaces to push boxes into position.
Use tabs, indents, or tables instead. For multi-question forms, a table is usually the most reliable option. You can hide the table borders if you do not want grid lines to appear.
The layout changes when someone else opens the file
Word documents can shift if the recipient does not have the same fonts, printer settings, or version of Word. This is one reason many teams convert final forms to PDF before sharing them.
If the document must remain editable, keep the design simple: standard fonts, tables for alignment, and minimal floating shapes. If the layout must stay fixed, PDF is safer.
Word Online may not support every checkbox workflow
Word for the web can display many documents with checkboxes, but advanced form-building features are more limited than in the desktop app. If you need to create or edit checkbox content controls, use the desktop version of Microsoft Word.
For basic printable checklists, Word Online may still be enough because symbol-based checkboxes behave like normal text.
Turn Your Word Checkbox Form Into a PDF With PDFelement
Word is a good place to draft forms because text editing is fast. But once the form is ready to distribute, PDF is often the better format. A PDF preserves layout more reliably, opens consistently across devices, and is easier to share without the content shifting.
That is where PDFelement fits into the workflow. After you create a checkbox in a Word document, you can convert the file to PDF for distribution, review, archiving, or signing. If the form needs further work after conversion, PDFelement can help you edit text, organize pages, add annotations, and manage the PDF without going back and forth between file formats.
G2 Rating: 4.5/5 |100% Secure
When to keep the form in Word
Keep the document in Word if the recipient needs to edit the wording, add sections, or collaborate on the form structure. Word is still the better drafting environment.
For example, a manager reviewing an onboarding checklist may need to rewrite instructions or add department-specific tasks. In that case, sending the Word file makes sense.
When to convert the checkbox document to PDF
Convert the form to PDF when the layout is final and the recipient only needs to read, sign, print, or complete the form. PDF is better for completed templates, client-facing documents, and forms that should not be casually edited.
This is especially useful for forms that include branding, tables, signature areas, or carefully aligned checkbox sections. PDF helps keep those elements in place.
How PDFelement supports checkbox form workflows
If you already have a Word document with checkboxes, you can use PDFelement as the next step in the document workflow. Open or convert the document as a PDF, then prepare it for sharing.

G2 Rating: 4.5/5 |100% Secure
For forms that need PDF-level fields, PDFelement also supports form editing tools, including checkbox fields. This is useful when a Word checklist needs to become a fillable PDF form rather than a static printout.
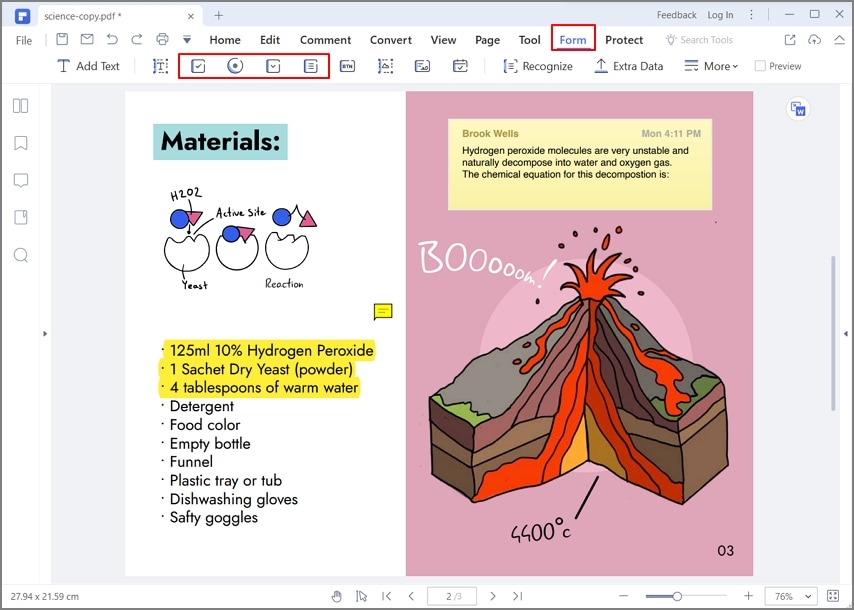
For example, you might draft an employee equipment checklist in Word, convert it to PDF, then add fillable checkbox fields in PDFelement before sending it to new hires. That workflow gives you Word’s easy drafting tools and PDF’s more stable sharing format.
You can also adjust field properties such as field names and appearance settings, which helps when a PDF form needs cleaner organization or a more polished look.
People Also Ask
-
How do I add a checkbox in a Word document?
To add a clickable checkbox in a Word document, enable the Developer tab, place your cursor where the box should appear, then select Developer > Check Box Content Control. The checkbox can then be clicked on and off inside Word. -
How do I add checkbox in Word for a printable checklist?
Use a checkbox bullet list. Select your list, open the arrow beside the Bullets button on the Home tab, choose Define New Bullet, then select a square checkbox symbol from a symbol font such as Wingdings or Segoe UI Symbol. This creates printable boxes beside each list item. -
What is the difference between a checkbox content control and a checkbox symbol?
A checkbox content control is interactive. Users can click it to check or uncheck it in Word. A checkbox symbol is just a character, like a letter or punctuation mark. It is better for printed documents but cannot be clicked. -
How do I insert checkbox in Word without the Developer tab?
If you do not need a clickable box, use Insert > Symbol > More Symbols and choose an empty square symbol. You can also create a custom checkbox bullet list. If you need a clickable checkbox, you must use the Developer tab in the desktop version of Word. -
How do I tick a box in Word?
If it is a clickable checkbox, click the box once. If it is a symbol, replace the empty box with a checked box symbol such as ☑. If it is a shape or image, you may need to insert a check mark over it or replace it with a proper checkbox. -
Can I add multiple checkboxes in Word quickly?
Yes. Insert one checkbox, then copy and paste it wherever needed. For longer forms, place checkboxes in a table so they stay aligned. For printable lists, use checkbox bullets instead of inserting each box manually. -
Why can’t I click the checkbox in my Word document?
The box is probably not a real checkbox control. It may be a symbol, shape, or image. Only checkboxes inserted from Developer > Check Box Content Control are clickable in Word. -
Can I make a Word document with checkboxes into a fillable PDF?
Yes. You can draft the form in Word and then convert it to PDF. If you need interactive PDF checkbox fields, use a PDF editor such as PDFelement to add or adjust form fields after conversion. -
Do checkboxes work in Word Online?
Word Online can display many checkbox documents, but its form-control editing features are limited compared with the desktop app. For creating clickable checkbox content controls, use Microsoft Word on Windows or Mac. -
Which checkbox method should I use for a form people will email back?
If recipients will complete the form in Word, use Developer checkbox content controls. If you want the layout to stay fixed and the form to be filled as a PDF, convert the document and use fillable PDF checkbox fields instead.

