
Table of Contents
Cropping a picture in Word is easy once you know where the tool is hidden. The catch is that Word only shows image tools after you click a picture, so many users look around the ribbon and miss the Crop command entirely. This guide shows you how to crop a picture in Word, how to crop to a shape or exact ratio, and how to avoid the small layout problems that often appear after editing images inside a document.
Word is not a dedicated photo editor, but for document work it is usually enough. You can trim away unwanted edges, focus attention on the important part of a screenshot, make several headshots the same shape, or fit an image neatly into a report, proposal, worksheet, or brochure. If the final document needs to be shared as a PDF, you will also find a practical workflow for keeping the finished file easy to send and review.
Quick Answer: How to Crop a Picture in Word
To crop a picture in Word, click the image, go to Picture Format, select Crop, drag the black crop handles inward, and click Crop again or press Enter to apply the change. That is the basic workflow in recent desktop versions of Microsoft Word for Windows and Mac.
Here is the short version:
- Select the picture in your Word document.
- Open the Picture Format tab on the ribbon.
- Click Crop.
- Drag the crop handles on the sides or corners of the image.
- Click outside the image, press Enter, or click Crop again to finish.
Cropping in Word does not work exactly like deleting part of an image in a photo editor. In most cases, Word hides the cropped areas from view while keeping the original image data in the document unless you compress pictures or delete cropped areas later. That is useful if you want to adjust the crop again, but it can also make the file larger than expected.
If you only need a quick visual trim, the normal Crop button is enough. If you need a more polished layout, use Word’s extra crop options: Crop to Shape, Aspect Ratio, Fill, and Fit.


 G2 Rating: 4.5/5 |
 100% Secure
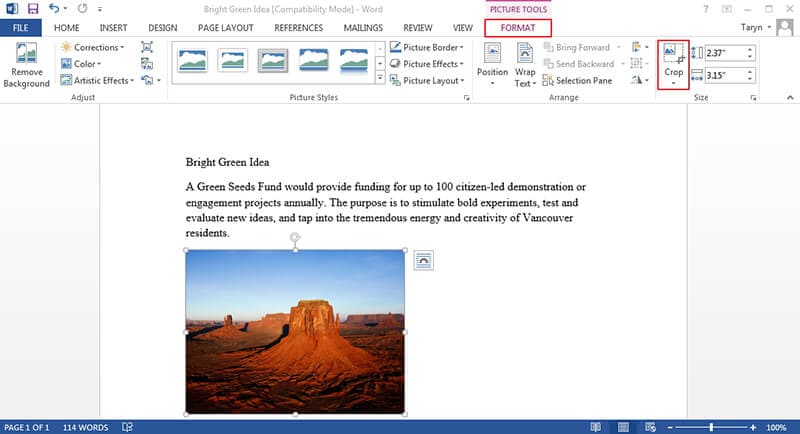
How to Crop an Image in Word Step by Step
The following steps apply to current desktop versions of Microsoft Word, including Microsoft 365 versions. The labels may look slightly different in older editions, but the process is largely the same: select the picture first, then use the crop controls under the image formatting tab.
Step 1: Insert or Select the Picture
If the image is already in your document, click it once. You should see selection handles around the image. If you need to add a picture first, go to Insert > Pictures, then choose an image from your device, stock images, or an online source depending on your Word version.
Once the image is selected, Word displays the Picture Format tab. This tab is contextual, which means it appears only when an image is active. If you click back into normal text, it disappears.
Step 2: Open the Picture Format Tab
With the image selected, look at the top ribbon and choose Picture Format. On some older versions, the tab may be called Format under Picture Tools.
The Crop button is usually on the right side of the ribbon in the Size group. It looks like two overlapping right angles. If your Word window is narrow, the command may be tucked into a smaller menu, so expanding the window can make it easier to find.
Microsoft’s own support page for cropping pictures in Office also shows how the Crop menu changes depending on the Office app and version.
Step 3: Use the Crop Handles
Click Crop. Word will place black crop handles around the image. These are different from the white resizing handles. The black handles control what part of the image remains visible.
Drag a side handle inward to trim one edge. Drag a corner handle inward to crop two edges at once. If you want a balanced crop, start with small adjustments rather than pulling the handles aggressively. This is especially helpful for screenshots, product images, and portraits where cutting too close can make the image look awkward.
The shaded area outside the crop boundary shows what will be hidden. The unshaded area is what will remain visible after you apply the crop.
Step 4: Reposition the Image Inside the Crop Frame
A detail many users miss: after clicking Crop, you can move the picture behind the crop frame. Place your cursor over the image, then drag the image itself to reposition the visible subject.
This is useful when the crop size is correct but the subject is slightly off-center. For example, if you are cropping a screenshot and the important button is too close to the left edge, drag the image until the button sits better within the frame. If you are cropping a profile photo, move the face into a more natural position instead of repeatedly changing the crop handles.
You can also resize the image while still in crop mode. Drag the image’s white corner handles to zoom in or out within the crop area. Use this carefully because enlarging a low-resolution image can make it blurry.
Step 5: Apply or Cancel the Crop
When the picture looks right, click Crop again, press Enter, or click anywhere outside the image. Word applies the crop and returns you to normal editing.
If you change your mind while cropping, press Esc before applying the crop. If you already applied it, use Ctrl + Z on Windows or Command + Z on Mac to undo the last action. You can also select the image later and reopen the Crop tool to adjust the crop again.
More Ways to Crop in Microsoft Word
The standard crop handles are enough for quick edits, but Word has several other crop controls that help with cleaner layouts. These options are especially useful when you need consistent image shapes across a document, such as team bios, step-by-step screenshots, product cards, class handouts, or marketing one-pagers.
Crop to Shape
To crop a picture to a shape in Word, select the picture, go to Picture Format > Crop, open the drop-down arrow under Crop, choose Crop to Shape, and select a shape.
Word then masks the image into that shape. Common choices include circles, rounded rectangles, arrows, stars, and speech bubbles. For a clean circular portrait, choose an oval shape and then use an equal height and width for the picture. If the image frame is not square, the oval may look stretched instead of circular.
After cropping to a shape, you can still adjust the image position. Click Crop again, then drag the picture inside the shaped frame until the subject is centered.
This option is helpful, but it can also be overused. For professional documents, simple shapes usually age better than decorative ones. A rounded rectangle or circle often looks cleaner than stars, banners, or complex callouts.
Crop to Aspect Ratio
If you need predictable image dimensions, use Aspect Ratio. Select the image, open Picture Format > Crop > Aspect Ratio, and choose a ratio such as 1:1, 4:3, 16:9, or another available option.
Aspect ratio controls the relationship between width and height. It does not necessarily set the final physical size on the page. For example, a 16:9 crop can be small or large, but it will keep the same widescreen shape.
Use aspect ratio cropping when you want images to line up neatly. A few practical examples:
Use 1:1 for square profile photos or product thumbnails.
Use 16:9 for presentation-style screenshots and wide banners.
Use 4:3 for older screenshots, classroom materials, and standard document visuals.
After choosing the ratio, Word may place a crop frame over the image. Drag the image inside that frame to decide what part appears.
Crop to Fill or Fit
The Fill and Fit options are easy to confuse, but they solve different layout problems.
Fill makes the image fill the selected frame completely. Some parts may be cropped away. Use this when the shape or image box must stay full, such as a cover image or a row of equal-size tiles.
Fit makes the whole image visible inside the selected frame. It may leave empty space if the image’s shape does not match the frame. Use this when you cannot afford to hide any part of the picture, such as a chart, diagram, scanned ID, or screenshot with important text near the edges.
A simple rule works well: choose Fill for visual design and Fit for information accuracy.
Crop Multiple Pictures Consistently
Word does not always behave like a batch image editor, but you can still keep several pictures consistent with a careful process. First crop one image to the ratio or shape you want. Then select the other images and apply the same ratio or set the same height and width under Picture Format > Size.
If you are building a grid, table, or staff directory, consider placing images inside a table with invisible borders. That gives you more control over alignment than trying to drag several floating pictures by hand.
For repeated document layouts, the best approach is to decide the picture format before inserting every image. For example, if all screenshots should be 16:9, crop each one to 16:9 as you add it. Fixing inconsistent crops after a long document is finished takes much longer.
Reset or Remove a Crop
If you want to undo a crop later, select the image and click Crop again. Word will show the hidden image area if the original data is still available. Drag the crop handles outward to reveal more of the image.
You can also reset broader picture formatting by selecting the image and choosing Picture Format > Reset Picture or Reset Picture & Size, depending on your Word version. Be careful with Reset Picture & Size because it may undo more than the crop, including size changes and formatting.
If the document has already been compressed with cropped areas deleted, the hidden parts may no longer be recoverable from that Word file. In that case, you need to insert the original image again.
Fix Common Problems When You Crop Picture in Word
Cropping should be simple, but Word’s image behavior depends on layout options, file type, and how the image was inserted. If something looks wrong, the issue is usually not the crop itself. It is often text wrapping, image anchoring, compression, or a limitation of the Word version you are using.
The Picture Format Tab Is Missing
The Picture Format tab appears only after you select an image. If you are clicking near the image but not on it, Word may place your cursor in the text instead. Click directly on the picture until you see selection handles.
If the image is behind text, open Home > Select > Selection Pane in Word for Windows, then choose the image from the pane. You can also try right-clicking the object and checking whether Word recognizes it as a picture.
In some documents, the image may be part of a header, footer, text box, shape, SmartArt object, or grouped object. Double-click inside the relevant area first, or ungroup objects if needed, then try selecting the picture again.
The Image Moves After Cropping
If the image jumps around when you crop it, check the layout option. Select the picture and click the small Layout Options button near it. For stable document editing, In Line with Text often behaves most predictably because Word treats the picture like a large character in a paragraph.
Floating options such as Square, Tight, Behind Text, and In Front of Text give you more design freedom, but they can shift when nearby text changes. If you are creating a formal report or instruction document, keep important images inline unless you have a reason to float them.
For pages with multiple images, use tables, columns, or text boxes deliberately instead of manually dragging everything into place. Manual positioning can look fine until you add one paragraph and the layout changes.
Cropped Parts Still Affect File Size
A common surprise is that cropping does not always reduce the Word file size. Word may keep the hidden parts so you can restore them later. If you want to reduce file size, use the picture compression settings.
Select an image, go to Picture Format > Compress Pictures, and look for an option such as Delete cropped areas of pictures. You can apply compression to one image or all images in the document, depending on the dialog options.
Do this near the end of editing, not at the beginning. Once cropped areas are deleted, you may not be able to recover them from the document. Save a backup copy first if the images matter.
Crop Handles Are Hard to Control
For precise cropping, zoom in before dragging. Use the zoom slider in the bottom-right corner of Word so the image takes up more screen space. Small images are difficult to crop accurately when the page is zoomed out.
You can also use the size boxes under Picture Format for more controlled dimensions. If you need exact output for a template, set the height and width after choosing the crop ratio. Keep in mind that Word is still a document editor, not a pixel-perfect image editor, so highly detailed image work may be better handled before insertion.
Word for the Web Has Fewer Options
Word for the web supports many everyday editing tasks, but its picture tools may be more limited than the desktop app. If you cannot find the crop option or advanced shape controls online, open the file in the desktop version of Word.
This matters for documents with complex layouts. Desktop Word gives you better access to crop handles, shape masks, compression, layout options, and fine control over image placement.
After Cropping: Save, Share, or Convert the Word Document
Once the picture looks right in Word, think about how the document will be used. If you are still drafting with a team, keeping the file as a Word document makes sense. People can edit text, swap images, and adjust the crop if needed.
If the document is ready to send, submit, print, or archive, PDF is usually safer. A PDF preserves layout more reliably across devices, especially when the document includes cropped screenshots, logos, signatures, diagrams, or carefully positioned images.
When Word Is Enough
Stay in Word if the recipient needs to edit the document. This is common for internal drafts, collaborative reports, class assignments, and templates. Word is also better if you expect to replace images later.
Before sharing the Word file, skim through the document at different zoom levels. Check that cropped pictures still align with headings, captions, tables, and page breaks. If an image sits at the bottom of a page, make sure it has not pushed a caption onto the next page.
Why Convert the Cropped Word Document to PDF
Converting to PDF helps lock the visual result. This is useful after you crop image in Word and arrange the page exactly the way you want. PDF reduces the chance that a recipient’s Word version, fonts, printer settings, or screen size will change the layout.
PDF is also practical for documents that need review or approval. Reviewers can comment on the file without accidentally moving images or changing text flow. If the document includes forms, signed pages, or screenshots used as evidence, PDF is usually the better final format.
G2 Rating: 4.5/5 |100% Secure
Where PDFelement Fits Into the Workflow
PDFelement is useful after you finish cropping and arranging images in Word, especially if the final document needs to become a polished PDF. A common workflow is simple: crop the picture in Word, check the layout, convert the Word document to PDF, then use PDFelement to review and manage the PDF before sharing it.
For example, if your document is a proposal, training handout, or application packet, PDFelement can help you annotate pages, compress the PDF for email, organize or delete pages, add signatures, and make final text edits if small corrections are found after conversion. If the Word file includes scanned images or screenshots with text, OCR can also help make scanned PDF content searchable or editable, depending on the source quality.
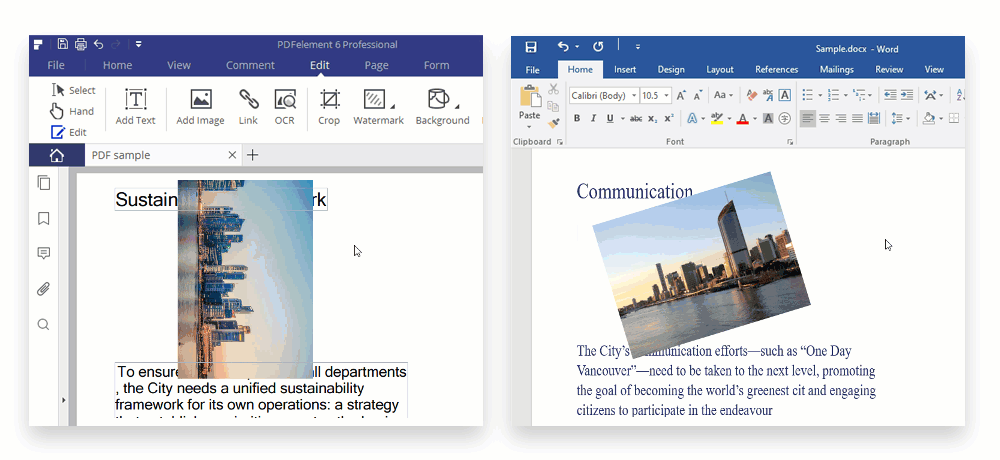
This does not mean you should crop every image in a PDF instead of Word. If your source document is still being built in Word, crop and position the image there first. Use PDFelement for the PDF stage: checking the final layout, reducing file size, adding comments or signatures, and preparing the document for distribution.

If you discover an image issue only after conversion, PDFelement can also support PDF image editing workflows, depending on what needs to be changed. For larger layout changes, though, it is usually cleaner to return to the Word file, adjust the crop there, and export a fresh PDF.
Practical Tips for Cleaner Cropped Images in Word
A good crop is not just about removing unwanted edges. It should make the document easier to read. In Word, images compete with headings, body text, tables, margins, and white space, so the best crop is often the one that supports the page rather than the one that looks dramatic on its own.
Keep the Main Subject Clear
Before cropping, decide what the image is supposed to show. If it is a screenshot, the important button, menu, or message should be easy to spot. If it is a portrait, the face should not sit too close to the edge. If it is a product image, leave enough space around the object so it does not feel cramped.
For instructional documents, avoid cropping away interface context that readers need. A tight crop of one button may look clean, but the reader may not know where that button is located. Sometimes a slightly wider screenshot is more helpful.
Match Image Style Across the Document
A document looks more professional when images follow a consistent pattern. If one screenshot is wide, another is square, and a third is a tall narrow crop, the layout can feel accidental. Choose a consistent approach for similar image types.
For example, use the same width for all full-page screenshots. Use the same crop ratio for all profile photos. Keep icons and logos aligned to similar sizes. These small choices make a report or guide feel edited rather than assembled.
Avoid Cropping Text Too Tightly
If the picture contains text, leave a little breathing room around it. Cropped text near an image edge can look like a mistake, and it may become harder to read after printing or PDF conversion.
This is especially important for charts, scanned forms, receipts, certificates, and screenshots of settings panels. If every label matters, consider using Fit instead of Fill, or edit the image in a dedicated image tool before placing it in Word.
Use Image Compression at the Right Time
Compression is helpful when a Word file becomes too large, but it should usually be the last image-related step. Crop first, proofread the document, confirm the layout, then compress if needed.
If you select Delete cropped areas of pictures, save a separate editable copy first. That way, you can still return to the original crop if someone asks for a wider screenshot or a different image composition later.
Add Captions Where They Help
A cropped image often needs context. If the picture is part of a report, manual, or tutorial, add a short caption beneath it. In Word, you can right-click the image and choose Insert Caption, or simply type a caption in a consistent style.
Captions are especially useful after cropping because the image may no longer show all surrounding context. A clear caption can explain what the reader is looking at without forcing you to keep unnecessary image areas.
People Also Ask
-
How do I crop a picture in Word to a circle?
Select the picture, go to Picture Format > Crop > Crop to Shape, and choose the oval shape. To make it a true circle, set the picture’s height and width to the same value. Then click Crop again if you need to reposition the face or subject inside the circle. -
How do I crop in Word without changing the image size?
Click the image, choose Picture Format > Crop, and drag the black crop handles rather than the white resizing handles. Crop handles change the visible area. Resizing handles change the displayed size. If the image still changes size, undo and try again while zoomed in. -
Can I crop an image in Word to an exact size?
Yes, but size and crop are separate controls. First use Crop or Aspect Ratio to decide what part of the image is visible. Then use the Height and Width boxes under Picture Format > Size to set the displayed dimensions. For strict templates, lock the aspect ratio where appropriate. -
Why can I still recover cropped parts of my image?
Word often keeps cropped image data so you can adjust the crop later. If you want to remove hidden areas permanently and reduce file size, use Picture Format > Compress Pictures and select Delete cropped areas of pictures. Save a backup before doing this. -
How do I crop multiple images the same way in Word?
Apply the same Aspect Ratio to each image, then set matching height or width values under Picture Format > Size. For a neat layout, place images in a table or structured section rather than dragging each picture freely around the page. -
Can I crop a picture in Word for the web?
Word for the web may support basic picture editing, but advanced crop options can be limited compared with desktop Word. If you cannot find the command you need, open the document in the desktop app and crop the picture there. -
Does cropping a picture in Word reduce file size?
Not always. Cropping mainly hides part of the image. To reduce file size, compress pictures and delete cropped areas. Do this only after you are sure you will not need to restore the hidden parts. -
Should I crop images in Word or in a photo editor first?
For simple document edits, crop in Microsoft Word. For detailed retouching, background removal, color correction, or pixel-level precision, edit the image in a photo editor first and then insert it into Word. Word is best for layout-friendly cropping, not advanced image production. -
What should I do after cropping pictures if I need to send the document?
If the layout is final, convert the Word document to PDF before sending. This helps preserve image placement and page formatting. You can then use a PDF editor such as PDFelement to annotate, compress, organize, sign, or review the final PDF.

