 Home
>
Google Tips and Tricks
> How to Wrap Text in Google Slides
Every official task, ranging from a mere meeting to document handling, involves a certain clerical format that the employee has to fulfill. In the ambit of document management, there are several tasks that are to be fulfilled to enhance the basic display of the document or presentation. This article indicates the method of how to wrap text in Google Slides while preparing presentations.
How to Wrap Text in Google Slides
Google Slides has been referred to as the most prolific alternative to Microsoft PowerPoint. While providing free services, it attenuates similar tools for managing the slides and adds up an extra feature of online editing and management that makes it accounted for among the best options for creating slides. Wrapping the text in the slides is something that develops a profound structure under a few simple steps. To understand how to wrap text on Google Slides, you need to follow the guidelines provided as follows.
Step 1. Insert Textbox
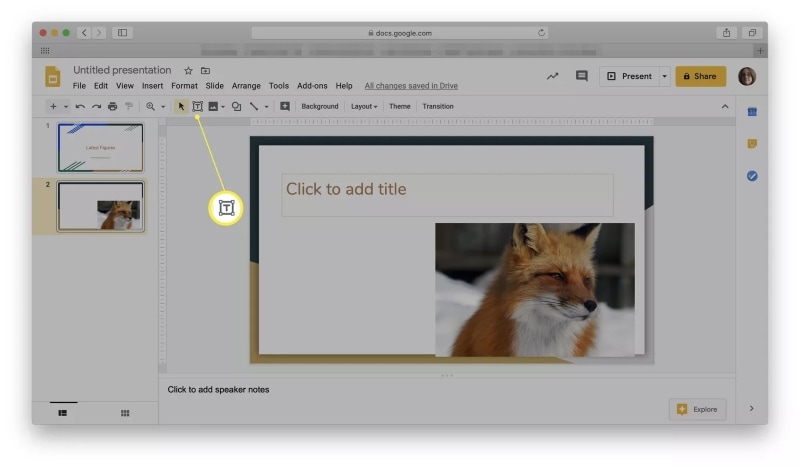
You need to import the presentation on Google Slides for initiating its editing. After opening the file successfully, tap on the “Text Box” button on the sub-toolbar.

Step 2. Select the Position
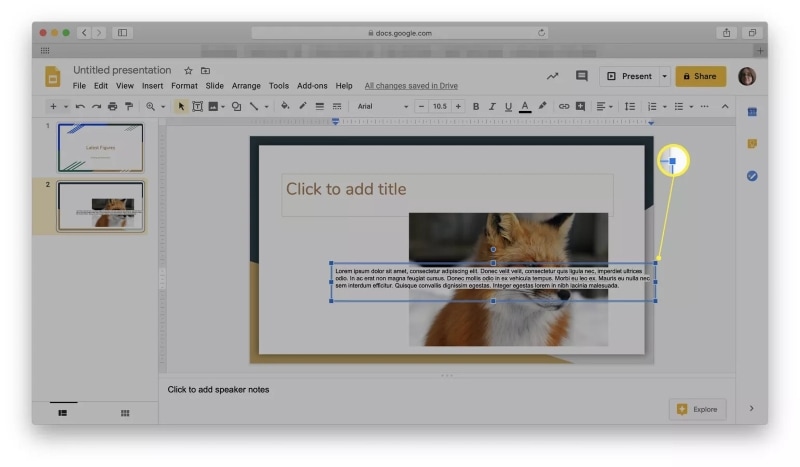
Point out the position where you wish to add the text box. A box appears on the screen with the space to add text accordingly.
Step 3. Wrap the Text
The sides of the text box are displayed by a blue line that can be easily dragged to resize the text box. You can simply move it throughout the slide to wrap it around the image properly.

Tip:Learn how to convert PDF to Google Slides
A Powerful PDF Software for You
PDF file format is another common format that is consumed for various official purposes. Many offices prefer using PDF format as a standard of file sharing. But this format is generally hard to edit. Thus, many PDF editing tools appeared in the market, such as Wondershare PDFelement - PDF Editor Wondershare PDFelement Wondershare PDFelement, a powerful PDF editor, provides the best editing tools and conversion systems that help you keep the quality of the original document intact. Without changing the basic format of the PDF file, PDFelement allows you to edit, annotate, and convert the files with ease.
Moreover, you can develop different forms and comments and review the existing PDFs with no difficulties. The privacy maintained in the platform is another appreciable feature of PDFelement. It also allows you to merge multiple files into one or split PDF pages with wase. You can surely consider using PDFelement for managing and editing your documents.
How to Edit Text in PDF
PDFelement integrates state-of-the-art tools and features in its package that allows you to edit and amend PDF files with ease. The very basic editing is related to managing the content and text in the file. For this purpose, the tools available at the platform allow you to easily manage the files, similar to how you wrap text in Google Slides. To understand the simple procedure of editing text in a PDF, look over the steps defined below.
Step 1. Upload the File
Successfully download and install the platform on your desktop and launch it accordingly. You can open a PDF file on the platform by tapping on the "Open File" present on the home window.

Step 2. Edit the Text
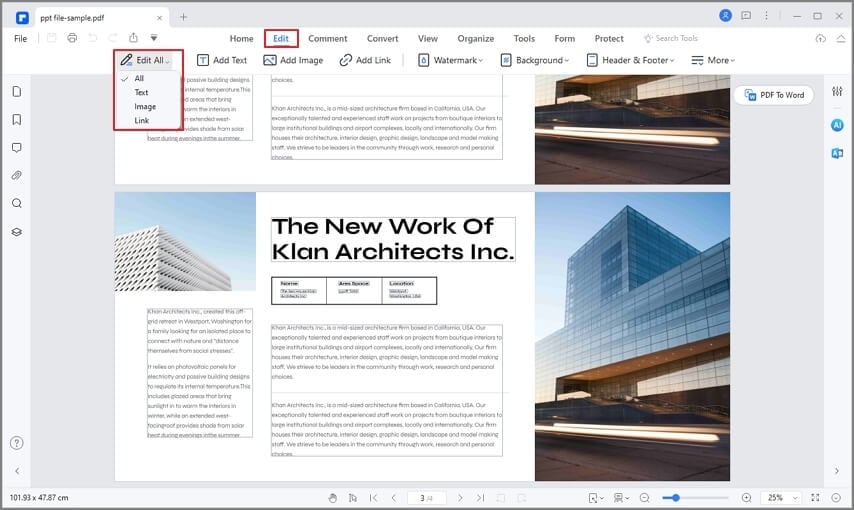
Tap on the "Edit" tab present on the top toolbar to open up a new sub-menu. Then select the icon displaying "Edit text and Image Object." You can now edit the text present on the file with ease.

Step 3. Add or Delete Text in PDF
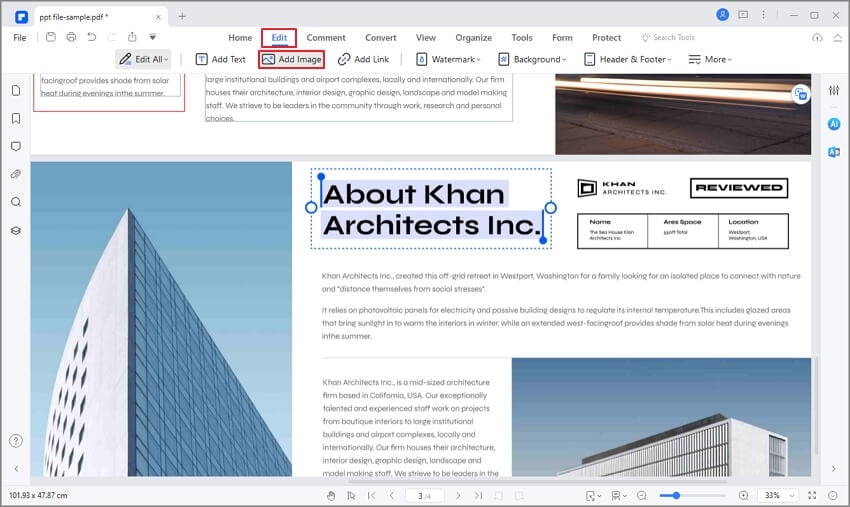
In a similar tab, you can access the "Add Text" icon to draw a text box for adding text to the PDF file. Use the appropriate buttons to remove unwanted text.

Free Download or Buy PDFelement right now!
Free Download or Buy PDFelement right now!
Try for Free right now!
Try for Free right now!
 100% Secure |
 G2 Rating: 4.5/5 |
  100% Secure


Audrey Goodwin
chief Editor