
Table of Contents
A watermark is one of the easiest ways to mark a Word document as confidential, draft, sample, approved, or branded. It sits behind the main text, so readers can still see the document content while understanding its status or ownership.
If you are searching for how to put watermark in Word, the short answer is: open the Design tab, choose Watermark, and select a built-in option. That works for many documents. But Word also lets you create custom text watermarks, add picture watermarks, use watermarks on only certain pages, and remove them when the document is ready to share.
This guide walks through the practical methods for Microsoft Word on Windows, Mac, and the web. It also covers what to do after converting your Word document to PDF, where a tool like PDFelement can help you add, edit, or manage watermarks without going back to the original Word file.


 G2 Rating: 4.5/5 |
 100% Secure
How to Put Watermark in Word: The Quick Method
Microsoft Word includes several built-in watermarks, such as “Confidential,” “Do Not Copy,” “Draft,” and “Urgent.” These are good enough for internal drafts, review copies, and basic document control.
Add a Built-In Watermark in Word
For most recent desktop versions of Word on Windows, including Microsoft 365, Word 2021, Word 2019, and Word 2016, follow these steps:
- Open the Word document.
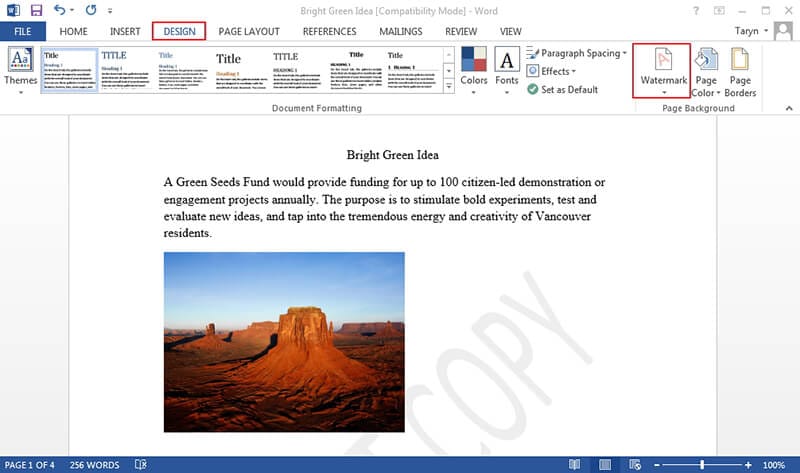
- Click the Design tab in the ribbon.
- Select Watermark in the Page Background group.
- Choose one of the watermark styles from the gallery.
- Word applies the watermark to the document pages automatically.
This is the fastest answer to “how do you put a watermark on a Word document?” It is also the safest method if you do not need custom formatting. Word handles the placement, transparency, and page background behavior for you.
Built-in watermarks are usually applied across the document, not just the current page. If your file has multiple sections with different headers, the behavior can vary slightly, especially in older documents that have been edited many times. Later in this guide, you will see how to control watermarks section by section.
Add a Custom Text Watermark
A custom text watermark is useful when the built-in choices do not match your workflow. For example, you may want a watermark that says “Client Review,” “Internal Use Only,” “Sample Copy,” “Version 2,” or your company name.
To create one:
- Open the document in Word.
- Go to Design > Watermark.
- Choose Custom Watermark.
- Select Text watermark.
- Type your watermark text.
- Adjust the language, font, size, color, layout, and transparency options.
- Click OK.
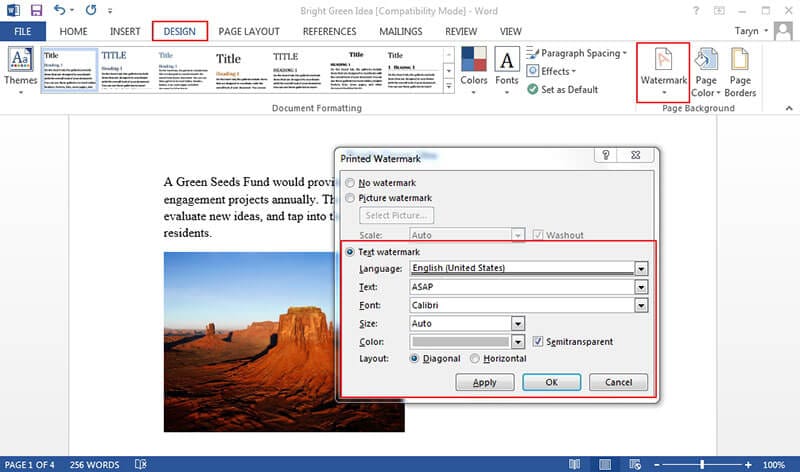
For most professional documents, keep Semitransparent selected. A watermark that is too dark can interfere with reading and may look harsh when printed. Light gray is often a better choice than bright colors, unless the watermark is part of a brand design.
The Diagonal layout is common for status labels such as “Draft” or “Confidential.” The Horizontal layout can work better for logos, department names, or short labels that should feel less intrusive.
Add a Picture Watermark
Word can also use an image as a watermark. This is often used for logos, seals, sample stamps, or background branding.
To add a picture watermark:
- Go to Design > Watermark.
- Select Custom Watermark.
- Choose Picture watermark.
- Click Select Picture.
- Choose an image from your computer, OneDrive, or another available source.
- Set the scale if needed.
- Keep Washout selected if you want the image to appear lighter.
- Click OK.
A picture watermark works best when the image has a clean shape and enough contrast to remain visible after Word fades it. Avoid detailed photos unless you are intentionally creating a background effect. Logos with transparent backgrounds usually produce cleaner results than images with solid white boxes around them.
If the picture looks too faint, uncheck Washout. If it becomes too strong, keep Washout on and adjust the original image before inserting it. Word gives you basic scaling controls, but it is not an advanced image editor.
How to Put a Watermark on a Word Document in Different Versions
The watermark feature has existed in Word for a long time, but the menu location has changed. If you are following instructions online and cannot find the same tab, you may be using a different Word version.
Word for Microsoft 365, Word 2021, Word 2019, and Word 2016
In current Word desktop versions for Windows, the watermark command is under:
Design > Watermark
This is the standard location for modern Word. From there, you can use a built-in watermark or open Custom Watermark for text and picture options.
If you do not see the Design tab, check that you are using the desktop Word app rather than Word for the web. The web version has fewer page background controls.
For Microsoft’s official documentation, you can also refer to Microsoft’s guide to inserting a watermark in Word.
Word 2013
Word 2013 also uses the Design tab:
Design > Watermark
The workflow is very similar to Word 2016 and later. Open the watermark gallery for built-in designs or choose Custom Watermark to create your own.
If your document was created from a template, the watermark may already be part of the header. In that case, editing the watermark may require opening the header area. Double-click near the top of the page to activate the header, then click the watermark object if it can be selected.
Word 2010 and Word 2007
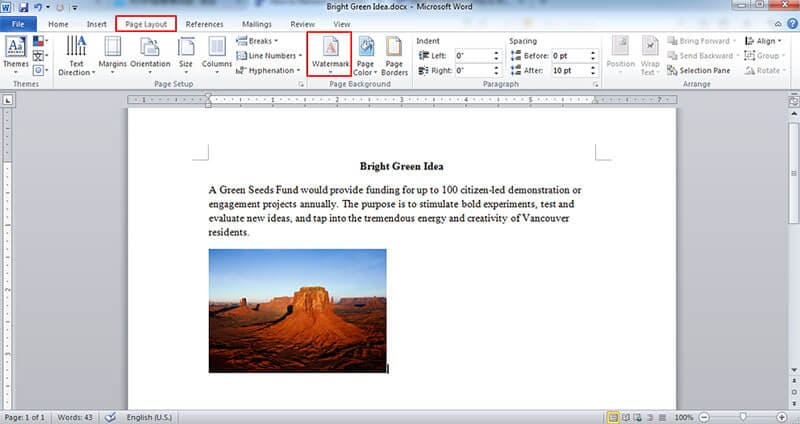
In Word 2010 and Word 2007, the watermark tool is located under the Page Layout tab:
Page Layout > Watermark
Then choose a built-in watermark or select a custom option.
This version difference is why many tutorials seem slightly confusing. If someone asks “how do I put a watermark on a Word document” and they are using Word 2007, telling them to click Design will not help. The feature is there, but it lives in Page Layout.
Word for Mac
In Word for Mac, the steps depend on the version, but the usual path is:
Design > Watermark
From there, choose a text or picture watermark and adjust the settings. If your ribbon is collapsed, expand it first so you can see the Design tools.
The Mac interface may not match Windows screenshots exactly, but the idea is the same: use the page background or design controls, then choose a text or picture watermark.
Word for the Web
Word for the web is more limited than the desktop app. It may display watermarks that already exist in a document, but creating or editing a watermark is best done in the desktop version of Word.
If you are working in a browser and cannot find the watermark option, open the file in the desktop app:
- Click Editing or Open in Desktop App, depending on your interface.
- Wait for the document to open in Word.
- Use Design > Watermark.
- Save the document so the change syncs back to OneDrive or SharePoint.
For quick reading and basic edits, Word for the web is convenient. For layout features like watermarks, section breaks, headers, and advanced printing behavior, the desktop app is still the better choice.
How to Customize a Word Watermark Properly
Adding a watermark is easy. Making it look professional takes a little more care. The main controls are text, font, size, color, transparency, layout, and section behavior.
Change Text, Font, Color, and Transparency
To edit a custom text watermark, go back to:
Design > Watermark > Custom Watermark
Then choose Text watermark and change the settings.
Short watermark text works best. A phrase like “Confidential” or “Draft” is readable even when faded. Long text such as “This document is confidential and may not be shared outside the organization” can become cluttered and distract from the document content. If you need legal or compliance language, place it in the footer instead of trying to force it into a watermark.
Font choice matters too. Simple fonts such as Arial, Calibri, Aptos, or Times New Roman are easier to read when they are lightened. Decorative fonts can become blurry after printing or PDF conversion.
For color, light gray is the usual safe option. A pale red can work for urgent or restricted documents, but test it by printing one page or saving to PDF. Some colors that look acceptable on screen become too dark on paper.
Make a Watermark Horizontal or Diagonal
In the custom watermark dialog, Word lets you choose between Diagonal and Horizontal layouts.
A diagonal watermark is hard to miss, which makes it good for draft status, confidential material, or review copies. It also spreads across more of the page, so it is less likely to hide behind a single chart or table.
A horizontal watermark is quieter. It is often better for logos, company names, or document types that should be visible without feeling like a warning label.
If your document is formal, such as a proposal, report, contract draft, or policy document, avoid using large bright text unless the status must be obvious. A watermark should support the document’s purpose, not dominate it.
Add a Watermark to One Page Only
By default, Word applies a watermark through the header area, which usually means it appears on every page in the section. To add a watermark to one page only, you need to isolate that page with section breaks or use a manually inserted object.
The section-break method is cleaner for formal documents:
- Place the cursor at the end of the page before the page that needs the watermark.
- Go to Layout > Breaks > Next Page.
- Place the cursor at the end of the page that needs the watermark.
- Insert another Next Page section break.
- Double-click the header on the watermarked page.
- Turn off Link to Previous.
- Add the watermark for that section.
- Check the following section and turn off Link to Previous there as well if needed.
- Remove the watermark from sections where it should not appear.
This takes more effort than applying a document-wide watermark, but it gives you better control. It is useful for title pages, sample pages, appendix pages, or individual pages that need a special status.
For a less formal document, you can insert a text box or WordArt object, rotate it, set a light color, and send it behind text. That method is faster but easier to disturb while editing.
Add Different Watermarks to Different Sections
Some documents need more than one watermark. For example, the first section may be marked “Draft,” while an appendix is marked “Internal Data.” Word can handle this through sections.
The key is understanding that watermarks are connected to headers. If two sections have headers linked together, changing the watermark in one section can change it elsewhere. To prevent that, open the header and turn off Link to Previous before adding or changing the watermark.
Use this workflow when you need different watermarks:
Divide the document with Layout > Breaks > Next Page section breaks.
Open each section’s header and disable Link to Previous where needed.
Add or remove the watermark in each section separately.
Check the document in Print Layout view before sharing.
Section-based watermarks can be tricky in documents with different first pages, odd/even headers, or imported template formatting. After editing, scroll through the full file rather than checking only the first page.
How to Remove or Fix a Watermark in Word
Watermark problems usually happen because the watermark is stored in the header, because the document uses sections, or because an object is covering it. Here is how to handle the common issues.
Remove a Watermark
To remove a standard Word watermark:
- Go to Design > Watermark.
- Choose Remove Watermark.
In Word 2010 or 2007, use:
Page Layout > Watermark > Remove Watermark
If that does not work, the watermark may not be a true Word watermark. It may be a picture, WordArt object, text box, or background image placed inside the header. Double-click the top area of the page to open the header, select the watermark object, and press Delete.
If the document has multiple sections, repeat the process in each section. A watermark may disappear from one part of the document but remain in another if the headers are not linked.
Fix a Watermark That Does Not Appear
If you added a watermark but cannot see it, first switch to Print Layout view. Word may not display watermarks properly in Draft view or some reading views.
Next, check whether the watermark is hidden by content. Large tables, images, shapes, or text boxes with solid fills can cover the watermark. This is especially common in forms, invoices, certificates, and templates.
Try these fixes:
Change the fill color of text boxes or shapes to No Fill or a transparent fill.
Move large objects behind text only if that does not affect the layout.
Open the header and check whether the watermark object exists.
Save the file as a PDF to confirm how it will appear when shared or printed.
If the watermark appears in PDF but not clearly in Word, the issue may be only a display limitation. If it disappears in PDF too, the watermark is probably being covered or was applied to the wrong section.
Fix a Watermark That Appears Behind Tables or Text Boxes
Word watermarks sit behind the document text because they are usually anchored in the header layer. Normal paragraphs allow the watermark to show through. Objects with solid backgrounds do not.
For example, a table with white cell shading can block the watermark. A text box with a white fill can do the same. The document may look as if the watermark has been removed, even though it is still there.
To fix this, select the table or object and inspect its fill or shading. For tables, look under Table Design > Shading. For shapes and text boxes, check Shape Format > Shape Fill. Setting the fill to No Fill or a lighter transparent fill may reveal the watermark.
Do not remove necessary background fills from forms or branded layouts without checking the final appearance. Sometimes it is better to use a more visible PDF watermark after exporting instead of fighting Word’s layering behavior.
Prevent Watermark Quality Problems
Picture watermarks can become blurry if the source image is too small. Use a clean, high-resolution logo or image, especially if the document will be printed.
Avoid stretching small images to full-page size. If your logo is designed for a corner or header, it may not look good as a large watermark. For a full-page image watermark, start with artwork created for that purpose.
If you plan to convert the Word document to PDF, always review the PDF before sending it. Watermarks, fonts, headers, and background elements can shift slightly depending on how the file is exported.
After Word: Add or Edit Watermarks in PDF with PDFelement
A Word watermark is useful while you are drafting and editing. But many documents are shared as PDFs because PDF preserves layout better and is harder to accidentally change. Once the file becomes a PDF, you usually cannot manage its watermark comfortably in Word anymore.
That is where PDFelement fits into the workflow. If you have already exported your Word document to PDF and then realize you need to add “Confidential,” update a logo watermark, remove an old draft mark, or apply a watermark to selected pages, PDFelement lets you work directly on the PDF instead of rebuilding the Word file.
G2 Rating: 4.5/5 |100% Secure
Why Watermarks Behave Differently in PDFs
In Word, the watermark is tied to the page background and header structure. In a PDF, the file is more fixed. The watermark becomes part of the page content or an overlay, depending on how it was created.
That difference matters. If the original Word file is still available and easy to edit, changing the watermark in Word may be the cleanest option. But if the PDF is the final version, or if the Word file is missing, editing the PDF directly is more practical.
PDFelement can also help with related PDF tasks after watermarking, such as compressing a large file, combining several documents, adding comments, converting PDF back to Word when edits are needed, applying password protection, or preparing a document for signing.
How to Add a Watermark to a PDF
The exact interface may vary by version, but the general workflow in PDFelement is straightforward:
- Open PDFelement.
- Open the PDF file you want to edit.
- Go to the watermark tool from the edit or page-design options.
- Create a new text or image watermark.
- Adjust page range, size, position, opacity, and rotation.
- Apply the watermark and save the PDF.

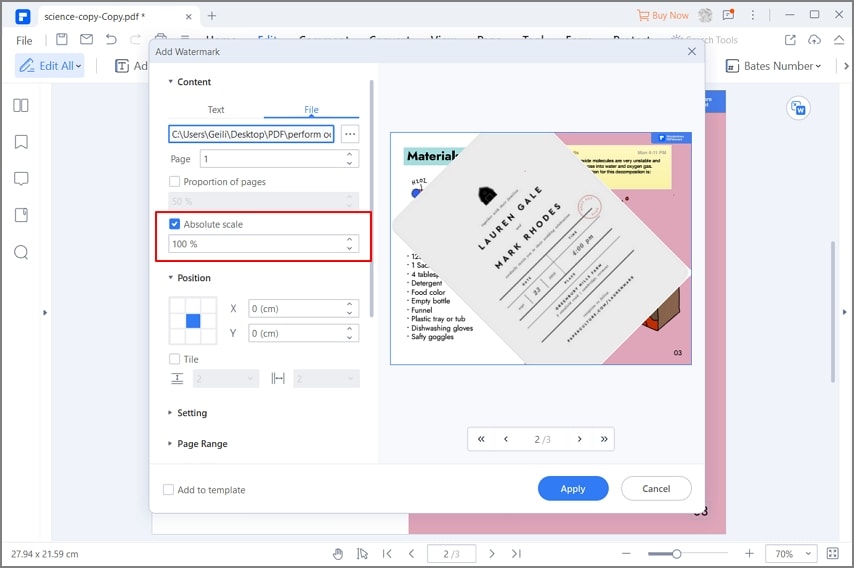
The page range setting is especially useful. For instance, you may want a “Sample” watermark only on the first three pages, or a “Confidential” watermark on every page except the cover. Doing that in Word requires section setup; doing it in a PDF editor can be faster when the document is already finalized.
Why PDFelement Is Useful After Exporting from Word
The common pain point is timing. Watermark decisions often happen late: after a contract draft is ready, after a proposal has been exported, or after a report is being prepared for external review. Reopening Word, adjusting sections, exporting again, and checking the PDF can waste time.
PDFelement is useful because it works at the PDF stage. You can add or revise the watermark, then continue with other final-file tasks such as redacting sensitive information, adding a signature field, compressing the file for email, or combining supporting documents into one PDF package.
It should not replace Word for writing and layout-heavy editing. Word is still the right place to draft the document. But once the document is in PDF form, PDFelement becomes the more practical tool for final handling and controlled sharing.
G2 Rating: 4.5/5 |100% Secure
Best Practices for Professional Watermarks
A watermark should communicate status without making the page harder to read. The right watermark depends on the document’s audience, sensitivity, and final format.
Choose the Right Wording
Use direct wording. “Draft,” “Confidential,” “Internal Use Only,” “Sample,” and “Do Not Distribute” are common because they are clear at a glance.
Be careful with words that carry legal or business implications. Marking something “Approved” or “Final” can create confusion if the document is still under review. If a document contains regulated or sensitive information, follow your organization’s naming and classification rules rather than inventing your own labels.
For client-facing documents, avoid overly aggressive marks unless necessary. “Client Review Draft” can feel more professional than a giant red “DO NOT COPY” across every page.
Keep It Readable but Not Distracting
A watermark that is too faint may be useless. A watermark that is too dark can make the document unpleasant to read. The middle ground is usually a light gray or pale color with enough size to be noticed.
Before sending the file, check at least three views: on screen, exported to PDF, and printed if printing matters. Some watermarks look fine on a monitor but become heavy on a black-and-white printer.
If your document includes charts, tables, and images, inspect those pages separately. Busy pages may hide the watermark, while blank pages may make it look much stronger.
Use PDF for Final Sharing
Word documents are easy to edit, which is useful during drafting but risky for final sharing. If your watermark is meant to discourage copying, mark a status, or preserve a review version, PDF is often the better final format.
Exporting to PDF helps preserve the page layout and reduces accidental changes. For stronger control, you can also add password protection or restrict editing in your PDF tool. Watermarks are not a complete security system, but they are a visible layer of document control.
For more details about Word’s built-in behavior, Microsoft’s support pages are a useful reference. For final PDF workflows, a PDF editor such as PDFelement gives you more control after the document leaves Word.
People Also Ask
-
How do you put a watermark on a Word document quickly?
Open the document, go to Design > Watermark, and choose one of Word’s built-in watermark options. Word will apply it to the document automatically. In Word 2010 or 2007, use Page Layout > Watermark instead. -
How do I put a custom watermark in Word?
Go to Design > Watermark > Custom Watermark. Choose Text watermark to type your own wording, or choose Picture watermark to use a logo or image. You can adjust the font, size, color, transparency, scale, and layout before clicking OK. -
Can I add a watermark to only one page in Word?
Yes, but it requires extra setup. The cleanest method is to place the target page in its own section using Layout > Breaks > Next Page, unlink that section’s header from the previous section, and then apply the watermark only to that section. For quick informal files, you can also use a rotated text box or WordArt object behind the text. -
Why can’t I see my watermark in Word?
Make sure you are in Print Layout view. If the watermark still does not appear, it may be hidden behind a table, image, shape, or text box with a solid fill. The watermark may also have been applied to a different section of the document. -
How do I remove a watermark from a Word document?
Use Design > Watermark > Remove Watermark. In Word 2010 or 2007, use Page Layout > Watermark > Remove Watermark. If that does not remove it, double-click the header area, select the watermark object manually, and press Delete. -
Can Word add a logo as a watermark?
Yes. Go to Design > Watermark > Custom Watermark, choose Picture watermark, and select your logo image. Use the scale and washout settings to control its size and brightness. A transparent PNG logo usually works better than a logo with a solid background. -
Can I put a watermark in Word for the web?
Word for the web may display existing watermarks, but creating or editing watermarks is better handled in the desktop Word app. Open the file in the desktop version, add the watermark through Design > Watermark, and then save it back to OneDrive or SharePoint. -
Will my Word watermark appear after saving as PDF?
Usually, yes. Word watermarks normally appear in exported PDFs. Still, you should open the PDF and check it before sending, especially if your document has tables, images, text boxes, section breaks, or custom headers. -
How do I add a watermark to a PDF after converting from Word?
Use a PDF editor such as PDFelement. Open the PDF, choose the watermark tool, create a text or image watermark, adjust opacity and page range, and apply it. This is useful when the Word file is no longer available or the PDF is already the final version. -
Is a watermark enough to protect a document?
No. A watermark is a visible warning or status label, not full protection. For sensitive files, combine watermarks with PDF permissions, password protection, redaction where needed, and careful sharing practices.

