How to Insert Clip Art in PowerPoint
Do you want to make your presentation more attractive and appealing?Adding clip art is a great choice for that. So this article shows you a simple menthod to insert clip art in PowerPoint.
 100% Secure |
 Home
>
PowerPoint Tips
> How to Insert Clip Art in PowerPoint
Home
>
PowerPoint Tips
> How to Insert Clip Art in PowerPoint
Clip Art is a collection of media files, including images, audio, video, and animation files. And Microsoft includes this collection of media files with the Office package, which are available for PowerPoint, Word, and other applications. In newer versions, you can also access Bing.com to search for images, as long as you have an Internet connection. So, how can you insert a PowerPoint clip art? This post gives you a specific guide to help you achieve this process.
Recommendation: To convert files between PowerPoint, Word, Excel, and PDF formats, a PDF editor like Wondershare PDFelement is essential. This tool not only converts office documents to PDF swiftly but also provides advanced PDF editing capabilities, including tasks such as adding images, correcting typos, and much more..


 G2 Rating: 4.5/5 |
 100% Secure
How to Insert Clip Art in PowerPoint
There are different steps for adding clip art PowerPoint. It depends on which version of the software you have. For starters, newer versions do not have a clip art library. But they still allow you to insert PowerPoint clip art free. It just has a matter of different steps. Let’s start with a guide for older versions first.
• For PowerPoint 2013/2016/2019
These newer versions of PowerPoint do not contain a clip art library. However, you can still insert a clip art in PowerPoint. Here is a quick guide om how to insert clip art in PowerPoint.
Step 1. Open the PowerPoint
Open the PowerPoint and go to “Insert” > “Online Pictures”.
Step 2. Select the Clip Art
A window pops up, and you can type a word or phrase that will describe the image you search for, then press the Enter key.

Step 3. Insert the Clip Art
You can filter the results by “Type”. The results include photographs, clipart, line drawing, animated GIF, and more. Select "Clipart" if you want only clip art results. Finally, you can select a picture you want to use, and then click “Insert”.
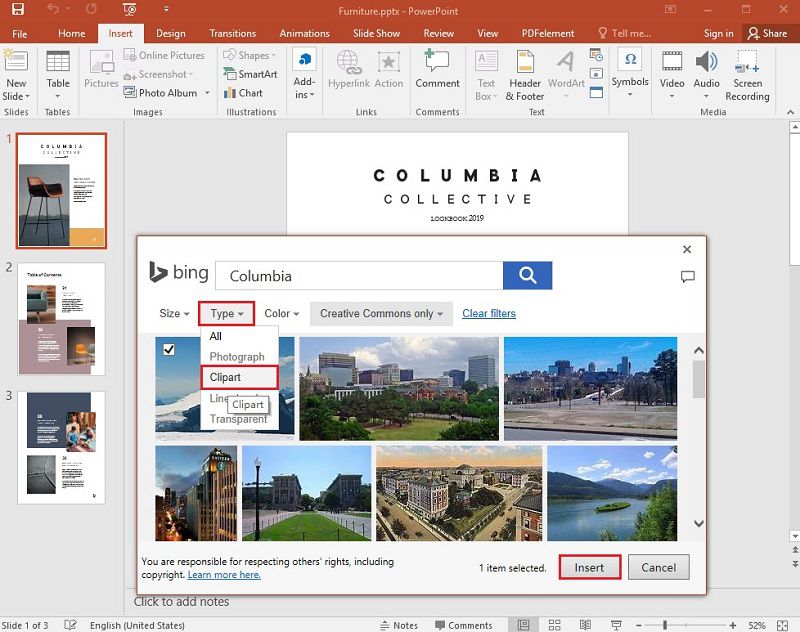
Note: Bear in mind of the licensing filter. You can choose between “Creative Commons only” and “All”. You are responsible for respecting copyright. You can also try and install the Office add-in Pickit. This add-in will give you free and licensed clip art for Microsoft Office usage.
• For PowerPoint 2010
- Step 1. Go to the “Insert” tab of the toolbar ribbon and then click on “Clip Art”.
- Step 2. The “Clip Art” task panel will appear on the right side of the application window.Then go to the Search for box, and type keywords that fit the image/animation you search for.
- Step 3. In the “Results Should Be”, select the types of media you want to get. You can select all media types, or check only illustrations, photographs, videos, and audio.
- Step 4. If you are connected to the internet, select the “Include Bing Content”. Click on “Go” to begin the search, and the results will be shown in the task panel. You can scroll vertically or horizontally. Right click on an image to enter the “Preview/Properties” window. Here, you can browse by selecting previous or next.
- Step 5. Once you have the image you want, right click the thumbnail image in the task panel, and then click on “Insert”. After you insert the image, you can adjust placement. Finally, you can select it, and drag it using your mouse.
The Best PDF Software
PowerPoint is a Microsoft Office application. But what happens when you want to send your PowerPoint presentation to a person without Microsoft Office? That can make communication harder. Which is why many users convert their PowerPoint presentation to a PDF file format. PDF is the most versatile file format. You can use it on any operating system or any device. More importantly, you can add images in PDF as well. For that, you need a powerful and comprehensive PDF editor. Wondershare PDFelement - PDF Editor Wondershare PDFelement Wondershare PDFelement is such an application, working with powerful editing and annotating tools, for a price that is much lower than the competition. Here are the main features:
G2 Rating: 4.5/5 |100% Secure
- Convert or scan PDF to a wide range of file formats.
- Quickly and easily edit PDF documents without going back to the source file.
- Edit any object within the PDF file.
- Automatically create fillable form fields.
- Manually add form fields within the document.
- Extract data from fillable form fields.
- Add comments, markups, stamps, drawings, and other comments and annotations.
- Use OCR to turn any image into searchable and editable text.
- Optimize PDF to reduce file size.
- Add digital signature to your documents.
How to Add Image to PDF Documents
Step 1. Select the Image in the PDF File
Open the PDF file and click the "Edit" button, and then select the image or object you want to edit. Drag the object to move it. You can notice an alignment grid line that will allow you to keep the documents alignment set. You can also click the object, and use the arrow keys to move the object.
G2 Rating: 4.5/5 |100% Secure

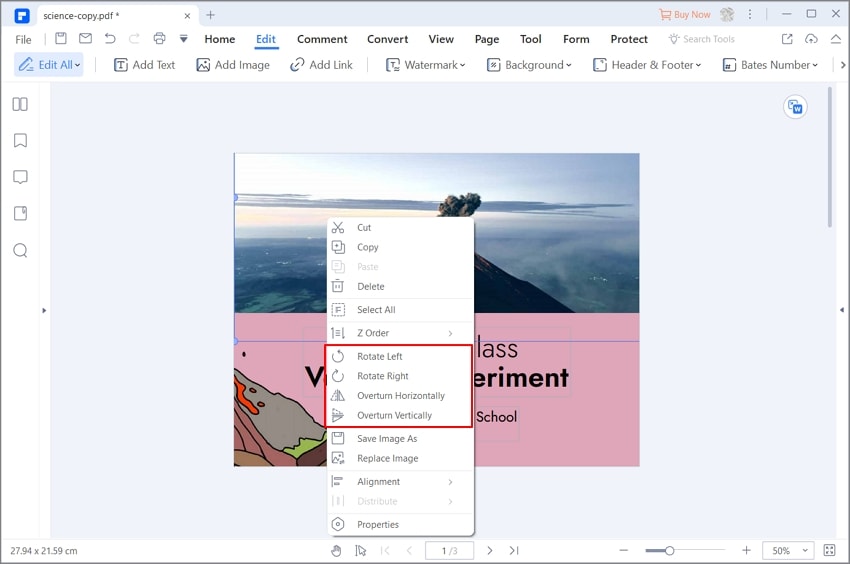
Step 2. Edit the Image
Place the mouse cursor on the edge of the box to drag and resize the image. Right click on the edge of the blue box to click rotate left, overturn horizontal, rotate right, or overturn vertical. Other options include replace image, clip image, and more. You can find all of these options in the right-side panel as well.
Step 3. Add Image to PDF
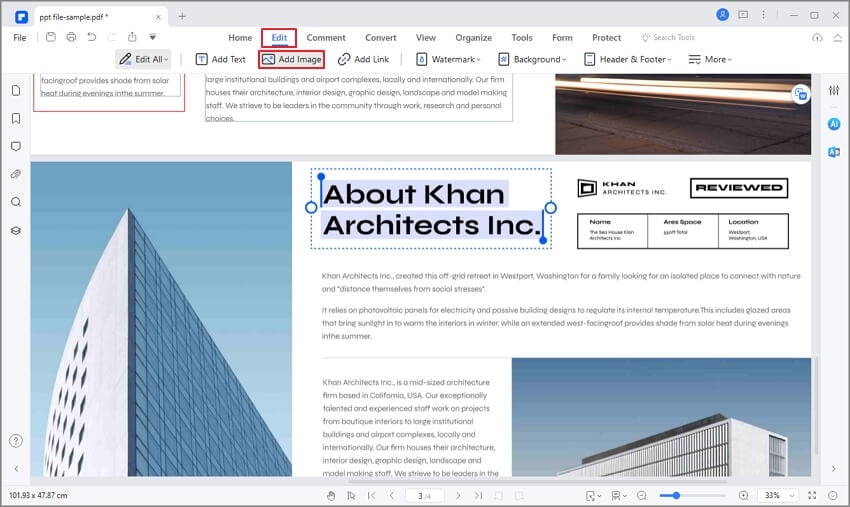
Go to “Edit” > “Add image”, and select the image you want to add in your document. If you click the “Edit” button in the top-left corner, you can also copy and paste an image from the clipboard into the PDF directly.
Free Download or Buy PDFelement right now!
Free Download or Buy PDFelement right now!
Try for Free right now!
Try for Free right now!


Elise Williams
chief Editor