 Home > Compress PDF on Mac > How to Compress PDF without Losing Quality on Mac (macOS 11 Included)
Maintaining the quality of PDF documents is important especially in the academic and corporate worlds. Since large PDFs often used in these fields are easier to handle when compressed, you will have to reduce the sizes. If you compress PDF high quality in the wrong way, you are likely to lose its value and hence make it questionable and unreliable. The most recommended way to compress PDF without losing quality is through PDFelement for Mac, a top-notch PDF editor.
Part 1. How to Compress PDF High Quality on Mac
PDFelement for Mac performs tremendously in all its functions and hence can compress PDF high quality perfectly and produce a valuable document. This impeccable compressor tool does not encourage the removal of any PDF elements like images to reduce size. Instead, it provides several compression options.
Therefore, it gives you the freedom to personalize the new PDF file you need through custom compression settings. Many professional PDF editors complicate matters, making it difficult to use them. Luckily, PDFelement for Mac simplifies the compression process to 3 steps as explained below, and so beginners are advised to feel free to use it.
Here is the PDFelement for Mac procedure to compress PDF files without losing quality.
Step 1: Run PDFelement for Mac and Launch the Respective PDF
To compress PDF high quality, first, visit Wondershare’s official website and download PDFelement for Mac. Since it works perfectly in macOS 10.14,10.15 Catalina, and 11 Big Sur, the installation process will go smoothly. When done, go to Applications, click on the PDFelement for Mac icon and run it.
Launch the respective PDF by dragging and dropping it in the PDFelement for the Mac window, where it will open automatically. Alternatively, select the “Open File” option at the program’s bottom and include the respective PDF file.

Step 2: Select Compression Level
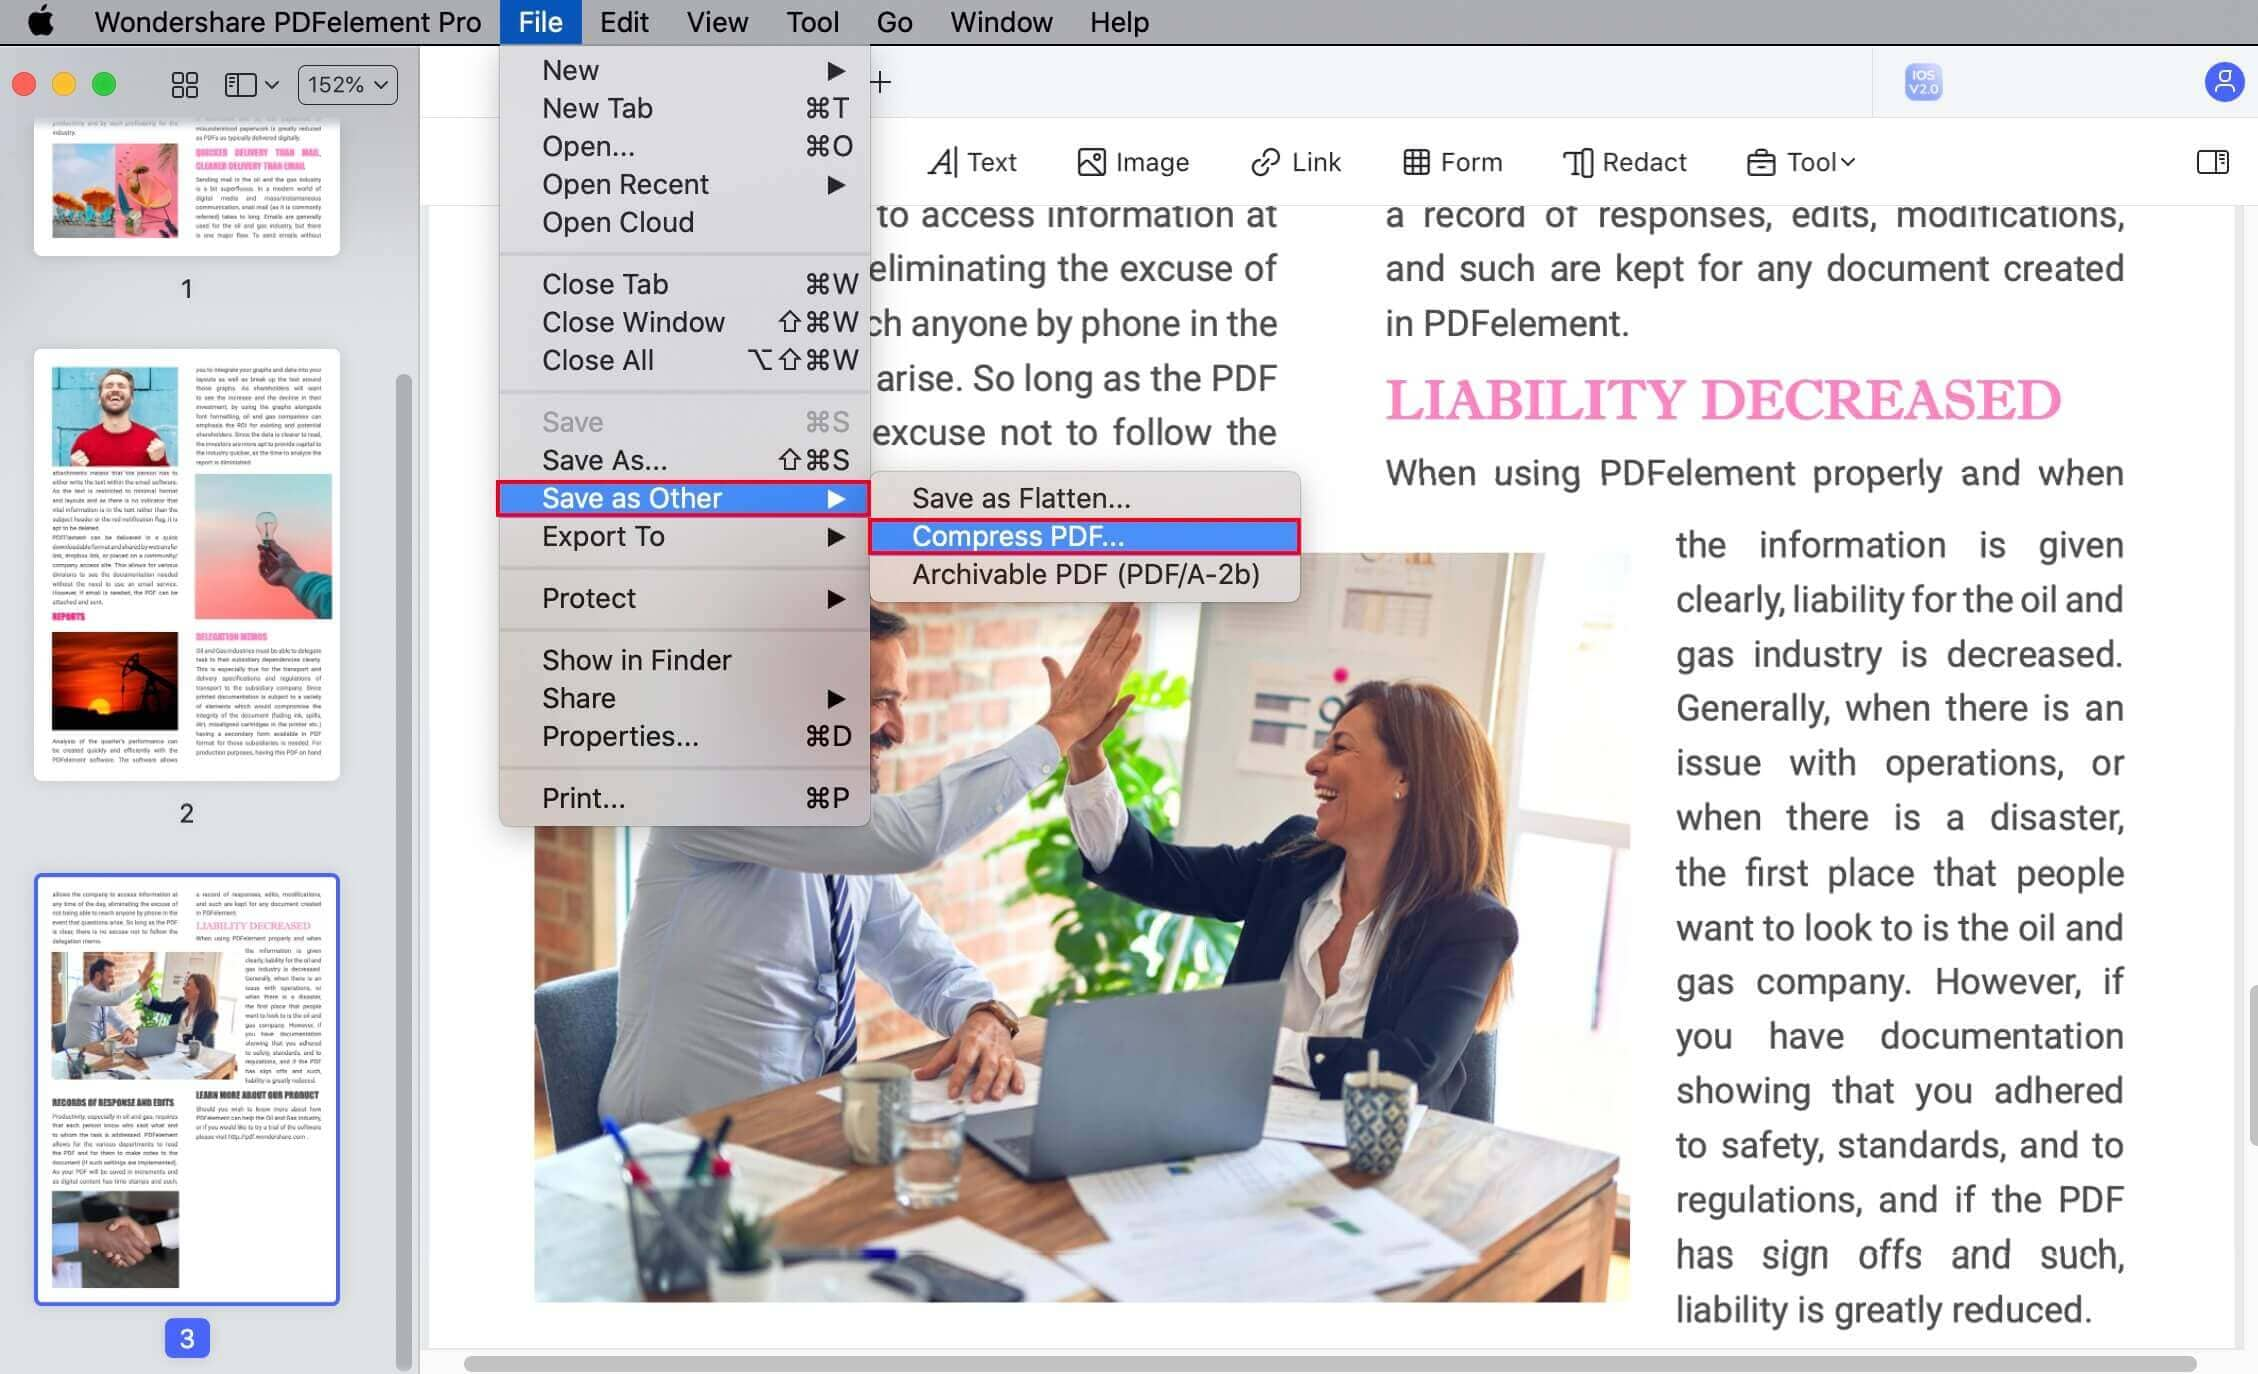
There are various compression levels, low, medium, and high, and so you must specify your choice. To access these compression levels, go to the main menu at the window top and click on “File”. A drop-down menu will appear, so choose “Save as Other”. Few choices will appear, here select “Optimized PDF”. An optimization window will pop up, whereby you should select the most suitable compression settings. Since you would like to compress PDF without losing quality, it is advisable to select the High.
Step 3: Preview Compressed PDF and Save
If you select the Low or Medium or High options, it is necessary to check the outcome. The application will bring forth the original PDF and the compressed file. You should confirm that quality has not been interfered with. In case you find any interference, it is possible to go back to the compression settings and choose the best, the High option, since it provides the best compression results.
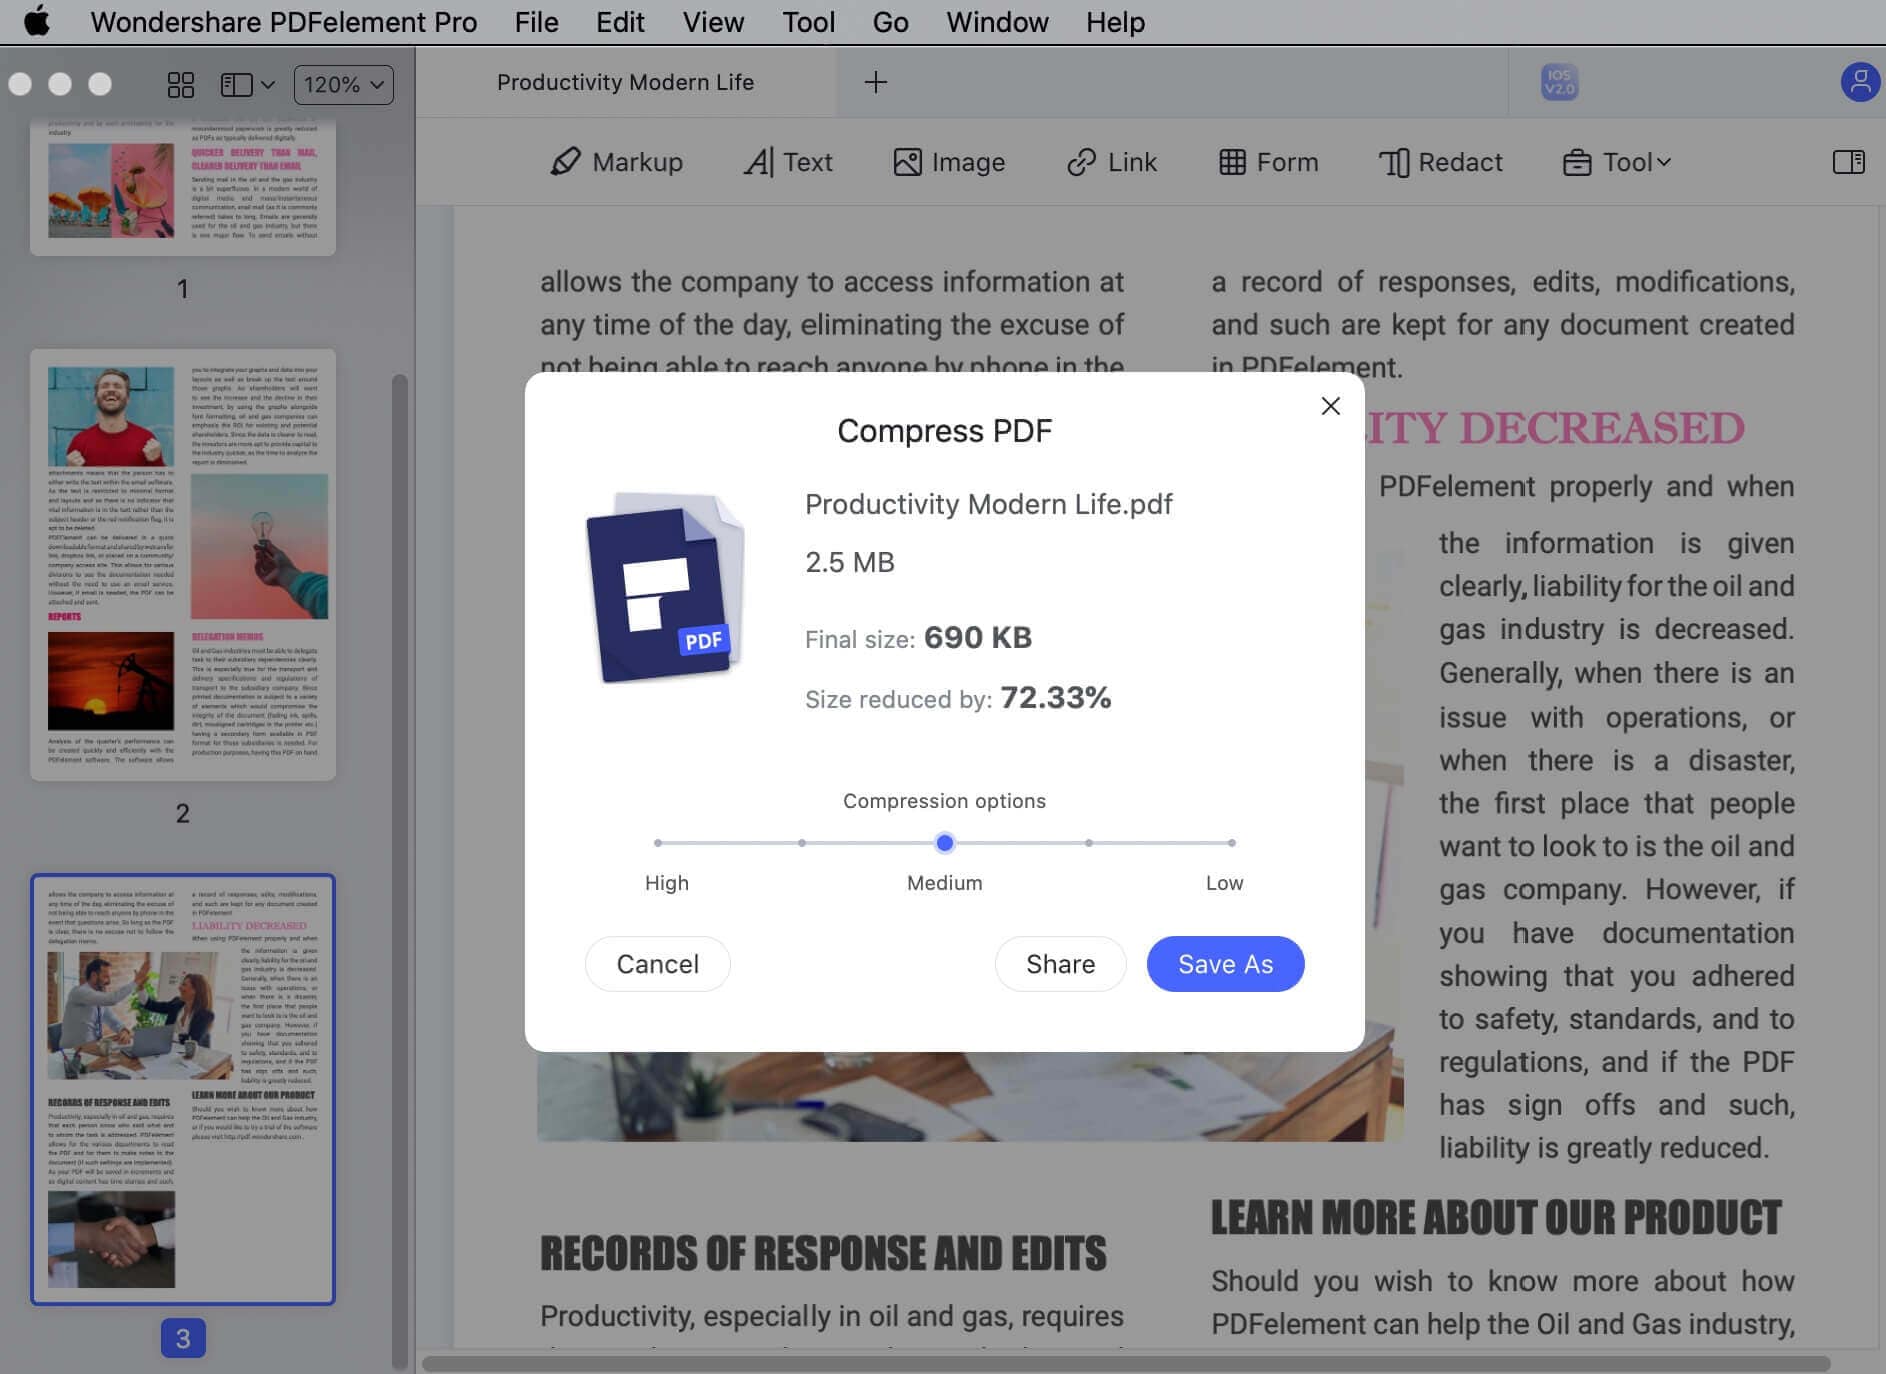
Once you agree with the quality of the compressed PDF, click on Save As, a function that allows you to rename the new compressed file.
Part 2. How to Compress PDF Files with Preview
Preview is a text and image viewer built into the macOS operating system. In this viewer, you will find a tool that will help you reduce the size of your PDFs without losing quality.
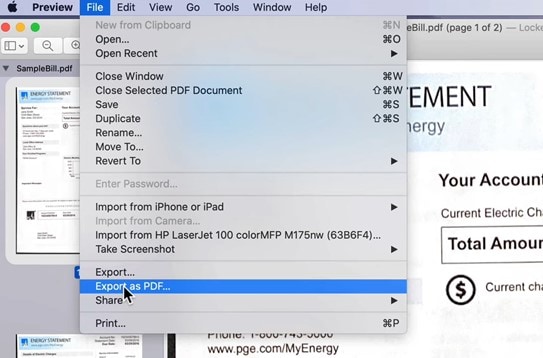
Step 1: Go to Export as PDF…
The first thing you have to do is open your PDF document with Preview. Next, display the "File" menu and click on the option "Export as PDF ..."
Step 2: Set the exportation preferences
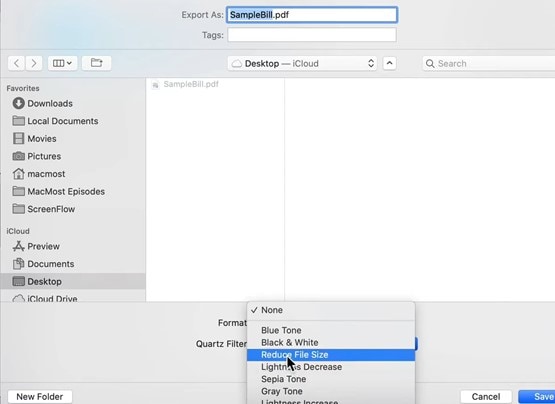
Next, you will see a window where you can choose the export preferences. In the upper part of the window, choose the name for the document and, in the lower part of the window, in the option "Quartz Filter," select the option "Reduce File Size" and click "Save."
Part 3. How to Compress PDF Document with Expert
PDF Expert is a PDF reading and editing application. This application is easy to use and allows different levels of compression.
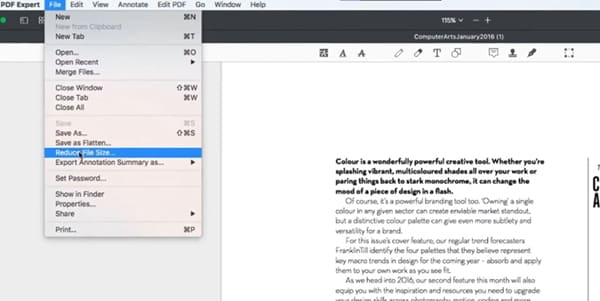
Step 1: Go to Reduce File Size
The first thing you should do is open your PDF document with PDF Expert. Next, go to the "File" menu and click on the option "Reduce File Size ..."
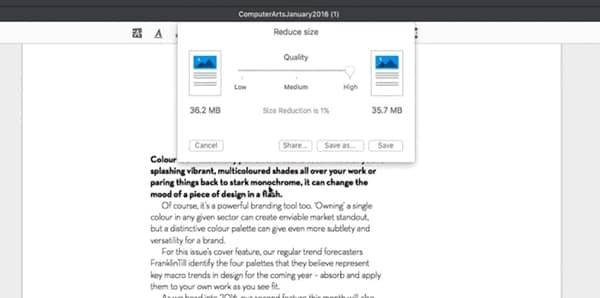
Step 2: Set the compression features
Next, you will see a window where you can adjust the compression level and calculate the weight of the document. When you have selected the most suitable setting, click on "Save as ..." and choose a destination location.
Part 4. How to Compess PDF with PDF SAM
PDF Sam is an application focused on managing PDF documents and, in its Pro version, offers an advanced compression tool.
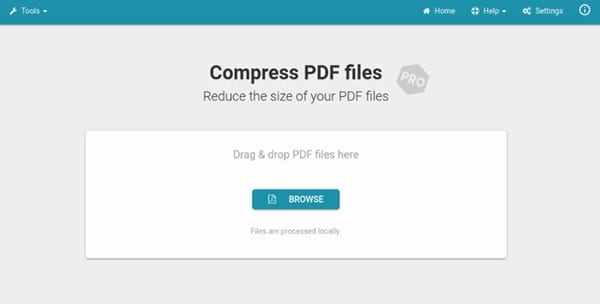
Step 1: Open your PDF with PDF SAM
Once you have opened the application, drag and drop the document into the window.
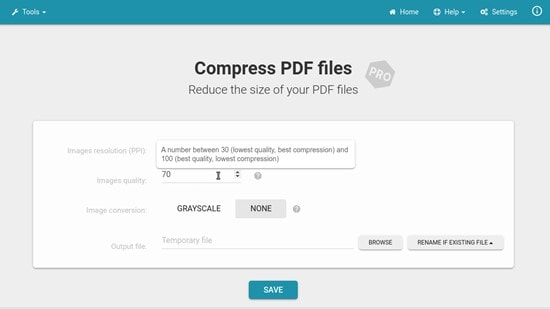
Step 2: Set the compression features
Now, you will see a window where you can adjust the resolution, color, and quality of the images to reduce the document's weight. Adjust the parameters and click on "Browse" to add the path where the file will be stored, then click on "Save."
Small Tips to Compress PDF on Mac
Compressing PDF documents without losing quality is theoretically impossible since compression consists of discarding information. However, this does not mean that the lost quality is noticeable. Next, I will give you some tips that can help you compress your documents without perceiving a quality reduction.
- Keep the image smaller:
High-resolution images are often large files, and it is generally unnecessary for images to have such a high resolution. If your PDF document has a lot of images of this type, it is possible that by simply reducing the scale of the images, you can drastically reduce the size of the file with no apparent change in quality.
- Delete unnecessary pages or images:
Less is more. Keeping your document organized, with only the necessary images and pages, will reduce the weight of the file and improve the reading experience and facilitate reading comprehension.
- Convert PDF to other formats:
If you want to reduce the size of your PDF document solely to save its information, you can extract its text and image content and store them in other files, thus saving only what is essential.
Extended: How to Reduce PDF File Size on iPhone or iPad with Good Quality
If you are an iPhone or Ipad user and you need to reduce the size of your PDF documents, you can perform these tasks in a short time with PDFelement. PDFelement is a PDF document management software available on macOS and iOS. Below I will show you how to use it.
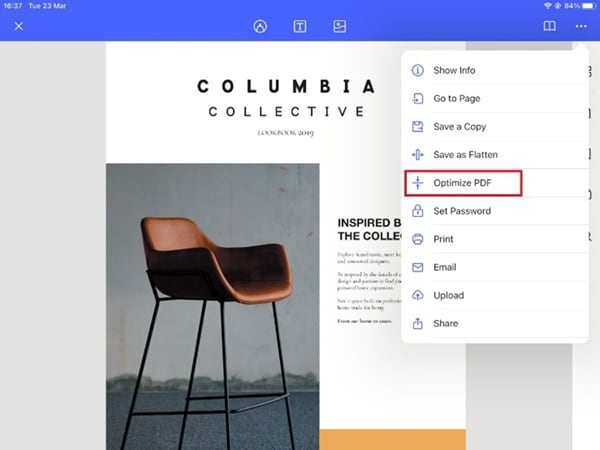
Step 1: Go to Optimize PDF
You should first open the PDFelement application on your device and open the document you want to compress. Next, touch the button "..." found in the upper right and choose the option "Optimize PDF."
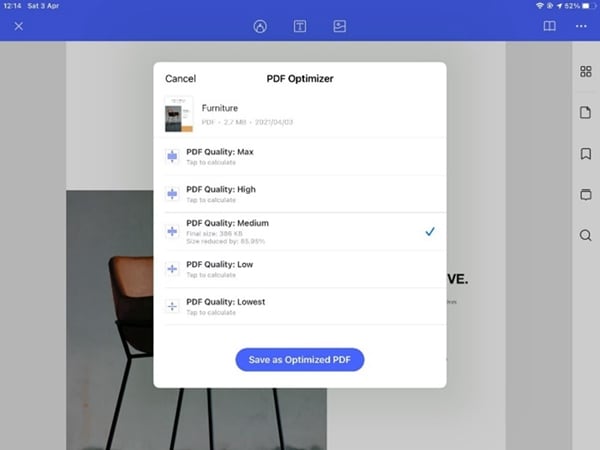
Step 2: Save the Optimized PDF
Now you will see a window where you can choose the level of compression of the document. Choose one of the options and, when finished, press the button "Save as Optimized PDF.
Conclusion
The PDF format is ideal for transferring information. Still, it is essential to consider the weight of these documents because, if they have high-resolution images, they could become weighty and challenging to transfer. Fortunately, compressing PDF documents on Mac is very simple and, thanks to applications such as PDFelement, it is also possible to carry out these processes from your iPhone or iPad.
Free Download or Buy PDFelement right now!
Free Download or Buy PDFelement right now!
Buy PDFelement right now!
Buy PDFelement right now!
 100% Secure |


Audrey Goodwin
chief Editor
Comment(s)