Today, more than half of all business documents are shared online. That's why professionals and students must learn how to create a signature on a MacBook.
In our article, we'll introduce the best ways to add your signature to PDFs using a MacBook. We'll look at several tools that are easy to use and suitable for different needs. Whether you're signing a contract or approving project plans, knowing these methods will help your work run smoothly and securely.
In this article
Method 1: How to Create a Digital Signature on Mac Using PDFelement
If you need to create a signature on your MacBook, PDFelement is a good choice. It's an all-around app that lets you sign documents in different ways. You can easily type, draw, or upload your signature. You can also use PDFelement to edit your documents from start to finish. You can send, complete, sign, and track your documents in one place. You can also store your signed documents securely on your computer with strong encryption.
Here are a few features of PDFelement that make it our top choice.
- Easy Signature Options: Choose how you want to add your digital signature to PDFs, whether typed, an image or handwritten.
- Cloud Management: Send, fill, sign, track, and manage your documents via Cloud for a seamless workflow.
- Local Storage with Encryption: Your signed documents are stored safely on your computer with encryption.
- Quick Legal Signatures: Make your document signing quicker by creating areas for electronic signatures that you can fill with a mouse or trackpad.
- Add a Signature Image: Improve your workflow by adding an image of your signature to documents.
- Electronic Signature Requests: Easily send documents to clients or team members for their electronic signature. They can sign from anywhere, and you'll be updated when it's done.
- Keep Your Documents Secure: Add passwords to your PDFs and hide personal information for more security.
- Sign from Anywhere: You can sign documents anywhere, anytime, and on any device.
- Stamp Your PDFs: Mark your confidential documents with a stamp. This could be an image, drawing, or text for extra security.
Step-by-Step Process
Let us walk you through how to create a digital signature on a Mac using PDFelement.
Step1Open Your PDF
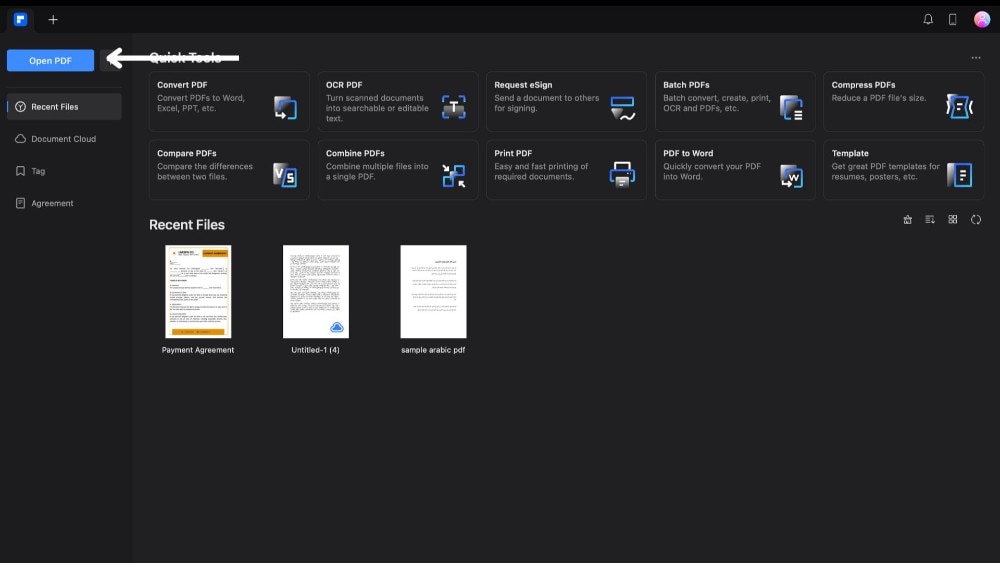
First, open the PDFelement app on your MacBook. Click 'Open PDF' to select and open the PDF you must sign.
Step2Find the Signature Tool
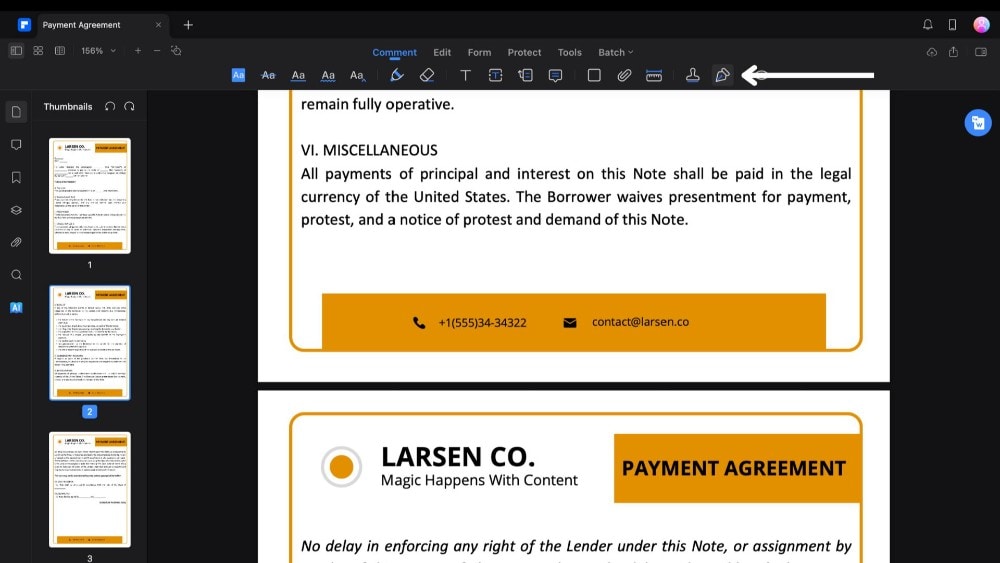
Next, click on the 'Comment' button at the top. Look for the pen icon, which is the signature tool, and click it.
Step3Start Creating Your Signature
A sidebar will show up with a 'Create Signature' button. Click it to see how you can make your signature in PDFelement. You can create your signature in three different ways.
Upload a Signature Image
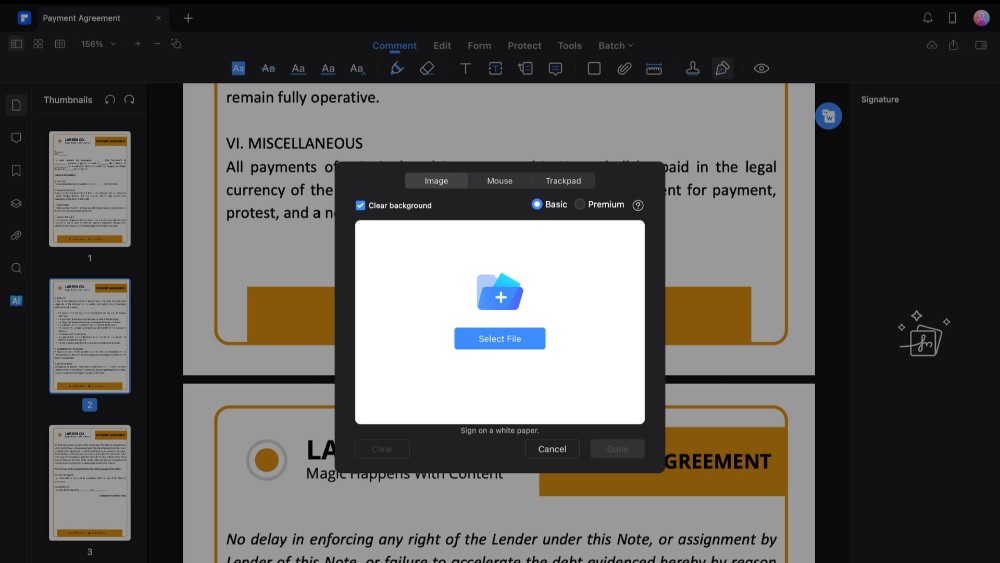
If you have a picture of your signature, click 'Select File' to upload it from your MacBook. It's best to sign on white paper for a clear signature. PDFelement will take out any background from your image.
Draw with a Mouse
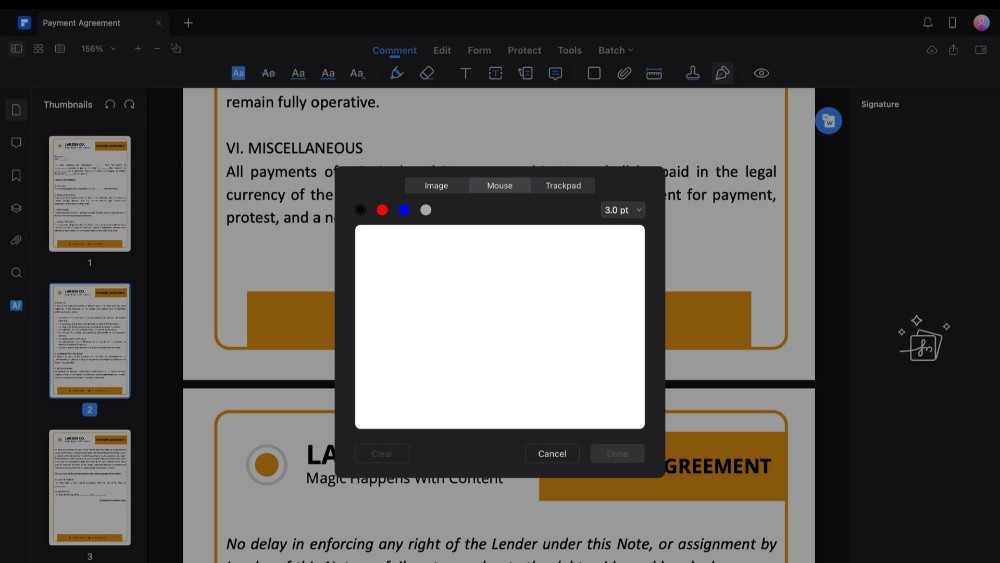
You can draw one with your mouse if you don't have a signature image. There are options for color and thickness. Draw your signature and click 'done' when you like what you see.
Use the Trackpad
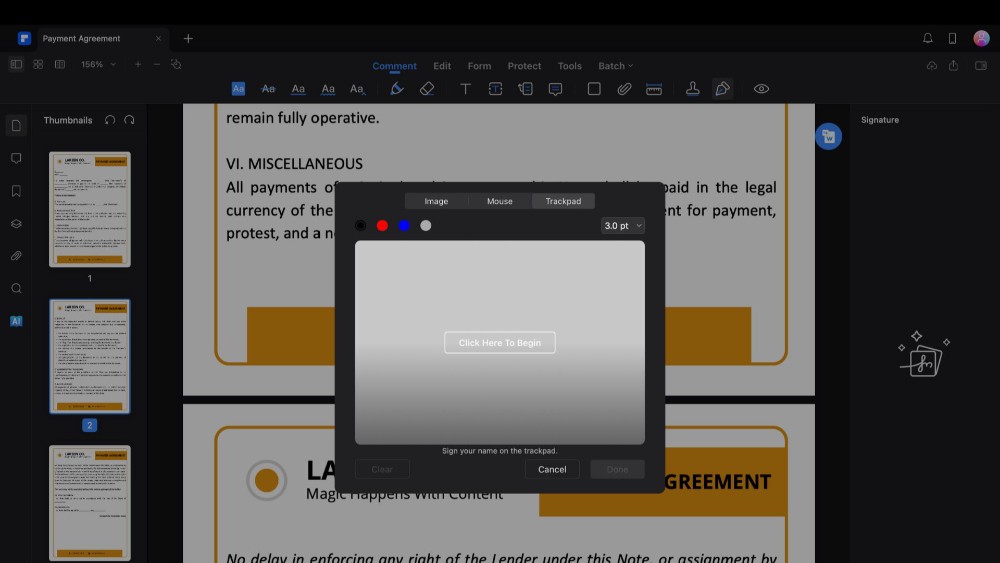
You can also make your signature using the trackpad. Just click 'Click here to begin,' sign on the trackpad, and press any keyboard key to save it.
Step4Add Your Signature
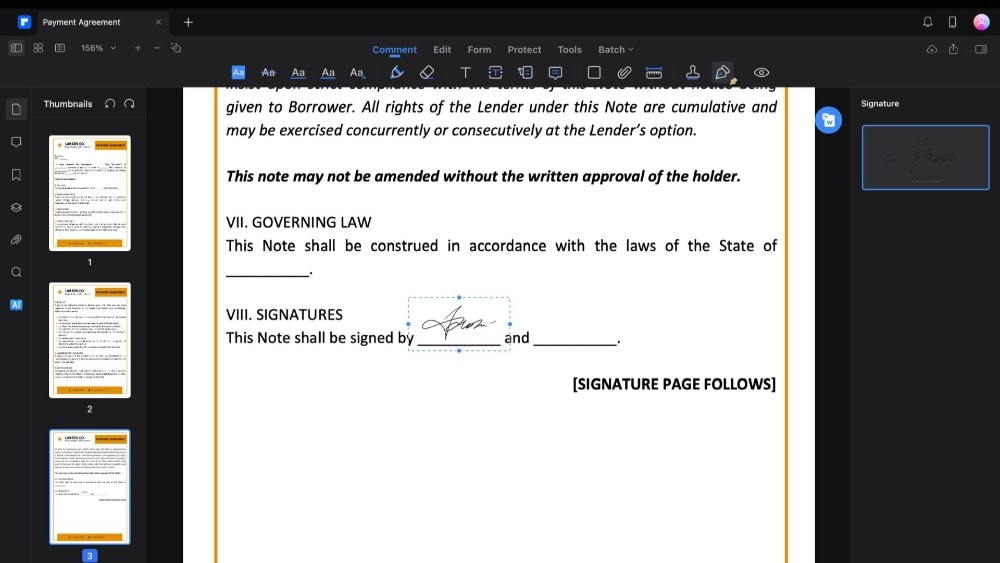
To add the signature to your PDF, first click on your signature. Then, click where you want it in the document again. You can move and resize the signature to fit your document just right.
Method 2: How to Create Digital Signatures on Mac Using Preview
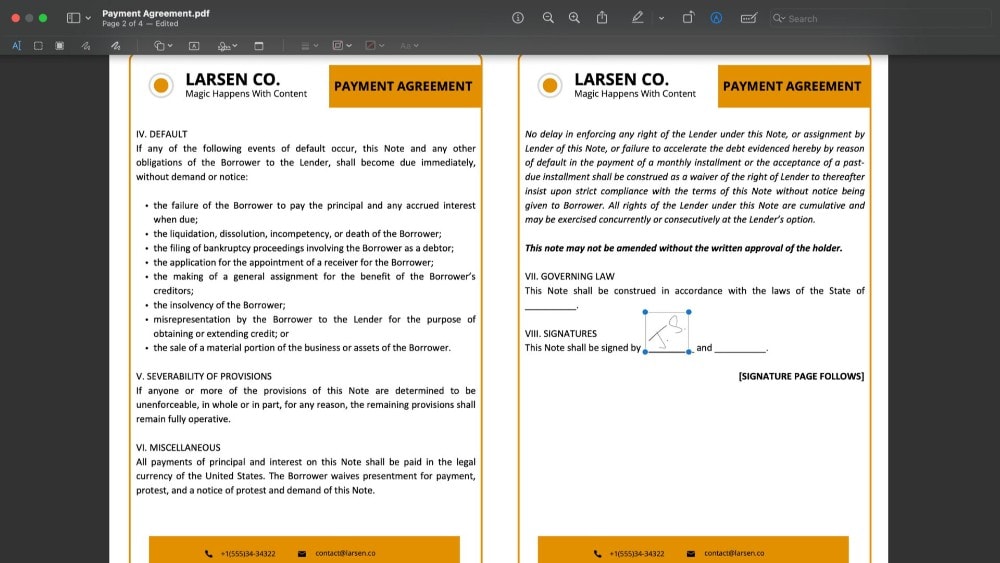
With Preview on your MacBook, adding signatures to PDFs is quick and easy. It's built into macOS, so you don't need to download anything else. This feature is ideal for signing documents without complex editing tools. With Preview, you can create a signature using the camera, trackpad, or mouse - you choose the easiest method. Once you've signed, Preview saves it. This means you can sign future documents faster.
Although Preview is suitable for simple signing tasks, it doesn't have the advanced security or editing features that other PDF programs offer. But for many, Preview's ease of use is enough to get PDFs signed on the Mac.
Step-by-Step Process
Here is how you can create a digital signature on a MacBook using Preview.
Step1Open the PDF
Download the PDF you need to sign. You can find this file in the "Downloads" section of your Finder. When you open the file, it will automatically open in the Preview app.
Step2Use the Markup Tool
Look for the markup tool in the app's top toolbar and click on it. This tool allows you to edit and add various elements to your PDF.
Step3Create Your Signature
Next, click on the signature option that appears. You'll see three different methods to add your signature to the document.
With the Trackpad
If you don't have a scanned signature, use this option. Click the 'Click here to begin' sign with your trackpad, and press any key when done. If you like it, click "Done." If not, try again.
With the Camera
Write your signature on white paper and show it to your MacBook's camera. Preview turns it into a digital signature. Click "Done" when it looks right.
With Your iPhone
Select the iPhone option, and a screen for signing appears on your iPhone. Sign there, and it shows up in Preview. Click "Done" when finished.
Step4Place Your Signature
Click on your new signature to add it to the PDF. You can move and resize it, just like any image, to fit perfectly.
Method 3: How to Create Digital Signatures on a MacBook Using Smallpdf
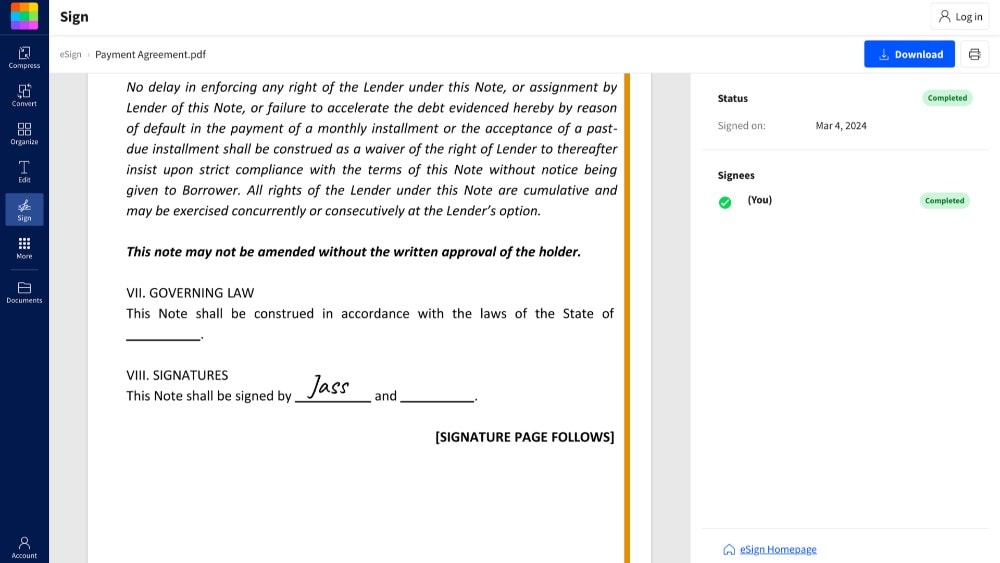
Smallpdf helps you sign documents quickly and make sure they're legally valid. When you add your signature to a document, Smallpdf ensures it is secure and has legal significance, meaning it's recognized in legal contexts.
The eSign feature in Smallpdf lets you ask up to 100 people to sign a document at the same time. It tells each person exactly where to sign, making the whole process smoother and faster for everyone involved. It also lets you easily see all the contracts still waiting for a signature, making it easier to manage them.
Step-by-Step Process
Here's how to use Smallpdf on your Mac to add signatures to PDFs.
Step1Visit Smallpdf's Website
Start by opening Smallpdf's website. Look for the 'Tools' dropdown menu at the top. Click on it and select the eSign PDF feature. There's no need to download anything; you can sign your PDF on their website.
Step2Upload Your PDF
Click 'Choose File' to pick the PDF you must sign from your downloaded files. Your PDF will upload to Smallpdf instantly.
Step3Create your Signature
After uploading, you'll move to the eSign page. Here, Smallpdf gives you three options to create your signature.
Drawing Your Signature
You can draw your signature using your mouse or trackpad. Once you're happy with it, click the 'Create' button.
Type Your Signature
Another option is to type your name. Smallpdf will transform it into a signature-like font. This is the simplest way to sign a PDF.
Upload a Signature Image
You can also upload an image of your signature from your MacBook. For the best results, sign on white paper. Smallpdf will optimize and remove any background from your signature.
Step4Add Your Signature to the Document
Scroll to the part of the document where you want to add your signature. Click on your signature to place it in the document. Like any image, you can resize and move your signature to exactly where it needs to be.
How Do Different Methods for Adding Signatures Compare?
If you need to sign documents on your Mac, there are many ways to do it. You can use Preview, which is already on your Mac, or try other programs like PDFelement and Smallpdf. Each method has its benefits and might be better for different people. This comparison will help you determine which way to add signatures works best.
| Feature | PDFelement | Preview | Smallpdf |
| Edit PDFs | Yes | Yes | Yes |
| Create Digital Signatures | Yes | Yes | Yes |
| Insert Images | Yes | Yes | Yes |
| Legal Binding Signatures | Yes | No | Yes |
| Download Required | Yes | No | No |
| Multiple Signature Options | Yes | Yes | Yes |
| Cloud Storage Integration | Yes | No | Yes |
| Optical Character Recognition (OCR) | Yes | No | No |
| Edit Scanned PDFs & Data Extraction | Yes | No | No |
| AI Tools | Yes | No | No |
| Mobile App Availability | Yes | Yes | Yes |
Takeaway
We've looked at different ways to add signatures to PDFs on your MacBook, including PDFelement, Preview, and Smallpdf. Each option offers something special: top-notch security, user-friendliness, or powerful editing features. The best choice for you will depend on your specific needs, such as how often you sign documents and what extra features you might need.
If you're looking for a versatile tool to help you manage your documents more efficiently, consider trying PDFelement. It gives you a comprehensive signing experience that caters to a wide range of needs.

 G2 Rating: 4.5/5 |
  100% Secure


