More than 80% of documents are shared online, and the ability to sign and send documents securely is more crucial than ever. For Mac users, there is an easy way to do this. You can add your signature to a PDF using Preview in Mac. Our guide shows you how to do this.
We will cover the basic steps for adding signatures to PDFs with Preview. We'll also discuss some alternative methods you can use to sign your PDFs more securely.
In this article
Part 1. Adding Signature to PDF Using Preview on Mac
Preview is a handy tool built into your Mac that allows you to do more than just view your PDFs. You can also edit them. It also allows you to add your signature to any PDF document. This makes Preview suitable for both your personal and professional tasks.
If you need to sign a document, you don't have to print, sign, and scan it again. With Preview, you can insert your signature directly into the PDF document. It saves time and helps you stay organized. It's also good for the environment as it reduces paper consumption.
Step-by-Step Process
Let's look into how to add a signature to a PDF in Preview app on a Mac.
Step1Download the PDF
First, download the PDF you need to sign. You'll find it in the "Downloads" folder on your Mac. Simply opening the PDF will automatically launch it in the Preview app.
Step2Find the Markup Tool
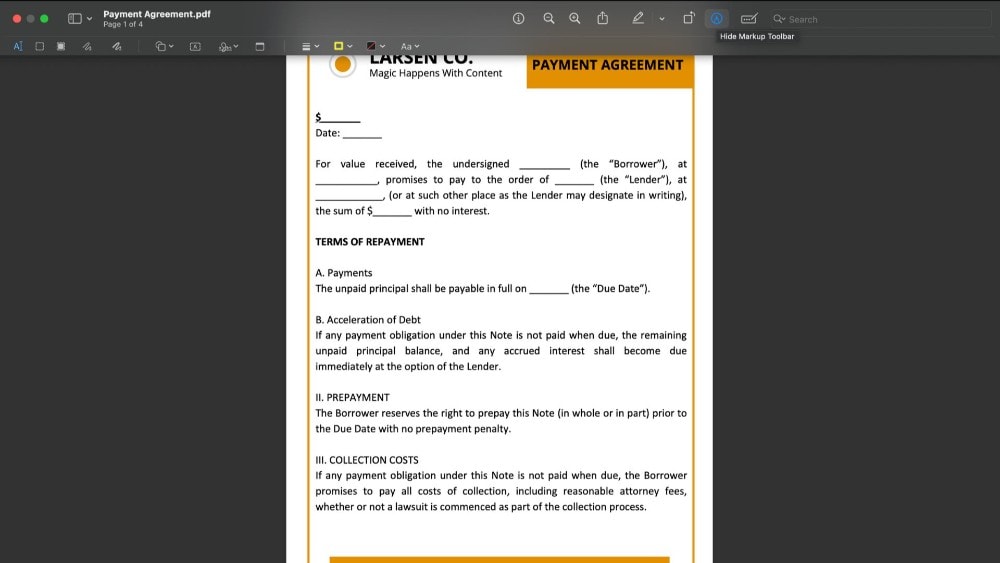
Look for the markup tool. It's located in the app's top toolbar. Click on it to proceed.
Step3Creating Your Signature
Now, click on the signature option that appears. Clicking this gives you three ways to create a digital signature on Preview.
Using Your Trackpad
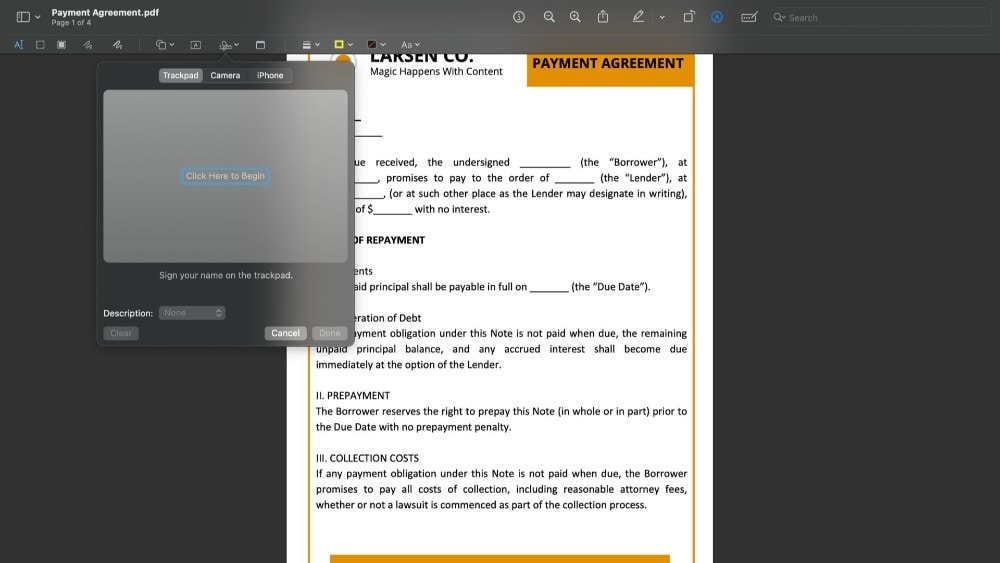
If you're okay with a simple signature, use the trackpad. You can then sign your name directly on your Mac's trackpad. Press any key when finished. If you like the signature, click "Done." If not, you can erase it and try again.
Using Your Camera
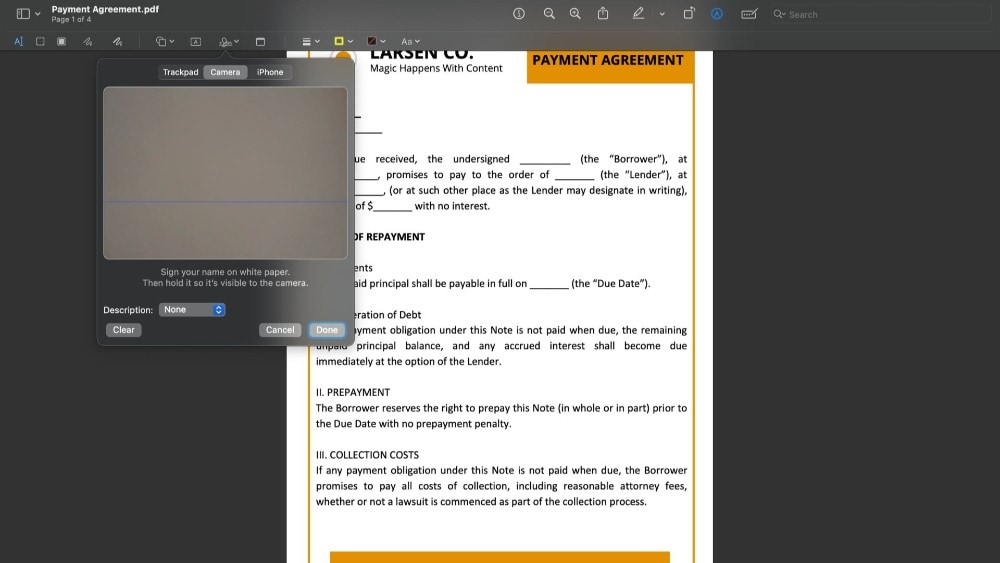
You can also take a picture of your signature. Sign your name on a white sheet of paper and hold it in front of your MacBook's camera. The Preview will then create a digital version of your signature. Click "Done" when you're happy with how it looks.
Using Your iPhone/iPad
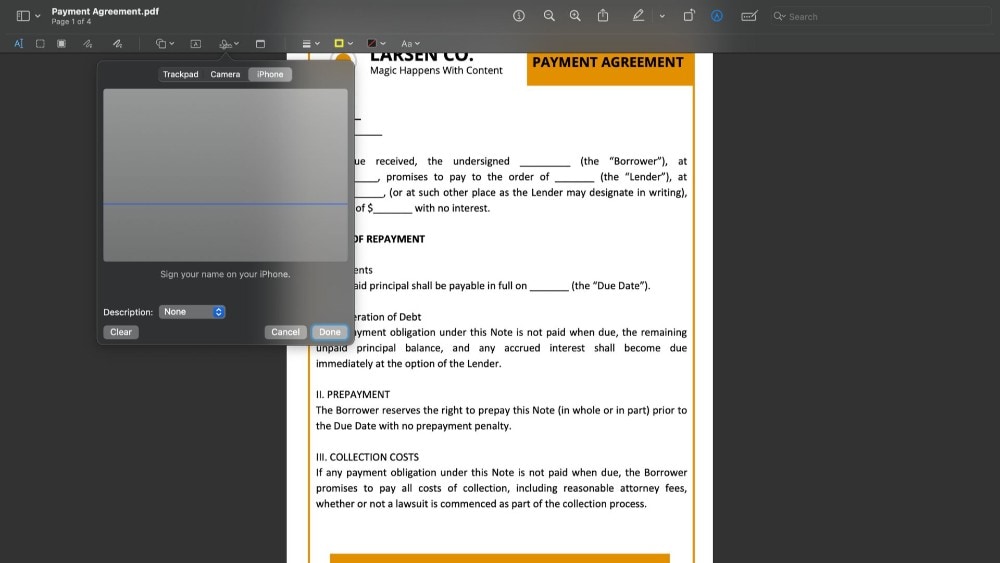
If you prefer, you can also create your signature with your iPhone/iPad. A white screen will appear on your connected iPhone/iPad when you select the iPhone option. Here, you can draw your signature with your Apple Pencil or finger.
This signature will then be displayed in the Preview on your Mac. Click on "Done" to finalize your electronic signature in Preview.
Step4Inserting Your Signature in Preview
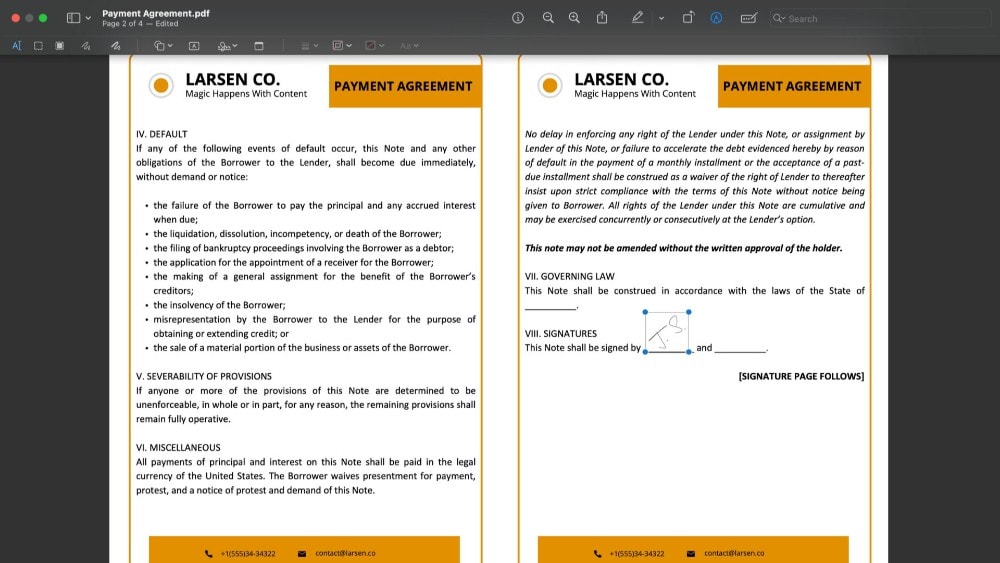
After creating your signature, inserting it into your document is easy. Just click on the signature you've made. Like a regular image, the signature can be moved and resized to fit your document perfectly.
Saving Your Signature
Regardless of which method you use for your signature, Preview automatically saves it for you. This means you won't have to do it again the next time you sign a document. Your signature is already there and ready to use.
If you ever need to delete a signature from Preview, it's easy:
- Click the Sign button to view your saved signatures.
- When you have found the signature you want to delete, hover over it with the mouse.
- An "X" will appear to the right of the signature. Click on this "X," and the signature will be deleted from the Preview.
Part 2. Adding Signature to PDF Using PDFelement on Mac
PDFelement is a versatile software that simplifies the handling of documents on your Mac, especially when you need to add signatures. With this tool, you can easily sign documents or add fields for electronic signatures using your mouse or trackpad. The clear user interface makes adding signatures to documents simple and efficient.
Here are the key features of PDFelement when signing your documents.
- Easily Create E-Signatures: Quickly sign documents or add fields for electronic signatures, saving you time.
- Add Signature Images: Place an image of your signature into documents to streamline your workflow.
- Document Tracking: Monitor the status of your signed documents in real time from any device.
- Document Protection: Keep your PDFs and personal information secure with advanced security features.
- Password Security: Add passwords to your PDFs for extra protection against unauthorized access.
- Redact Sensitive Info: Remove sensitive information from your PDFs to protect your privacy.
Step-by-step process
Here's a guide on creating and adding your signature into a PDF using PDFelement on a Mac.
Step1Open the PDF
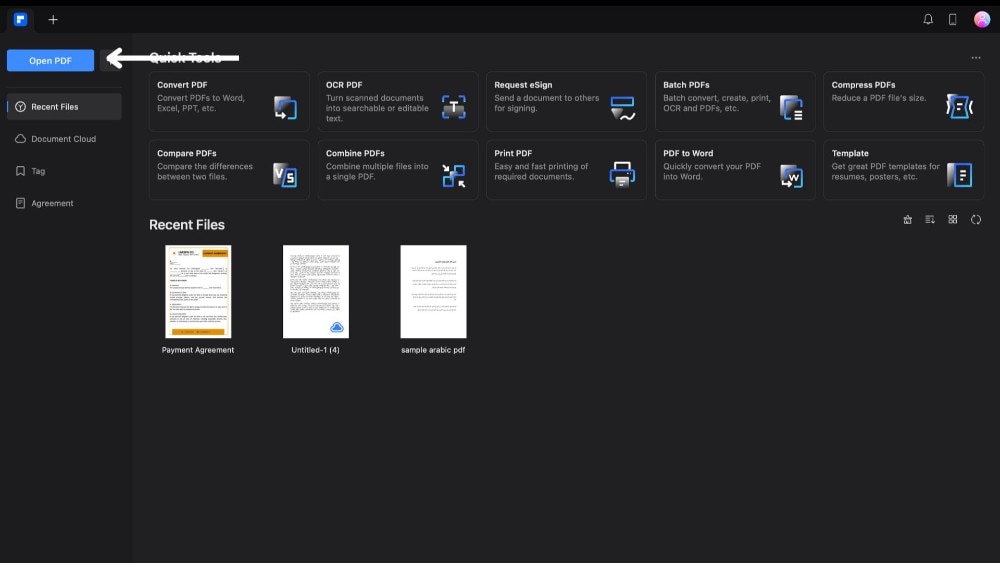
First, open up PDFelement on your MacBook. Click 'Open PDF Option' and pick the PDF you need to sign. It will open in a new window.
Step2Find the Signature Tool
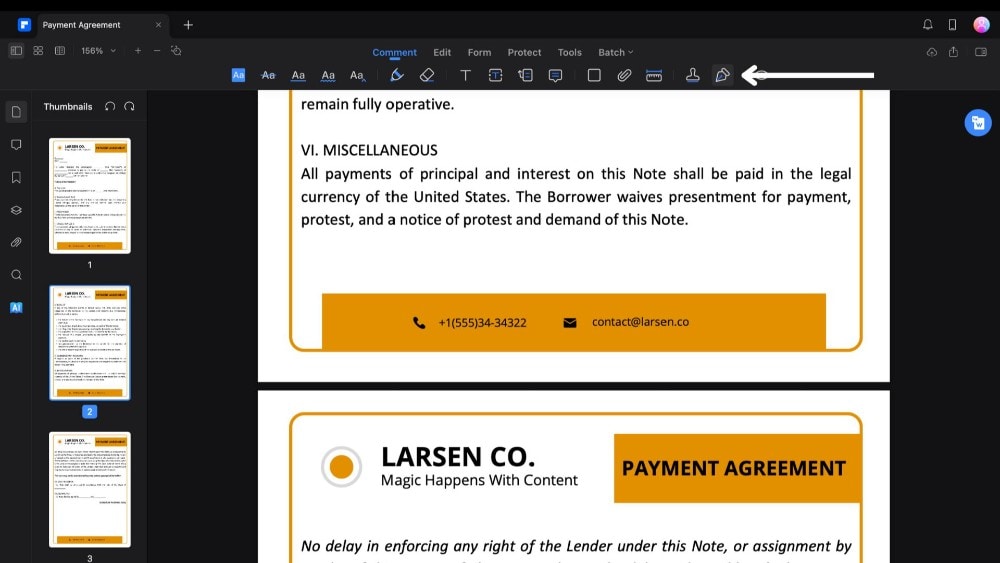
Then, go to the top toolbar and click on 'Comment.' Look for the pen icon, which is for signatures, and click it.
Step3Create Your Signature
A side menu will show up. Click "Create Signature" to see your options for making a signature with PDFelement.
Using an Image
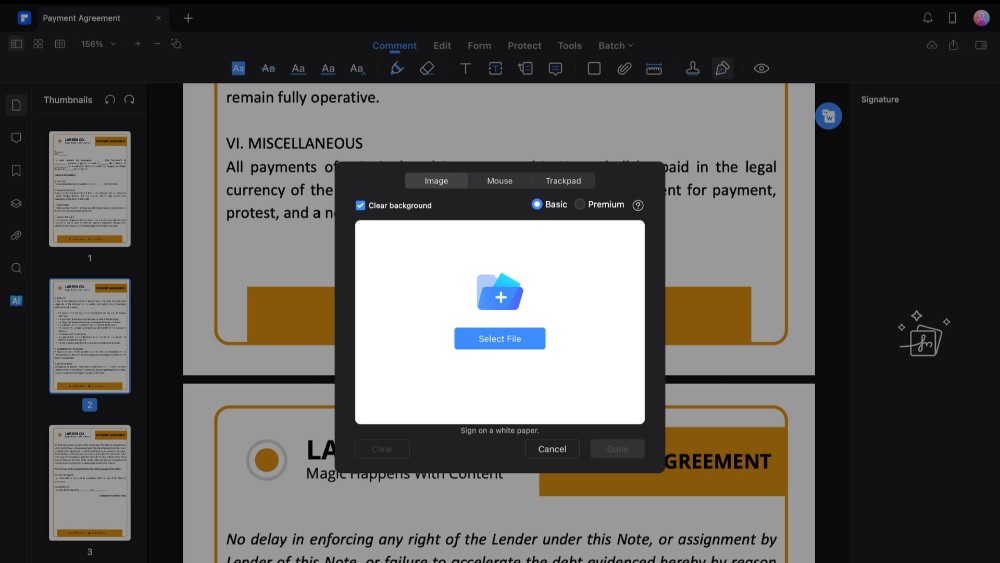
Use this option if you already have a picture of your signature on your MacBook. Click 'Select File,' choose the signature file from your MacBook, and upload it. Signing on white paper is best to ensure your signature is precise. PDFelement will clear out any background from your image.
Using a Mouse
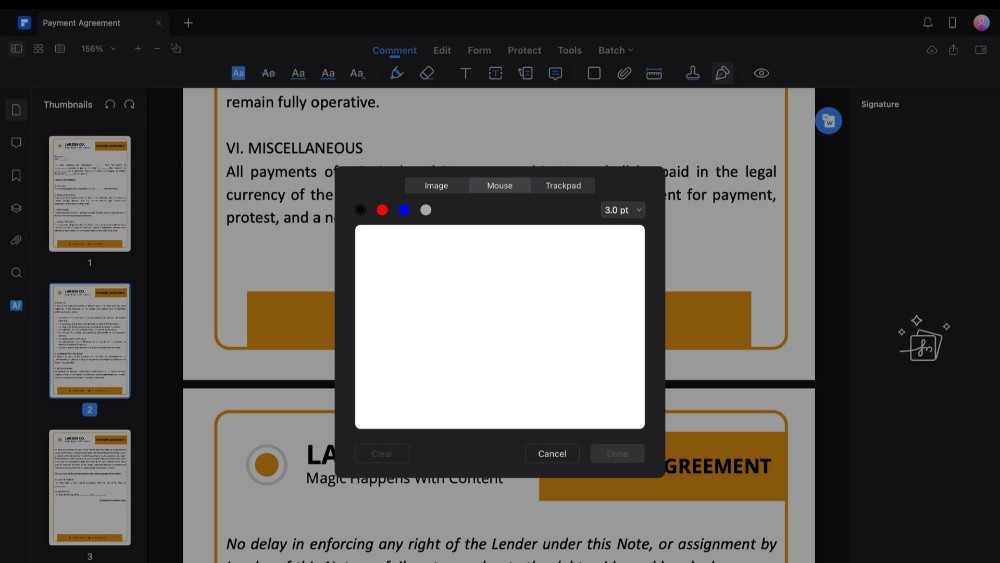
You can also use your mouse to sign directly within the app. You can choose from four colors and adjust the boldness of your signature. Once you're happy with it, click "Done."
Using a Trackpad
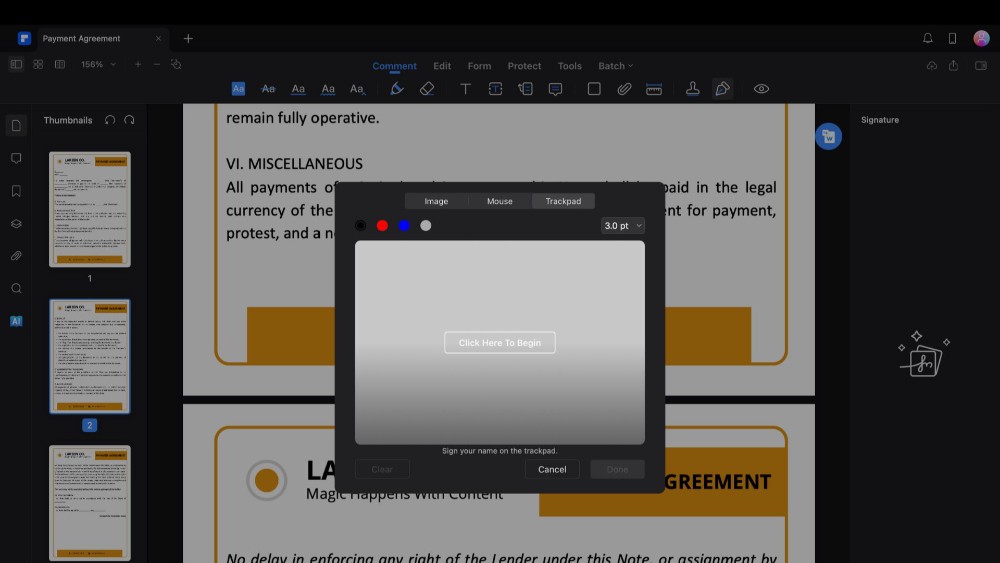
The simplest method might be using your Mac's trackpad. Select 'Click here to begin' and sign your name on the trackpad. Press any key on your keyboard to save the signature.
Step4Inserting Your Signature
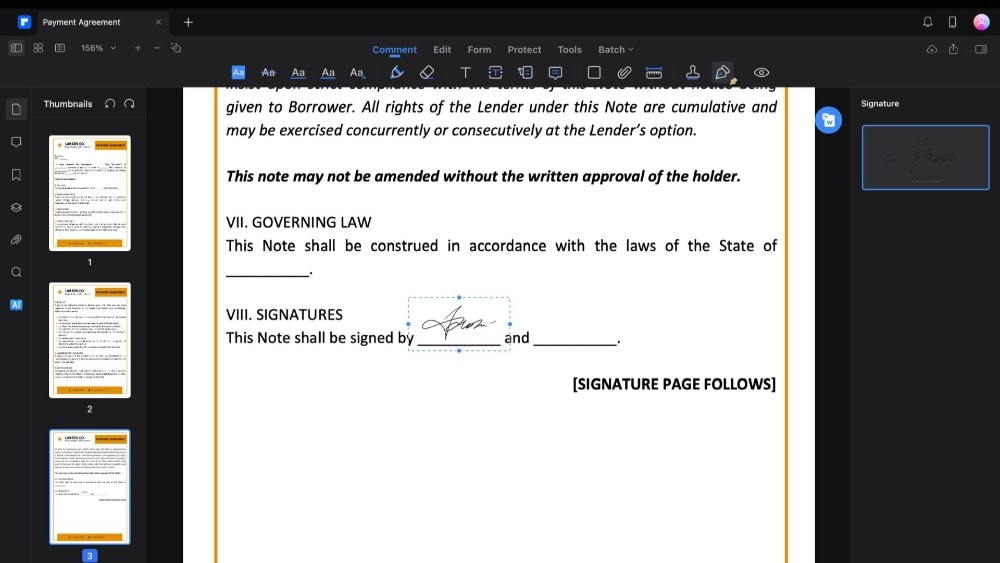
To add your signature to the PDF file, first click on the signature you have created. Then, navigate to the page in the PDF file where you want to add your signature. Simply click on it, and your signature will be inserted automatically. You can move and resize the signature like any other image to fit perfectly in your document.
Part 3. Comparing Preview and PDFelement for Adding Signatures on Mac
When adding signatures to PDF documents on a Mac, you have two notable options: Preview and PDFelement. Both offer unique features, but they cater to different needs and preferences.
Here is a short comparison of these two PDF signing tools.
| Feature | Preview | PDFelement |
| User-Friendliness | Very easy to use with a simple interface. | User-friendly but has more features to learn. |
| Signature Creation | Allows signatures via trackpad, camera, or image. | Adds legal e-signatures in addition to Preview’s methods. |
| Document Editing | Basic editing and annotation tools. | Comprehensive editing, including text, images, and annotations. |
| Security | Basic security with password protection. | Enhanced security, including password protection, redaction, and secure e-signatures. |
| File Compatibility | Focuses on PDFs, limited export options. | Supports a wide range of file formats for import and export. |
Preview is the first choice for simple signatures and is ideal for quick, straightforward use. PDFelement, on the other hand, offers a wider range of features for those who expect more from their PDF software, such as better security and legal e-signatures. Let's look at this in more detail.
Ease of Use
Preview: It's integrated into macOS and offers an uncomplicated and intuitive interface for adding signatures. You can add signatures quickly and in just a few steps, making it ideal for anyone who appreciates simplicity.
PDFelement: While it offers a more comprehensive suite of features, PDFelement still maintains a user-friendly interface. However, the additional functionalities might require a slight learning curve compared to Preview.
Signature Creation Methods
Preview: Allows users to create signatures using the trackpad, camera, or by uploading an image. It's a convenient solution for quick signature additions.
PDFelement: Offers similar methods for creating signatures but also lets you create legal e-signatures. This is useful for documents that need to be legally binding.
Editing and Managing Documents
Preview: Provides basic editing tools suitable for quick edits and annotations. However, its capabilities are limited compared to dedicated PDF editors.
PDFelement: Features a robust set of editing tools, including text editing, image insertion, and advanced annotation features. It's designed for more comprehensive document management needs.
Security Features
Preview: Offers basic security features, such as the ability to lock a PDF with a password. While useful, it doesn't offer advanced security features.
PDFelement: Includes advanced security options such as password protection, redacting sensitive information, and creating secure, legally binding e-signatures. These features are crucial for users who work with sensitive or confidential documents.
File Compatibility and Export Options
Preview: Primarily focused on PDF files, Preview handles viewing and basic editing well but offers limited export options to other formats.
PDFelement: Supports a wide range of file formats for import and export, making it a more versatile tool for users with various document types.
Best Uses
Preview: Ideal for everyday users who need a quick way to sign PDFs without extra features.
PDFelement: Perfect for professionals, like those in business or law, who need a complete set of PDF tools, including more secure signature options.
Part 4. Tips for Adding a Perfect Signature on Mac
When you sign documents with your Mac, you have to make a little effort to make them look good. Here's how to ensure your digital signature is perfect, whether using Preview, PDFelement, or any other program on your Mac.
Use Good Lighting When Using the Camera
When capturing your signature with your Mac's camera, make sure you're in a well-lit area. Good lighting will help the camera capture a clear and sharp image of your signature to look professional on your documents.
Practice on Paper First
Before you use the trackpad or a digital pen, try practicing your signature on paper. This gives you a feel for how your signature looks and allows you to adjust its style before adding it digitally.
Keep It Simple
A simpler signature often translates better into digital form. Complex signatures might not come out as you hope when using a trackpad or mouse.
Adjust Your Trackpad Settings
If you're using the trackpad for your signature, adjust its sensitivity in the System Preferences on your Mac. This can make signing feel more natural.
Use a Stylus If Possible
Using a stylus can give you more control if your app supports it. This is especially true if you're signing directly on an iPad or iPhone linked to your Mac.
Check the Preview Before Saving
Always review your signature's preview before saving it. This is your chance to catch any issues and redo the signature if it doesn't look right.
Consider the Size and Placement
Consider its size and placement once you've added your signature to a document. Make sure it fits well in the space provided and looks balanced. In the Preview and PDFelement, you can change and move the size of your signature after adding it.
Save Multiple Versions
Keeping a few different versions of your signature is a good idea. You might want one that's more formal and another that's casual. Different sizes can also be handy, giving you choices for various types of documents.
Takeaway
Adding your signature to PDFs on a Mac with Preview is straightforward and efficient. If you're looking for a more advanced yet user-friendly tool, PDFelement is a good choice. Both offer a user-friendly way to add your signature, with options like trackpad, camera, or image files. Remember to practice your signature and check its placement for the best results. With these tools, digitally signing documents will become an effortless part of your workflow.

 G2 Rating: 4.5/5 |
  100% Secure


