Steps to Screenshot on a Mac on macOS 11

2024-05-22 13:36:15 • Filed to: macOS Tips and Tricks • Proven solutions
The keyboard of a Windows computer comes with a key known as Print Screen that users use to make screenshots. In Apple computers, there is no such option to take a screenshot on your Mac for macOS 11. The only way to capture your MacBook’s screen on macOS 11 is to use keyboard commands and apps like Preview, which comes embedded in a Mac computer. The best part about these is that they are easy to learn and quick. So, how do you take a screenshot on a macOS 11 computer? Use the information in this article to find out.
How to Take a Screenshot with Keyboard on macOS 11
The Mac keyboard commands are the quickest and easiest way to take a screenshot on your Mac for macOS 11, whether you want to capture the entire screen or a potion, or a window. They are explained in detail below.
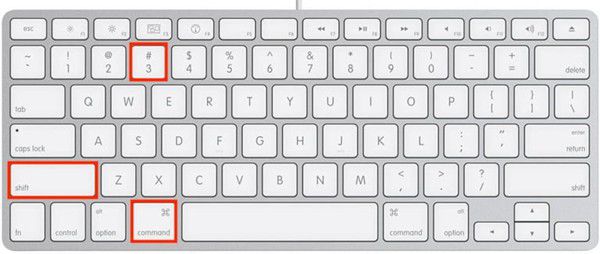
1. Capture the Entire Screen
There are two methods that you can use to capture your MacBook’s entire screen on macOS 11.
- Method 1; to acquire an instant capture of your MacBook, press the Command + Shift + 3 keys simultaneously.
- Method 2; to save the image to your clipboard, press the Command + Shift+ 3 + Control keys simultaneously.
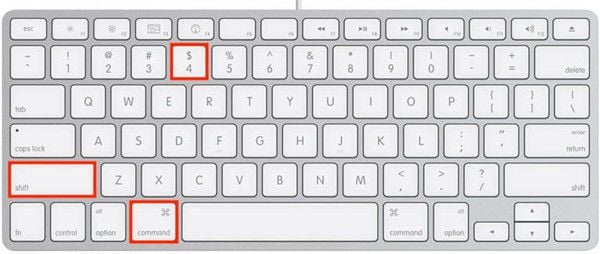
2. Capture a Selected Area
In capturing a chosen area, there are also ways to go;
- Way 1: Press Command + Shift + 4 keys simultaneously. Since your pointer will be turned into a crosshair, click and then drag to create a box around the point of interest that should be captured. As soon as you let go of the mouse button, the screenshot will be automatically saved to your desktop.
- Way 2: alternatively, you may prefer to save the screenshot to the clipboard. To achieve this, press Command+ Shift + 4 + Control key simultaneously. The pointer will become a crosshair that you should click and drag to define the region that you wish to capture.
3. Capture a Single Window
To capture a single window on macOS 11, use the following steps;
- Make your pointer a crosshair by pressing Command + Shift + 4 keys simultaneously. If you wish to save the image in your clipboard, you should press Command + Shift + 4 + Control instead.
- Proceed by hitting the Spacebar; the pointer changes to a camera icon as the screen turns light blue
- Any window that you hover over will be highlighted with a light blue overlay. Now choose the window you want captures and the image will be saved to your desktop.
Note that this method not only captures windows, but also saves desktop, the menu bar, the Dock and an open menu.
Additionally, the image you save comprises of the window and its shadow against a transparent background. However, you have the option to exclude the shadow by pressing and holding the Option key as you click to save the image.
How to Take a Screenshot without Keyboard on macOS 11
It is fair to admit that using the above keyboard commands to take a screenshot on your Mac for macOS 11 can be annoying because you must memorize the keys, which are different. Are you wondering “How do I take a screenshot on macOS 11 without the keyboard commands?” The answer is yes you can, through Preview application.
Preview app comes in handy when you take screenshots infrequently because it does not involve specific key combinations that you must remember.
Here is the procedure to use Preview to capture your MacBook’s screen on macOS 11;
- Locate the Applications folder and open it. Find the Preview app and launch it
- Go to Files and select Take Screen Shot. Here you will find multiple options; to capture the current window, the entire screen or only a part of it.
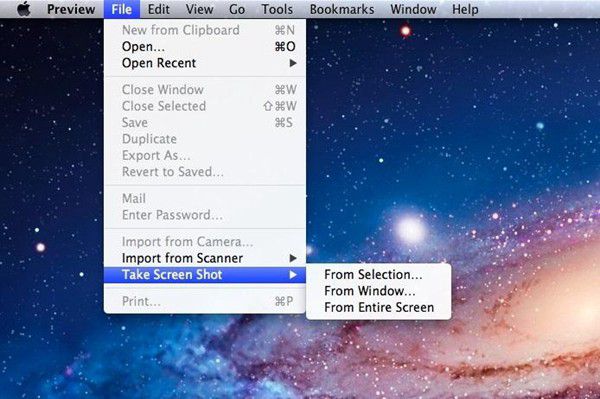
- If you select From Entire Screen, you will see a 10 second countdown that provides you the time to prepare the screen for capturing, which is quite convenient since you will capture your MacBook’s screen on macOS 11 according to your requirements.

If you press the Control function on your keyboard as you take a screenshot on your Mac for macOS 11, Preview will copy the image to your clipboard. Unlike when using keyboard commands, captures are not saved to your desktop.
Preview allows you to manually save them to enable naming and saving where you prefer. You may also opt to get rid of them if they are not what you want. Since the screenshot opens in the app, you can edit too.
Best Image to PDF Converter for macOS 11 – PDFelement for Mac
As you take a screenshot on your Mac for macOS 11, you may want to convert it to PDF. The best PDF converter for this task is PDFelement for Mac, which also manipulates images in PDF form. This tool is powerful and comes with unique features that not only convert PDFs, but also unlocks texts within images.
PDFelement for Mac has multiple capabilities, including supporting multiple output formats. So, you can have your image in PDF form and also change PDF to image or other files formats like Microsoft Word, Excel and PowerPoint, TEXT or HTML. As you deal with images, it provides a unique technology known as Optical Character Recognition that unlocks texts within the images. This technology rescues a situation whereby PDF text is un-editable by translating printed text into machine-readable text.
Therefore, PDFelement for Mac provides you with the freedom to have any type of document through its transformation feature. It also benefits you by giving you power over your photos, since you can manipulate the texts present. If you get familiar with the OCR technology, you can simplify your office work by scanning it and making it PDFs that you can edit and convert to other types of files.
Free Download or Buy PDFelement right now!
Free Download or Buy PDFelement right now!
Buy PDFelement right now!
Buy PDFelement right now!
Audrey Goodwin
chief Editor