PDFelement-Powerful and Simple PDF Editor
Get started with the easiest way to manage PDFs with PDFelement!
Working on a big project? That must involve handling many documents or singular ones with diversified information. So, while using Google Docs, users appreciate the simple yet advanced editing features available to them. One such option that optimizes the user experience for many is the Google Docs Outline feature.
With it, one can easily create a centralized overview of the whole document for easy access, review, and organization of their document. This is highly efficient to refer to instead of scrolling through huge long pages of content to find a specific topic.
Want to create the same in your own documents? Learn the steps on how to edit Document Outline in Google Docs here, and get started on the process soon after.
In this article
Part 1. What is Document Outline in Google Docs?
Now, before jumping into the main meat, i.e., how to edit Google Docs Outline, knowing what it involves is necessary. So, let's start there.
Google Docs offers the Outline functionality that helps create an overall structure for documents. It is possible to generate that through the available elements like table titles, headings, and titles.
The Outline essentially indexes a simple and quick table of document content. Users can learn which part of the document contains a particular topic. Secondly, it makes it easier to visualize the hierarchy of the content, establishing a sequence.
The uses of Google Docs Outline differ as per the type of user:
- Visitors-Readers can use it as a document overview; they refer to it to understand the main discussion points or the phases of the content. Whether reading the file on a desktop or smartphone, the Document Outline works as a helpful index.
- Editors/Authors-Writers, content creators, and professionals in corporate sectors in charge of documentation of important files can benefit from knowing how to edit Document Outline in Google Docs. If they keep the Outline function action, it is easier for authors and editors to follow a structured overview of the content. The tool shows the hierarchical importance of each part of the article, which helps users stick to their pre-planner article breakdown accurately.
- Search engines- Besides the writers and readers, the Outline feature in Google Docs also supports SEO and search engine ranking. Firstly, search engine algorithms consider headline tags during their ranking process. Plus, this tool helps summarize content details and keywords.
Part 2. How to Edit a Document Outline in Google Docs?
Different elements of the Outline tool in Google Docs make it a user-friendly tool for users. The process on how to edit Outline on Google Docs is not overtly complex if you know the main elements.
Step 1 You have to open Google Docs first. Go to docs.google.com directly and log in with your account.
Alternatively, you can go to your Gmail account and click on the menu icon at the top-right. Click on the Docs option from the drop-down menu.
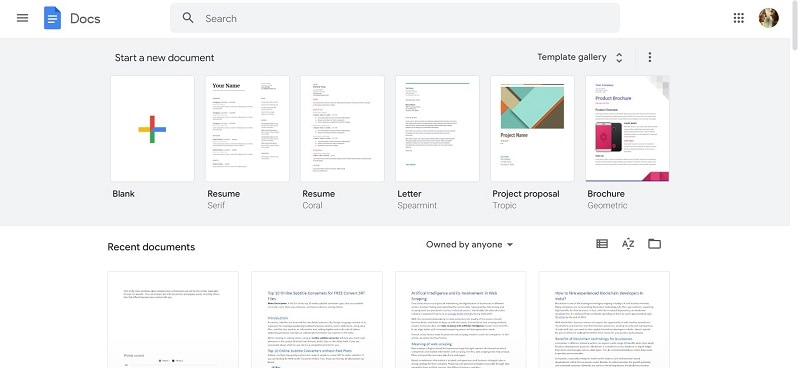
Step 2 Click on the Blank option on the Docs homepage to create a new doc file. Or, directly open a pre-made file from the Recent Documents section- these are the files you synced into Google Drive or those shared with your account.
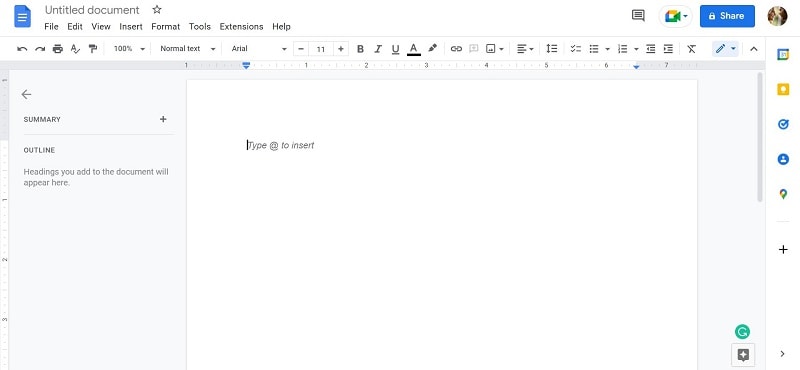
Step 3 See on the left side of the blank page when you open the document. It will show the empty Outline.
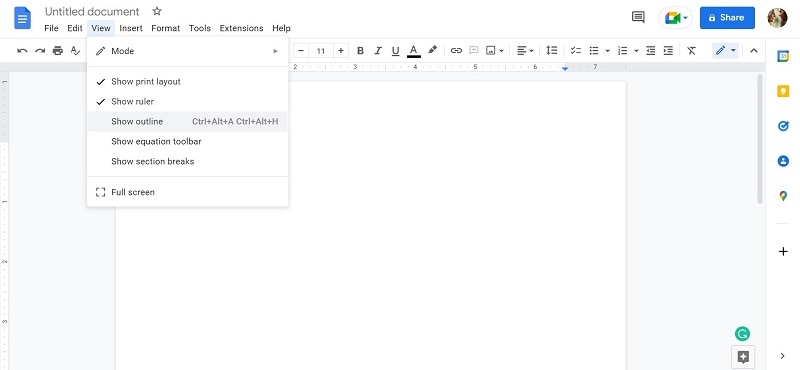
If it does not appear by default, you have to change the settings for it. Press the View tab from the main taskbar and choose "Show Document Outline". Or, use the keyboard's hotkey combinations like Ctrl + Alt + A.
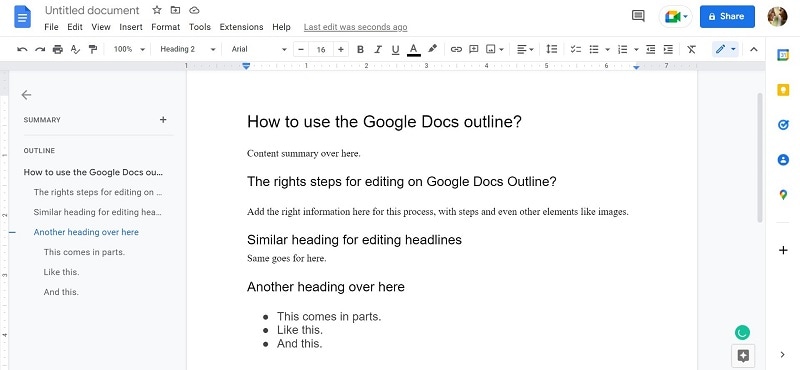
Step 4 When you start typing and changing the headings and another formatting, it will appear in the Outline beside the file from now on. This is the version before any formatting, for example.
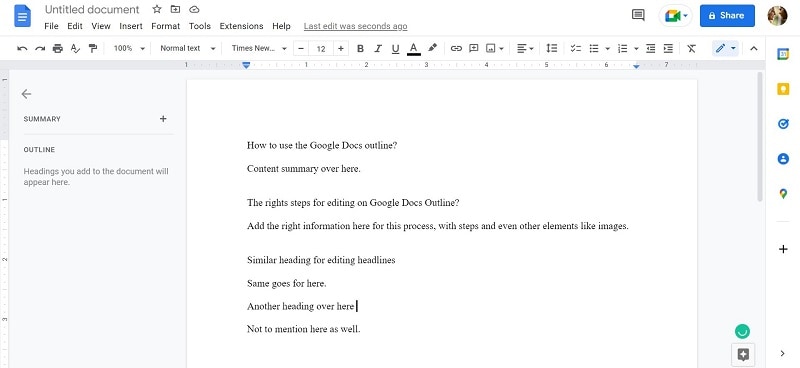
But with headings and other formatting modifications, the Outline display will appear as such.
Part 3. How to Add Headings to Outline in Google Docs?
It is possible to add headings, and doing so is an integral part of this editing process. So, when you are learning how to edit Document Outlines in Google Docs, focusing on this point is essential.
Step 1 Open Google Docs on your preferred browser and follow the steps mentioned in the previous part about opening a blank file.
Step 2 Start typing the content that you are creating.
Break your content parts into sections by pressing the Enter key wherever the paragraph ends. For a clearer, here is a better version with a paragraph-like breakdown.
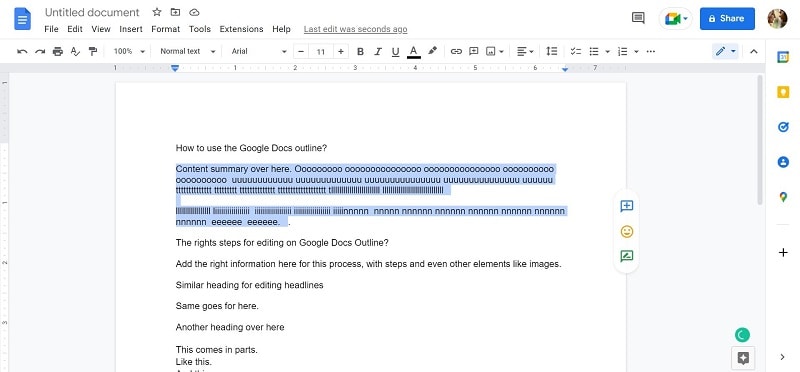
Step 3 Change the text that you will turn into headings with font-based changes first. Like, bold all of your headings while writing. You can refer to it later for easier formatting.
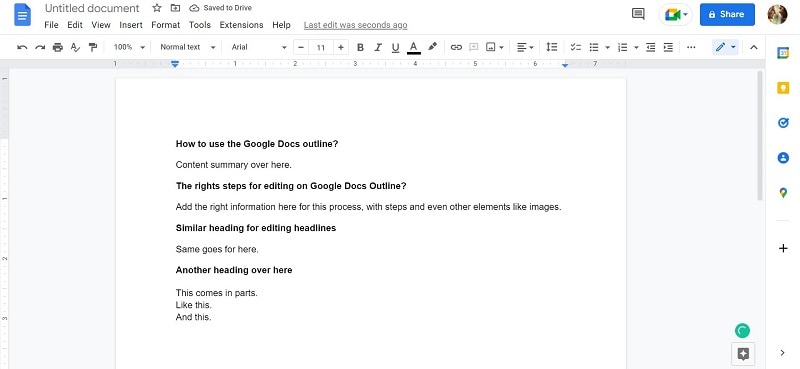
Step 4 Next, right-click and drag to select the heading section and click on the drop menu with "Normal Text" mentioned.
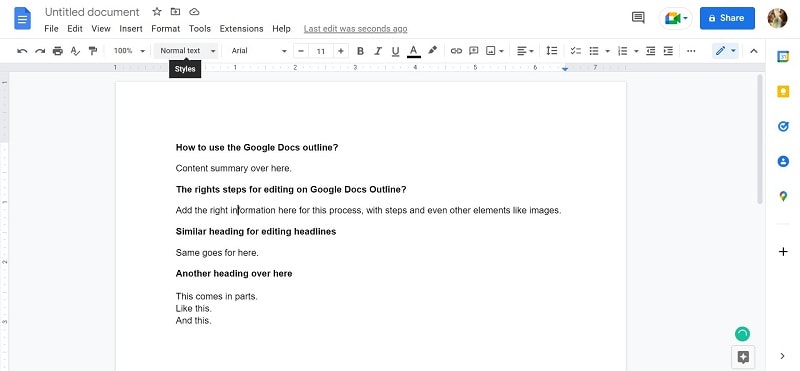
Step 5 A list of text styles will appear when you press it. Choose the heading type for your content, following the content breakdown sequence, e.g., Heading 1, Heading 2, Heading 3, etc.
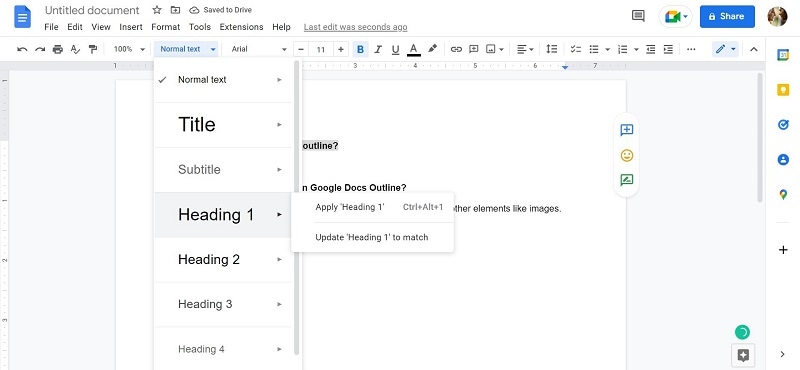
Do this for all of the headings.
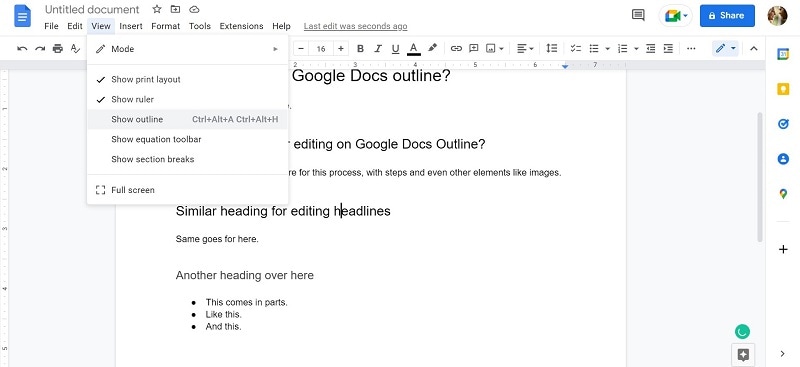
Step 6 Then click on the View tab.
Step 7 Tap on the "Show Outline" option. The content Outline will appear on the left side.
Part 4. How to Remove Headings from Google Docs Outline?
Sometimes users want to hide specific headings from the Outline in Google Docs. For this, you do not have to change the text format on your document directly or delete the whole section. While editing Google Docs Document Outline, you can disable or remove specific headings from the index.
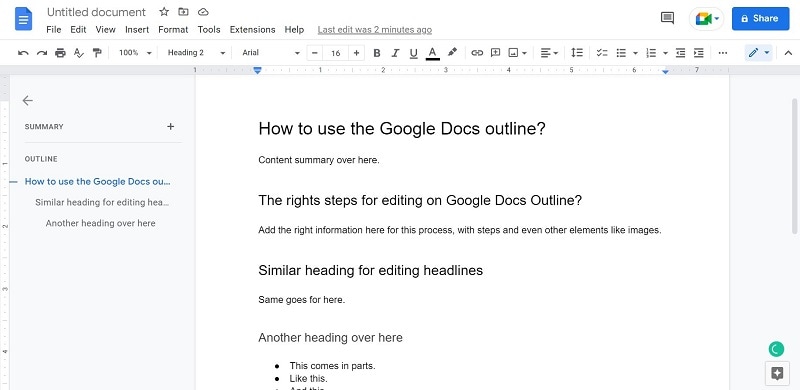
Step 1 Scroll your mouse to the Outline and hover over the particular heading you want to remove.
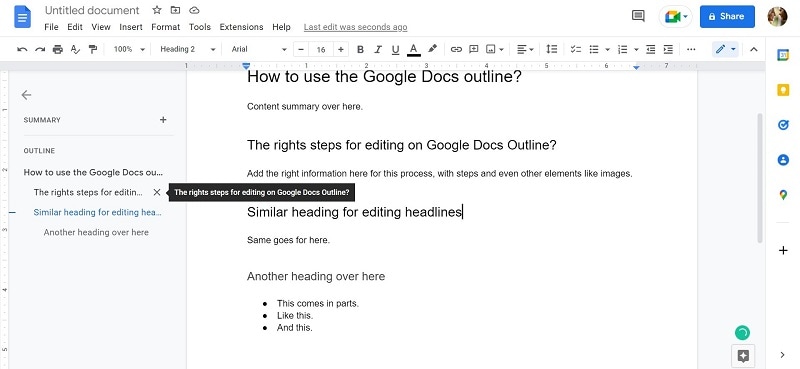
Step 2 Click the cross (x) sign at the side of the heading.
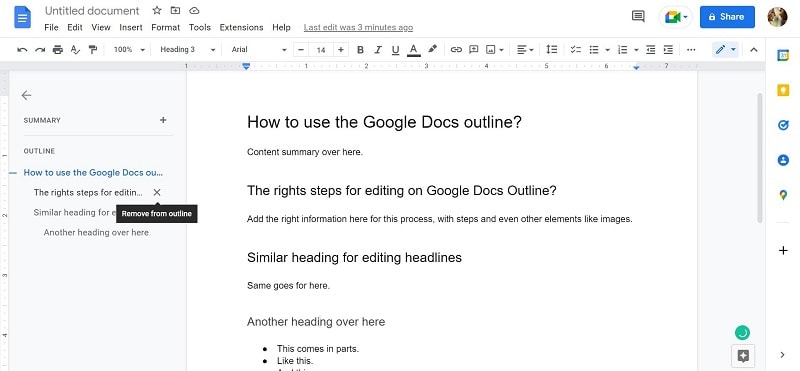
It will automatically remove the heading from the Outline list but not modify the Heading 1/2/3 formatting in the main document.
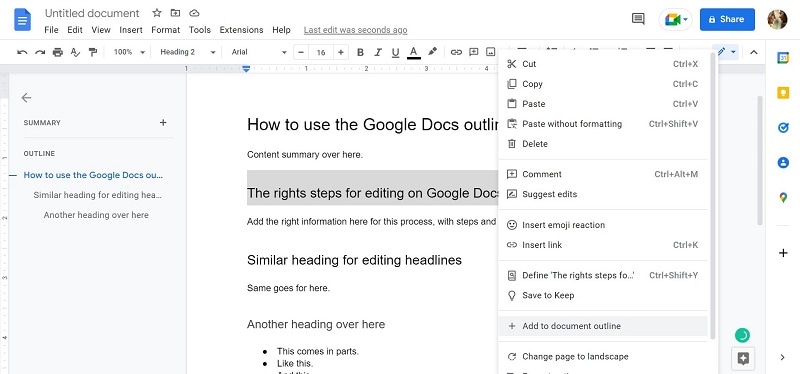
Step 3 If you want to return the heading in the main Outline again at a later time, that is also possible. Select the heading by highlighting it and right-clicking on it. Click on the Add to Document Outline option.
Part 5. How to Navigate Through Google Docs with an Outline?
One of the best benefits of the Outline tool in Google Docs is the fact that it works as an index of content for the document. So, readers and editors that open the document in Google Docs can use the Outline beside the content to navigate to specific parts of the file. For example, in the doc file about "How to fix XYZ", you can click on the heading for the section on Additional tips to reach that section instead of reading through the entire content.
Step 1 Go to Google Docs and create a new Blank Document to start your writing. You can click on a recent or shared document to simply edit specific parts of a document.
Step 2 When the file opens, click on the View option from the top toolbar. Then, press the "Show Outline" action. The Outline of the whole file with the formatted heading-wise breakdown will appear on the screen.
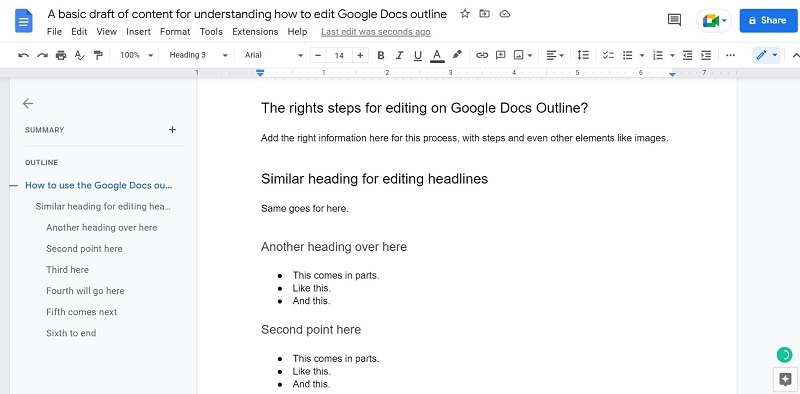
Step 3 Click on the specific heading from the Outline that you want to go to. You will automatically reach that location.
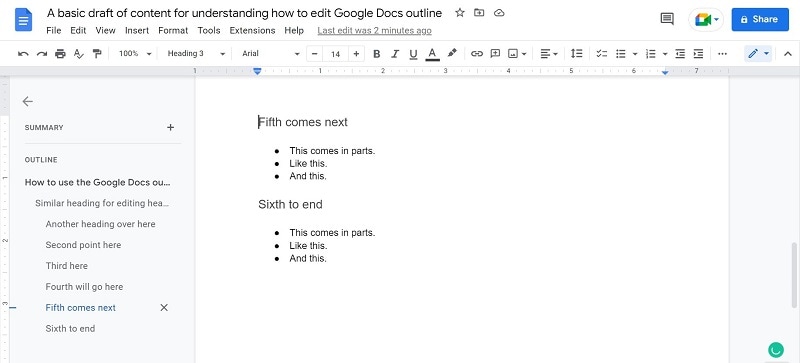
Step 6 Then, make your changes to the file content (as an editor) or read through the point you wanted to know (as a viewer).
Part 6. How to Close or Hide Google Docs Outline?
To conclude this guide on how to edit Google Docs Outline properly, the final concern to discuss is how to hide this section in the document. Both methods are available for users to temporarily hide the Outline or remove it from the document viewer. Plus, if one needs to add the Outline again, they can re-track their steps easily.
1. How to hide the Outline on Google Docs temporarily?
Step 1 Open your document and do the steps for enabling the Outline viewing process first. To hide it for some time, click on the arrow icon at the top of the Summary section to Close Document Outline.
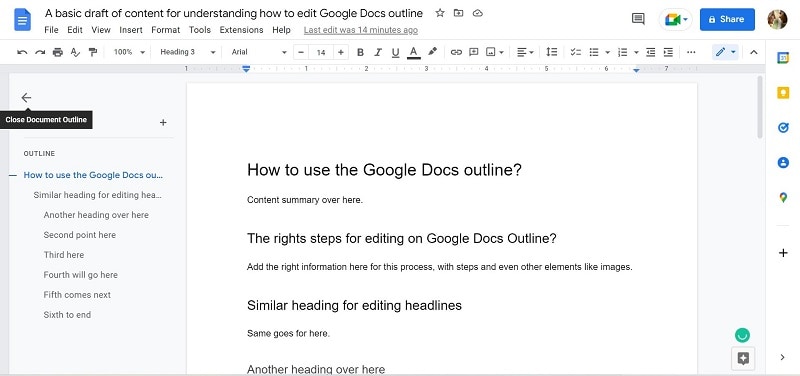
That will hide the Outline temporarily.
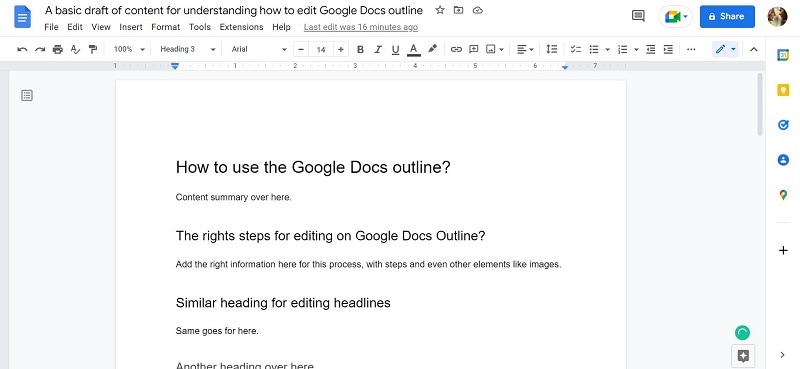
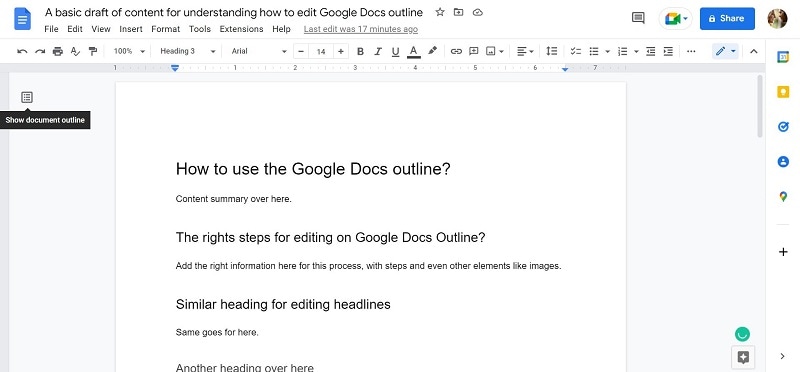
Step 2 Click on the tiny Outline icon again to Show Document Outline.
2. How to close Google Docs Outline?
Step 1 Keep editing your document and the Outline as needed. If you are ready to close the Doc Outline in your file, you should tap on the View tab in the top toolbar again.
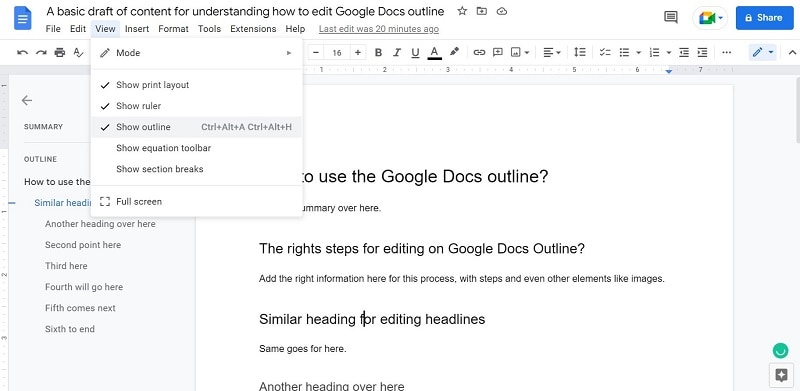
Step 2 From the drop-down menu, you will see a tick beside the "Show Outline" option, which indicates the active status. Click on it to disable it.
Step 3 The Outline will stop showing, but your heading formatting will still remain as before. You can reactivate the Outline view later through the View option again. Depending on the Font Style Formatting, the Outline might stay the same or rearrange itself.
Final Words
The process of creating, editing, and managing an Outline in Google Docs is not complex at all. It is simple to prepare an index of the content with this tool, remove it, or hide the list whenever needed. So, whether you are writing a story, article/blog, or legal document, you can use this feature to organize your content during the process.
Such high-quality functions for outlining PDF files are available through other reliable software types like Wondershare PDFelement - PDF Editor Wondershare PDFelement Wondershare PDFelement. For example, if you download the file in PDF format but still add the Outline to it. Try it out if that interests you.
Thinking about outlining PDf files? Check out PDFelement, the easiest way to work with PDFs. Click the link below to know more.
 Home
Home
 G2 Rating: 4.5/5 |
  100% Secure


