- It allows directly editing the PDF text, images, and forms with ease, and sign your forms using a handwritten signature.
- It supports extracting, reordering, rotating, inserting, or deleting pages.
- You can convert PDF to other formats, such as Microsoft Word, Excel, PowerPoint, PMG, JPG, TIFF, GIF, HTML, Text, etc.
- Print and share the edited PDF directly through many ways.
- It uses Bookmarks for intuitive navigation through PDF files. You can add, delete, modify, search and edit your bookmarks.
- Combine multiple PDF files into a new PDF document.
- It supports handwriting input to avoid the imprecision of finger operation.
Introduction
Get Started
Create&Open PDF
View&Navigate PDF
Edit PDF
Convert PDF
Organize PDF
Annotate PDF
PDF Recognize
Protect PDF
Fill&Sign PDF
Optimize PDF
PDF AI Tools
Print PDF
Share PDF
Help
Product Introduction
Download and Install
1System Requirements
- Operating System: It requires iOS 13.0 or later version.
- Available Space: The App requires 60.1MB of free space(preferably 100MB).
2Download and Install on iOS
- Open the “App Store” from your iOS device and search for the "PDFelement" in the search toolbar.
- Click on the “Get” button present with the program application.
- Click on the “Install” button on the pop-up window and install the program.
- Click on the “Open” button to open the installed program.
- To use PDFelement for iOS, you need consent to the "Privacy Policy" and "End User License Agreement". “Agree” on the license agreement and the privacy policy of the installed application.
Register (Remove Trial Watermark)
1Trial Version Limitations
- The trial version will leave a watermark on your files when you save them after editing or commenting on the file.
- You may not possible to use the all functions.
2Purchase PDFelement for iOS
- Open "App Store" on your device to download PDFelement for iOS.
- Search "PDFelement" on the search bar at the top of the screen.
- Click on download sign and download the program.
- Open the program, and you will find the "Unlock PDFelement" button on the bottom of the program's left menu.
- Click on the unlock button, and you can purchase the software according to the plan you want.
3Register PDFelement for iOS
- Once the program is purchased through the App Store of the device, you can launch the purchased application again.
- Open PDFelement for iOS for registration.
- Create Wondershare ID and password. The company also sends users an email with a registered code in case users can't use the program.
- Log in with Wondershare ID and register in the program.
4Remove Trial Watermark
- The document files you worked on during the trial version will have the watermark on them. After registration, the complete registered version program does not have any limitations to be used.
- To remove the trial watermark, open the document file again in the registered PDFelement for iOS. The trial watermark on the file will be removed automatically.
- Now, you can save a clean copy of a document file used for testing.
Left Menu and Top Menu
1Left Menu
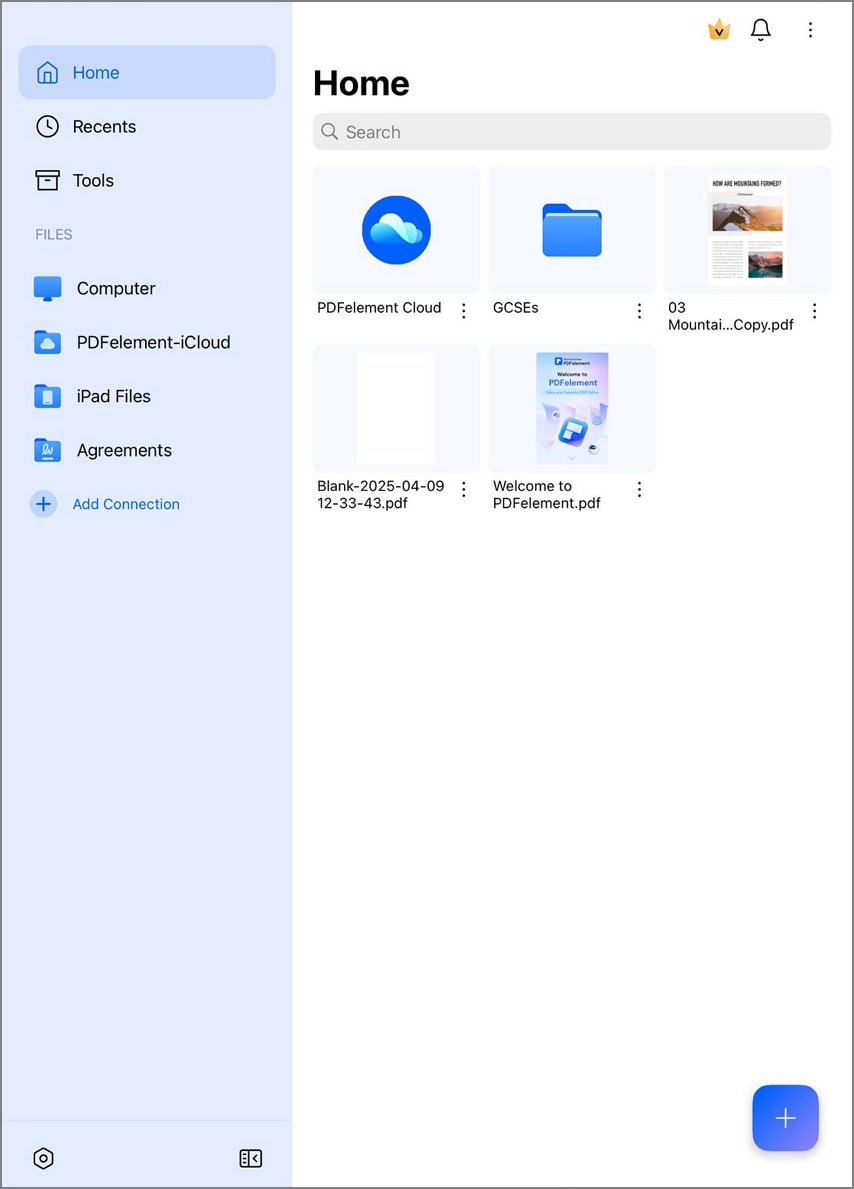
- Home: The main locations for you to find and open your PDF files.
- Recent: You can see the recently viewed folders and any files here.
- Tools: It allows you to quickly find the commonly-used tools, inclucing Connections, Convert, Image to PDF, PDF Optimizer, Merge, and Compress.
- Files: You can search for the files on your device, or create a new folder for your files.
- Photos: Directly upload images from your device to PDFelement.
- Comnputer: At here, you can also import PDF files from computer. Enter the address shown on the screen in the browser on a computer. Then upload the file from a local computer.
- PDFelement:Log in to your Wondershare ID on the bottom and check the details for your account. Besides, the “On Sale” tag shows in the trial version. It gives you the option to unlock PDFelement and buy it. You can have more subscription benefits and enjoy more functions.
2Top Menu
- Select: You can select the files or folder to move, copy, delete, and more.
- Display: You can display your files and folders as a grid or list type.
- File information: You can show the name, date or size of your files.
Create New
- Create New PDF or Folder: Click on the '+' (Plus) button on the bottom right corner of the screen. Under "Create New" option, click on "Folder" or "Blank PDF". You can create a new PDF or create a new folder to save PDF.
- Scan: Click on the "Scan" button to create a new PDF file from the camera. It automatically activates the camera of the device.
Import From
- Files: Under the Home tab, Click on '+' > 'Import From'> 'Files' and browse to local folder. Make modifications in the file and save the changes to the preferred destination. Under the Connections tab, click on Wondershare Cloud to import your PDF files stored on Wondershare Cloud. Tips. Register Wondershare ID and get 1G cloud storage for free.
- Photos: PDFelement for iOS supports the creation of a new PDF file from photos stored on the device.
Page View Mode
- Scroll Direction: In this, you can view pages of the PDF file in two modes, i.e., vertical mode and horizontal mode.
- Enable Scrolling: Pages of the PDF file are arranged in the vertical column on the screen when enabling scrolling.
- Two Page View: In this mode, only two pages simultaneously display, side by side, on the screen.
- Keep iPad awake: This mode puts your screen sharp while working or making PDF document file changes.
Page Navigation
1Go to Page
- Click on the "Three Dots" appearing in the top right corner of the screen. Select option 'Go to Page.'
- Enter the page number you want to open in the document.
2Select
- Open the PDF document and click on the "Organize Pages" icon beside the Search icon on the top menu.
- Tick the check box on the page to select it for the update.
3Rotate
- Once the page is marked for an update, rotate button is enabled.
- Click on the button on bottom floating bar to rotate the page in a clockwise direction.
4Extract
5Delete
6More
- It allows you to copy and share the selected pages of current documents.
- It allows you to add a blank page or add image file from photos.
Navigation Panel
1Search Panel
2Bookmark Panel
- Open the PDF page where you want to add a bookmark.
- Click on the "Bookmark" button at the bottom to edit the bookmark name.
- Click on the bookmark to navigate through the PDF.
3Comment Panel
4More Tools
Edit Texts
1Edit Text
- Tap on the "Text" button at the centre of the PDF page on the top, which allows you to enter new text and make changes to the existing text.
- Click on the paragraph, line, or text you want to make changes, and then tap on the edit option.
- Now choose the font, size, color, etc., as you need for the edited text or paragraph in your PDF file.
2Add Text
- Tap on the "Text" button at the centre of the screen on the top. "Add Text" will appear on the screen. Click on it.
- Click the portion on the document's page to place the new text and tap edit in options that appeared on the screen. Now you can insert the new text on the existing PDF files.
- Select the font, font size, color, layout, etc., as per your wish for a text or paragraph.
Edit Images
1Add Image
- Click on the “Image" button currently present in the center of the device screen. Click “Add Image” and then select "Photos" from your device directly or choose "Camera" to take a photo. After taking a photo, click "Use Photo" to insert the photo into the file.
- Click and hold on the edge to resize as needed and move the image as required. Tap and drag the image to the appropriate location. Using the arrow keys on the keyboard will allow for precise movements of the pictures.
2Delete Image
3Copy/Paste Image
4 Rotate/Replace/Extract/Crop Image
- Rotate: The Orientation of the selected image in the document is changed.
- Replace: New image added in the document file as a substitution to the previous one.
- Extract: Selected photo taken out from the PDF document.
- Crop: Adjust the image only to show the essential aspects of the form.
Add Watermarks
1Add Watermark
- To add a text watermark, enter the text you want to add in the Text box.
- After entering the text, you can also set the size, color, opacity, rotation, and position for the added watermark.
- In addition, you can also choose to show the watermark as one word, or tile it on the whole page by clicking the "Tile" button. Finally,after setting, click the "Apply" button to save the watermark.
- Now, the watermark is added to the document. Last but not least, please click the Save icon to save the changes.
- If you need to add an image as the watermark, you can click the “Image" tab, and then click "Select" to upload your image. After that, you can set the watermark size, opacity, rotation, and position.
2Remove Watermarks
Convert PDF
1Convert PDF to Other File Formats
- Open the PDFelement for iOS, and upload your PDF file you need to convert.
- Then click the "..." icon on the top-right corner.
- After that, select the "Convert" option in the drop-down menu.
- Then in the pop-up window, there are 11 types of formats, including Word, Excel, PowerPoint, Pages, PNG, JPG, TIFF, GIF, Text, HTML, and RTF. You can select one of the output formats.
- Once selected, click the "Start" button.
Organize Pages
1Rotate PDF Pages
- Open the PDFelement for iOS, and select the PDF document you want to organize. Click on “Organize Pages” on the top-right corner panel. After that, all PDF pages will align in a line.
- Now, you will find “Rotate” on the top menu.
- Select a PDF page or multiple pages by tapping on it to rotate the page. Then, click the “Rotate” to rotate it. You can spin it in any direction.
2Delete PDF Pages
- Open the PDFelement for iOS, and select the PDF document you want to organize. Click on “Organize Pages” in the top-right corner. After that, all PDF pages will align in a line.
- You will find the “Delete” option after a rotation on the top menu.
- Select a PDF page or select multiple pages as per your consideration by tapping on it to delete the page. Then, click the “Delete” to remove it.
3Insert PDF Pages
- Open the PDFelement for iOS, and select the PDF document you want to organize. Click on "Organize Pages" in the top-right corner. After that, all PDF pages will align in a line.
- Click on the "Add" option on the top menu. Then you will find four options to add files into the PDF.
- Click on "Blank Page" to add a blank page into the PDF document.
- Click "Scan" to add a scanned page into this PDF file.
- Select "Photos" to browse and select photos from your device to insert into the document file.
- Select "Another File" to insert pages from your other PDF files into this PDF.
4Extract PDF Pages
- Open the PDFelement for iOS, and select the PDF document you want to organize. Click on “Organize Pages” in the top-right corner. After that, all PDF pages will align in a line.
- You will find the “Extract” option on the top menu.
- Select a PDF page or select multiple pages as per your consideration by tapping on it to delete the page. Then, click the “Extract” to remove it.
Change Page Order
- Open the PDF documents stored on the device. Click on the "Organize Pages" function on the top right.
- Now, long press on the page you want to move and drag the page to the document's correct place.
Crop Pages
- Now, in the pop-up window, you can crop the page by dragging the page box.
- Once done, click the "Apply" button on the top right corner. Or if you want to apply the cropped page to all pages, you can click the "Apply to all pages" button at the bottom.
Combine Multiple Files into One PDF
- Open PDFelement for iOS. Click on the "..." icon and then click the "Select" option on the top-right corner of the screen. It will allow you to select the multiple files stored on the device.
- Now select the documents you want to merge by tapping on the document icon's checkboxes.
- Once selected the multiple files, tap onthe "More" at the bottom of the screen. Then click on the "Merge" option in the popup, and it will directly combine files.
Text Markups
- Highlight: To draw a user's attention to important information or aspects in a text in your PDF document. Effective highlighting first asks the reader to pick out the essential parts and then gives an effective way to review them later.
- Strikethrough: A horizontal line drawn through the text, used to indicate that a text should be deleted or ignored of an error or the removal of it from the document file.
- Underline: To point up the word among the sentence.
1Highlight
- Open your PDF file and click the "Comment" button on the top-center of your device screen. Tap on "Highlight" present first in a panel, and different fluorescent colors appear on the screen.
- Choose the colors of your choice from the highlight panel and then select the text or sentence, or paragraph you want to highlight for attention or reference. Drag the cursor and highlight immediately.
2Strikethrough and Underline
- Open the PDF document and click the Comment" button at the screen's top-center. The panel will open with options, where you'll find the "Strikethrough." Tap on it and choose the color of your choice and then select the text to markup.
- Open the document file and click the "Comment" button. The panel opens, also has the underlining option present. Click on the "Underline" button. Now you can choose the color of your choice and text to underline.
Comments
1Text Comment
- Click on Comment on the top of the screen, and then click on "Text".
- From the dropdown, choose text font color and size.
- Select a background color or border color if you need to add a text box.
- Now tap on the PDF document where you want to add the text.
- Tap again to edit or delete the text comments.
2Sticky Note
- Open the PDF document and click on the Comment tool and click on "Sticky Note" in the floating toolbar.
- Click on the PDF document where you want to sticky notes.
- You can tap on the sticky notes to edit and delete them.
Stamps
1Built-in Stamp
- Tap the "Fill & Sign" button, prominently located in the center of your device's screen.
- Next, select the "Stamp" tool from the secondary toolbar.
- Upon clicking the stamp tool, a variety of pre-designed logos will appear on your screen. Simply choose the one that suits your PDF document. You can resize the stamp by dragging it from one of the edge boxes to fit your requirements.
2Custom Stamp
- Choose the "Custom" option within the "Stamp" tool.
- Tap "Create" in the new window that appears.
- This window allows you to personalize various aspects of your stamp, including text, date, time, shape, and color.
- You can even import an image to use as a custom stamp. Select "Import" within the "Custom" option, then browse your iOS device to choose an image.
- Your custom stamp will be saved in the "Custom" tab for future use, and you can delete stamps at your convenience.
Shapes
1Add Drawing Shapes to PDF
- Choose the Comment and click on the "Shapes Tools" in the floating toolbar, and from the dropdown, choose the shape to add from the list.
- Click on the PDF page to draw the shape and drag to draw an arrow, line, circle, or rectangle. You can also change the thickness, opacity, and color of shapes.
- Rectangle: Rectangle is the most used area shape. This symbol is most commonly used to highlight some point or indicate something inserted in the document.
- Oval: Oval option is either used to draw an oval or a circular shape.
- Line: Used to draw a straight line.
- Arrow: Arrow gives you a direction to a particular annotation in the document.
- Polygon: To draw a closed plane figure bounded by three or more lines segments.
- Connected Lines: To draw an open plan figure with three or more line segments.
2Use Pencil And Eraser Tools
- Click on the "Comment" in the toolbar and select the "Pencil" tool.
- Choose the color, thickness, and opacity of the pointer.
- Click and drag the pointer on the screen to create the image that you need.
- If you need modification, you can use the intelligent eraser tool to erase or remove the drawing's part to make changes.
- Select eraser, either partial or whole mode and reduce or increase the size eraser as per your requirements.
OCR PDF
How to convert a scanned document to an editable PDF
- The size of the PDF that you want to apply OCR to cannot exceed 50MB.
- You can OCR a PDF containing up to 50 pages.
- You can perform OCR on up to 10 files at the same time.
Text-only Recognize
How to extract text from a scanned PDF
Password
- After launching, select the document file and tap on it to open the file.
- To assess the password, tap on the "Three Dot" icon. You will find the option "Set Password" there. Click on "Set Password" and add the password to the document.
- After tapping on the set password, the pop-up appears on the screen, where you can set the password of your choice and save it, and securing the informational data in the program on your system.
Fill in Forms
1Fill Interactive Forms
- Open the form within PDFelement for iOS.
- Select the "Fill & Sign" option.
- Tap the fillable fields or boxes to input your text.
- Upon form completion, tap the "Three Dots" icon in the top-right corner. Then, choose "Save a Copy" to retain your filled form as a copy.
2Fill Non-interactive Forms
- Open the form within PDFelement for iOS.
- To add text to non-interactive form fields, tap "Edit PDF" at the top of the screen.
- Select "Add Text" to input text in the non-interactive form field.
Signatures
- Open the PDFelement for iOS app on your iPad or iPhone. Access the PDF file you need to sign directly from your device.
- Tap on the "Fill and Sign" tool located in the top toolbar of the screen. From the options presented, select "Signature."
- Temporary Signature: Quickly sign the document with a temporary signature.
- Create a Signature: Build a personalized signature that can be saved within the app for future use.
- Choose from three signature creation options:
- Draw: Craft your signature by drawing it directly on the screen.
- Image: Upload a pre-existing image of your signature.
- Camera: Capture a photo of your signature using your device's camera.
- Once your signature is created, append it to the document. Place the signature in your preferred location within the document.
- Customize the size of your signature to fit seamlessly within the document.
- By following these simple steps, you can efficiently create and apply digital signatures using PDFelement for iOS. Enjoy a hassle-free and paperless signing experience, all within a single, comprehensive app.
Sign PDF Contracts
- Launch PDFelement on your iOS device. Navigate to the "Agreements" tab, where you'll find the contract marked with a "waiting for your signature" notification. Tap to open the contract.
- At the top of the contract, you'll see a notification bar indicating the number of remaining required fields. Go to the signature field and tap it to add your signature.
- You have three signature options:
- Draw: Create your signature by drawing it.
- Image: Upload an image of your signature.
- Camera: Capture a picture of your signature using your device's camera.
- Once you've completed all required fields, tap the "Finish" button. A dialog will appear, asking you to confirm your agreement to the contract, the Consumer Disclosure, and conducting business electronically with the sender. Tap "Tap to Sign" to confirm your signature.
- After signing the agreement, return to the "Agreements" tab to review the status, recipients, and activities related to this agreement.
Optimize PDF
- Select a PDF File you want to make smaller or compressed. Open the PDFelement for iOS. Tap on the "..." icon on the top-right cornerof the screen on your device and click the “Reduce File Size" option. It will automatically reduce the PDF file size.
- After taping on PDF Optimizer, you can select the PDF Quality (Max, High, Medium, Low, Lowest) according to the user requirement.
- After selecting the PDF Quality, you can save the PDF in local folders on your devices such as Home” shown in the "Save to" box. Once done, tap on the “Save” button.
Chat with AI Assistant
- Launch PDFelement on your iOS device.
- Access the AI Assistant by tapping the "AI" icon located at the top right corner of the screen.
- Simply type your questions or messages to initiate a chat with the AI assistant in the popup sidebar.
- The AI assistant will promptly respond, providing valuable insights and information.
Summarize PDF
- Open your PDF document with PDFelement for iOS. Invoke the AI magic by tapping the "AI" icon, positioned at the top right corner.
- In the popup sidebar, select the "Summarize this PDF" prompt.
- Watch in amazement as our AI assistant gracefully summarizes your document and presents the result in the sidebar.
- Review the abstract, outline, keywords, and questions provided by the tool.
- Tap the "Copy" button to easily paste the summary wherever you need it.
- If the result doesn't meet your expectations, tap the "Regenerate" icon to get a new output.
Ask PDF
- Open a PDF document within PDFelement for iOS. Tap the "AI" icon to access the AI tools.
- Select the "Ask PDF" prompt. Type your question concerning the PDF content.
- The tool will diligently search for the answer within the document and present it to you, along with the page number where it's located.
- For even more convenience, you can also access the Ask PDF tool by highlighting specific text within the PDF document. Then, choose the "Ask PDF" option from the popup floating toolbar. The tool will search for answers related to the selected text.
Explain PDF
- Open a PDF document within PDFelement for iOS. Tap the "AI" icon located at the top-right corner of the application interface.
- Select the "Explain what you want" prompt in the right sidebar. Enter the text you require an explanation for.
- The tool will initiate an internet search for relevant explanations and promptly display them to you.
- Alternatively, highlight the text you want to explain within the document. Tap the "Explain" tool from the floating toolbar. The AI assistant will swiftly provide you with the explanation you need.
Translate PDF
- Open a PDF document within PDFelement on your iOS device. Tap the "AI" icon.
- Select the "Translate what we want" prompt found in the AI sidebar and enter the text you want to translate.
- Watch as the chosen text is seamlessly translated into the language set in your application.
- If you're reading a document in a foreign language and come across text you'd like to translate instantly, select the text you want to translate directly within the document and tap the "Translate" tool available in the floating toolbar. The AI assistant will promptly provide you with the translation you need.
Print Options
- Open the program and select or choose the PDF document you want to print and click on the “Three Dot” icon button on the top-right corner on your device screen, to open for more options in it.
- You will see the print written when you go down the options. Click on the “Print” button, and print command options will appear on your device screen.
- In the pop-up print window, you can select the printer to print the document, number of copies, and adjust the range.
Wondershare Cloud
- Launch and open PDFelement for iOS. Select the PDF document file you want to share with Wondershare Cloud. Click on the three-dot icon button on the middle of the document file.
- Click on the “Upload” button, and you will see Wondershare Cloud listed on the pop-up window.
- Tab on the "Upload to "Wondershare Cloud" button on the middle bottom of the device's screen to start uploading.
Google Drive
- Launch and open PDFelement for iOS. Select the PDF document file you want to share and upload it to Google Drive. You can find the “Tools” option at the left column of the device’s screen.
- Click on the “Add Connection” button, and you will find the “Google Drive” option in the pop-up window.
- Tap on the “Google Drive” sign option, and you can upload the PDF document file to it.
OneDrive
- Launch the program on your device. Select a PDF document file you want to upload and save to OneDrive.
- After selecting a PDF document file, click on “Add Connection” on the left side panel at the top. After that, you will find the OneDrive option down there in the pop-up.
- Click on the “OneDrive” option. It will ask for signing in the OneDrive. Sign in OneDrive link with PDFelement for iOS. After signing in, now, you can review and send PDF files there.
Dropbox
- Launch and open PDFelement for iOS. Select the PDF document file you want to upload to Dropbox.
- Click on the "Add Connection" button on the program's left side menu on the device's screen. You will find the Dropbox option in add connection down the line.
- Click on the "Dropbox." After tapping on Dropbox, you will find the page showing the sign-in to Dropbox to link with PDFelement for iOS.
- You can sign in with the email and password, or you can sign in with Google.
- After signing in, you can upload the selected PDF document file to Dropbox.
Share Screenshots
Notes
- Open the program and select or choose the document file you want to save in Notes.
- Click on the three dots on the top-right corner of the screen. You will find the share option down the line. Click on the “Share” option.
- Now, you will find more options for sharing your file, which also includes Notes in it. Click on the “Notes” and save your document file on Notes.