 Home
>
PDF Images
> How to Extract Images from PDF on Linux
One of the easiest ways to convert PDF files to editable text on Linux is to use the pdftotext command line tool. But as you may well know, this only works for the text part and you may need to extract images from PDF on Linux. In this guide, we are going to be looking at how you can extract images from PDF in Linux OS. We are also going to provide you with an effective solution to extract images from PDF in Windows and Mac.
How to Extract Images from PDF on Linux
To extract the images from a PDF document on Linux, you need another command tool line known as "pdfimages". This tool is part of the poppler-utils package and may already be installed in your system. If it is not, you can find the steps to install it online. Once it is installed, follow these simple steps to use this tool to extract images from the PDF document:
Step 1: Press "Ctrl + Alt + T" to open a Terminal window on your Linux system and then type in the following command.
pdfimages /home/lori/Documents/SampleWithImages.pdf /home/lori/Documents/ExtractedImages/image
Note: Replace first path and the PDF filename in all commands in this tutorial with the filename of the PDF whose images you want to extract.
Step 2: Once you press "Enter" in the command, the images will be extracted from the document in PPM (portable pixamap) or PBM (portable bitmap) format. To create JPG files from the extracted images, enter the following format.
pdfimages -j /home/lori/Documents/SampleWithImages.pdf /home/lori/Documents/ExtractedImages/image This will however only convert the first images to JPG. If you want to convert all the images in the PDF to JPG, enter the following command:
pdfimages -l 1 -j /home/lori/Documents/SampleWithImages.pdf /home/lori/Documents/ExtractedImages/image
How to Extract Images from PDF on Windows and Mac
Extracting images from a PDF in Windows and Mac is a much simpler process, especially when you have Wondershare PDFelement - PDF Editor Wondershare PDFelement Wondershare PDFelement. This PDF management tool makes it easier for you to easily extract any images from any PDF document. Some of the features that make it the most ideal solution include the following:
- It is very easy to use. All functions can be completed in just a few simple steps as we shall see shortly.
- It can be used to edit both the text and images in the PDF document. For example, you can delete and add images to the PDF or even change the size and location of any images within the document.
- It can also be used to convert PDF documents to a variety of other formats including Word, Excel, PPT, TXT, HTML, JPG and more.
- You can make comments and markups to the PDF documents.
- It is easy to protect your PDF document by applying passwords, permissions and redaction.
- It is easy for you to share, print the PDF file.
- It has an OCR function that can be very useful when editing scanned PDFs.
The following simple steps show you how you can extract images from a PDF using PDFelement in both Windows and Mac:
On Windows:
Step 1: Enter Editing Mode
Download and install PDFelement on to your computer. After installation, launch the program and in the main window, click on "Open File" to open the PDF document that you want to extract images from. Once the document is open click on "Edit" in the main menu to enter the program’s "Edit Mode".
Step 2: Extract Images from PDF on Windows
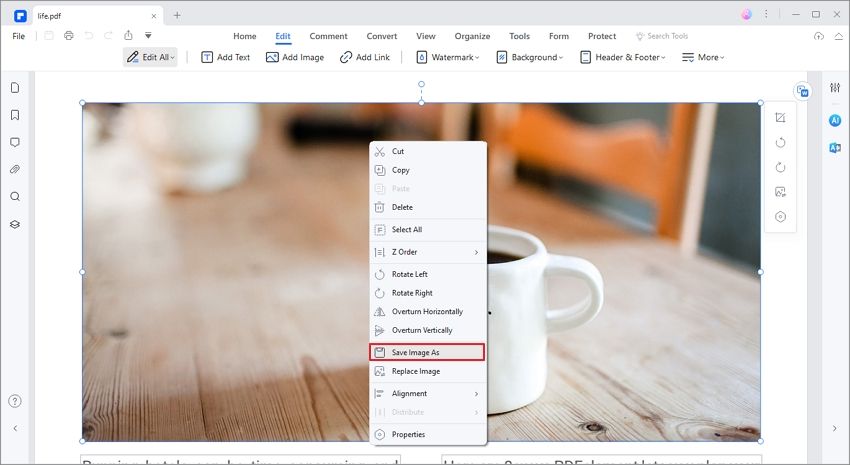
Click on the image you would like to extract to select it. Right-click on the image and then choose "Extract Image" from the options presented.

Step 3: Save the Extracted Image
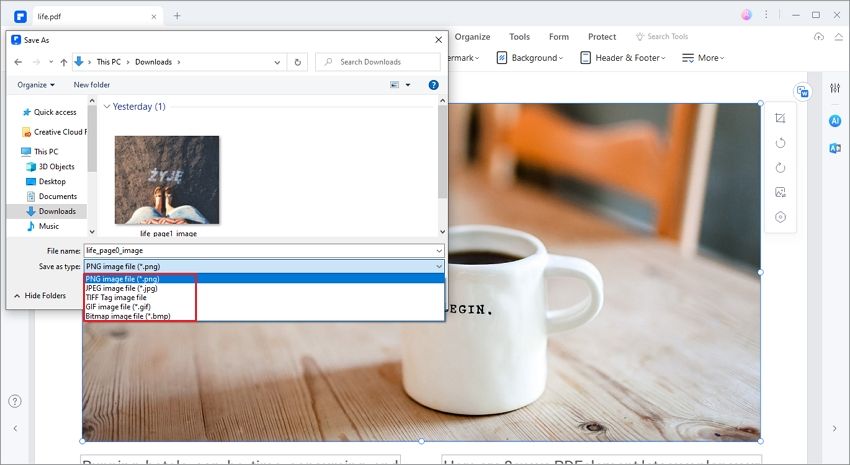
A "Save As" dialogue box will open, allowing you to save the extracted image. Here, you can change the output folder to save the image. In the "Save as Type" section, ensure that the format is "JPG" and then click "Save" to complete the process.

On Mac:
Step 1: Extract Images from PDF on Mac
Open the PDF document you would like to extract the image from. The easiest way to do that is to simply drag and drop the PDF to the program’s main window. Once the document is open, click on "Image" from the tools on the left and then click on the image you want to extract to select it.

Click on the "Extracting" from the tools at the top to begin the extraction process.
Step 2: Save the Extracted Image
A "Save As" popup box will appear. Here, you can change the filename of the exported image and change the output folder under "Where". Once you are happy with your output folder selection, click on "Save" to save the extracted image.

Free Download or Buy PDFelement right now!
Free Download or Buy PDFelement right now!
Try for Free right now!
Try for Free right now!
 100% Secure |
 G2 Rating: 4.5/5 |
  100% Secure


Elise Williams
chief Editor