 Home
>
macOS Tips and Tricks
> How to Fix External Hard Drive Not Showing Up on macOS 12
From past experiences of Mac users who acquired a new macOS, you could find that external hard drive is missing after macOS 12 download. When external hard drive is not showing up on macOS 12, you may hardly understand the cause. This article enlightens you on some causes, and ways to fix.
How to Find an External Hard Drive on macOS 12
1. You can check Apple’s Disk Utility to see if an external drive is showing up.
Disk Utility is within System Preferences.
If it is visible, then click the option to Mount, which should make it visible on the desktop and in the External Drives option in the Finder menu.
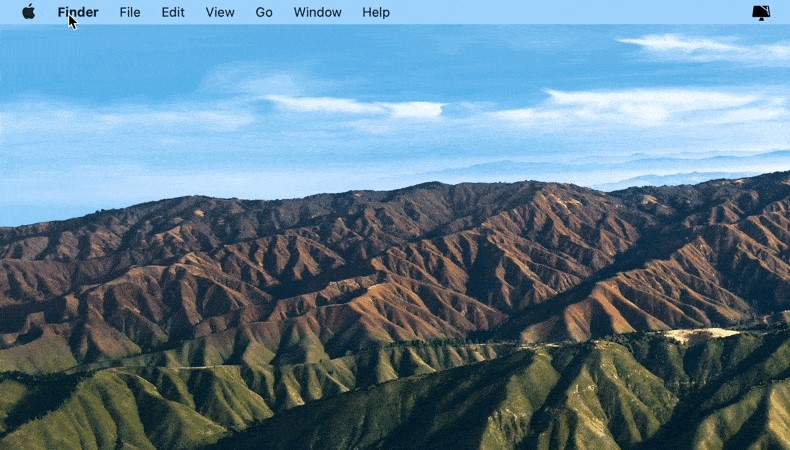
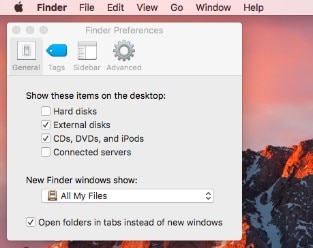
2. Alternatively, go to the Finder menu and select Preferences (Cmd+comma).
In General, click on External disks to ensure that from now on it shows on the desktop
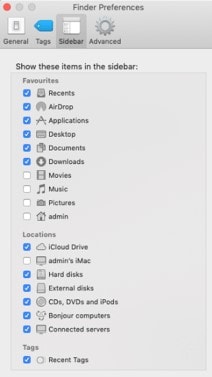
In the Sidebar tab you can choose which folders and devices will be shown in the left-hand column of the Finder window.
Reasons Why External Hard Drives Aren’t Showing Up on macOS 12
If your external hard drive is not showing up on macOS 12 after plugging it in, then there should be some specific reasons. The following are some possible causes:
- The Drive is not properly plugged in
- The Cable is frayed or wires are exposed
- The USB connector could be damaged and thus not recognizing the device
- There could be another hardware issue
- The USB ports could be damaged
- Mac PC could be working slowly and thus taking long to register the connection
All these issues can be the reasons why there is a missing external hard drive after macOS 12 update.
How to Solve Missing External Hard Drive after macOS 12 Update
1. Check The USB Connectivity
The very first solution if my macOS 12 deleted my entire external hard drive making it invisible would be to check the USB connectivity. It is possible that you may have not connected the external hard drive to the USB port, which is presented on the Macbook/iMac/mini/Pro properly.
So, you should try to reconnect the external hard drive to the same or even another compatible USB port. If it fails to fix the issue then you can also change the USB cable and then reconnect it. Also, if you have another Mac system at your home or at your friend’s home then you can connect the drive there and check whether it shows or not.

2. Restart Your Mac PC
If you have resolved the USB connectivity issue but still find that the external hard drive is missing after macOS 12 download, you should try to restart your Mac PC. Sometimes, your Mac may have some internal issues and hence fails to respond well to actions that you need it to perform.
To restart your Mac, you should follow the below steps:
Step 1: Shut down the Mac system.
Step 2: Now, unplug all the power cord to cut out power flow.
Step 3: Also, unplug all the USB connections including the missing external hard drive after macOS 12 update.
Step 4: Now, you should wait for 5 to 30 minutes and then plug in the cords. Ensure that the Mac PC is being powered. If it is a Mac laptop, ensure that it is charged
Step 5: Now, it’s time to turn on the Mac system, MacBook Pro or iMac.
Step 6: Now, simply plug in the external hard drive that was not showing up on macOS 12, to the functional USB port only and then open Finder and check the drive.
3. Enable External Hard Drive Visibility Option
If restarting Mac does not solve the issue, there is a great need to enable the option of visibility of missing external hard drive after macOS 12 update. Perform the following steps.
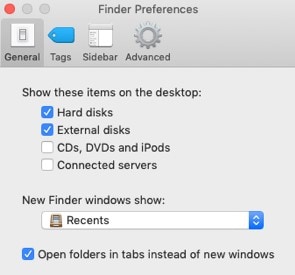
- Go to the option Finder and go to the Preferences and access option General.
- Under the option, Show these items on the desktop, you have to check the checkboxes named Hard Disks and External disks.
- Similarly, go to Folder option and then access Preferences and then go to Sidebar option. Now, under the section, Show these items on the sidebar, you have to check the checkboxes named External disks and Hard disks.
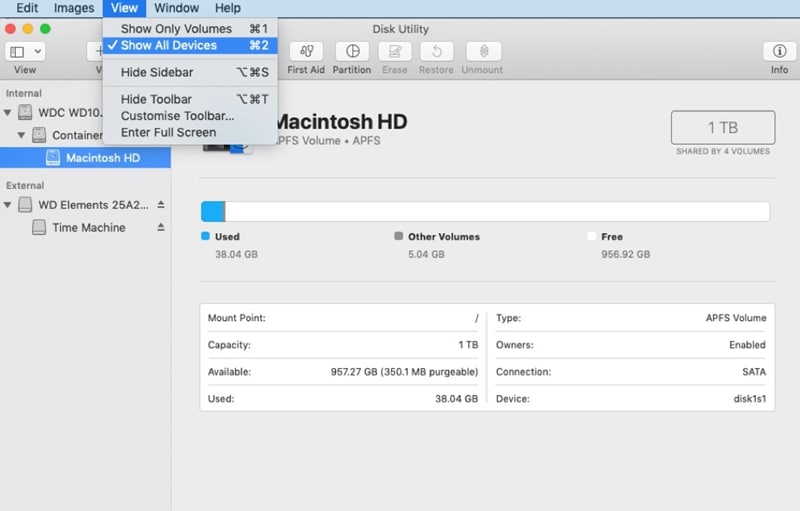
- Next, go to the option Finder and then Applications. Here, choose Utilities and then go to the option Disk Utility.
Now, in the Disk Utility option, go to the View option and then Show All Devices to view all mounted and un-mounted external hard drives on Mac.
4. Run First Aid on an External Hard Drive
As mentioned above, external hard drive is missing after macOS 12 download due to other hardware issues, which are repairable through First Aid.
Mac’s built-in First Aid tool is designed to verify and repair a range of issues related to corrupted files and apps, startup issues, and, crucially, external hard drive problems. So, if your issue has to do with wanting to know how to open a flash drive on Mac that’s displaying but not allowing you access to files, First Aid might be able to help.
- Go to System Preferences and access Disk Utility.
- Highlight your external hard drive and click on First Aid.
- Select Run to start running diagnostics and prompt Mac to automatically fix any issues.
If First Aid is successful in repairing any faults causing missing of external hard drive after macOS 12 update, your hard drive should be available to mount.
5. Reset Your NVRAM
NVRAM is actually very helpful in retaining the information while the power is turned off. Reset the NVRAM by:
- Shutting down or rebooting the Mac system.
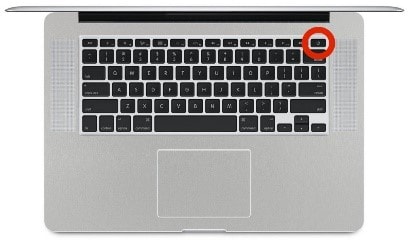
- Now immediately press the keys marked as red in the below image in a sequence which is – Command, Option, P and then R.
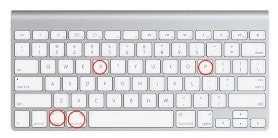
- Hold all these keys for not more than 20 seconds and after you hear the second chime, just simply release the buttons.
- After releasing the keys, your Mac system will restart and it is possible that your external hard drive will then start showing up on Mac.
Best PDF Editor to Handle PDF Files on macOS 12 – PDFelement for Mac
After recovering a missing external hard drive after macOS 12 update, you may want to manage and work on PDF files stored in the device, but lack the right tool. Well, you do not have to worry anymore about PDF management because PDFelement for Mac is well equipped for the task.
PDFelement for Mac is the only reliable solution for the PDFs in your external hard drive. Aside from being efficient and affordable, it is user friendly and extremely easy to use whether you are a beginner or not. Basically, it does not require technical skills to operate despite hosting advanced features such as Optical Character Recognition technology.
With PDFelement for Mac, you can achieve any level of productivity in your office, or school work. The best part is that it is also compatible with other kinds of files such as Microsoft Office documents. You can open and read Word, Excel and PowerPoint.
Features
- It opens, views and edits PDFs by altering texts, images and links as needed
- It converts PDFs to Word, Excel, and PowerPoint files without interfering with their layout and formatting
- It allows manipulation of scanned PDFs or image-based documents through OCR
- It adds, removes and updates watermark and backgrounds
- It highlights and underlines PDF content.
Free Download or Buy PDFelement right now!
Free Download or Buy PDFelement right now!
Try for Free right now!
Try for Free right now!
 100% Secure |

Audrey Goodwin
chief Editor