 Home
>
Create PDF
> How to Create Multi-Page PDF
How to create a multi-page PDF? That's a question many business users ask, so we decided to show the process in a couple of different ways. As for the purpose of doing this task, a lot of businesses regularly need to merge multiple documents to create multi-page PDFs to send to their vendors (specs, requirements, etc.), their clients (portfolios and so on), and even for internal use (training, etc.). This article shows you the step-by-step process of how to create a multi-page PDF in two different ways. With these methods, you can easily learn how to make a multi-page PDF without Acrobat and the high cost it entails. For this exercise, we'll use an affordable Adobe Acrobat DC alternative called Wondershare PDFelement - PDF Editor Wondershare PDFelement Wondershare PDFelement, which is quickly becoming the de-facto PDF editor of choice for small and large companies that don't want to spend tens of thousands of dollars deploying Acrobat DC or Acrobat Pro DC across their organization.
Here are the four methods to create multi-page PDFs from two or more source PDF files.
Method 1: Create a Multi-page PDF by Adding Files
This method involves adding new PDF files to an existing one using PDFelement's "Insert from PDF" function. The idea is to have your master file open and then use the Insert function within the Page tab to add new content. The details are shown below:
-
Step 1. Open the Original PDF
Launch the program and click the "Open files" option to import the master PDF file to which you want to add additional PDF files. You can also import the file into the program using a drag and drop action.

-
Step 2. Add another PDF to a PDF
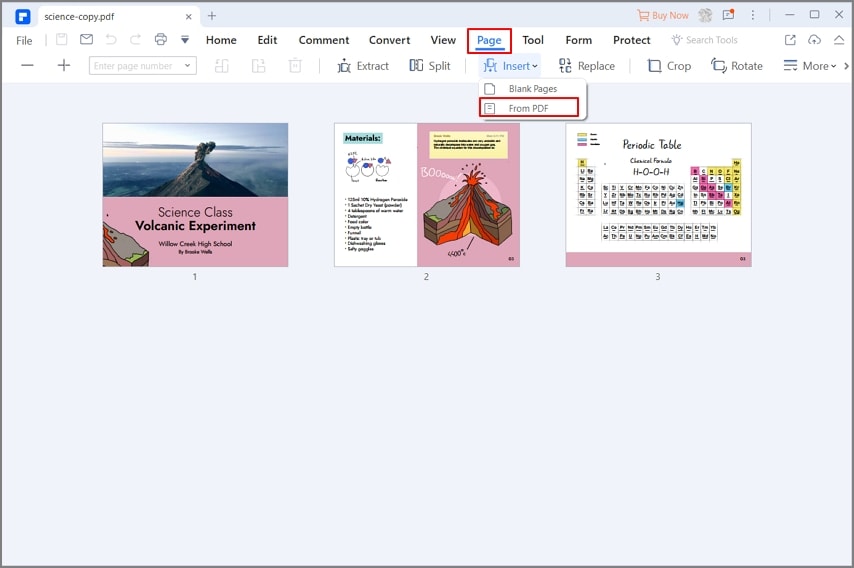
Next, go to the "Page" tab on the main menu at the top, then click the "Insert" option in the ribbon toolbar below it and select the option that says "From PDF". This will cause a new Insert window to pop up, where you'll see several options.
-
Step 3. Create a Multi-Page PDF
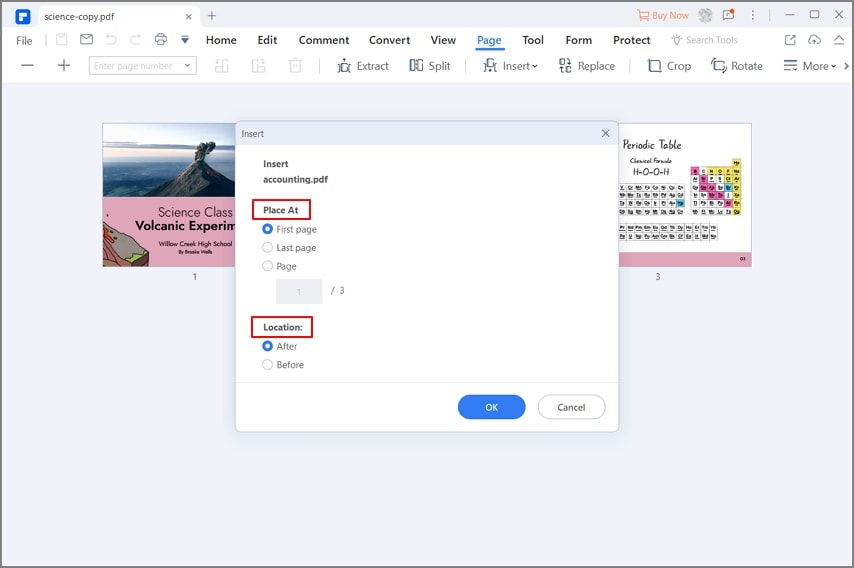
The first step here is to browse and select your PDF file. Once that's done, choose where you want the new pages to be added using the options in the "Place At" section. Click "OK" when you're ready and the selected pages from the source file will be inserted at the specified place in the open master PDF.
You can repeat this process with multiple source files to compile your master PDF. Finally, save the master PDF with a new name and exit the application. There's also another way to create a multi-page PDF, and this is by combining several PDFs or several different file types and merging them into a single, multi-page PDF file.
Method 2: Make a Multi-Page PDF from Images
With PDFelement, you can also create a multi-page PDF from images easily and efficiently. The PDF editor can create PDFs from images in different formats, including JPG, PNG, TIFF, GIF, etc.
-
Step 1. Create PDF from Images
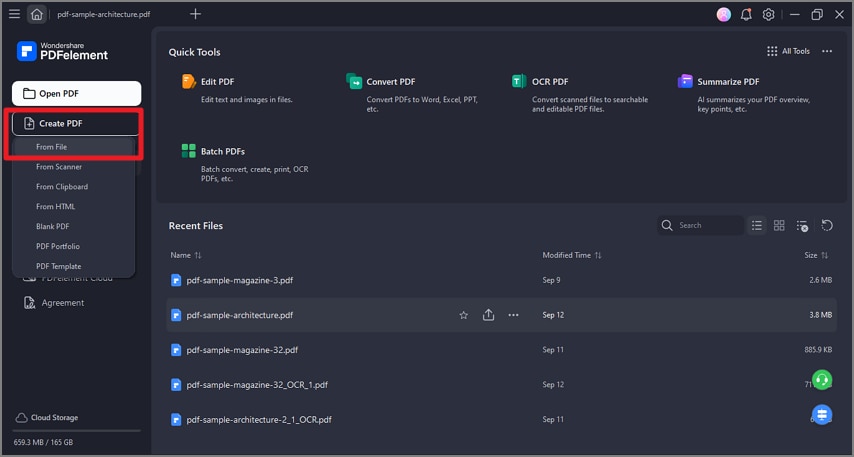
Run PDFelement on your computer. Click the "Create PDF" button on the homepage. There are several options, that allow you to create PDFs in different ways. To create a multi-page PDF from images, select "From File."
-
Step 2. Create a Multi-page PDF from Images
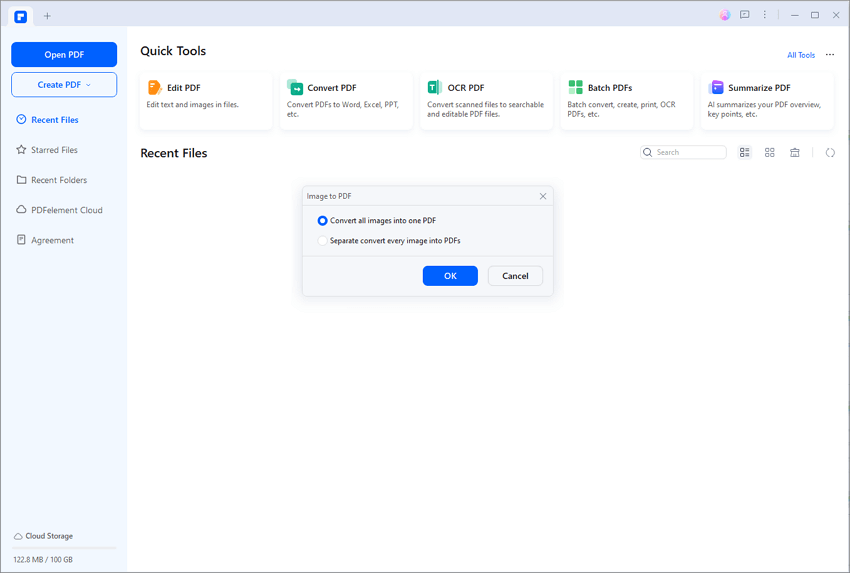
Then select all the needed images from your computer. The PDF editor will ask if you would like to combine all the images in one PDF or as multiple PDFs separately. To create a multi-page PDF, select the former.
-
Step 3. Rearrange the Multi-page PDF
Now you have the multi-page PDF. Feel free to reorder the PDF pages, rotate, or add more images. When you are done, save the multi-page PDFs.
Method 3: Combine Multiple Files to Make a Multi-Page PDF
This method uses the "Combine PDF" and "Combine Files" functions in PDFelement. The first one can be found on the home page when you load the application; the second is on the "Tool" tab. The step-by-step process for both is shown below:
-
Step 1. Click "Combine Files"
To merge other file types and create a single, multi-page PDF, click the "Combine Files" option in the "Tool" tab.

-
Step 2. Add Multiple Files
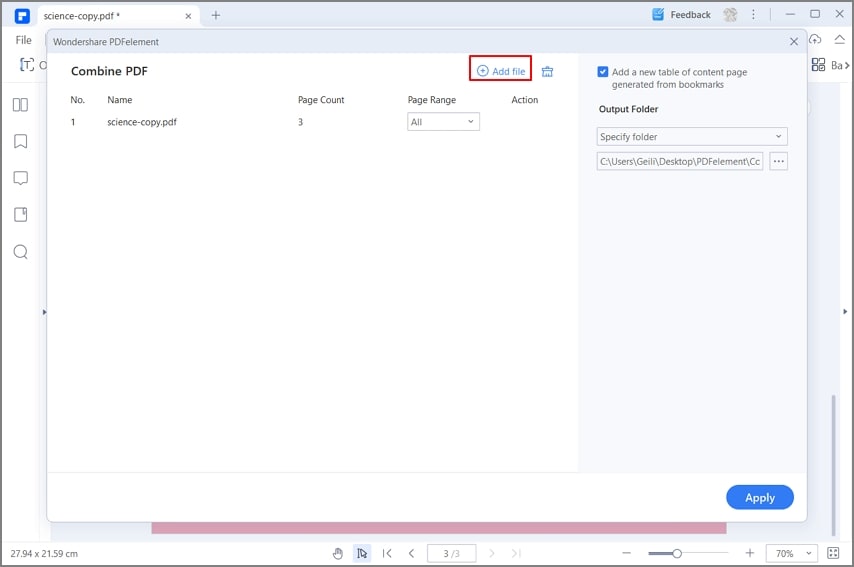
A "Combine Files" window will appear on your screen. You can click "Add file" to import files of different formats, as shown in the screenshot below.
-
Step 3. Create a Multi-Page PDF
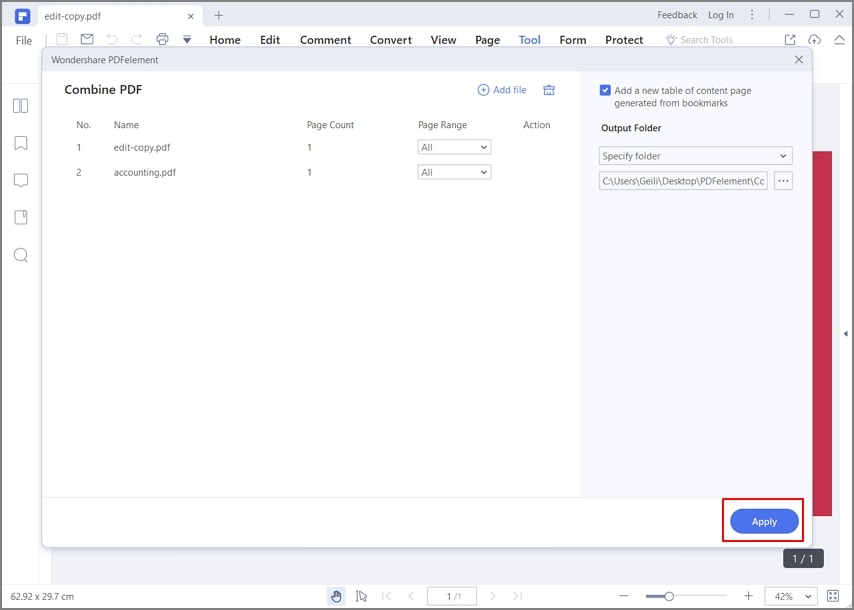
Once you add your source files, choose your output folder at the bottom of the window and hit the "Apply" button to merge the files. The output file will be a PDF, and you will see that all the original content has been preserved as in the original source files. This is especially important when you have various content types like text, images, tables, graphs, charts, and so on.
Apart from allowing you to make multi-page PDF files from different source files or different PDF files, PDFelement offers an extensive palette of PDF tools you can use to make your document management task more efficient.
In short, PDFelement will give you full control over your PDF files and other documents, making you more productive and letting you focus on important tasks like taking care of clients and being more efficient at your work.
Method 4: Create a Multi-page PDF in Photoshop
Another way to make a multi-page PDF is using Photoshop, which can turn every image into a PDF page and save it as a whole new file. Follow the steps if you don't know how.
-
Step 1. Automate PDF on PS
Go to File > Automate and select PDF Presentation from the menu, which will open a new window that allows you to select images to create a multi-page PDF.

-
Step 2. Create a Multi-page PDF
Click the "Browse" button to select all the images you want to add. Order the images to make sure they are in the right sequence before the PDF file is created. Then go to the Output option, make sure that "Multi-page Document" option is ticked and customize other output options if needed.

-
Step 3. Save a Multi-page PDF
Click the "Save" button to save all the added images as a multi-page PDF. Name the multi-page PDF and select a location to save it.
Free Download or Buy PDFelement right now!
Free Download or Buy PDFelement right now!
Try for Free right now!
Try for Free right now!
Related Articles
- How to Create a PDF Portfolio
- HEIF to PDF Conversion: Solutions for Mac, Windows & iPhone Users
- How to Convert HEIC to PDF: Top Mac, Windows & iPhone Options
- CHM to PDF Conversion: Online & Desktop Solutions
- How to Convert PDF Portfolio to Single PDF Using the 4 Best Tools
 100% Secure |
 G2 Rating: 4.5/5 |
  100% Secure


Elise Williams
chief Editor