
It was from Windows 98 that Windows Update was designed as an official program to update the system and in the XP version it could already be updated automatically, and this has continued until today in Windows 10 and this will be the case when Windows 11 arrives.

There is no doubt that updates are part of practically any software including Windows and represent great advantages thanks to the addition of new add-ons, security patches, bug fixes, bug fixes, and extensions, among other aspects. On the other hand, automatic updates are not always positive, since sometimes some of them lead to errors or problems on the computer, so it is advisable to deactivate and install them when you are sure that they will not interfere with the correct functioning of your operating system.
In this article
Part 1. Why Do You Stop Automatic Updates on Windows
Although Windows automatic updates are designed to improve and correct errors in the system, there are times when they cause problems of different kinds. Next, we will review two of the most common to explain the reason for its origin:
1. Consume large chunks of the computers processing power
In some cases, Windows updates can generate incompatibilities with some computer software, and this makes their operation not optimal, causing a greater consumption of processing power.
Example 1: A very popular example was the KB4592438 patch, which many users complained about as immediately after installation their computers were running very slowly. This happened on computers with an Intel processor, where an incompatibility arose between the Windows 10 update and the Intel Driver Software Assistant Tool, causing the DSAService process, which has a direct relationship with several drivers, to consume more background resources than normal.
Example 2: Another update that generated a related problem was Build 18362.329, this caused the file SearchUI.exe (which is part of Cortana) to cause CPU usage to increase by up to 40% on average, a situation that affected a large number of users.
2. Data loss during update
Although it is not so common for an update in Windows to delete information, this situation has occurred in some cases. The most talked about was that of Version 1809 of Windows 10, which caused thousands of users to complain instantly.
This update deleted files stored in the Documents folder, something that caused a lot of anguish in the cyber community. This error was generated due to a network infrastructure problem caused by an external DNS service provider's global outage, affecting Windows Update connectivity, generating problems in the installation of Version 1809.
Although the error was quickly corrected, this did not exempt thousands of people from having worried about their information and having to perform complex tasks to recover it, such as using applications with which they were not familiar or investing considerable time in looking for alternatives to access their data through procedures where they spend several minutes, when it is normal to do it in a few seconds.
Wondershare PDFelement
Simplify how people interact and communicate with PDF documents using intuitive and powerful PDF tools.

Part 2. How to Turn Off Automatic Updates on Windows 10/11
The errors that occurred in the previous examples could only be avoided if users had turned off automatic updates in Windows 10, so if you have that operating system or Windows 11, you can make sure you do not receive automatic updates. To achieve this, I advise you to do all the procedures that I will show you below since each of them will deactivate automatic updates differently.
Method 1. Change Windows Update Settings
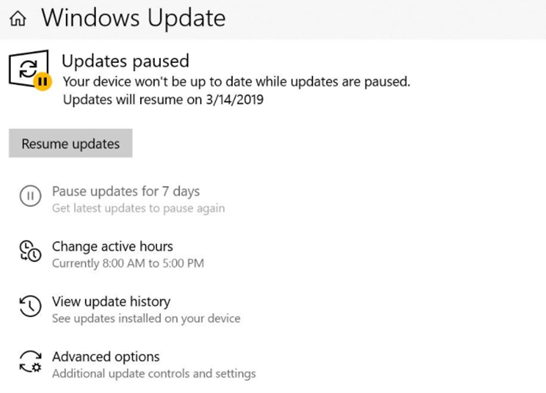
Simply type "Windows Update" in the search box to open the tool and choose "pause updates for 7 days.

Method 2. Disable the Windows Update Service:
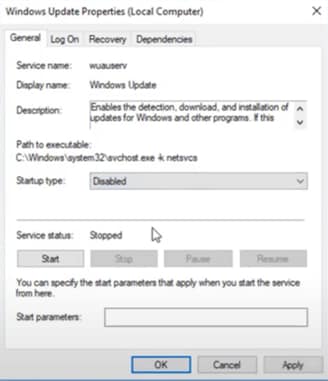
Type Services in the search box and click on the first option to open the tool. Scroll down and search for "Windows Update" and then double click.
A new window will be displayed. Click Stop and then change to "Disabled in the drop-down list next to Startup type.
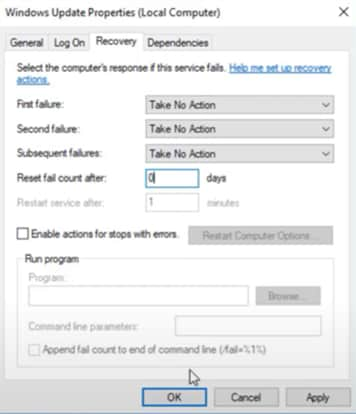
Now go to the "Recovery" tab and next to "First Failure" choose the option "Take No Action" and change the number of "Reset fail Count after" to "0" days; finally choose "Apply" and your configuration will be saved.
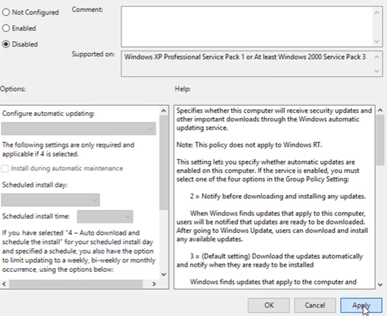
Method 3. Turn off Automatic Updates with Group Policy Editor:
Type "gpedit.msc" in the search box to open the Local Group Policy Editor, and click on the "Windows Components" and "Windows Update" folders. Then click on "Configure Automatic Updates."
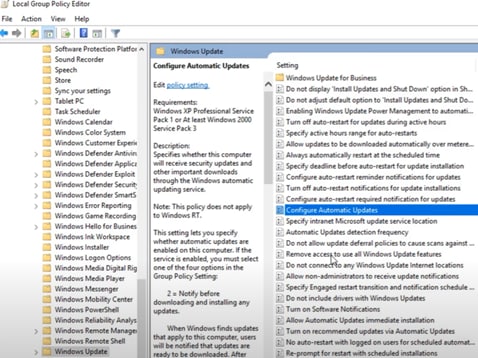
A new window will be displayed, click on "Disabled," then on "Apply" and finally on "OK" to confirm the configuration change.
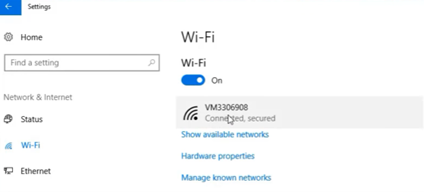
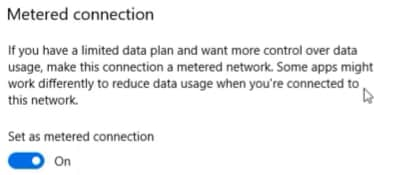
Method 4. Set up a Metered connection:
Open Settings and click on Wi-Fi, then click on the name of your network.
Scroll down to the Metered connection section and click the switch button below Set as metered connection to activate the function.
Method 5. Disable automatic updates via Registry:
Open Registry Editor and go to the following folders: "HKEY_LOCAL_MACHINE", "SOFTWARE", "Policies", "Microsoft", "Windows."
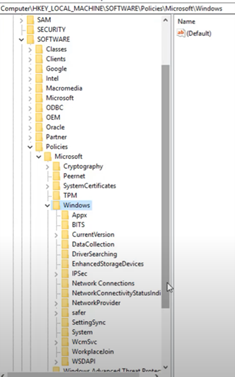
Inside the Windows folder you will make a new one by right clicking on "Windows", then click on "New" and finally on "Key."
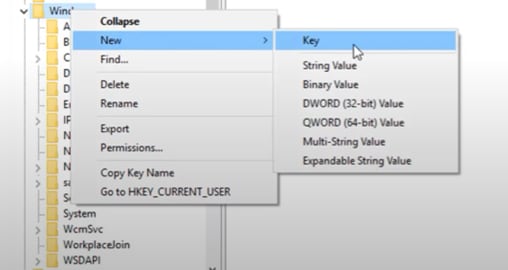
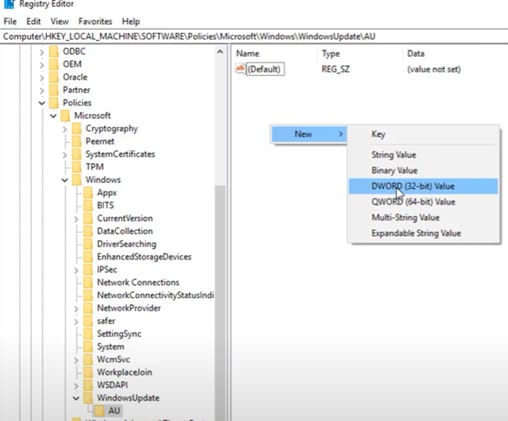
Rename the new folder to "WindowsUpdate" and now you must create a new folder within it (repeating the previous step) which you will name "AU." Make sure you are inside this folder, right click and choose "DWORD (32-bit) Value."
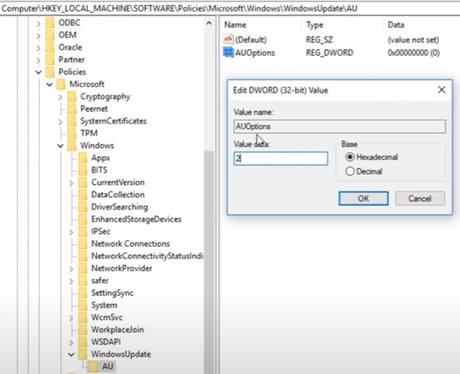
A new file will appear to which you must rename it "AUOptions." Open it with a double click and change the number from "Value Data" to "2." Finally confirm by choosing "OK."
Finally, it only remains for you to restart Windows so that all the changes are applied correctly and you can be sure that there will not be an update installed without first confirming and giving permission.
PDFelement-Powerful and Simple PDF Editor
Get started with the easiest way to manage PDFs with PDFelement!
Part 3. How to Uninstall a Windows Update
You have already learned how to disable automatic Windows updates, but if for some reason Windows 10 or Windows 11 installed one that you did not like or caused problems for your computer, it is possible to uninstall it. Next, I'll show you how to do it through a few simple steps:
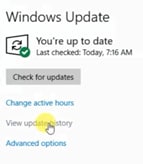
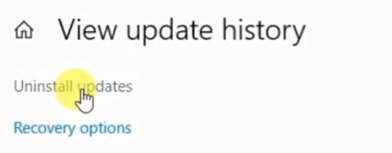
Type "Windows Update" in the search box and click on "Windows Update History.
then "Uninstall updates."
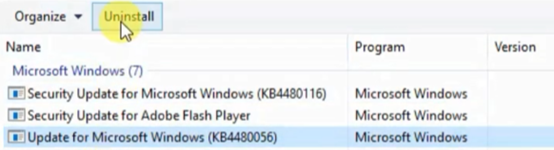
A list of updates will be displayed. Now you just have to check the names of the updates, select the one you want and then click "Uninstall." This will be enough to delete it.
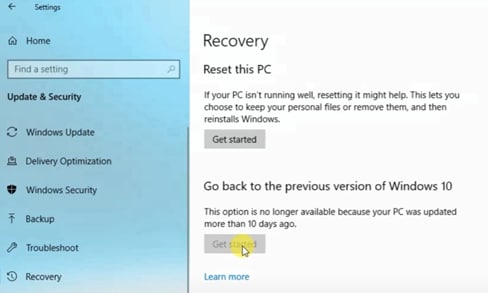
If Windows installed a new version, the above process would not help you as it is intended to remove updates that are patches. Sometimes Windows installs builds, which are more complex updates and are taken as new versions of the operating system. To uninstall a build, you will need to do the following:
Type "Windows Update" in the search box and click "Recovery." Then, in the section "Go back to the previous version of Windows 10" click on "Get Started." This option is available only 10 days after installing the update. After that period, you will not be able to do the uninstallation process through this method and the only way to go back to the previous version will be through formatting.
For this reason, it is highly recommended that if you experience problems after an update in Windows, you uninstall as quickly as possible, so you can safely return to the previous version avoiding doing other more complex and time-consuming procedures such as formatting your computer.
Conclusion
Updates in Windows are a very useful tool that usually provides security and stability to the operating system. Without being essential, several of them are necessary for all applications and processes to run smoothly, giving a comfortable user experience. On the other hand, if they are installed automatically, there is a risk that some of them will generate problems in the computer for the reasons already mentioned, so it is advisable to wait and make sure that they do not have errors and then perform the installation manually.

