
Managing InDesign files often requires you to convert InDesign to PDF, especially within the business world when you are working with clients, vendors, or stakeholders who do not have Adobe's specialized design software installed on their computers. Adobe InDesign .indd or .idml files are complex, proprietary document formats that handle intricate layouts, typography, and high-resolution graphics. However, they are virtually unreadable outside of the Adobe ecosystem.
Whether you are finalizing a magazine layout, a corporate brochure, an interactive digital form, or a simple newsletter, finding the right workflow to transition from InDesign to PDF is a critical step in document management.
This guide is designed for two types of users: those who have Adobe InDesign installed and need to know the optimal export settings, and those who have received an .indd or .idml file and need an InDesign to PDF converter to convert without InDesign. Once your document is converted, we will also explore how to effortlessly edit and annotate your new PDF using top-tier PDF editing software - Wondershare PDFelement.


 G2 Rating: 4.5/5 |
 100% Secure
In this article
- Method 1: How to Convert InDesign to PDF Directly (With InDesign)
- Method 2: How to Convert InDesign to PDF Online (Without InDesign)
- Post-Conversion: How to Edit Your PDF with PDFelement
- Advanced InDesign PDF Export Settings Explained
- Troubleshooting Common InDesign to PDF Errors
- Conclusion
- Frequently Asked Questions (FAQ)
Method 1: How to Convert InDesign to PDF Directly (With InDesign)
If you are the original designer or you have an active subscription to Adobe Creative Cloud, the most reliable and high-quality method is to convert your InDesign files to PDF directly within the application itself. Native export guarantees that layers, vectors, typography, and color spaces are preserved accurately.
Before you begin, always ensure your document is saved to prevent the loss of any recent changes, and resolve any preflight errors (like missing image links or missing fonts) indicated by the red/green light at the bottom of your InDesign workspace.
Follow these steps to natively convert InDesign to PDF:
Step 1Initiate the Export Command
With your document open, navigate to the top menu bar. Click on File and scroll down to select Export (or use the keyboard shortcut Ctrl + E on Windows / Cmd + E on Mac).
Step 2Choose Your File Type
A "Save As" dialogue box will appear. Name your file. In the "Save as type" (Windows) or "Format" (Mac) dropdown menu, you will see two primary PDF options: Adobe PDF (Print) and Adobe PDF (Interactive).
- Adobe PDF (Print): Select this if your document is intended for physical printing, high-resolution viewing, or if it requires commercial printer marks (bleeds, crop marks).
- Adobe PDF (Interactive): Select this if your document includes hyperlinks, buttons, audio, video, or page transitions intended for on-screen digital consumption.
Step 3Configure Export Settings
Once you click Save, the Export Adobe PDF dialogue box opens. Here, you can define the exact parameters of your PDF.
- If you chose Print, you can select presets like "High Quality Print" or "Smallest File Size" from the Adobe PDF Preset dropdown at the top. You can also specify page ranges, determine whether pages should export as single pages or spreads, and add printer marks.
- If you chose Interactive, viewing options give you a chance to define the scaling of the PDF pages on the screen. Clicking on the "Default" option ensures automatic page sizing that will properly fit on the screen. You can also opt for "Open in Full Screen Mode" or set the image resolution (typically 72 to 144 ppi for digital viewing) to optimize the online reading experience.
Step 4Finalize the Conversion
Once you are satisfied with your settings, click the Export button at the bottom of the window. InDesign will process the file in the background (you can check the progress in the Background Tasks panel) and generate your PDF.
Method 2: How to Convert InDesign to PDF (Without InDesign)
A common scenario in the business world is receiving a requested design file from a freelancer or agency, only to realize they sent the source .indd file instead of a readable PDF. If you do not have Adobe InDesign installed, you cannot open this file natively.
In this situation, you will need to rely on an InDesign to PDF tool. There are several free online converters that act as a bridge, allowing you to convert InDesign to PDF online without downloading heavy software or paying for an Adobe subscription.
Using an InDesign to PDF Converter Online(for INDD)
Tools like 2PDF.com, Online2PDF provide straightforward, cloud-based conversion engines for INDD to PDF conversion. Here is a general guide on how to use these platforms:
Step 1Select a Converter
Open your web browser and navigate to a trusted conversion site like Online2PDF.
Step 2Upload Your .indd File
Click the "Choose Files" or "Upload" button on the homepage. Browse your computer for the InDesign file and select it. Most free online tools have a file size limit (often ranging from 50MB to 100MB). If your file is larger, you may need a premium account.
Step 3Select PDF as the Output
In the output format dropdown menu, select PDF.
Step 4Initiate the Conversion
Click the "Convert Now" button. The platform will upload your file to its servers, process the proprietary Adobe data, and render it into a standard PDF.
Step 5Download Your PDF
Once the process is complete, a download link will be provided. Click to save the new PDF to your local drive.

Using Markzware (for IDML to PDF)
There are very few online converters that support IDML to PDF conversion, but Markzware is one option that can handle this task. If you need a simple way to turn an Adobe InDesign Markup file into a PDF without using desktop publishing software, Markzware can help. Follow the steps below to complete the conversion.
Step 1Create an account
First, visit the Markzware website and create an account. If you already have one, simply sign in with your credentials to access the service.
Step 2Upload your IDML
After logging in, open the dashboard and locate the upload area. Select the IDML file from your computer and upload it to the platform.
Step 3Select PDF as the Export Format
Once the file is uploaded, choose PDF from the list of available export formats. Start the conversion, then download the PDF file when the process is complete.
Post-Conversion: How to Edit Your PDF with PDFelement
Converting your document from InDesign to PDF is often just the first step in a broader document workflow. Once you have your PDF, you may realize you need to make quick textual changes, add collaborative comments, or sign the document. Opening InDesign to make minor text edits and re-exporting can be tedious and time-consuming.
This is where a dedicated PDF editor becomes invaluable. Working with PDFs is fast and easy with PDFelement, a modern, powerful PDF tool used by professionals in various fields to create outstanding documents. It offers a comprehensive suite of features for editing and modifying your PDF files, serving as the perfect solution for all your post-conversion PDF needs.
G2 Rating: 4.5/5 |100% Secure
Step 1Open Your Converted PDF
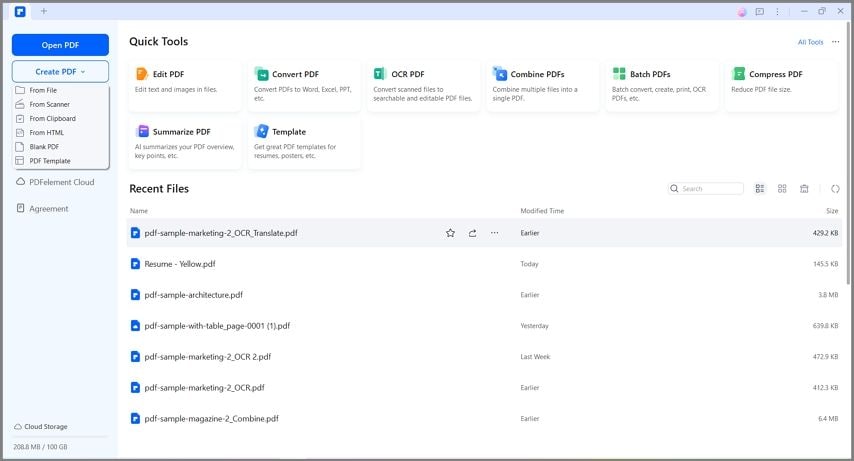
Launch PDFelement on your desktop. On the home screen, you can simply drag and drop your newly converted PDF into the interface, or click the "Open PDF" button to browse your files.
Step 2Edit the PDF Layout and Text
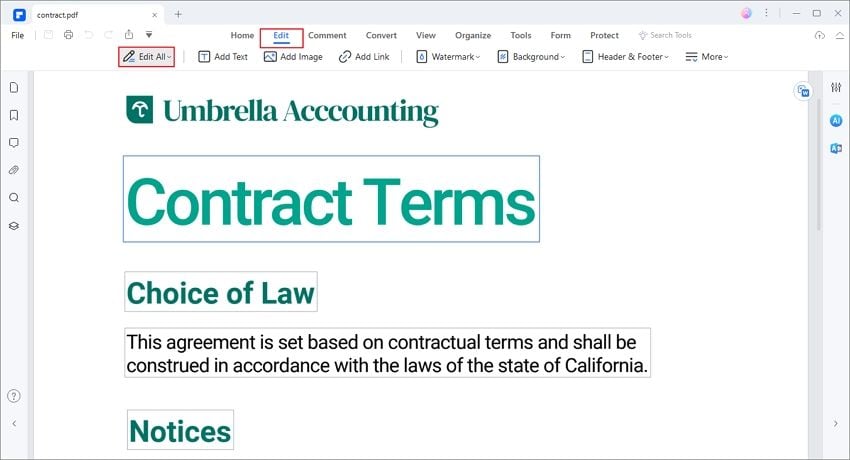
PDFelement transforms your static PDF into an editable document. By navigating to the Edit tab, you gain access to powerful word-processor-like tools. You can edit PDF text and images by simply clicking and typing.
If you notice a typo from the original InDesign file, you do not need to send it back to the designer. You can easily crop pages, run a spell check, alter font sizes, add watermarks, and insert updated headers and footers directly within PDFelement.
Step 3Annotate and Collaborate
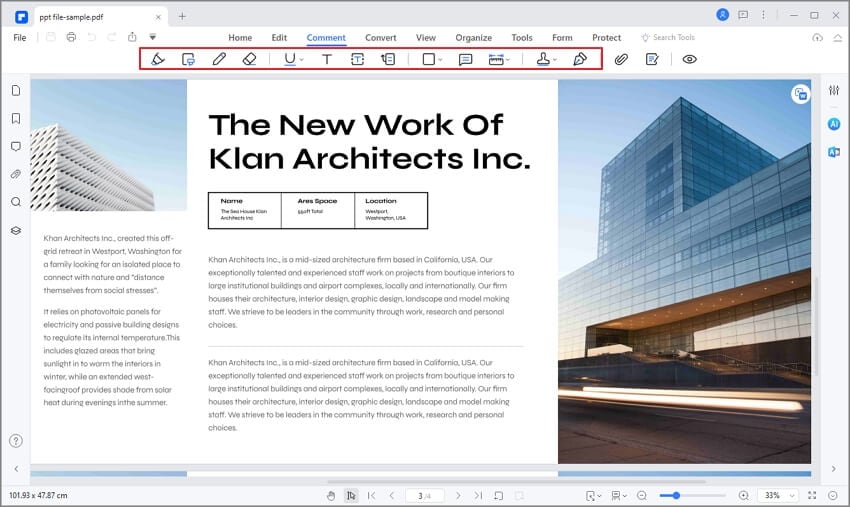
For team reviews, the annotation tools are essential. Using the tools under the Comment tab, you can add sticky notes, text markups (like highlights and strikethroughs), place attachments, draw freehand shapes, and apply approval stamps. Once you are finished collaborating, you can save your document securely, even applying password encryption if the contents are sensitive.
Key Features of PDFelement
- Format Conversion: Conversion of PDFs to other file formats like Word, Excel, PowerPoint, HTML, images, and more.
- Direct Editing: Effortlessly edit text, graphics, and layouts.
- OCR Technology: Turn scanned files or flattened image PDFs into editable documents that are searchable and selectable.
- Form Handling: Transformation of non-fillable forms (such as those exported statically from InDesign) into fully interactive, fillable PDFs.
- Security: Password encryption, redaction, and digital signature capabilities.
G2 Rating: 4.5/5 |100% Secure
Advanced InDesign PDF Export Settings Explained
For users performing the native export within InDesign, the sheer number of settings in the Export dialogue box can be overwhelming. Understanding these settings ensures your resulting PDF serves its exact purpose without bloated file sizes or poor print quality.
High-Quality Print vs. PDF/X Standards
When exporting for physical production, commercial printers often request specific PDF formats.
- High-Quality Print: This preset creates a PDF suitable for high-quality printing on desktop printers and proofers. It downsamples color and grayscale images to 300 ppi and monochrome images to 1200 ppi, embedding all subsets of fonts.
- PDF/X-1a / PDF/X-4: These are ISO-standardized presets specifically built for the graphic arts industry. PDF/X-1a forces all colors into CMYK or Spot colors (stripping out any accidental RGB web colors), ensuring color accuracy on the printing press. PDF/X-4 allows for live transparency and advanced color management.
Marks and Bleeds
If your design extends to the very edge of the page (like a full-page photo), InDesign requires a "bleed"—a slight overlap of artwork beyond the page edge that gets trimmed off after printing. When converting to a Print PDF, you must navigate to the "Marks and Bleeds" tab in the export window. Check "Crop Marks" so the printer knows where to cut, and check "Use Document Bleed Settings" to ensure that extra artwork is included in the final PDF.
Image Compression
If you are exporting a document strictly for email distribution, a 300 ppi, high-quality CMYK file will be massively oversized and difficult to send. To fix this, use the "Smallest File Size" preset, or manually adjust the "Compression" tab. Set color and grayscale image downsampling to 72 or 100 ppi, and change image quality to Medium or Low. This aggressively shrinks the file size for fast web loading.
Troubleshooting Common InDesign to PDF Errors
Even experienced designers run into roadblocks when trying to convert InDesign to PDF. Here are the most common preflight and export errors, and how to resolve them before conversion.
1. Missing or Modified Links
InDesign does not embed images by default; it "links" to them to keep the .indd file lightweight. If you move or rename an image file on your hard drive, InDesign loses the connection. Before exporting, check the "Links" panel. Any image with a red question mark is missing. You must double-click the icon and "Relink" the file by finding its new location on your computer. If you export with missing links, the resulting PDF will display blurry, low-resolution preview versions of your images.
2. Missing Fonts
If you open an InDesign file that utilizes a font you don't have installed on your system, the text will be highlighted in pink. If you convert to PDF without fixing this, InDesign will substitute a default font (like Minion Pro), ruining the layout. Always resolve font issues via Type > Find/Replace Font to sync missing Adobe Fonts or replace them with local alternatives before exporting.
3. Overset Text
A red plus sign + at the bottom right of a text box means there is more text in the frame than can physically fit. If you export to PDF, that hidden text will simply be cut off and omitted from the final document. You must either expand the text box, reduce the font size, or thread the text to a new page before conversion.
G2 Rating: 4.5/5 |100% Secure
Conclusion
Understanding how to convert InDesign to PDF is a foundational skill in modern digital workflows. Whether you are an experienced designer fine-tuning commercial print settings natively in Adobe, or a business professional utilizing an InDesign to PDF online converter to access a locked file, mastering this conversion ensures your documents remain versatile and professional.
Furthermore, remembering that the workflow doesn't end at conversion is vital. Equipping yourself with a robust PDF editor like PDFelement allows you to take that static exported file and transform it into an interactive, collaborative, and easily updatable document, streamlining your communication and saving you countless hours of repetitive design work.
Frequently Asked Questions (FAQ)
-
Can I open an InDesign file in PDFelement directly?
No, PDFelement is specifically designed to handle, edit, and convert PDF formats, alongside standard Office documents and image formats. It cannot natively parse proprietary Adobe .indd files. You must first use an InDesign to PDF converter online, or export it natively from InDesign, and then open the resulting PDF in PDFelement. -
What is the best InDesign to PDF online converter?
There are several highly rated free tools available. Zamzar is widely regarded as one of the most reliable and user-friendly platforms for this specific conversion. FreeConvert and AnyConv are also excellent alternatives that support .indd files. Always ensure you check the privacy policies of online converters if you are uploading sensitive corporate documents. -
Why are my images blurry when I convert from InDesign to PDF?
Blurry images in your exported PDF are usually caused by two things: either your export compression settings are too aggressive (e.g., you selected "Smallest File Size" which downsamples images to 72 ppi), or you have broken image links in your InDesign file. Check your Links panel in InDesign to ensure all graphics are properly linked and updated before exporting, and choose a "High Quality Print" preset for sharp images. -
Is there a difference between "Export" and "Print to PDF" in InDesign?
Yes. "Export" is the native, Adobe-engineered method that retains maximum fidelity, including interactive elements, bookmarks, hyperlinks, and complex vector transparency. "Print to PDF" (using a virtual PDF printer) is an older, flatter method that acts as a basic digital printout. Native Export is always the recommended workflow in modern versions of InDesign.
![All the Methods to Convert a PDF to Black and White [2026]](https://images.wondershare.com/pdfelement/images2026/pdf-like-article-3.png)