
Create a Flowchart in PowerPoint
Learn how to create a flowchart in PowerPoint using Shapes or SmartArt. Follow simple steps to add, connect, customize, and format your flowchart.
 100% Secure |
 Powered by AI
 Home
>
PowerPoint Tips
> Create a Flowchart in PowerPoint
Home
>
PowerPoint Tips
> Create a Flowchart in PowerPoint
Quick answer: How to Create a Flowchart in PowerPoint
- Open the slide where you want to add the flowchart.
- Go to Insert > Shapes and choose a flowchart shape.
- Click and drag on the slide to add the shape.
- Repeat to add the other steps in your flowchart.
- Use Insert > Shapes > Lines to add connectors between the shapes.
- Add text to each shape, then adjust the layout and formatting as needed.
Creating a flowchart in PowerPoint can help you visualize a process, workflow, or decision-making path without using a separate diagramming tool. PowerPoint provides built-in options such as Shapes and SmartArt, so you can create a flowchart directly on a slide.
In this guide, you'll learn how to create a flowchart in PowerPoint using Shapes and SmartArt, as well as how to edit and customize it. We'll also cover what you can do with your flowchart after it's finished, including saving and working with it as a PDF.


 G2 Rating: 4.5/5 |
 100% Secure
How to Create a Flowchart in PowerPoint
There are two common ways to create a flowchart in PowerPoint:
- Shapes: Best when you want more control over the layout, connectors, and individual elements of your flowchart.
- SmartArt: Best when you already have a list of steps and want to turn it into a visual diagram quickly.
For a simple, linear process, SmartArt can save time. If your flowchart contains multiple branches, decisions, or a more customized layout, Shapes give you more flexibility.
Method 1: Create a Flowchart with Shapes
Using Shapes gives you control over where each element appears on the slide. This makes it useful for detailed workflows, decision trees, and flowcharts with multiple branches.
Step 1. Insert Flowchart Shapes
- Open PowerPoint and go to the slide where you want to create the flowchart.
- Select Insert > Shapes.
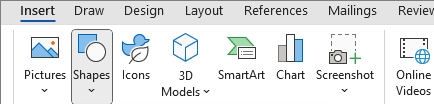
- Scroll to the Flowchart section to see the available flowchart shapes.
- Select a shape and click or drag on the slide to place it.
- Repeat the process to add the shapes you need.
Common flowchart shapes include:
| Shape | Typical Use |
| Oval | Start or end of a process |
| Rectangle | Process or action |
| Diamond | Decision |
| Arrow/Connector | Shows the direction of the workflow |
Step 2. Arrange the Shapes
Once you've added the main elements, arrange them in the order in which the process occurs.
Try to keep the flow moving consistently from top to bottom or left to right. Leave enough space between shapes so that connectors remain easy to follow.
If your flowchart contains several branches, position related steps together and leave enough room for each branch to remain visually distinct.
Step 3. Connect the Shapes
Connectors show how the different steps in your process relate to each other.
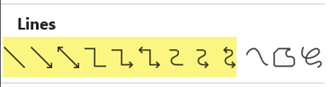
- Go to Insert > Shapes.
- Choose a suitable line or connector.
- Click and drag between the relevant shapes.
- Repeat until all steps are connected.
Use connectors consistently throughout the flowchart. For decision points, make sure each branch clearly indicates where the process goes next.
Step 4. Add Text to the Shapes
You can usually add text directly to a shape by selecting it and typing.Keep the text short and descriptive. For example, instead of:
"Check whether the customer has completed all the required information",you could use: "Check customer information "
Short labels make a flowchart easier to scan.
If you need a separate label, you can also use Insert > Text Box to add text outside the shapes.
Step 5. Customize Your Flowchart
After creating the basic structure, customize the appearance of your flowchart.
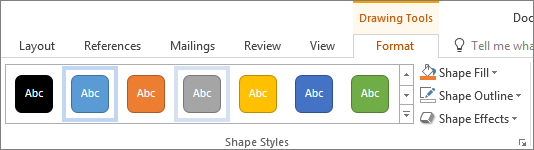
You can adjust:
- Shape colors
- Fill and border styles
- Font size and formatting
- Shape size
- Connector styles
- Alignment and spacing
Method 2: Convert Existing Text into a Flowchart with SmartArt
If you already have a list of steps in PowerPoint, you may not need to create every shape manually. SmartArt can turn structured text into a visual diagram.
Step 1. Insert SmartArt
Go to Insert > SmartArt
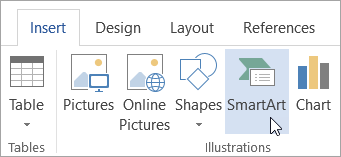
Step 2.Choose a Process Layout
In the Choose a SmartArt Graphic dialog box, select Process, then choose a layout that fits your workflow.
Step 3.Add Your Steps
Replace the [Text] placeholders with the steps in your process. You can also use the Text Pane to enter and organize the content.
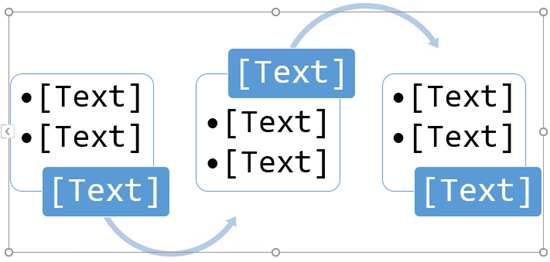
Step 4.Customize the SmartArt
With the SmartArt selected, use the SmartArt Design options to change the layout, colors, and style.
What to Do with Your Flowchart After Creating It
Creating the flowchart is only the first part of the workflow. Once your diagram is finished, you may need to share it with teammates, keep a finalized copy, or make small changes later.
PowerPoint is useful when you need to continue editing the original presentation. However, PDF can be a convenient format when you want to share a finalized version while keeping the document's layout consistent.
Wondershare PDFelement provides tools for working with PDF files, including PDF conversion, editing, annotation, organization, and sharing.This makes it useful as a next step in a flowchart workflow: create the diagram in PowerPoint, export it as a PDF, and then continue working with the finished document when needed.
Here are some ways PDFelement can help with your flowchart PDF.
G2 Rating: 4.5/5 |100% Secure
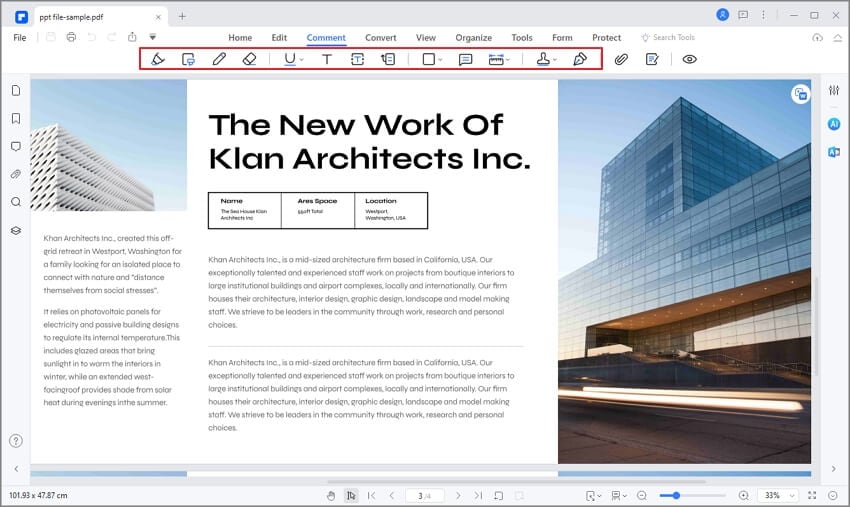
Annotate the Flowchart for Review
Flowcharts are often used to explain processes and gather feedback from teammates.
For example, someone reviewing your workflow may need to:Highlight a specific step, Add a comment, Mark an area that needs revision.
PDFelement provides PDF annotation and markup tools that can be used to add this type of feedback to the flowchart PDF.
Edit PDF
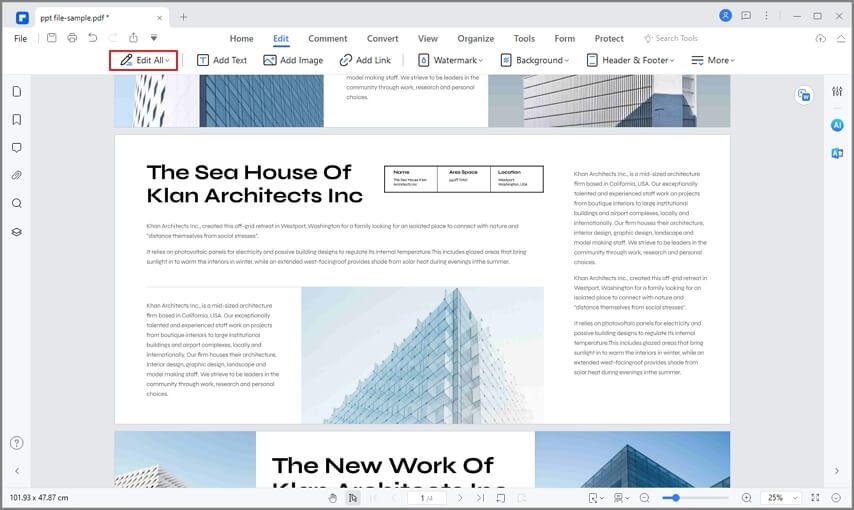
Sometimes you may notice a typo or need to make a small change after exporting your flowchart.
Instead of going back to the original PowerPoint file for every minor correction, you can open the PDF in PDFelement and edit supported PDF content directly.
PDFelement provides editing tools for text, images, links, and other PDF objects, allowing you to make changes to the finished document when needed.
G2 Rating: 4.5/5 |100% Secure
Convert Flowchart PDF
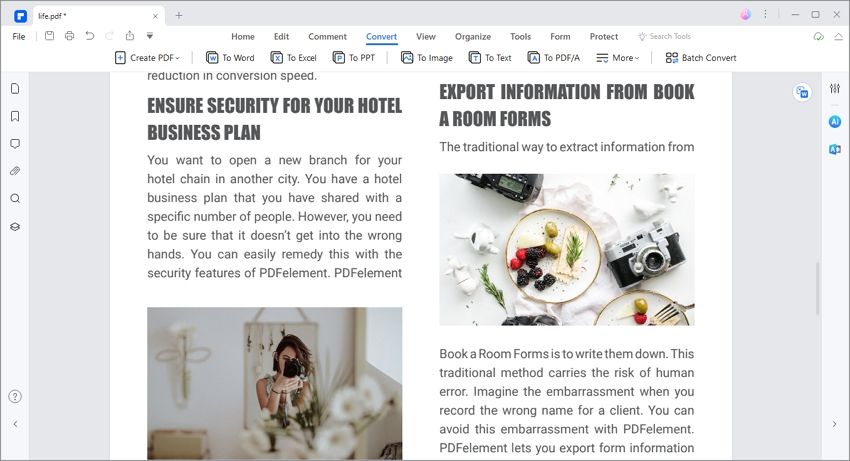
- For this option, you can either use the buttons on the "Convert" tab.
- In the toolbar, you'll see some frequently used conversion formats like "To Word," "To Excel," and so on; clicking on a format will open a "Save As" window, where you can name the file and choose the target folder location.
- When you hit "Save" in the Explorer window, your PDF will be converted accurately into the chosen format.
Conclusion
PowerPoint provides two practical ways to create a flowchart: Shapes give you greater control over the layout, while SmartArt can quickly turn structured text into a visual process.
After creating and reviewing your flowchart, you can save it as a PDF when you need a finalized, shareable version. If you need to make further changes, add annotations, or manage the finished document, PDFelement can extend the workflow beyond PowerPoint and help you continue working with the flowchart as a PDF.
Free Download or Buy PDFelement right now!
Free Download or Buy PDFelement right now!
Try for Free right now!
Try for Free right now!


Elise Williams
chief Editor