Have you recently started using PDF documents and wondered, "what is a PDF password"? Well then, you have clicked the rightmost link to find so. PDF Password, as the name implies, is a security measure placed on a PDF document that restricts access to the document.
Password-protecting PDF files have been a thing for a while now. It's a great way to keep your confidential information safe, but what happens when you forget the password? Or what if you need to edit a PDF that's been locked down? If you are new to PDF passwords and want to know more about them, this guide is for you.
Here, we will learn about the PDF password and how to remove these restrictions to use the document efficiently. We will also discuss some of the restrictions of a locked PDF, which is why most users prefer removing PDF permissions. So, without further ado, let's get into it.
In this article
Part 1: Why Is My PDF Locked? What Is the PDF Password?
A PDF password is a measure to encrypt the document's contents and set permissions on how the document can be used. For example, a PDF password can prevent printing or allow only certain users to view the document's contents.
There are two types of restrictions that can be placed on a PDF document: password-based restrictions and privilege-based restrictions. Password-based restrictions require the user to know the password to view or modify the document. Privilege-based restrictions allow certain users to view or modify the document without a password.
While PDF restrictions keep the document safe from prying eyes, these come with serious drawbacks that you should be aware of. Here are some things to consider before you lock your PDF.
● Once a PDF is locked, editing or changing the content in the file can be complicated (if not impossible). This means that if you need to make any revisions, you may have to start from scratch.
● Locked PDFs can be challenging to open, even for those with the password. This can be frustrating for people trying to view your document and may even lead them to give up entirely.
● Password-protected PDFs are not as secure as you might think. Even with a strong password, hackers can often bypass the Security and gain access to the file's contents.
When setting PDF restrictions, two types of passwords are available to choose from, namely, User Password and Owner Password. Before we jump into the process of removing passwords, let's learn about these two to get a better idea.
1. What is the User Password for PDF?
A User Password, also known as an Open Password, is a security code that allows you to restrict access to a PDF document. Once an Open Password has been set, anyone who tries to open the document will be prompted for the password. This can be useful for preventing unauthorized access to sensitive information.
Remember that the user password only restricts access to the document. However, if a user has a password, he can not just open the PDF but make other changes to the document as well.
2. What is Owner's Password?
The owner's password, or you can say the permission password, is a code used to set certain document restrictions in PDF files. It is set to prevent the document from being modified. This password is also known as Master Password or Restriction password and can be used to prevent printing, editing, or copying of the document's content.
This password is set by the document's creator and is required to view, print, or copy the document. If you don't have the permission password, you might access the document with an open password but cannot perform any other action, like printing, copying, or modifying.
Part 2: How to Remove PDF Restrictions with Secure PDF Tool
Now that you are aware of what is PDF password, its types, and its drawbacks, let's now move on to the guide on how to remove these restrictions with a secure PDF tool, Wondershare PDFelement - PDF Editor Wondershare PDFelement Wondershare PDFelement. This desktop application is packed with some powerful features and an intuitive interface, making it ideal for beginners and professionals alike.
Wondershare PDFelement is a one-stop destination to cater to your PDF requirements. It allows you to perform several features, including editing, compressing, merging, rotating, protecting, scanning, and more under one roof.
Here's a comprehensive guide outlining the step-by-step guide to remove PDF permissions using Wondershare PDFelement. Follow the instructions carefully to avoid any trouble later on.
Step 1Upload the PDF file to unlock
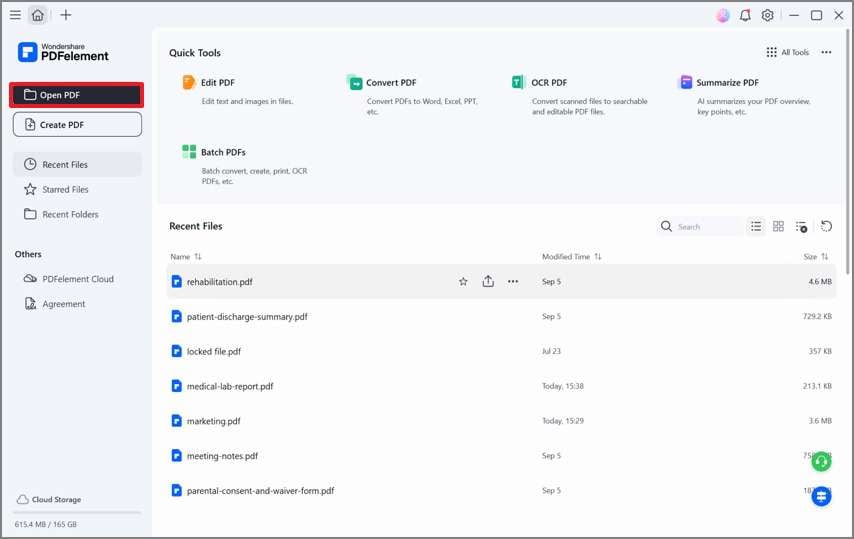
Begin the process of downloading and installing the Wondershare PDFelement to your system. Run the tool and locate the "Open PDF" button from the left pane. Click on it to upload the PDF file you want to unlock. Browse the file from the system's explorer window to import the document to the interface. You can also use the simple drag-and-drop approach to upload the PDF file.
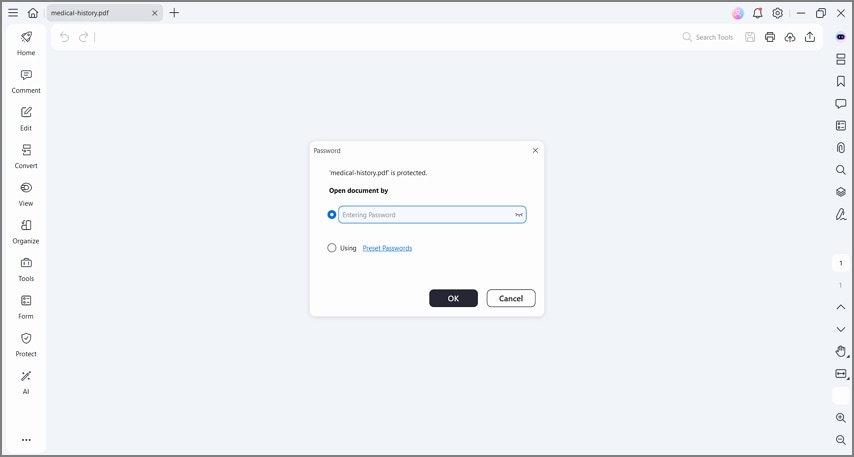
Since the document is password-protected, you'll be asked to enter the correct password to open the file. Alternatively, you can use the Preset Password to access the PDF document. As soon as you enter the code, click the Ok button to open the PDF.
Step 2Start the Unlocking Process
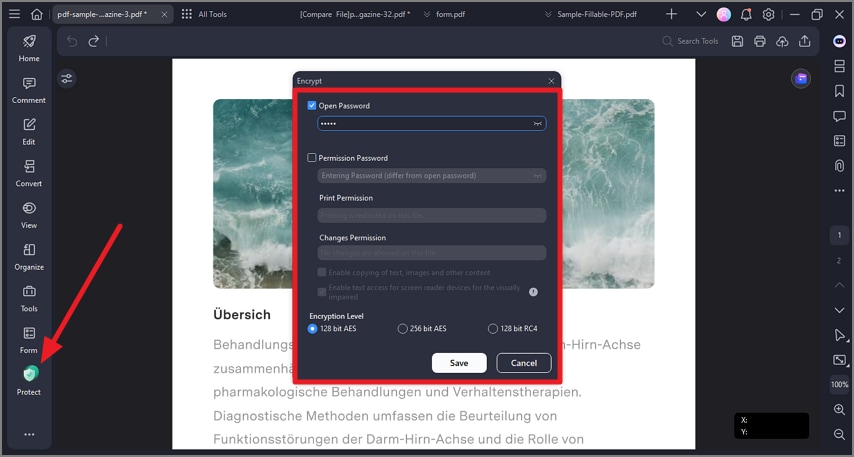
Once you have opened the locked file, it's time to begin the unlocking process. Go to the Protect button in the toolbar and click the Set Password tab.
A pop-up titled Security will appear on the screen. There, you need to uncheck both the Open and Permission password checkboxes and click the Save button at the bottom to apply the changes. Your PDF file has now been unlocked for good.
Step 3Edit PDF File (Optional)
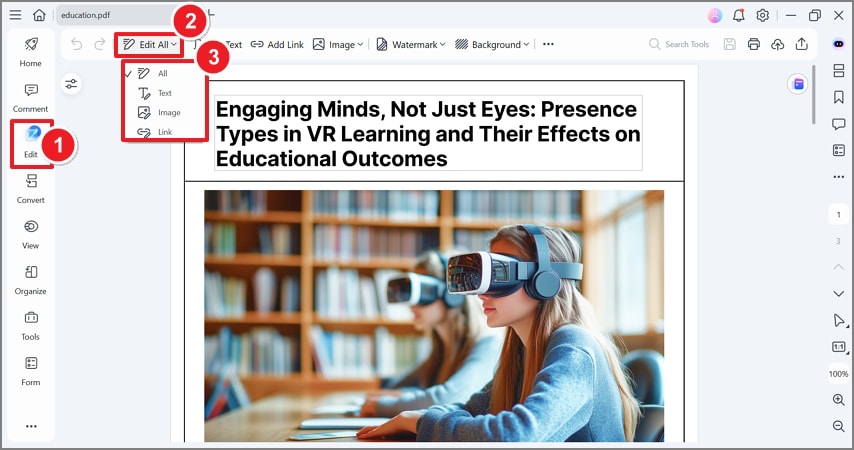
Editing a PDF file is an optional step for users. If you want to alter the PDF content, then simply click the Edit button in the toolbar and expand the menu. From there, you can add text, images, watermarks, hyperlinks, bates numbers, header and footer, background, and anything in between. Don't worry, as editing a PDF file with Wondershare PDFelement won't affect the formatting and layout. It also has a built-in spell-checker to rectify the typo mistakes in the PDF.
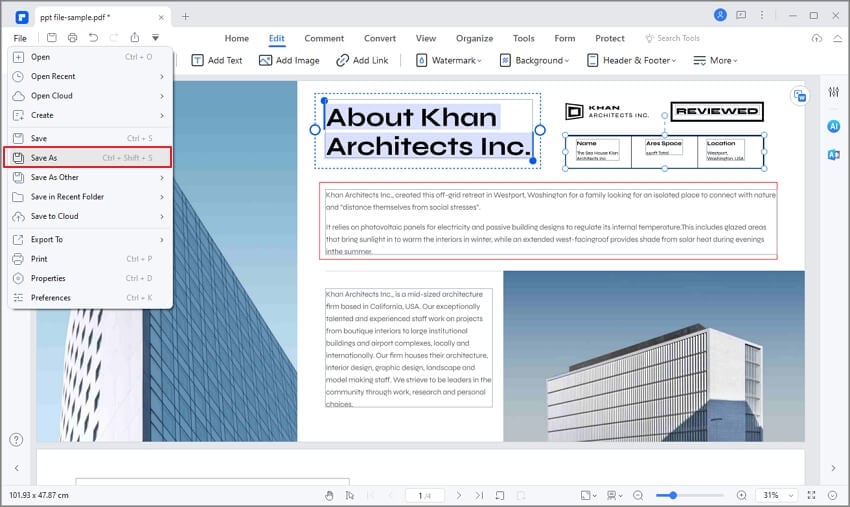
Once you are satisfied with the changes made in the document, it's time to save them. For this, you need to go to the File menu and select either the Save or Save As button to export the unlocked PDF file to the specific folder.
Other Features of Wondershare PDFelement
In addition to removing PDF restrictions, Wondershare PDFelement is helpful for performing several other PDF-related functions in one place. It is an affordable alternative to Adobe Acrobat and is available at a fraction of the cost. To cut through the clutter, we have outlined some of the best features of PDFelement here. Scroll through them and use the tool to manage your PDF files easily and efficiently.
● Edit: This tool is ideal for making changes in your PDF content, like an editable word file. You can simply edit PDF text, images, forms, pages, and more in a few clicks. The best thing is that it never affects the original formatting and makes edits quickly.
● Convert: Wondershare PDFelement is a simplified solution to convert your PDF files to other documents, including word, excel, PNG, JPG, and vice versa, and that too without changing the formatting.
● OCR: This application can easily identify text from scanned PDFs and images while making scanned PDFs editable and searchable.
● Annotate: With PDFelement, you can easily add notes and text comments to the PDF file. You can also strike out or underline the specific texts with different markup tools.
Part 3: Online Method to Remove PDF Permissions Quickly
While desktop tools are the safest option to remove PDF permissions, you can also turn to online methods to carry out the task anytime and anywhere. One such online tool is HiPDF. A free and easy-to-use online PDF application, HiPDF features 39 different tools for nearly all your PDF requirements. These tools are added to the interface to make your PDF tasks simple and quick.
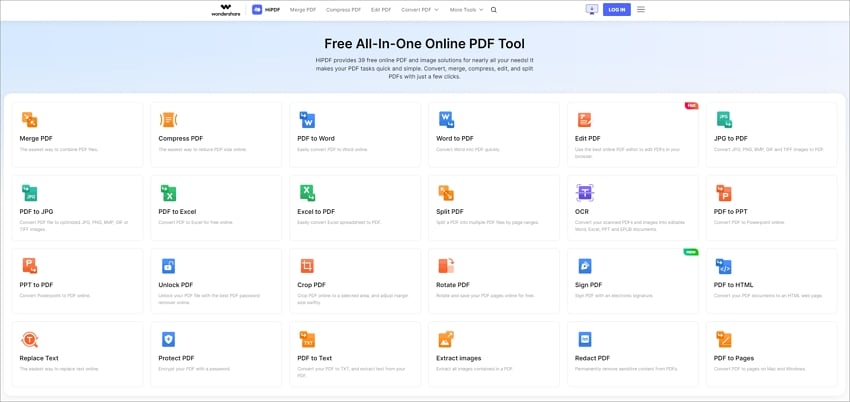
With HiPDF, you can easily merge PDFs, compress the file, convert them to other formats, rotate pages, split PDFs, protect the document, unlock the file, and much more. This award-winning application is widely appreciated for its safety and assures for deletion of all uploaded files within 60 hours of processing. In addition, HiPDF eliminates the hassle of signing up or registering. It doesn't require your personal information to get started.
Since HiPDF is a browser-based app, it can be used across all platforms and devices hassle-free. Do you want to use this tool to remove PDF restrictions? Follow the guide here and get it done with ease.
Step 1 Open the web browser to initiate the process and visit the official URL of HiPDF.
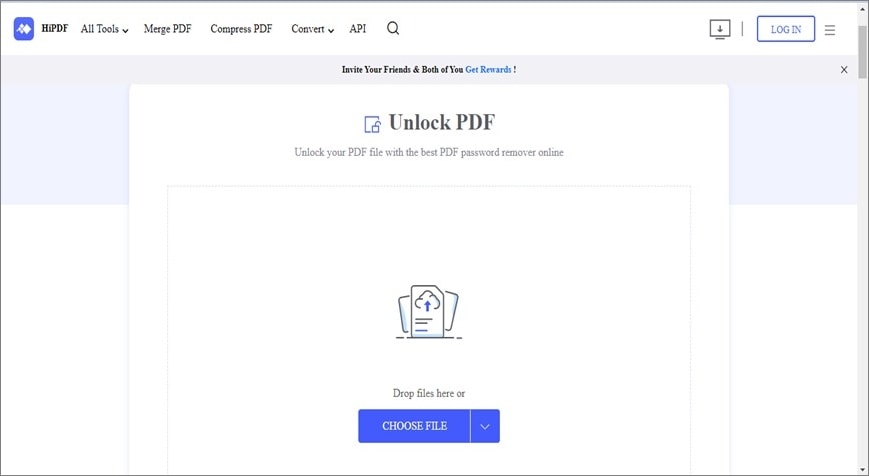
Step 2 Once you reach the homepage, expand the All Tools menu from the top and click the Unlock PDF option.
Step 3 A new window will appear on the screen where you'll be asked to upload the PDF file to unlock. Tap the Choose File button and import the PDF to the interface. You can either browse the PDF file from the system or upload it from the Cloud storage.
Step 4 Since the PDF is locked, you must enter the correct passcode to access the file.
Step 5 Tap the "Unlock" button at the bottom and wait for a few seconds until the tool unlocks the file.
Step 6 As soon as HiPDF finishes the process, select the Download button to save the unlocked PDF to the specific location for quicker access.
 Home
Home
 G2 Rating: 4.5/5 |
  100% Secure


