
In this article
- Understanding the Basics: Digitized vs. Digital Signatures
- Preparation: Setting Up for the Perfect Scan
- Method 1: How to Scan a Signature Using Your Smartphone
- Method 2: How to Scan Your Signature on a PC Using a Scanner
- Method 3: How to Scan a Signature into Word
- Method 4: Scan Signature from Image Online (Free Tools)
- Method 5: How to Add Your Digitized Signature to a PDF
- Best Practices for the Perfect Scanned Signature
- Frequently Asked Questions (FAQ)
In today's fast-paced digital landscape, printing, signing, and scanning physical paperwork is a tedious process of the past. Knowing how to scan signature files effectively allows you to authenticate documents in seconds, directly from your computer or smartphone.
Whether you are finalizing a freelance contract, signing a lease agreement, or approving internal company documents, learning how to digitize signature files is an essential modern skill. By creating a high-quality, transparent image of your handwritten autograph, you maintain the personal touch of a physical signature while enjoying the efficiency of digital document management.
In this comprehensive guide, we will walk you through everything you need to know about how to scan in a signature. From using a traditional flatbed scanner and mobile apps to learning how to scan a signature into word, this guide covers all the bases so you can sign documents flawlessly every time.


 G2 Rating: 4.5/5 |
 100% Secure
Understanding the Basics: Digitized vs. Digital Signatures
Before diving into the steps to scan your signature, it is important to clarify a common point of confusion: the difference between a digitized signature and a digital signature.
- Digitized Signature: This is an electronic representation (an image) of your physical, handwritten signature. When you learn how to scan in signature images, you are creating a digitized signature. It is commonly used for standard contracts, letters, and internal approvals.
- Digital Signature: This is a highly secure, encrypted electronic stamp of authentication. It operates behind the scenes using cryptographic technology to verify that a document has not been altered after it was signed.
For the purposes of this guide, we are focusing on creating a high-quality digitized signature image that you can easily stamp onto any digital document.
Preparation: Setting Up for the Perfect Scan
To ensure your signed scanned image looks professional and crisp, preparation is key. Do not simply scribble on a scrap piece of paper. Follow these rules before you start scanning:
- Use Unlined, Bright White Paper: Any lines, grids, or textures on the paper will be picked up by the scanner and make background removal incredibly difficult.
- Choose the Right Pen: Use a thick, black or dark blue ink pen. Felt-tip pens, gel pens, or fine-point markers work best because they create solid, unbroken lines. Avoid light-colored inks or faint ballpoint pens.
- Sign Naturally: Write your signature slightly larger than you normally would. It is much easier to scale a large, high-resolution image down than to scale a small image up without losing quality.
Method 1: How to Scan a Signature Using Your Smartphone
You don't need bulky office equipment to digitize your handwriting. Your smartphone can act as a powerful e signature scanner. Using robust PDF editing applications allows you to capture, crop, and enhance your signature in just a few taps.
Introducing PDFelement for iOS and Android

Whether you are an iOS or Android user figuring out how to scan my signature, PDFelement is a fantastic, user-friendly tool available for both platforms. It features a powerful built-in scanner that utilizes your smartphone's advanced camera capabilities to capture high-quality scans, automatically enhancing the contrast so your ink pops against a pure white background.
Using PDFelement offers numerous benefits for individuals seeking a hassle-free signature scanning experience. It easily integrates with your email clients and cloud storage, eliminating the need for manual file transfers, and allows you to apply your newly scanned signature directly to any PDF document right on your device.
G2 Rating: 4.5/5 |100% Secure
Scanning Signatures with PDFelement
Digitizing your signature using PDFelement’s scan feature is a simple process. Ensure you have the app installed from the App Store or Google Play Store before proceeding.
Step 1Launch the PDFelement Scanner
Open the PDFelement app on your smartphone. On the main interface, tap the "+" icon located in the bottom corner. Select Scan.
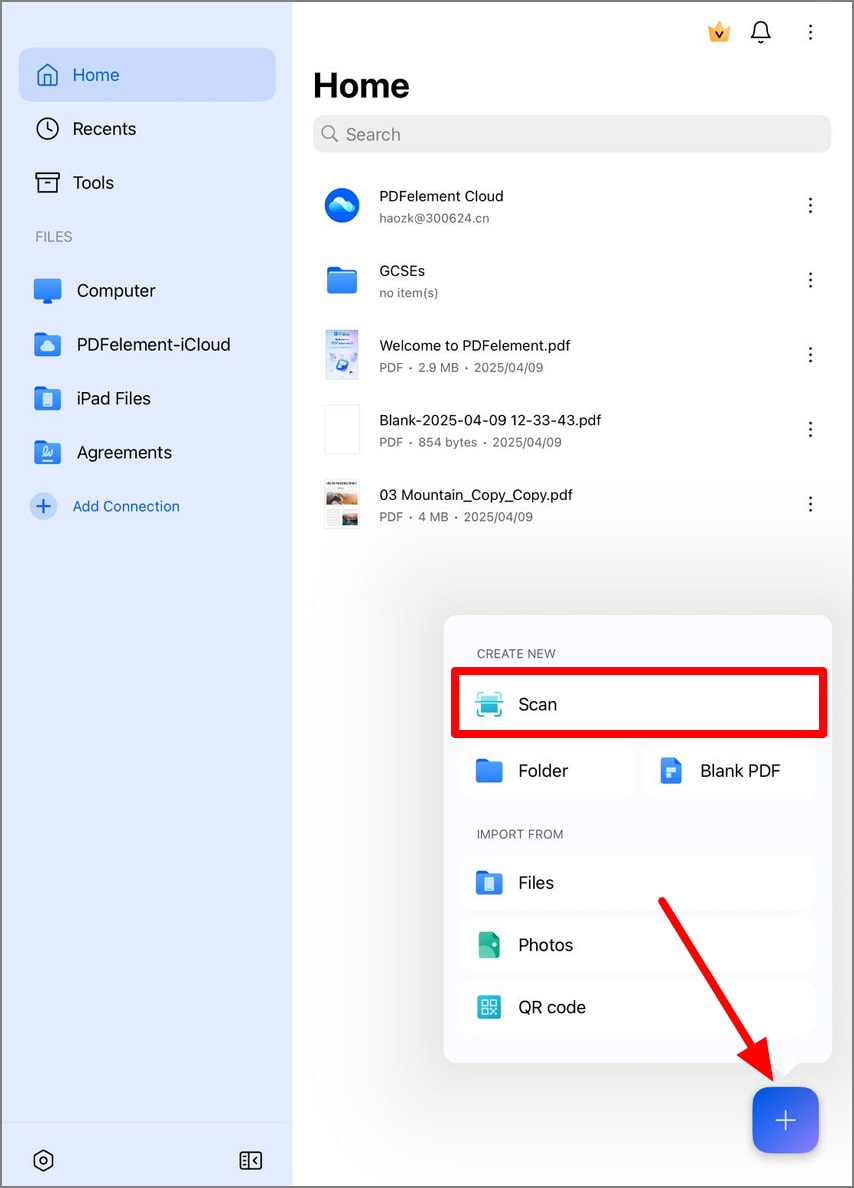
Step 2Capture the Signature
Place the sheet of paper with your signature on a flat, well-lit surface. Point your smartphone camera at the paper. PDFelement will automatically detect the borders of the paper and capture the image, or you can press the shutter button to manually take the photo.
Step 3Crop and Enhance
Once the photo is taken, adjust the blue bounding boxes so they tightly surround your signature, cropping out any excess white space. Then, use the built-in filters (we recommend the Black & White or Lighten filter). This will instantly strip away any shadows, leaving you with stark black ink on a pure white background. Tap Save.
Alternative Workflow: Direct Signature Insertion
If you already have a document open in PDFelement and just want to sign it quickly:
- Tap the Comment icon (represented by a speech bubble on iOS or found in the bottom toolbar on Android), and then tap the Sign icon.
- Tap the Create button.
- Choose the Camera option to take a live photo of your signature, or choose the Image option to upload a photo from your phone's gallery. PDFelement will automatically extract the signature and convert it into a crisp graphic that you can drag and drop anywhere on the page.

G2 Rating: 4.5/5 |100% Secure
Method 2: How to Scan Your Signature on a PC Using a Scanner
If you require absolute precision and have access to traditional office hardware, using a flatbed scanner is the gold standard for digitizing signatures. This method provides the highest resolution possible.

Here is exactly how to do it:
- Prepare the Document: Write your signature in the center of a clean, blank sheet of white paper using dark ink.
- Position the Paper: Place the paper face down on the scanner glass. Ensure the paper is completely flat to avoid shadows or distortions during scanning.
- Adjust Scanner Settings: Open the scanner software on your Windows or Mac computer. This is the most crucial step. Set the color mode to Black and White or Grayscale. Set the resolution to a minimum of 300 DPI (Dots Per Inch). This high resolution ensures your signature won't look pixelated when you zoom in.
- Initiate the Scan: Click the scan button in your software. Wait for the scanner to capture the full page.
- Crop the Image: Once the scan appears on your computer, use your default image editing software (like Microsoft Paint on Windows or Preview on Mac) to crop the image. Cut out all the empty white space so the final image border is tightly hugging your signature.
- Save the File: Save the scanned image as a PNG or JPG file. We highly recommend saving it as a PNG, as this format supports transparent backgrounds (which we will cover in the next sections).
Method 3: How to Scan a Signature into Word
One of the most common questions professionals ask is how to scan a signature into word. While capturing the signature is half the battle, placing it into a Microsoft Word document without a harsh white or gray rectangular background requires a few specific formatting steps.
Here is the ultimate method for how to scan signature into word seamlessly:
Step 1Insert the Image
Open your Microsoft Word document. Place your cursor on the line where you want your signature to appear. Go to the top ribbon, click Insert > Pictures > This Device, and select the JPG or PNG signature file you saved from your scanner or smartphone.
Step 2Adjust Text Wrapping
When the image is inserted, it might push your text out of place. Click on the signature image. A small layout icon will appear next to it. Click it and select In Front of Text or Behind Text. This allows you to freely drag the signature over the dotted signature line without messing up your document's formatting.
Step 3Remove the Background
If your scanned image has a slightly grayish or off-white background that clashes with the Word document, Word has a built-in tool to fix this:
- Click on your signature image.
- Go to the Picture Format tab at the top.
- Click on Color (in the Adjust group on the far left).
- Scroll down and select Set Transparent Color.
- Your mouse cursor will turn into a small wand. Click on the white/gray background area of your signature image. Word will instantly make that specific color transparent, leaving only your dark ink visible.
[Image: Microsoft Word interface showing the "Set Transparent Color" tool being applied to a signature image]
Step 4Save as Quick Parts for Future Use
If you don't want to repeat this process every time you need to sign a Word document, you can save your perfect, transparent signature as a reusable template.
- Select your properly formatted signature image.
- Go to Insert > Quick Parts > Save Selection to Quick Part Gallery.
- Name it "My Signature." The next time you need to sign a document, simply go to Quick Parts and drop it in with one click.
Method 4: Scan Signature from Image Online (Free Tools)
If you don't have a scanner or a dedicated mobile app, you can easily rely on web-based tools. If you have already taken a standard photo of your signature, you can scan signature from image online using free, cloud-based processors.
These platforms utilize algorithms to automatically strip away the background and enhance the text, essentially functioning as a signature scanner online free of charge.
1. Smallpdf
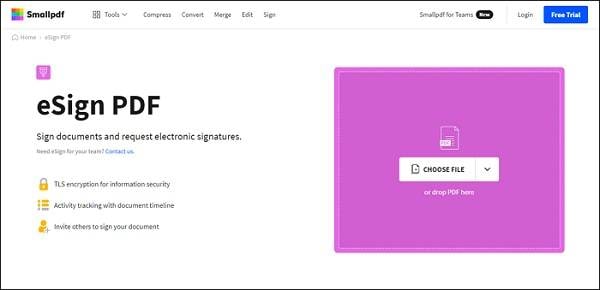
Smallpdf is a comprehensive online PDF tool suite that includes features tailored for e-signing. Through their eSign portal, you can upload an image of your signature. The platform's processing engine will automatically extract the ink from the background, allowing you to drag and drop the clean signature directly onto any PDF document you have uploaded to their server.
2. OnlineOCR
While traditionally used to extract typed text from images, OnlineOCR (Optical Character Recognition) tools can sometimes be leveraged to clean up documents. However, for an online scan photo and signature workflow, your best bet is to use dedicated background removal websites (like Remove.bg) to turn a standard smartphone photo of your signature into a clean, transparent PNG file in seconds.
Note: When using free online tools, always review their privacy policies. If your signature is highly sensitive, it is safer to process the image locally on your PC or smartphone rather than uploading it to a third-party server.
Method 5: How to Add Your Digitized Signature to a PDF
Once you have successfully digitized your signature, applying it to a PDF is the final step for most business transactions. While we demonstrated how to do this seamlessly on mobile using PDFelement, adding a signature to a PDF on your desktop requires robust desktop PDF editing software.
G2 Rating: 4.5/5 |100% Secure
Using dedicated PDF software allows you to import your saved signature image (the PNG file you created via scanner or online tools) and apply it as a standard image or a custom stamp.
- Open your contract or form in your preferred PDF editor.
- Navigate to the "Protect," "Sign," or "Markup" tab (depending on your software).
- Select "Create Signature" or "Add Image."
- Upload your digitized signature file.
- Scale the image to fit the designated signature box on the document and save your newly signed PDF.
Best Practices for the Perfect Scanned Signature
To ensure your digitized signatures look authentic and maintain high quality across all your professional documents, keep these expert tips in mind:
- Lighting is Crucial: If you are capturing a photo with your phone, do it in natural daylight. Avoid casting a shadow over the paper with your hand or the phone itself, as shadows make background removal much more difficult.
- Opt for PNG Formats: Whenever possible, save your final digitized signature as a PNG file rather than a JPEG. PNG files support "alpha channels," meaning they can have truly transparent backgrounds. JPEGs will always have a solid white (or colored) background.
- Maintain a Minimum of 300 DPI: For desktop scanners, never scan your signature at a low resolution. 300 DPI ensures the curves of your handwriting look smooth and professional, not blocky or pixelated.
- Secure Storage and Protection: Treat your digitized signature file like a sensitive password. Store the high-resolution PNG in a password-protected folder or an encrypted cloud drive to prevent unauthorized individuals from copying and applying your signature to fraudulent documents.
People Also Ask
-
How do I make the background of my scanned signature transparent?
You can make the background transparent using several methods. In Microsoft Word, you can use the Picture Format > Color > Set Transparent Color tool. Alternatively, you can upload your scanned image to a free online background removal tool, or use the Magic Wand tool in photo editing software like Photoshop or Mac Preview to delete the white background and save the file as a PNG.
-
Is a digitized, scanned signature legally binding?
In many countries, including the US (under the ESIGN Act) and the EU (under eIDAS), an electronic representation of your signature is legally binding for most standard business contracts, employment agreements, and leases. However, for highly sensitive legal documents (like wills or property deeds), a cryptographic digital signature or a physical wet-ink signature may be legally required.
-
Why does my scanned signature look blurry in Word?
Your signature likely looks blurry because it was scanned at a low resolution, or you took a photo in poor lighting. To fix this, rescan the original paper using a flatbed scanner set to at least 300 DPI, or use a dedicated scanner app on your smartphone that automatically sharpens and enhances the contrast of the ink.
-
Can I scan my signature directly into a PDF?
Yes. Many modern PDF editing applications (like PDFelement) feature scan and signature functions that allow you to activate your device's webcam or smartphone camera to take a picture of your signature on the spot. The software then automatically digitizes it and applies it to the PDF you are viewing.
Digitizing your signature doesn't have to be a complicated technical chore. Whether you prefer the mobility of smartphone apps like PDFelement, the high-fidelity precision of a flatbed scanner, or the convenience of online tools, learning how to scan a signature ensures you are always ready to sign, seal, and deliver your electronic documents efficiently. By following the preparation guidelines and utilizing formatting tricks in software like Microsoft Word, your digital paperwork will look just as professional as a hand-signed original.

