How to Insert a Picture in InDesign - 2026
Wondering how to insert a picture in InDesign? In this post, we will discuss the best way to insert images and photos in InDesign.
 100% Secure |
 Home
>
Indesign Tips and Tricks
> How to Insert a Picture in InDesign - 2026
Home
>
Indesign Tips and Tricks
> How to Insert a Picture in InDesign - 2026
One of the best things about InDesign is that it allows you to manipulate both images and text to create a great document. Therefore knowing how to insert a picture in InDesign can be a skill that will come in very handy when you're designing and creating documents in InDesign. But like everything with this program, it can be difficult to figure out the best way to add an image into a project, without messing with the other aspects of the document.
If you are having trouble with this aspect of the InDesign project, you will find this article very helpful. In it, we will discuss how to insert a photo in InDesign and also share with you a better and more effective tool - Wondershare PDFelement - PDF Editor Wondershare PDFelement Wondershare PDFelement to help you add images to documents easily and quickly.


 G2 Rating: 4.5/5 |
 100% Secure
One of the best tools you can use in place of InDesign is PDFelement. Because well, it can happen sometimes that you don't have the InDesign app and you need to edit an InDesign file. PDFelement is useful to you in this case since it can be used to edit just about any type of document. To be effective in this way, it has to have some incredible features. The following are just some of these features:
- It can create PDF files very easily. In fact, all you have to do to create a PDF is to open any file in any format with PDFelement.
- It is also very effective in converting these PDF files that you create to other formats including the more popular Word and Excel and the more rare HTML and TXT among others.
- It has pretty good annotation features that can come in handy when you want to add notes, comments, highlights and stamps to the document as you read.
- It has a powerful OCR feature that makes it very easy to edit scanned or image-rich PDF documents.
- But more advantageous than all of these features is the fact that the program is quite easy to use even for a beginner who has never worked with a similar PDF management tool.
How to Insert Image in InDesign File
Here's a step by step guide to help you insert a picture into an InDesign document:
Step 1: Open InDesign File
On the main window, you should see the "Open File" button. Click on it to import the InDesign file you want to edit (But you need save InDesign file into PDF first).

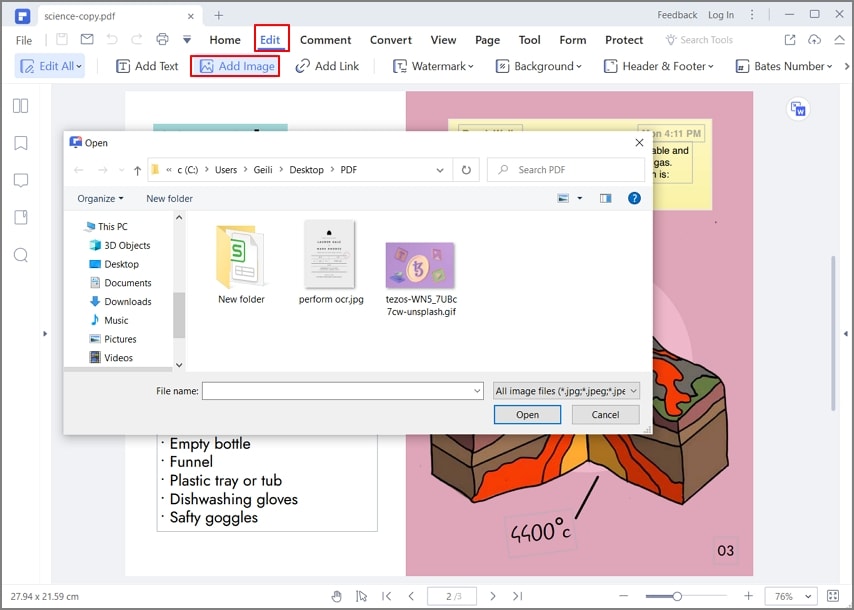
Step 2: Insert an Image
To add an image to the document, click on "Edit" > "Add Image" and then select the image you want to add from your computer.
Step 3: Edit Images in PDF
If you would like to edit the image you have just added to the document or any other image, click on the "Edit" button and then click on the image in question to select it. You should see an alignment grid on the document which you can use to move the image anywhere you want.
You can also place the mouse at the edge of the box around the image and drag the box to resize the image. If you want additional options for the image, right-click on it and then choose to "Rotate right" or "Rotate left," "Replace the Image" or even "Crop the Image" or any of the other options available.

How to Insert a Picture in InDesign
You can also choose to insert a picture into your InDesign document using the InDesign app. Here's a step by step guide to help you do that;
- Step 1: Open InDesign and then click on "File > Open" from the control panel to open the InDesign file you want to work on. If you don't have an existing InDesign file, you can choose to create a new document by selecting File > New > Document.
- Step 2: Now to add the image into the document, click on "File > Place" in the control panel and then navigate to the picture file you would like to import into the document. Double-click on it to place it.
- Step 3: You can use your mouse to drag the picture to the desired location.
- Step 4: if you need to you can adjust the size of the picture to ensure it fits in the area. To do that, select the picture using the select tool and then click on one of the handles located on the frame. Drag the handles while holding down the Control and Shift keys to ensure the resizing will remain proportional. If you would like to crop the image, drag the handles while holding down the Control key.
- Step 5: Repeat this process with all the other images you would like to add to the document.
Free Download or Buy PDFelement right now!
Free Download or Buy PDFelement right now!
Try for Free right now!
Try for Free right now!


Elise Williams
chief Editor