 Home
>
Draw on PDF
> Steps to Add Lines to PDF
There are a number of reasons why you need to add lines to PDF. For starters, you might need to highlight lines and areas on a map, especially if you work in real estate. Or you need to add lines to a lease agreement. Whatever the case, lines are quite useful tools in a PDF document. How to add a line in PDF? Well, the first thing you need is a good PDF editor. Our pick is Wondershare PDFelement - PDF Editor Wondershare PDFelement Wondershare PDFelement. Today, we will talk about the steps to add the line in PDF. The main reason why you do that is to highlight relations between sections.
Part 1: How to Add Arrow to PDF on PDFelement
Lines are part of the annotation tools in PDF editors. You can insert horizontal lines under each number, or you can draw lines to connect sections. Whatever the case, this is the guide for how to add a line in PDF using PDFelement.
Step 1. Load Document
Start by launching PDFelement and opening your document. There are a couple of ways to open your file. The simplest is "File" > "Open". If you used this file before, you will find it under "Open Recent" on the home screen. Or, if you want a different file format, click on "Create PDF" on the home screen and locate the document you want to add lines.

Step 2. Add Lines to PDF
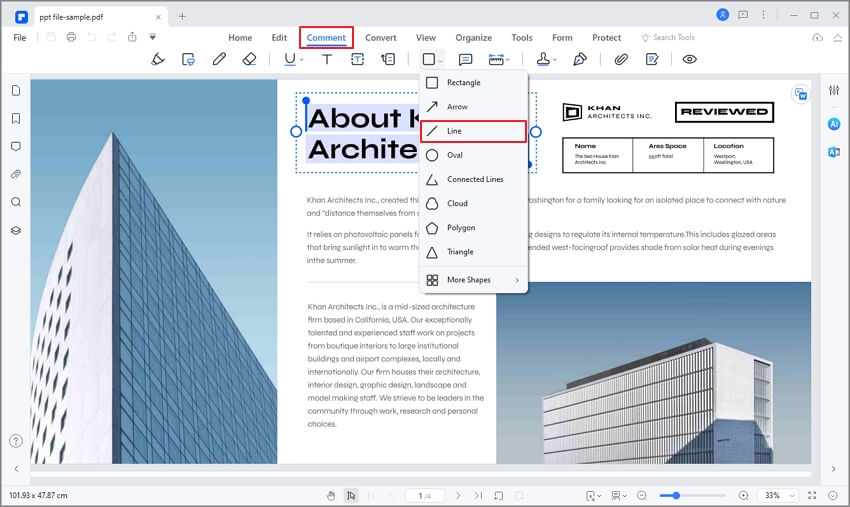
Go to the "Comment" section and click the "Lines" icon in the toolbar. Now you can draw a line using your courser, and you can change the lines to a horizontal or vertical line.

Step 3. Edit Lines
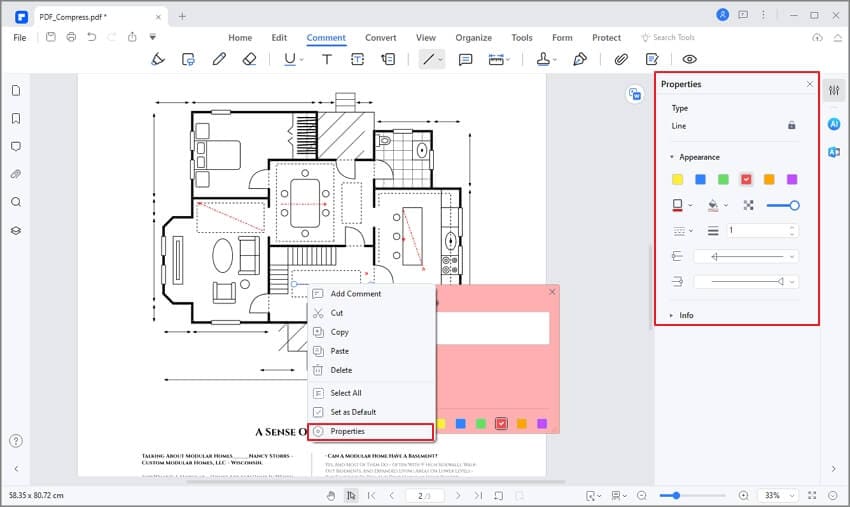
PDFelement allows you to edit the lines you've added. Select the Line, and you can move it by holding the mouse cursor. Right-click, and go to Properties to edit the Line. You can change the start, end, and style of the Line. You can also change the thickness, color, and opacity. If you like to add notes, either double-click the line or right-click and select "Open Pop-up Note".
You can also cut, copy, paste, and delete the lines. If you want to use the same line over and over again, right-click on the line, and select “Set as Default”. This will set the default settings for all the lines you add.

Step 4. Save PDF Document
When you finish editing and adding lines, simply go "File" > "Save". That is it

The Best Tool to Add Lines to PDF
Drawing tools allow you to add graphic elements into your PDF document. We saw how easy it is to add lines to PDF using PDFelement. The software can also help you add other graphic elements like polygons, ovals, rectangles, and circles in PDF.
PDFelement is one of the easiest ways to create, edit, convert, and manage PDF documents. Available for both Mac and Windows, the software is as easy as they come. Sold in 9 different languages, it is a great international software as well.
The best part about PDFelement is simplicity. You will love how easy it is to change anything. You can edit text, convert documents, add images, merge or split pages, insert pages, add comments, and much more with a few clicks.
The ability to organize your documents is excellent. There are features like digitally signing a document and sharing it with your friends and colleagues. So, with that in mind, let’s take a look at some of the main features of PDFelement.
- Easily create a PDF file from other files or from a scanner.
- You can combine files to create a single PDF document.
- View pages in different ways, continuously, one by one, or enter full-screen mode.
- Convert PDF to Microsoft Office formats, but also HTML, Epub, RTF, image or to text file format.
- Optimize PDF to reduce the file size of the document.
- Perform OCR to turn a scanned document into fully searchable or fully editable text.
- Edit text via Line or Paragraph mode.
- Rotate, crop, move images and other editing tools.
- Insert a link to the document.
- Edit header and footer, as well as bates number.
- Add graphic elements like lines, arrows, clouds, rectangles, connected lines, or polygons.
- Insert sticky notes and text boxes to the document.
- Add custom stamps to the document.
- Extract a range of pages from the document.
- Set page labels.
- Auto recognizes and creates interactive forms.
- Extract data from fields directly to CSV file.
- Digitally sign your document.
- Add password protection to the document.
- Redact sensitive information.
Part 2: How to Add a Line in Adobe Acrobat
You can use this PDF editor to add the line in PDF for several purposes, like separating sections or guiding users about information. It allows users to place lines anywhere with customizable options where you can change the thickness or color of the lines. To use this feature through Adobe Acrobat, walk through this guide below:
Step 1. After installing the Acrobat PDF editor on your computer, launch it and wait for it to open. Then, go to the “File” tab and click “Open” to open your document through it.

Step 2. Once opened, access the “Comment” tool from the right side of the interface and click the “Drawing Tools” symbol to expand its drop-down menu. There, select the “Line” option to be able to place it anywhere.

Step 3. Now, drag your cursor to draw the line of your desired length where you want on your PDF. After clicking this line, you can also customize its color or thickness using the available options. In addition, you can find other features in the “Drawing Tools” menu to add other shapes to PDF using Adobe Acrobat.

Part 3: How Do I Add Fillable Lines to a PDF?
Using Wondershare PDFelement, you can not only add shapes to your PDF documents but also add fillable lines. For this purpose, you can go to the "Comment" tab and utilize the underline function on any part of the text in your PDF. Moreover, you can use the “Form” tab to add a text field where you can fill in the content according to your requirements.
Besides, PDFelement provides users with great many other annotation functions to make their PDFs more engaging. Go through these simplified step-by-step instructions to add a line to the PDF:
Step 1. Run the PDFelement App and Import Your PDF
Start by installing this amazing PDF annotator and running it on your Windows or macOS device. Once its interface loads, hit the "Open PDF" button to import your document into it.

Step 2. Access the Edit Text Feature from the Edit Tab
Then, go to the “Edit” tab and click the “Edit All” drop-down menu. From there, select “Text” and add empty spaces to the desired part of your PDF's text.

Step 3. Use Underline through the Comment Tab
Afterward, reach the “Comment” tab and select “Underline” from the “Markup Tools” drop-down menu. Once selected, add this annotation feature to the empty space to add a line to the PDF.

Step 4. Add Text Box through Form Tab
Finally, tap the “Form” tab and then select the “Text Field” feature to add a text box on your document. You can then input any text on the fillable line with this PDF annotator.

Part 4: How to Insert Lines in PDF Online
Although you can efficiently use the line feature on your documents with great customizations using PDFelement, you can also utilize it directly on your web. In this regard, several online PDF tools are available including PDFSmart and pdfFiller, that can help you draw lines. However, it would be better if you go for HiPDF as it’s much more powerful and versatile in PDF editing. Here’s how you can insert a line in PDF using HiPDF:
Step 1. First, go to the official website of this PDF annotator and reach its Online PDF Editor webpage. Then, hit the “Choose File” button to upload your document to its interface.

Step 2. After the document gets opened in the tool’s interface, click the “Add Shape” tab to see all the available shapes. From there, choose the “Line” shape by clicking on it.

Step 3. Once you select the “Line” shape, it will be automatically placed on your document that you can move anywhere. Also, you can change the color, style, and even thickness of the line as per your requirements.

Part 5: How to Add Lines in PDF Using Microsoft Edge?
Users will find a built-in PDF annotator while reading documents using this internet browser. With its draw feature, you will be able to insert a line to a PDF file in different colors. Moreover, this PDF markup tool allows you to change the thickness of the line to highlight the content. Take guidance from the steps given below to learn how to add a line to a PDF:
Step 1. Start the process by opening the folder containing the file you want to annotate with this browser. Now, right-click on the file and hover over the “Open With” option to choose the “Microsoft Edge” program to proceed.

Step 2. Upon accessing the file on this browser, press the "Draw" button and access its drop-down menu to select the line color. Moving forward, adjust the thickness of the line before start drawing a line on your PDF document.

Step 3. After turning on the “Draw” feature, insert a line to your desired position on the file freehand. Then, press the “Save” icon on the top-right of your screen to finalize the process.

Conclusion
After going through this article, you have learned different ways to add line to PDF files online and offline. Using any of these methods, you can annotate documents to highlight the desired content for review and editing purposes. However, PDFelement stands out as the best option to insert line in PDF due to its ability to customize the appearance of the lines. Moreover, you can personalize the thickness and opacity of the added line to prevent it from interfering with the text. Therefore, get your hands on this PDF markup tool to optimize the way you annotate documents.
Free Download or Buy PDFelement right now!
Free Download or Buy PDFelement right now!
Try for Free right now!
Try for Free right now!
 100% Secure |
 G2 Rating: 4.5/5 |
  100% Secure


Elise Williams
chief Editor