
Many people feel worried when receipts pile up and make money tracking very hard. Therefore, they want a quick way to move details into sheets without typing each line. A receipt to Excel tool can help sort numbers fast and keep records clear. However, this saves time and stops small mistakes that can cause big money problems. So, this guide shows easy steps anyone can follow without stress or confusion.
In this article
- Why do People Convert Receipts to Excel
- Why is Manual Receipt Entry in Excel Inefficient
- What Data from Receipts Needs to Go into Excel
- Common Ways People Try to Scan Receipts into Excel (And Why They Fail)
- How Scanning Receipts into Excel Should Work
- How to Scan Receipts to Excel Accurately With PDFelement
- From Scanned Receipts to Excel Expense Summaries
- Common Mistakes When Converting Receipts to Excel
Part 1. Why do People Convert Receipts to Excel
In busy offices, workers and teams need a receipt to Excel tool for fast record-keeping. Below are clear reasons people store receipt details inside a spreadsheet for daily work:
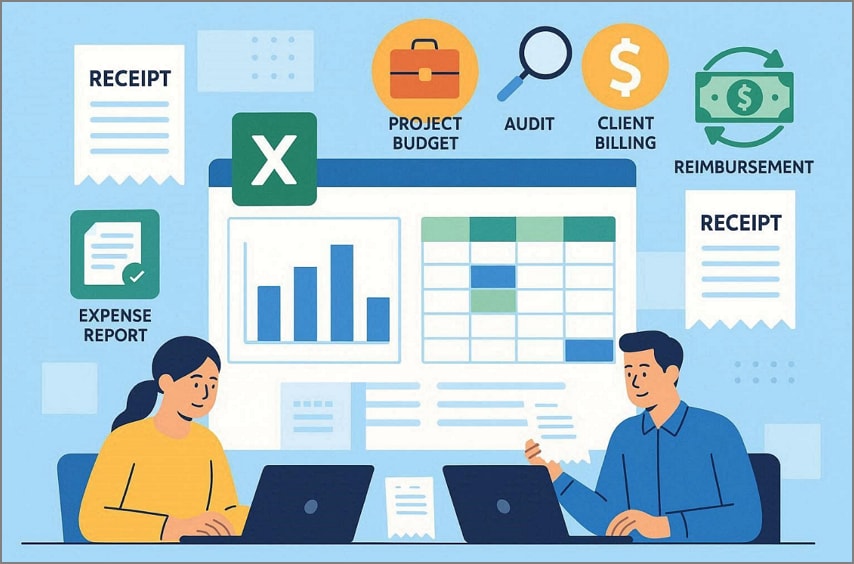
- Expense Reports: Employees log recipes for meals, travel, and office purchases into Excel daily. Formulas automatically calculate total tips, people, or departments, reducing manual errors.
- Reimbursement Claims: Staff attaches receipt images but summarizes data in Excel for manager approvals. Finance teams check the total, duplicates, and missing recipes before issuing.
- Project Budgeting: Teams record receipts per project to monitor budgets and spending limits. Excel helps managers see which projects are over or under budget immediately.
- Audit Teams: All receipts stored in Excel provide a clean record for internal or external audits. Structured data allows auditors to check compliance and validate expenses efficiently.
- Client Billing: Freelancers log expenses tied to client work for an accurate invoice. This ensures clients are billed correctly, and all costs are documented clearly.
Why Excel Remains the Preferred Format for Receipts
Excel remains popular for receipts because it works everywhere, including CSV files. Most employees understand sorting, filtering, and summing, making receipt tracking simple without training. Its templates provide structure for totals, tax, and extra columns for projects or clients. However, files can be backed up, versioned, and audited without depending on third parties.


 G2 Rating: 4.5/5 |
 100% Secure
Part 2. Why is Manual Receipt Entry in Excel Inefficient
When workplaces handle many receipts, work slows down unless they scan receipts to Excel. This section explains the real problems caused by entering receipt details into sheets manually:
- Time Waste: Typing receipt details one by one takes many minutes for each slip daily. However, large piles of receipts make workers spend hours.
- Wrong Amounts: People type wrong amounts when their eyes get tired from reading small, printed data. These mistakes change the total and make reports show costs higher than the real values.
- Duplicates Entries: Manual lists often repeat the same receipt when the user forgets earlier entries already saved. However, duplicate entries confuse reports and show spending bigger than it really is.
- Missed Tax: Workers sometimes skip the tax number because receipts look faded or unclear. As a result, missing taxes cause incorrect totals and create problems during later payment checks.
- Slow Work: Manual typing stops fast work because hands move more slowly than smart tools. This delay blocks teams from finishing reports on time for bosses' weekly meetings.
Why the Receipt Volume Makes Manual Entry Unsustainable
High receipt volume quickly overwhelms teams because 1,000 slips take far more time. Each employee can handle only a few dozen receipts accurately per day. Errors multiply as mis-typed amounts, wrong dates, and missing recipes arise rapidly. Therefore, even partial automation leaves 10-30% of recipes needing manual checks daily.
Part 3. What Data from Receipts Needs to Go into Excel
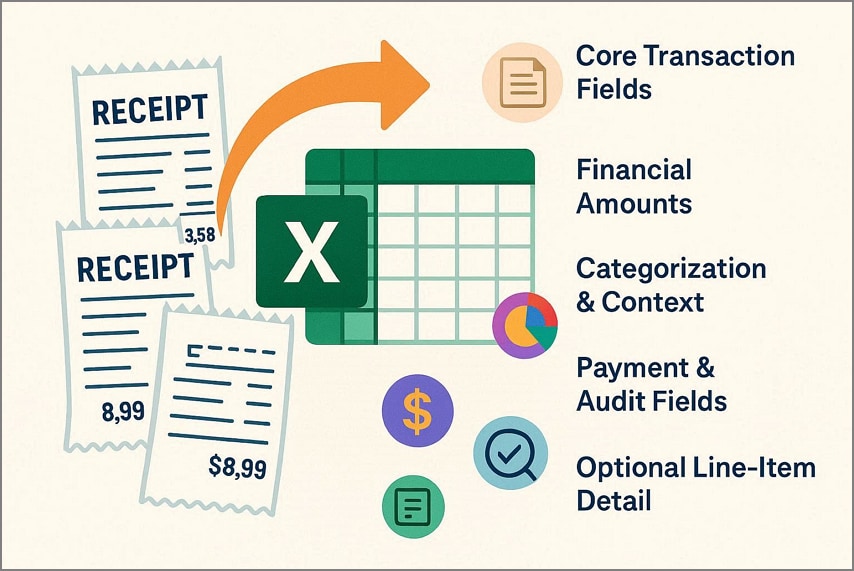
To keep records organized, employees often scan receipts into Excel for faster processing. Read the table below to see which key receipt details should always be included:
| Data Group | Fields to Include |
| Core Transaction Fields | Date, Vendor, Receipt Number, Description |
| Financial Amounts | Total, Subtotal, Tax, Discounts, Currency |
| Categorization & Context | Category, Business Purpose, Project, Employee |
| Payment & Audit Fields | Payment Method, Approval Status, Receipt Link |
| Optional Line‑Item Detail | Item Name, Quantity, Unit Price, Line Total |
Why Structured Fields Matter for Formulas and Summaries
Structures' receipt fields ensure Excel formulas and summaries run correctly and quickly. Consistent columns like date, amount, category, and tax let SUM and IF work. Pivot tables group spend by category, month, project, or employee easily. However, structured tables improve accuracy, reduce mistakes, and let reports scale automatically.
G2 Rating: 4.5/5 |100% Secure
Part 4. Common Ways People Try to Scan Receipts into Excel (And Why They Fail)
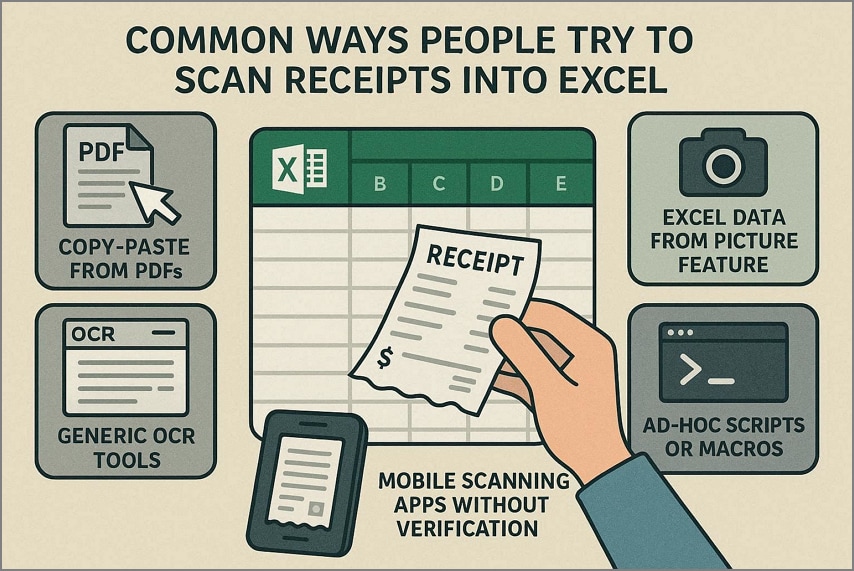
Many people try different tools to scan receipts to Excel but often face errors. This section explains common reasons and why they usually fail to capture data accurately:
- Copy-Paste from PDFs: Copying recipes from a PDF into Excel breaks column, number, and text layouts. Each paste needs manual cleanup, splitting columns, fixing headers, and aligning amounts again. This method wastes time and doesn't scale when handling many receipts. Errors appear frequently because merged cells and wrapped lines confuse Excel formulas.
- Generic OCR Tools: Basic OCR reads characters but struggles with receipts' tables, multi-column layout, and fonts. An accuracy of 85-90% still leads to incorrect totals, misplaced decimals, and misread currencies. Duplicate entries or missing fields appear because OCR cannot structure data.
- Excel Data from Picture Feature: Excel's "Data from Picture" works only on clean, table-like receipt layouts. Real receipts are often crumpled, narrow, or faded, so columns misalign frequently. Items may split incorrectly, and many cells require manual correction after import.
- Ad-Hoc Scripts or Macros: Scripts or macros split text and guess dates or amounts from receipts. Every vendor uses different formats, so rules often fail when layouts change. Errors appear in totals, categories, or taxes, making summaries and pivots unreliable.
- Mobile Scanning Apps without Verification: Many scanning apps focus on creating images, not extracting structured Excel data. They rarely export clean tables or CSV files ready for formulas and analysis. Even if text is recognized, users still must retype or correct most fields.
Part 5. How Scanning Receipts into Excel Should Work
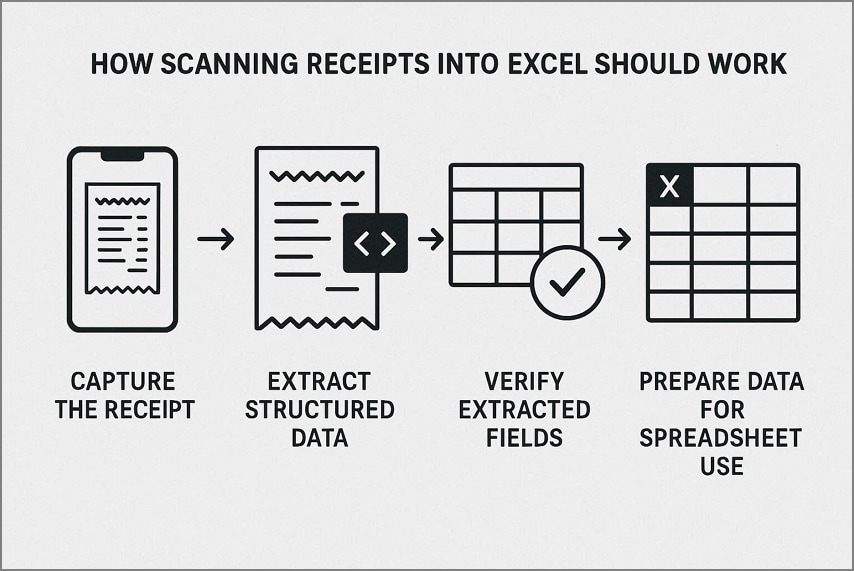
Scanning receipts into Excel should be a smooth and organized process that ensures data accuracy. Each step helps you manage expense information easily and save time on manual data entry. Now, let's explore the correct way to scan receipts into Excel.
Capture the Receipt
Start by gathering all your receipts, both paper copies and digital images saved on your computer. Each receipt should be easy to read and free of folds or blurry print. Good image quality ensures accurate recognition when you process your receipts later.
Extract Structured Data
Once you have the receipts, use reliable software to extract useful details such as the merchant name and total amount. This step separates important data from extra information on the receipt. Structured data helps build neat, organized Excel sheets for tracking expenses easily.
Verify Extracted Fields
After extraction, carefully review each data field to confirm everything is correct and complete. Check names, dates, totals, and tax amounts for accuracy before moving forward. Using a receipt scanner to Excel workflow still needs this quick review to prevent reporting errors.
Prepare Data for Spreadsheet Use
Once verified, format your data so Excel can read it without confusion and rework. Use consistent column headers like Date, Vendor, and Total to keep everything structured. Now your clean, confirmed data is ready for calculations and future financial analysis.
Part 6. How to Scan Receipts to Excel Accurately With PDFelement
Many people waste hours sorting and entering receipt details before they can review real financial data. This is where PDFelement helps by providing a smart way to scan receipts to Excel through an accurate workflow. It focuses on collecting and verifying information so that every record stays dependable. With clear steps and automation, it turns disorganized piles of receipts into prepared financial reporting data.
Moreover, its Receipt Assistant feature helps users manage large numbers of receipts without effort or delay. It allows uploading 100+ receipts in a single batch for quick processing. The Receipt Assistant ensures that every verified receipt is imported into Excel in a consistent format that supports analysis.
Key Features
- Mobile and Desktop Scanning: You can scan receipts on your phone and computer with just a few steps.
- Cross‑Device Sync: Scanned receipts appear on your desktop instantly, so you do not need extra transfers.
- Smart Data Extraction: The system reads each receipt and extracts key details such as name, date, and amount.
- Quick Field Check: Users can open any receipt field to confirm all information is correct before saving.
- Cloud Storage: All verified receipts stay safe online to make them easy to view and manage from anywhere.
- Excel‑Ready Data: The organized receipt data exports directly into Excel, ready for daily expense tracking and reports.
G2 Rating: 4.5/5 |100% Secure
Ultimate Guide to Scan Receipts to Excel Using PDFelement
Now that you know its main features, you can see how a receipt scanner to Excel simplifies organizing receipts every day:
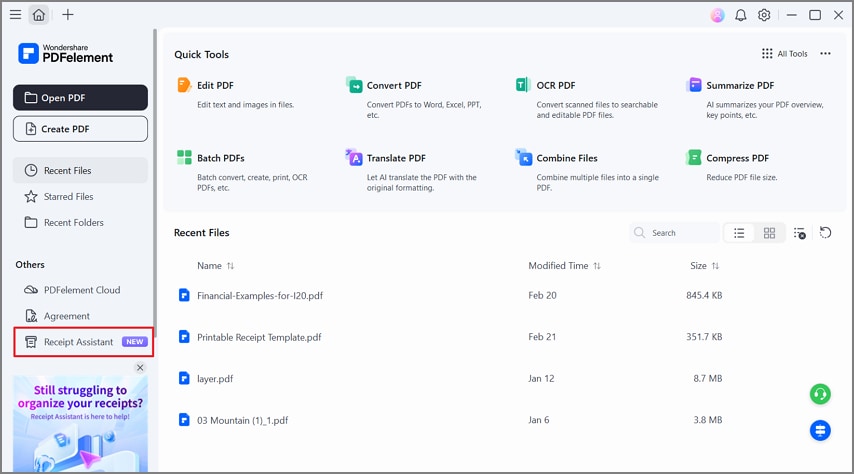
Step 1Access The Receipt Assistant Feature
Upon accessing the main interface, press the "Receipt Assistant" option in the left side panel to continue.
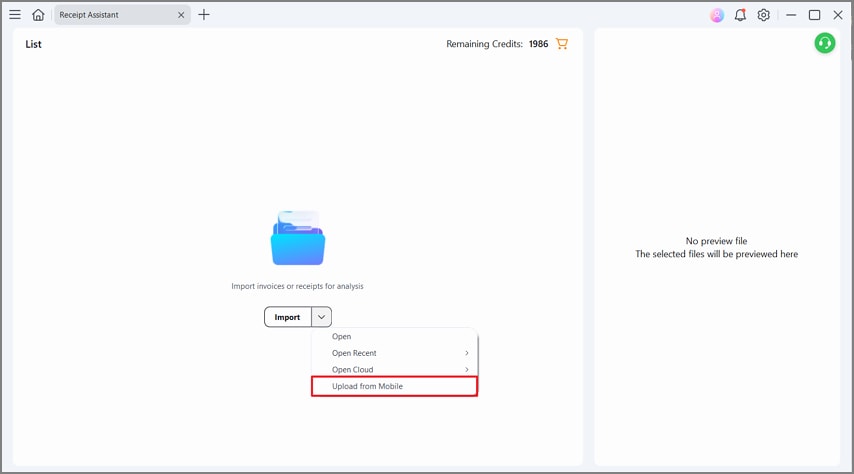
Step 2Choose The "Upload From Mobile" Option
On the next interface, press the "Arrow" icon next to the "Import" button and click the "Upload From Mobile" option. This will open the QR code to scan.
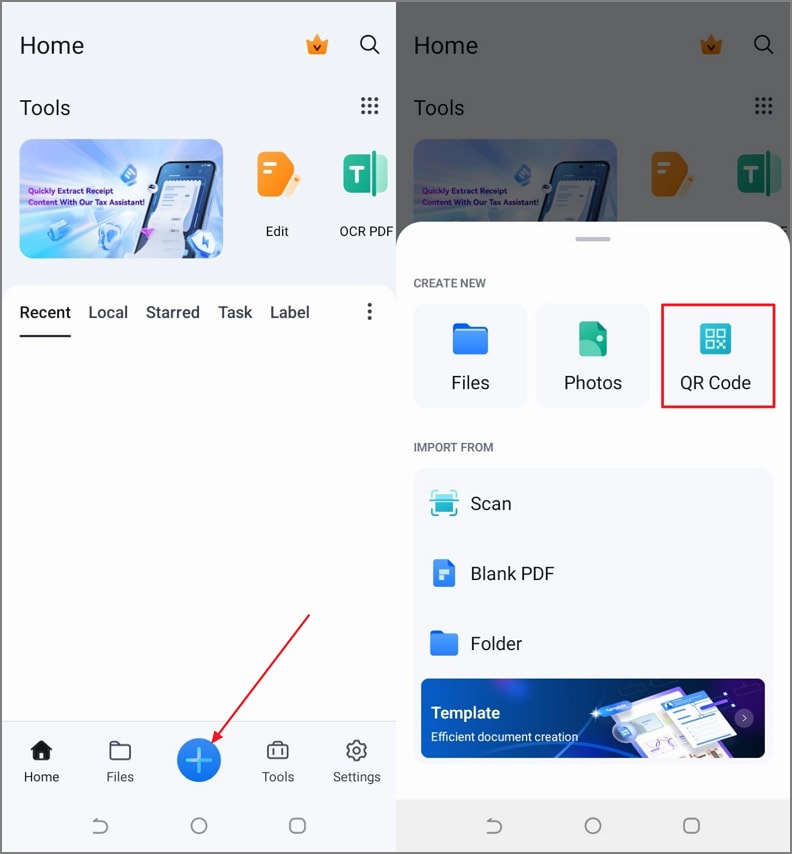
Step 3Access QR Code Scanner on PDFelement Mobile
Now, move to PDFelement Mobile and tap on the "+" icon at the bottom. Next, use the "QR Code" option to open a QR scanner. Make sure you have logged in with the same PDFelement account on both devices.
G2 Rating: 4.5/5 |100% Secure
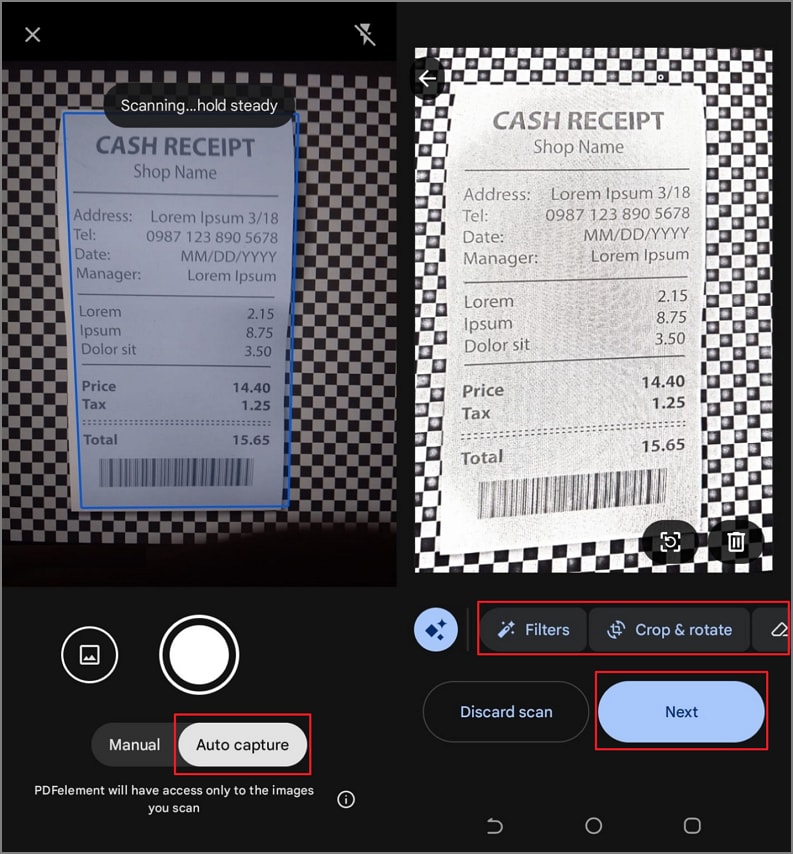
Step 4Scan Paper or Image-Based Receipt
Once you scan the QR code, you'll be directed to the camera interface. Afterwards, choose the "Auto Capture" option, set your camera on the receipt, and the tool will automatically capture and scan the receipt. You can also turn on the flash if needed. After that, use the editing controls to edit and tap on the "Next" option. It will open the scanned receipt on your PC interface.
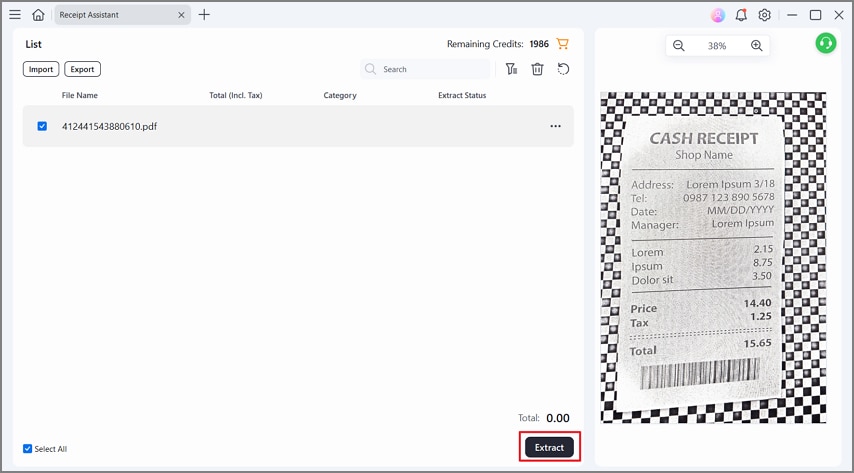
Step 5Run AI-Based Extraction
Now, view the scanned receipt in the right-hand panel and press the "Extract" button to start the extraction.
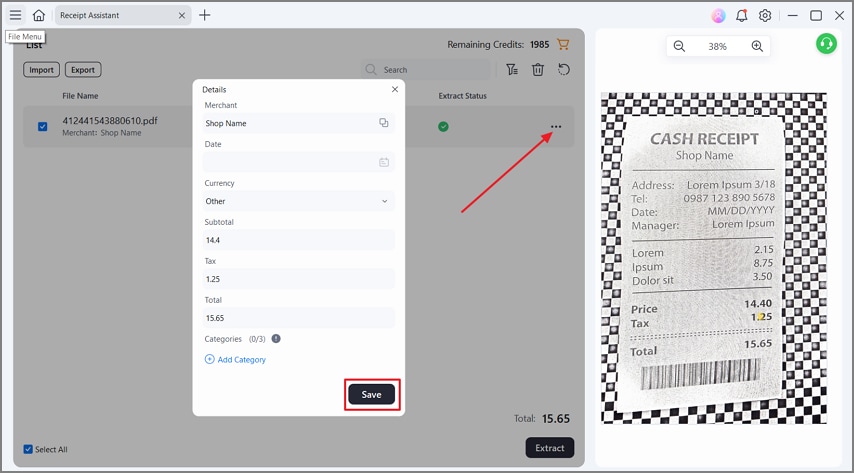
Step 6Review Extracted Receipt Details
After that, press the "Three-Dots" icon and choose the "Details" option. In the Details pop-up, edit the details if needed, and press the "Save" button to save the receipt details.
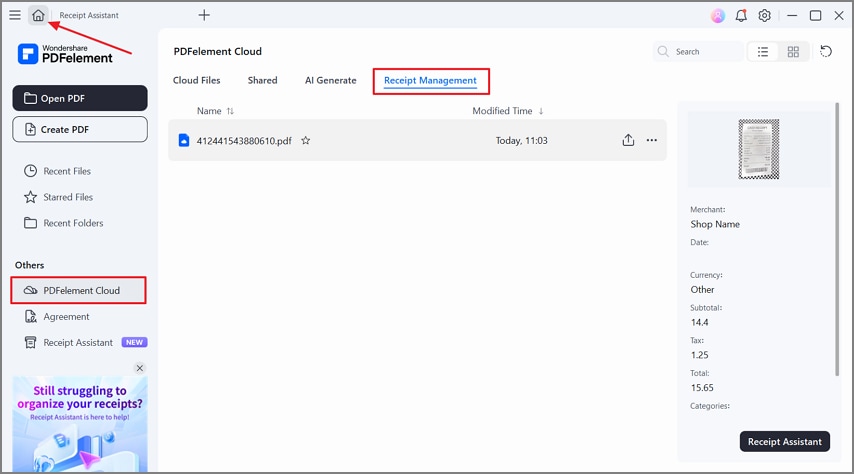
Step 7Search and Manage Receipts in PDFelement Cloud Space
Next, press the "Home" icon in the top left corner, click the "PDFelement Cloud" option, and use the "Receipt Management" tab to view your receipt saved in the cloud space.
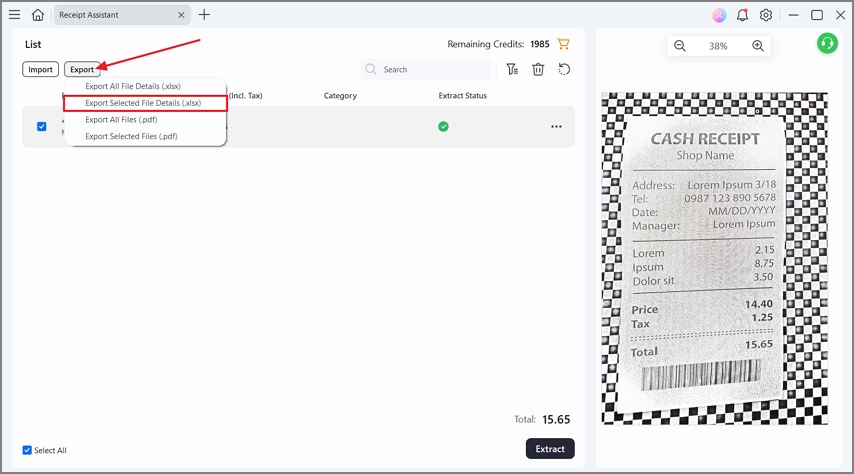
Step 8Export Extracted Receipt Details
Lastly, press the "Export" button and press the "Export Select File Details (.xlsx)" option to save receipt information in Excel. You can also export the scanned receipt to PDF.
G2 Rating: 4.5/5 |100% Secure
Part 7. From Scanned Receipts to Excel Expense Summaries
Cleaning receipt data in Excel makes it easier to see spending clearly and avoid confusing mistakes. After learning how you can scan receipts into Excel, let's move on and turn them into clear expense summaries.
Grouping Receipts by Date or Merchant
Start by grouping receipts by date to make daily spending easier to understand and track. Then group receipts by merchant to see how much you spend with each store or service provider. Look at the table below to understand how grouped receipt data might appear inside a simple Excel sheet.
| Date | Merchant | Category | Amount | Tax | Total |
| 2026-02-01 | ABC Travel | Travel | 200 | 20 | 220 |
| 2026-02-01 | Coffee Corner | Meals | 10 | 1 | 11 |
| 2026-02-02 | OfficeMart | Supplies | 50 | 5 | 55 |
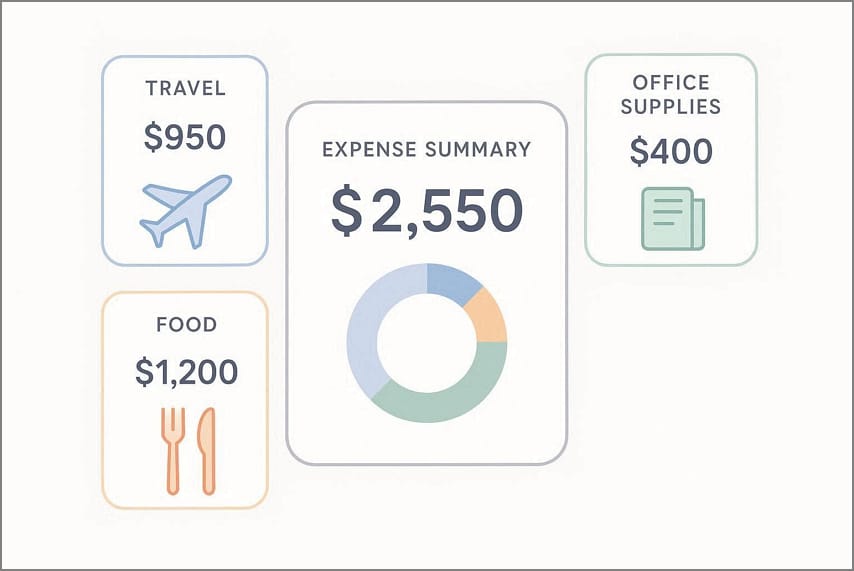
Creating Expense Totals and Categories
Add totals for each day or merchant so you can quickly see how much money was spent overall. Create simple categories like travel, food, and office supplies to separate different types of expenses clearly. This structure makes it easier to understand spending patterns and explain where money is going each month.
Preparing Reimbursement or Tax Reports
Use your grouped and categorized data to build clear reimbursement reports for your company or clients when needed. You can filter by date range or category to find only the receipts that matter for each claim. The same sheet can support tax season by separating personal and business costs for easier review.
Why Verified Data Improves Confidence
When each receipt is checked before entering Excel, you lower the risk of wrong numbers or missing details. This gives you more confidence in:
- Expense reports are shared with managers or finance teams.
- Tax documents prepared for accountants or authorities.
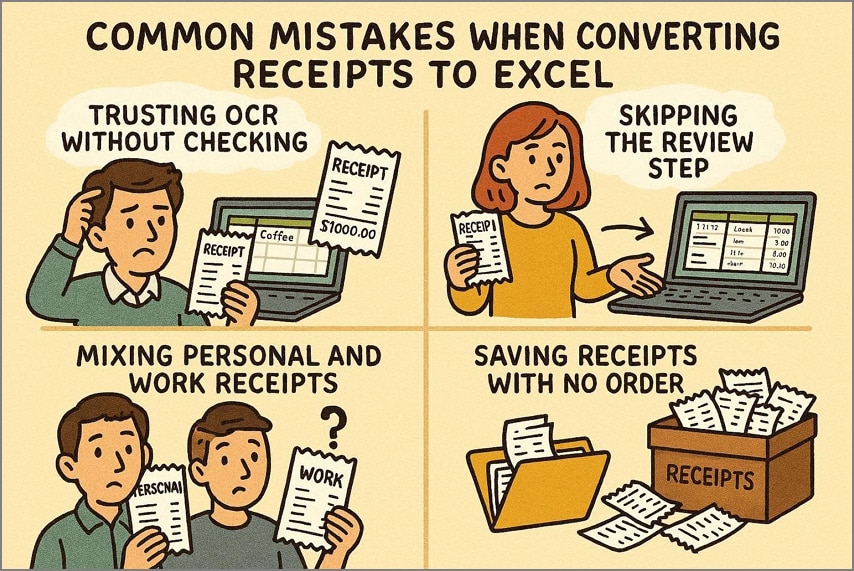
Part 8. Common Mistakes When Converting Receipts to Excel
Many people scan receipts to Excel and still end up with wrong or messy data in their spreadsheets. Now, let's explore the most common mistakes that quietly damage accuracy and waste time.
- Trusting OCR Without Checking: Many users accept OCR results as final, even when numbers and dates are misread or recorded incorrectly. These unnoticed errors can spread through reports, leading to wrong totals and confused financial records.
- Skipping the Review Step: Some people load receipt data into Excel and never double-check amounts, taxes, and merchant names for accuracy. When verification is ignored, small mistakes can lead to big issues with budgets and future audits.
- Mixing Personal and Work Receipts: Users often combine personal and business purchases on the same sheet, making tracking and reporting more difficult. This mix-up can confuse tax calculations, distort spending patterns, and create problems during tax reviews.
- Saving Receipts with no Order: Many teams store receipts in random folders or filenames, with no clear system and consistent structure at all. Later, it becomes hard to find documents, match them with Excel entries, and explain specific expenses when questions appear.
FAQs About Receipt to Excel Workflows
-
What is the easiest way to scan receipts into Excel?
The easiest way is to use software that reads receipts automatically and sends clean data into a spreadsheet. A tool like PDFelement can guide you through simple steps, reducing manual typing and setup. -
Can scanned receipts be converted accurately?
Yes, scanned receipts can be converted accurately when you use reliable OCR and a clear, high-quality receipt image. Tools such as PDFelement are designed to recognize key fields and reduce common reading mistakes. -
Do I still need to check the receipt data before using Excel?
Yes, you should always review the data briefly to catch any wrong numbers, missing dates, or misplaced items. A quick check avoids problems later in reports, budgets, or tax documents. -
Is a receipt scanner app enough for Excel reporting?
A basic app may scan receipts, but it might not structure data well for serious Excel reporting needs. For better results, use software that organizes fields clearly and supports checking before export. -
How do I reduce errors in receipt-based spreadsheets?
Use a receipt scanner to Excel workflow in PDFelement that extracts fields automatically and maintains a consistent layout across entries. Then verify key amounts and categories to ensure your final spreadsheet stays accurate.
Wrap-up: Turning Receipts into Reliable Excel Data
In the end, the receipt to Excel is about accurate data, not just changing one file type into another. Handling receipts with proper extraction and verification makes tracking easier and reduces errors in reports. Structured data leads teams through clear workflows for budgets, reimbursements, and tax preparation. If you want to turn receipts into Excel-ready data, consider using Wondershare PDFelement to transform scanned receipts into accurate expense records.

