Have you ever found yourself faced with a lengthy document, such as an article or a report, that requires you to extract the key points? This process of repeatedly skimming through the document can be time-consuming and exhausting, especially when you're already feeling drained or pressed for time.
But fear not, because we have a fantastic solution for you! In this article, we will introduce you to the world of auto-summarization in MS Word, and how you can leverage the incredible AI capabilities of PDFelement to effortlessly summarize your documents.
In this article
Part 1. AutoSummarize Feature of Microsoft Word
Microsoft Word can summarize a document since Word 2003. The Auto Summarize feature is available in MS Word 2003 and 2007. It shortens lengthy documents, leaving behind a subset of the most important parts of the original. This feature works by analyzing the entire text and only picking out what best relates to the main theme.
The auto-summary feature has not existed since Word 2010 was released. Lucikly, with the integrated AI-powered assistant Copilot, Microsoft 365 subscribers can summarize a Word document with the automatic summary feature of the AI assistant.
The following part will show you how to summarize Word documents in Microsoft 365 Word and MS Word 2003, 2007.
Part 2. How To Auto Summarize a Document in Microsoft Word
Now that you understand what auto summary is, why it would be important, and how to use it.
How To Auto Summarize Word in Microsoft 365 Word
To use Copilot to make a summary, you need a Microsoft 365 subscription that includes Copilot (for businesses or schools) and the Copilot features enabled.
Step 1 Open a Word document. If the document is stored on OneDrive or SharePoint, an automatic summary might appear at the top of the document when it is opened on the Web. Click "View More" to expand and see the full summary.
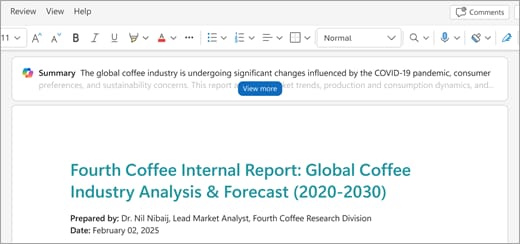
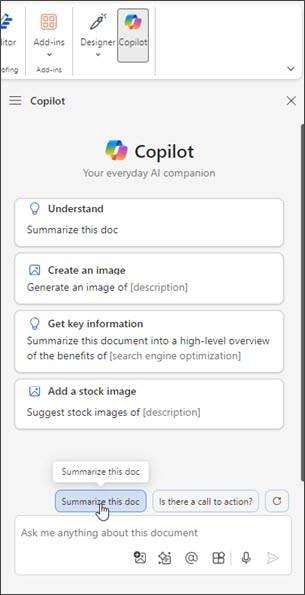
Step 2 If no automatic summary appears, ask Copilot manually. Go to the Copilot option in the ribbon to open the Copilot pane.
Step 3 In the Copilot chatbox, enter a prompt such as "Summarize this document" (or choose the "Summarize" suggestion).
Step 4 Copilot will generate a summary of the document. Read the generated summary to check it is completeness.
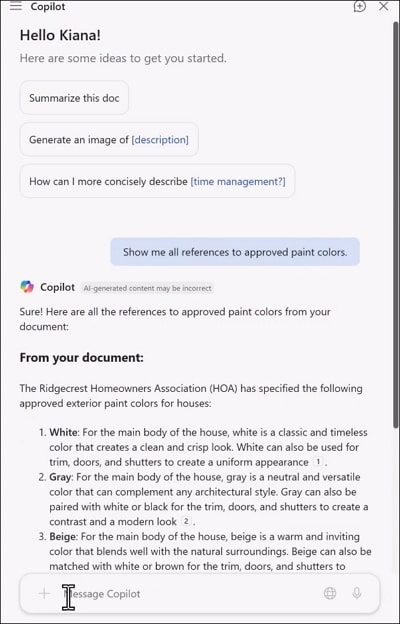
Step 5 Refine the summary if needed. Provide additional context or details (e.g. "make this summary for executives," or "get key information in bullet points") so Copilot can regenerate an improved version.
Tips:
- Copilot currently has a limit (~1.5 million words or ~300 pages) when generating Detailed summaries.
- Automatic summaries only appear in the document stored in OneDrive or SharePoint.
How To Auto Summarize Word in Word 2007/2003
Below is an easy guide to help you add the Auto Summary feature to the Quick Access Toolbar before you use auto summarize in Word.
Step 1 Launch Microsoft Word on your device. Click the "Microsoft Office Button" and select "Word Options" at the bottom of the dialogue box.

Step 2 Navigate to the "Customize" tab and select "All Commands" from the "Choose commands from" list.
Step 3 On the list, click "AutoSumary" tools and select "Add."
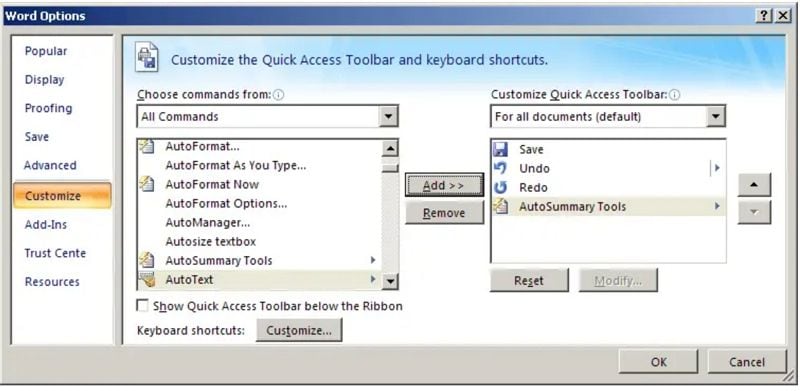
Once you have added the feature to your toolbar, you can follow these steps to use Microsoft Word summary.
Step 4 Once you have added the feature to your toolbar. Open your document in MS Word, navigate to the "Quick Access Toolbar," and select "More Commands." From there, click on "Auto Summarize." Wait for an "AutoSummarize" dialogue box to appear.
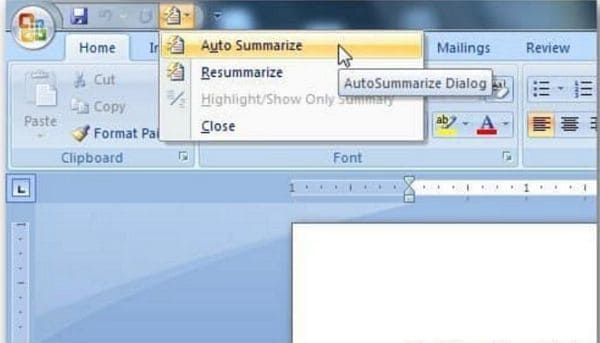
Step 5 Choose the kind of summary you want to generate for your document. Here are a few options you can select.
- Highlight key points: This option allows you to highlight the key points within the except and make them stand out by coloring them yellow. The rest of the document will remain grey. You can also change the default yellow color to any other of your choice.
- Create a new document and put the summary there: If you don't wish to alter the original document, you can use this option to create a new document with no ties to the original.
- Insert an abstract or executive summary and place it at the top of the document: Another option would be to have a heading named "Summary" at the top of the page. The rest of the document will remain untouched and your summary becomes part of the document.
- Hide everything except the summary: This option will hide all the text that isn't included in the summary, making it significantly shorter. Suppose you choose to print your document. In that case, only the summary will be printed. If you want to display the entire document, click "Close" in the "AutoSummarize" toolbar.
Step 6 Navigate to the "Percent of Original" box, and specify what details you want to include in your summary. You could choose from the following options:
- 10 sentences
- 20 sentences
- 100 or less words
- 500 or less words
- 10% of the text
- 25% of the text
- 50% of the text
- 75% of the text
Step 7 Select "File," select "Properties," then click on the "Statistics" tab to reveal a dialogue box. You can then specify whether you want MS Word to replace existing comments and keywords in the document. if you want otherwise, unclick the "Update Document Statistics" check box.
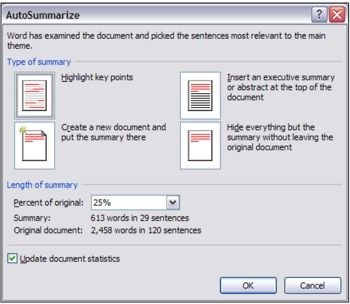
Step 8 Click "OK" to initiate the process of creating the summary.
Part 3. How To Use AI to Summarize Microsoft Word
Perhaps you are using Microsoft Word 2010 and have yet to upgrade to the newer version with the Auto Summary feature. Having the old version might deter you from leveraging technology to summarize your document within more minutes without having to skim through it multiple times. A better alternative would be to use Wondershare PDFelement, a popular PDF editing tool.
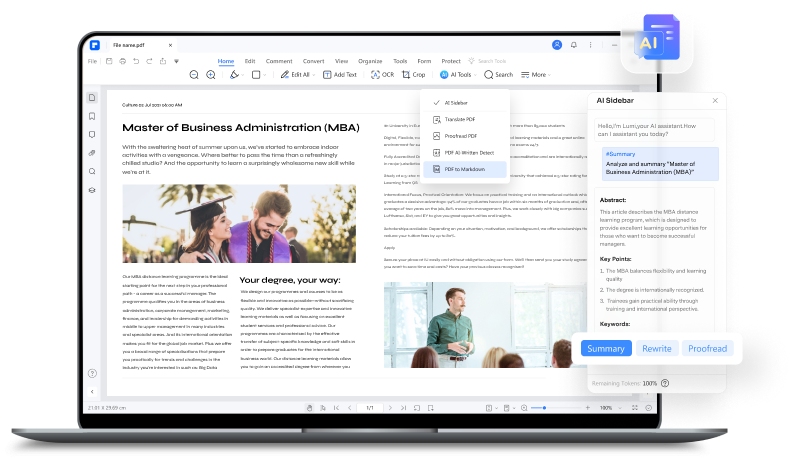
Wondershare PDFelement - PDF Editor Wondershare PDFelement Wondershare PDFelement can take the tedium out of shortening long paragraphs by doing the work for you. It can also take the main points from a lengthy document and shorten it to almost half its size or less.
Powered by AI models such as ChatGPT, Gemini, AI robot in PDFelement will analyze the contents of your document, highlight key points that align with the main theme, and summarize your document effortlessly.
How To Auto Summarize Word Using PDFelement
Use this simple guide to help you summarize your Word or PDF document using the AI in Wondershare PDFelement. Ensure you have installed the latest version of Wondershare PDFelement to access the Lumi PDF AI robot.
Step 1Import the Word Document for Summarization
To begin the summarization process, launch the latest version of PDFelement on your device and click the "Create PDF" button on the top-let corner of the interface. From the expanded list, choose the "From File" option and select the Word document from your computer. Now, PDFelement will automatically convert the document into PDF for seamless summarization.

Step 2Locate the AI Assistant Feature
After opening the PDF document within the editing interface, navigate to the "AI Assistant" section on the top-right corner and expand its list of options. Select "AI Summarize" tool from the available options and tap on "Summarize Current PDF" option from the small pop-up menu. After that, the AI assistant will automatically generate a summary and provide three questions based on the content.

Step 3Fine Tune the Generated Summary
Upon getting the summary, you can further refine it according to your needs by prompting the AI assistant. For example, you can change the format of the summary by entering the prompt "Give summary in bullet points."

Part 5. FAQs
We will answer some frequently asked questions in this section of the article.
1. Can ChatGPT summarize a Word document?
Yes. ChatGPT 4 allows you to upload Word documents. You should make sure you're using a version of ChatGPT that supports file uploads (ChatGPT Plus or Enterprise, GPT-4).
Step 1. Open a chat in ChatGPT. Click the paperclip icon next to the message box.
Step 2. Select your .docx file from your computer. You can upload multiple documents if you want ChatGPT to create a combined or comparative summary.
Step 3. In the message box, type a clear prompt such as: "Summarize this Word document in bullet points," "Give me a detailed summary with headings."
Step 4. ChatGPT will generate a summary of your Word document. Refine the summary with more prompts if needed.
Step 5. Once you're happy with the summary, copy the text and paste it into your document. Or you can ask ChatGPT to export the summary as a Word or PDF document which you can download.
2. Is there an AI Word document summarizer?
Yes. There are AI tools that can summarize Word documents (DOCX / DOC). Below are three examples:
ChatGPT: It allows you to upload a .docx file directly and summarize it. And you can refine the summary with further adjustment, such as shortening it, asking for focus on specific sections. It is very flexible and allow you to refine the length, style, and focus of the summary.
PDFelement: While PDFelement is primarily known as a PDF editor, it offers AI features that support summarizationfunctionality which can also be applied to Word files after conversion. It can handle various document formats (PDF, Word, PowerPoint) in a unified environment. And with its chat with documents feature, you can quickly grasp the content of your documents by asking AI.
NoteGPT: It is a web-based AI tool focused on summarization, note-taking, and learning workflows. It supports various file types including Word documents. And it supports interactive exploration of the document and integrates with other formats (PDF, PPT, video) which makes it versatile.
3. How to auto summarize in Word 2016?
Unfortunately, Microsoft discontinued the AutoSummary feature in the Word 2010 version. The same will apply to Word 2016. The Auto Summary feature is only available in newer updates of MS Word 365.
Conclusion
As you have seen, using the Auto Summary feature in MS Word is not hard. If you are unhappy with the results, you can always turn to Wondershare PDFelement to do the job. A pro tip we would like to share is to proofread the auto-summarized document once the process is complete so you spot any errors the program made and give your summary a human touch.
After all, technology is not entirely blameless. We hope this article has given you all the insight you need to create exquisite summaries and make your work more manageable.
 Home
Home
 G2 Rating: 4.5/5 |
  100% Secure


