
Understanding DPI is crucial when it comes to scanning photos. DPI, or dots per inch, determines scanned images' resolution and overall quality. A higher DPI means more dots or pixels per inch, resulting in sharper and more detailed scans.
Resolution plays a vital role in scanning photos. It refers to the level of detail and clarity captured in an image. DPI is a key factor in determining the resolution of scanned photos. By setting the appropriate DPI value, you can control the level of detail you want to capture in your scans. Whether you aim for web sharing or high-quality prints, understanding how resolution and DPI work together is vital for successful photo scanning.
In this article
What Is DPI and its Significance in Scanning Photos?
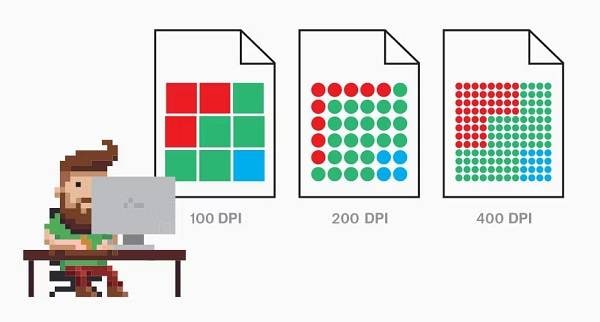
DPI, or dots per inch, is a measurement that determines the resolution of scanned photos. It represents the number of dots or pixels that can be captured within one inch of the scanned image. The higher the DPI, the more dots or pixels are present in each inch, resulting in a higher level of detail.
When scanning photos, DPI is critical in determining the quality and level of detail in the resulting digital image. A higher DPI setting captures more dots per inch, producing a more detailed and sharper image. This is particularly important when scanning photos with intricate details. Additionally, it is for small elements that need to be preserved accurately.
The significance of DPI becomes evident when you consider the intended use of the scanned photos. A lower DPI may suffice if you plan to share the images digitally on websites or social media platforms. However, a higher DPI is recommended for printing purposes or to maintain the highest level of quality.
DPI and image resolution are closely linked. Image resolution refers to the total number of pixels in an image, while DPI determines how those pixels are distributed within each inch. For example, an image with a resolution of 3000 x 2000 pixels scanned at 300 DPI will produce a print size of 10 x 6.67 inches. It can be obtained by dividing 3000 by 300 and 2000 divided by 300.
Balancing DPI and image resolution based on your specific requirements is essential. Higher DPI settings are ideal for producing sharp prints, especially larger ones. However, remember that higher DPI values result in larger file sizes, requiring more storage space.
DPI plays a significant role in scanning photos by determining the level of detail and quality of the resulting digital images. By understanding DPI, you can make informed decisions when scanning photos. This will ensure optimal results.
Determining the Best DPI for Scanning Photos

When selecting the DPI for scanning photos, several factors should be considered. You should consider these important considerations:
- The intended use of the scanned images
- The original photo's quality
- Your scanner's capabilities
For web use, a DPI between 72 and 150 is generally sufficient. Since digital screens display images at a lower resolution, scanning at a higher DPI will not enhance the image quality.
If you plan to print the scanned photos, a DPI range of 300 to 600 is recommended. This higher resolution ensures sharpness and detail in the printed output. Larger prints or fine art reproductions may benefit from an even higher DPI.
For archiving purposes, it is advisable to scan photos at a higher DPI, such as 600 to 1200. This allows for future flexibility and ensures that the digital copies capture as much detail as possible. Archival scanning is especially crucial for preserving irreplaceable photos or historical documents.
To select the optimal DPI, consider the intended use of the scanned photos. For everyday snapshots or casual sharing on social media, a lower DPI will suffice. However, if you anticipate printing the images or desire the highest level of quality, opt for a higher DPI.
Remember that scanning at higher DPI values results in larger file sizes. Ensure that you have sufficient storage capacity to accommodate the larger files. This is especially when scanning multiple photos.
Experimentation can also help determine the best DPI for your specific needs. Scan a few photos at different DPI settings, then compare the results to identify the optimal balance between file size and image quality.
Choosing the best DPI for scanning photos depends on several factors. Consider the purpose of the scanned images. Also, check the recommended DPI ranges for different uses and the capabilities of your scanner. By selecting the appropriate DPI, you can achieve the desired level of detail and quality in your scanned photos.
Difference Between 300 DPI and 600 DPI

300 DPI is a scanning resolution commonly used for various purposes. It means 300 dots or pixels per inch in the scanned image. Scanning at 300 DPI produces good-quality prints and suits general photo scanning needs.
On the other hand, 600 DPI offers a higher scanning resolution. With 600 dots or pixels per inch, it captures more detail and produces sharper images compared to 300 DPI. Scanning at 600 DPI is particularly advantageous when preserving photos with fine details. Or it is recommended when high-quality prints are desired.
When comparing the visual differences between 300 DPI and 600 DPI, the higher resolution of 600 DPI becomes evident. Scans at 600 DPI capture more fine details, such as intricate textures, small text, or subtle color variations. This results in crisper and more realistic representations of the original photos.
The benefits of scanning at 600 DPI extend beyond visual quality. Higher DPI scans offer more flexibility in terms of enlargement and cropping. They can be enlarged to larger print sizes without losing sharpness or detail. Additionally, higher DPI scans provide greater room for post-processing adjustments. This includes color correction or image enhancements.
However, it's important to note that scanning at 600 DPI also comes with larger file sizes. The increased detail and resolution require more storage space. This should be considered when scanning a large number of photos.
300 DPI suits general scanning needs. However, 600 DPI offers distinct advantages in image sharpness and capturing details. Scanning at 600 DPI provides enhanced visual quality and flexibility for printing and post-processing. But it also results in larger file sizes. Consider the specific requirements of your project or purpose when choosing between 300 DPI and 600 DPI for scanning your photos.
Introduction to InstaScan for iPhone

InstaScan is a powerful scanning app designed specifically for iPhone users. This app lets you scan documents, receipts, and photos directly from your iPhone. With its intuitive interface and robust features, InstaScan is an essential tool for capturing digital copies on the go.
One of the key advantages of InstaScan is its seamless integration with the iPhone's built-in camera. By utilizing the iPhone's camera capabilities, InstaScan provides an efficient scanning experience. This can be done without the need for additional scanning hardware.
The scanning resolution of InstaScan depends on the resolution of your iPhone's camera. iPhones typically have high-resolution cameras, allowing for impressive scanning quality. The app leverages the camera's capabilities to capture images with clarity and detail. It also ensures that your scanned documents and photos look crisp and professional.
In addition to its scanning functionality, InstaScan offers a range of features to enhance your scanning experience. These include automatic edge detection, image enhancement, and multi-page scanning. It also can export scans in various formats, such as PDF or JPEG.
With InstaScan, you have a versatile scanning solution right at your fingertips. Whether you need to digitize important documents or preserve cherished memories, this app is designed to simplify and streamline the scanning process, making it an indispensable tool for iPhone users.


Scanning Documents With InstaScan for iPhone
Scanning documents with InstaScan on your iPhone is a straightforward process. This allows you to create high-quality digital copies effortlessly. Follow these steps to effectively scan documents with the app:
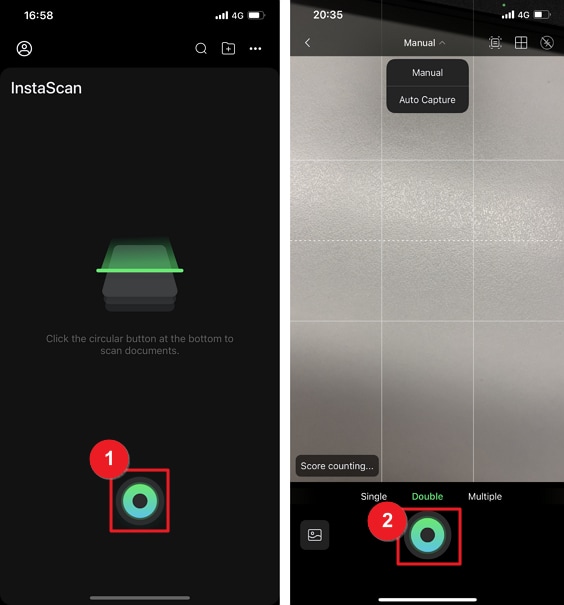
Step 1Open the InstaScan app on your iPhone
Ensure that you have the latest version installed for optimal performance.
Step 2Scan the document
This will activate the camera and enable you to capture the document you wish to scan. You can choose the desired scan mode, such as color or black and white, based on your preference.
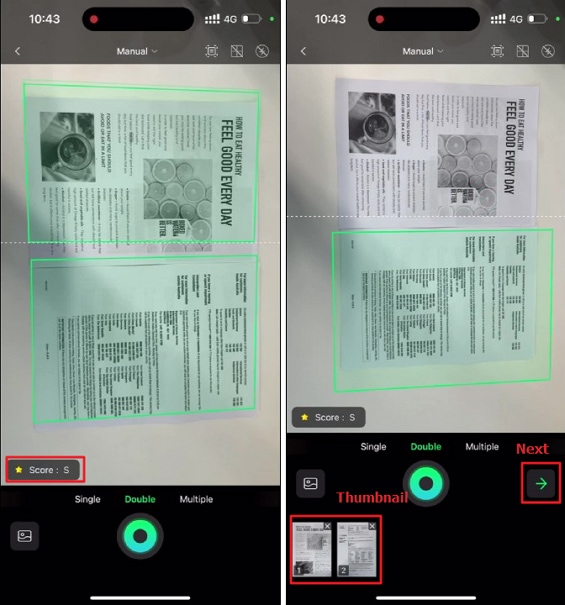
Step 3Make adjustments and edits
After capturing the document, you can make adjustments and edits to enhance the scan. InstaScan provides various editing options, including adding filters and cropping the image. It can also add additional pictures to create multi-page scans.
Step 4Save the edits
Once satisfied with the scan and any necessary edits, tap the Save button to save the scanned document to your iPhone. You can choose a preferred file format, such as PDF or JPEG, for easy accessibility and sharing.
To improve accuracy and organization, consider these tips when scanning documents with InstaScan:
- Ensure proper lighting: Adequate lighting conditions can impact the quality of your scans. Scan documents in well-lit areas or utilize the iPhone's built-in flash if necessary.
- Keep the document flat and steady: Maintain stability while capturing the document to avoid blurry or distorted scans. Place the document on a flat surface and hold the phone steady while taking the picture.
- Adjust page boundaries: InstaScan offers an automatic edge detection feature. However, you can manually adjust the page boundaries if needed. Ensure to include the entire document within the frame for a complete scan.
- Organize scanned documents: Use InstaScan's organizational features. These include creating folders or adding tags. This will keep your scanned documents well-organized and easily accessible when needed.
You can scan documents using InstaScan on your iPhone by following these steps and implementing these tips. This will ensure that you have high-quality digital copies at your fingertips.
Conclusion
Understanding DPI is essential for achieving optimal results when scanning photos. The choice of DPI depends on the intended use, with higher DPIs like 600 offerings sharper and more detailed images. The InstaScan app provides a convenient solution for scanning photos for iPhone users. It also has customizable DPI settings. Selecting the appropriate DPI and utilizing the right tools can preserve your cherished memories. This can be done in high-quality digital formats.

