Organizations and personnel rely more and more on digital documents for communication with the increasing demand for technology. However, we often have to deal with large PDF documents, which take longer to load and can affect our productivity. Hence, there is a need to optimize PDF files into a form that can solve this issue.
For this purpose, a special technique known as linearized PDF is available. Optimizing the PDF into linearized form enables users to view the contents of a document progressively while it continues to load in the background. This article will explicitly discuss what is linearized PDF and how you can create it with the best methods.
In this article
Part 1. What is a Linearized PDF?
Linearized PDF is a type of PDF that is optimal for efficient and faster web viewing without any loading time. Usually, when users open a regular PDF file in a web browser, it downloads the whole file before displaying it. So, it can be quite slow and less productive, especially for large PDF files.
However, linearization changes this process by structuring the PDF file in a way that allows for progressive rendering. When we open a linearised PDF in a web browser, the first page can be viewed while the rest of the file downloads in the background.
Part 2. 4 Ways to Create Linearized PDF
You are now familiar with the concept of linearized PDF; let's head to the discussion of how you can create it. Many useful tools available over the internet can help you create linearized PDFs effectively, which we will discuss in this section. Plus, we will shed light on a more convenient method to optimize PDFs.
Method 1: Use Adobe Acrobat
Adobe Acrobat is one of the major PDF editing tools that can help users in making linearized PDF files. You can use this tool to optimize your PDF for Fast Web View, which will restructure your PDF file for single-page downloading. Simply follow the guide below, and you can easily enable this feature.
Step1
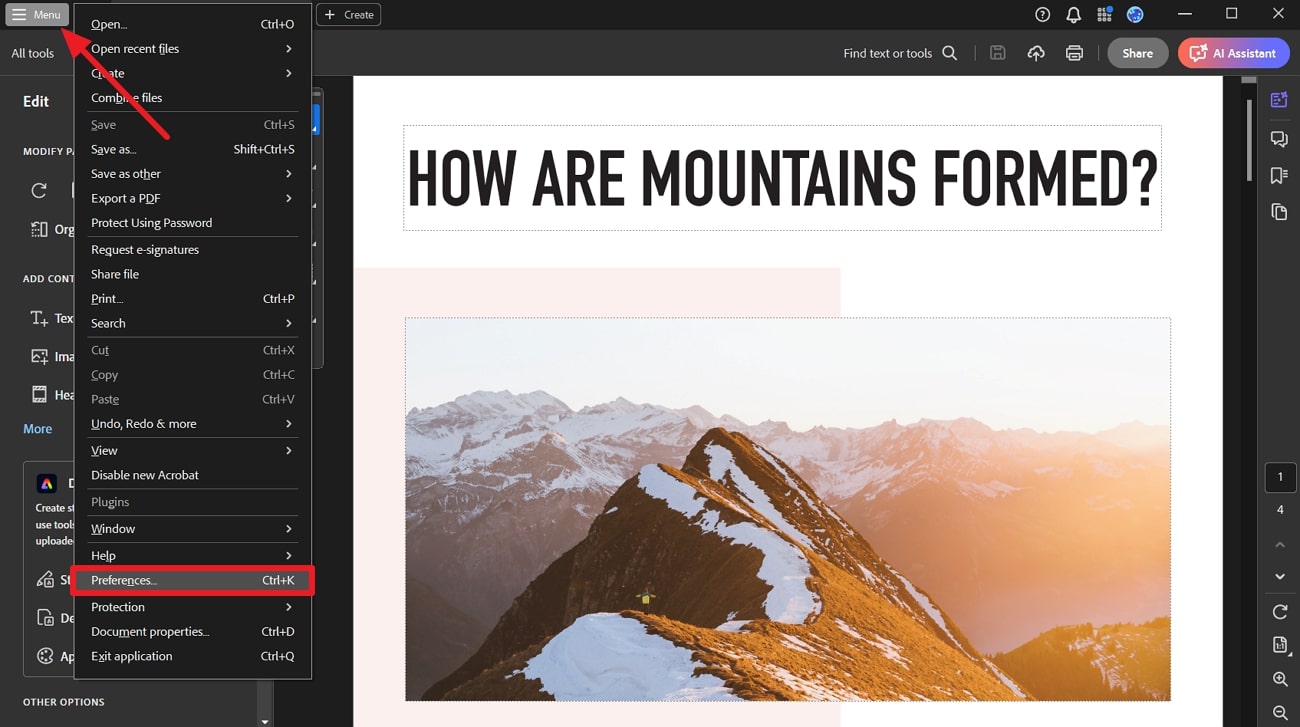
Start by downloading Adobe Acrobat from its official website and installing it on your system. Then, launch the program and import your desired PDF file. Once done, click the "Menu" tab from the upper left corner and select "Preferences" from the following context menu options.
Step2
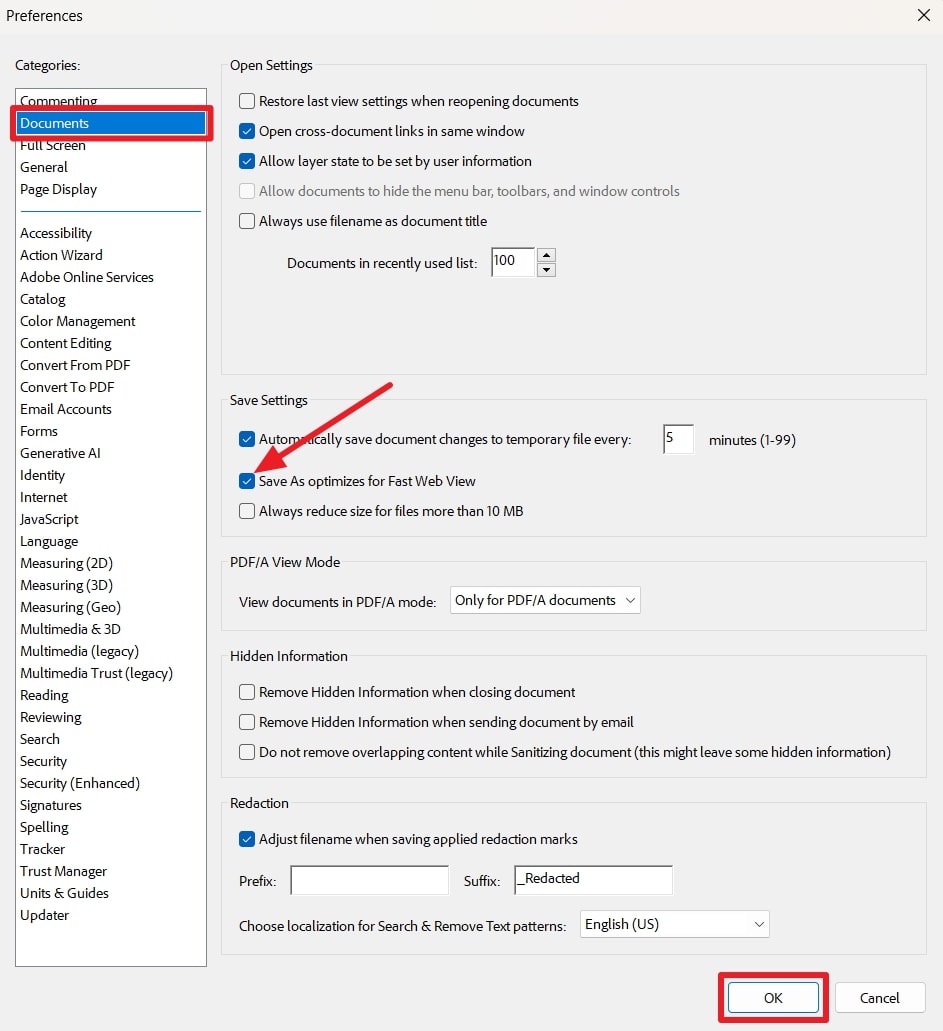
Afterward, a new window will appear with some categories of preferences on the left side. From there, select the "Documents" category and check the "Save As optimizes for Fast Web View" option. Lastly, hit the "OK" button to save the settings and turn your PDF into a linearized form.
Method 2: Use Advanced PDF Tools
Another tool, Advanced PDF Tools, is quite easy and simple to use for a linearization process. It changes the structure of your PDF file and lets you save the new copy as a separate file. Go through these steps to learn how to create linearized PDFs through this tool:
Step1
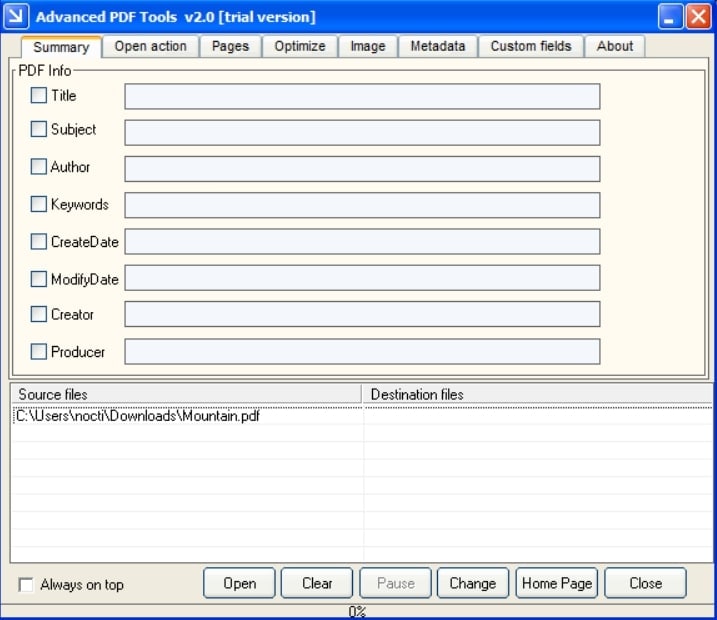
First, download the Advanced PDF Tools software from the provided link and install it on your computer. After that, run the installed application and drag your relevant PDF file to its interface to import it successfully.
Step2
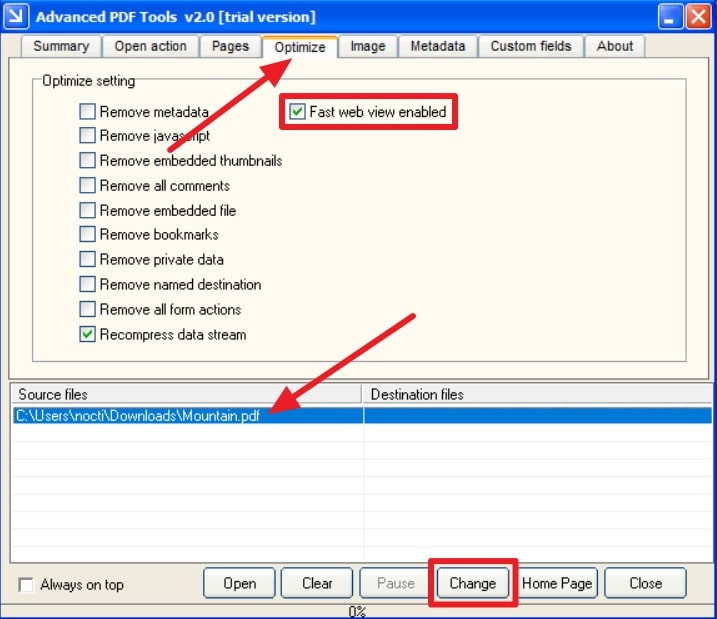
Once imported, tap the "Optimize" option from the top menu to access the optimizing settings. There, make sure to check "Fast web view enabled" to make your PDF linearized. Finally, select your PDF from the "Source files" panel and hit "Change." You will be then asked to save the new file to your desired location.
Method 3: Linearized PDF Online
If you are looking for a way to make your PDF linearized online without any installed application, this method is for you. PDF2GO is an online tool that you can access on almost any device through the internet to make linearized PDFs. Take a look at the straightforward guide below to use this tool with ease:
Step1
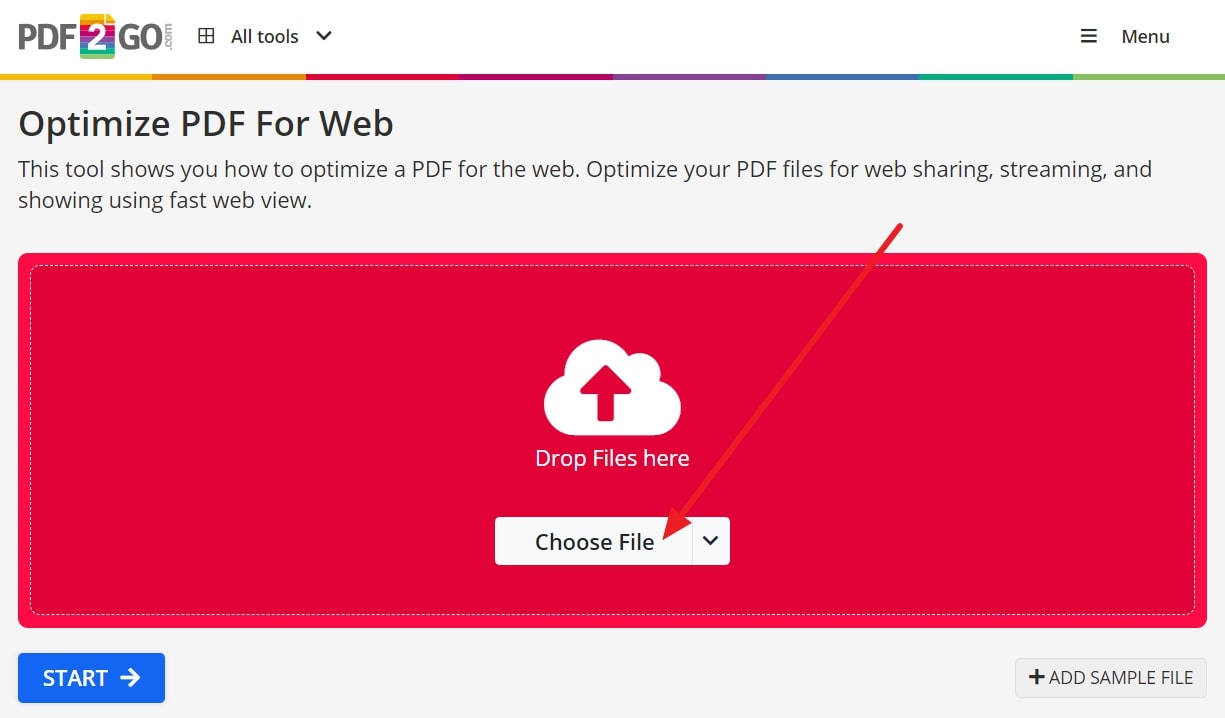
Begin by launching the PDF2GO website on your preferred web browser. Then, upload the PDF file that you want to linearize by dragging it on the website interface or clicking the "Choose File" button.
Step2
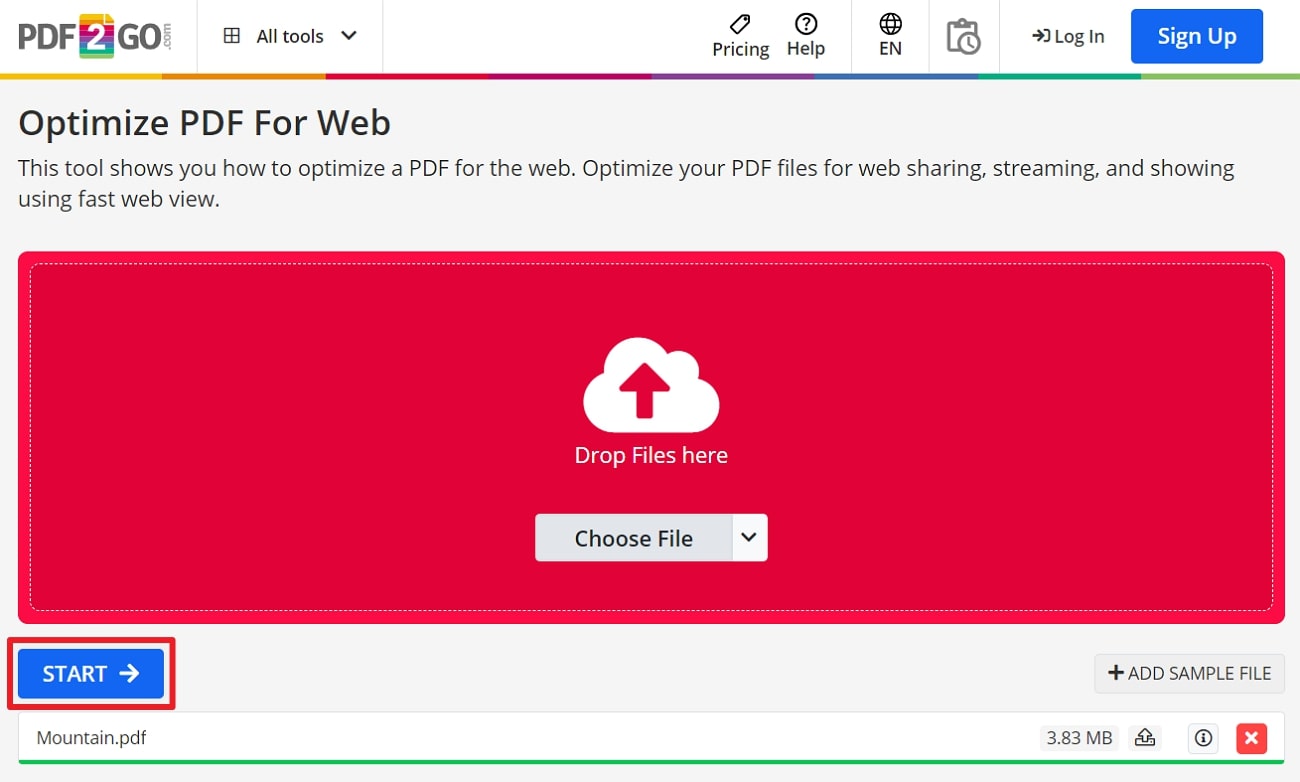
Now that you have selected your PDF to upload, you only need to wait for it to upload. Once uploaded, simply click the "Start" button, and it will lead you to the window where you can download your linearised PDF file.
Method 4: Use Foxit PDF
For further options, you can also use the Foxit PDF Editor to optimize your PDF as linearized. Through this tool, you can modify your PDF document in a way that it can be opened and read before downloading the whole file. Here's how you can use this tool to create linearised PDF in simple steps:
Step1
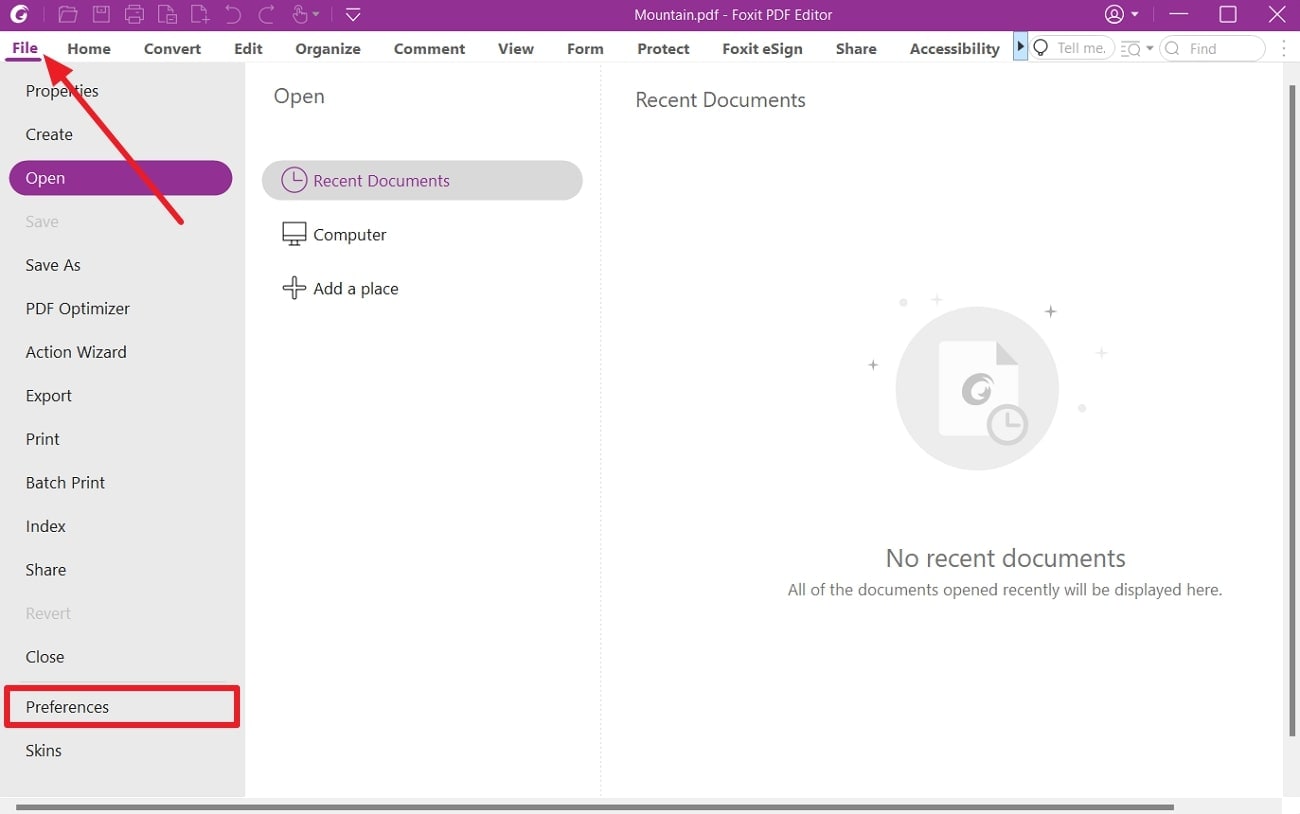
As we know, the very first step is always to download and install the tool into your system. After installation, launch the Foxit PDF tool and import your PDF file to initiate the linearization process. Then, click the "File" tab from the top menu and choose "Preferences" from the available options.
Step2
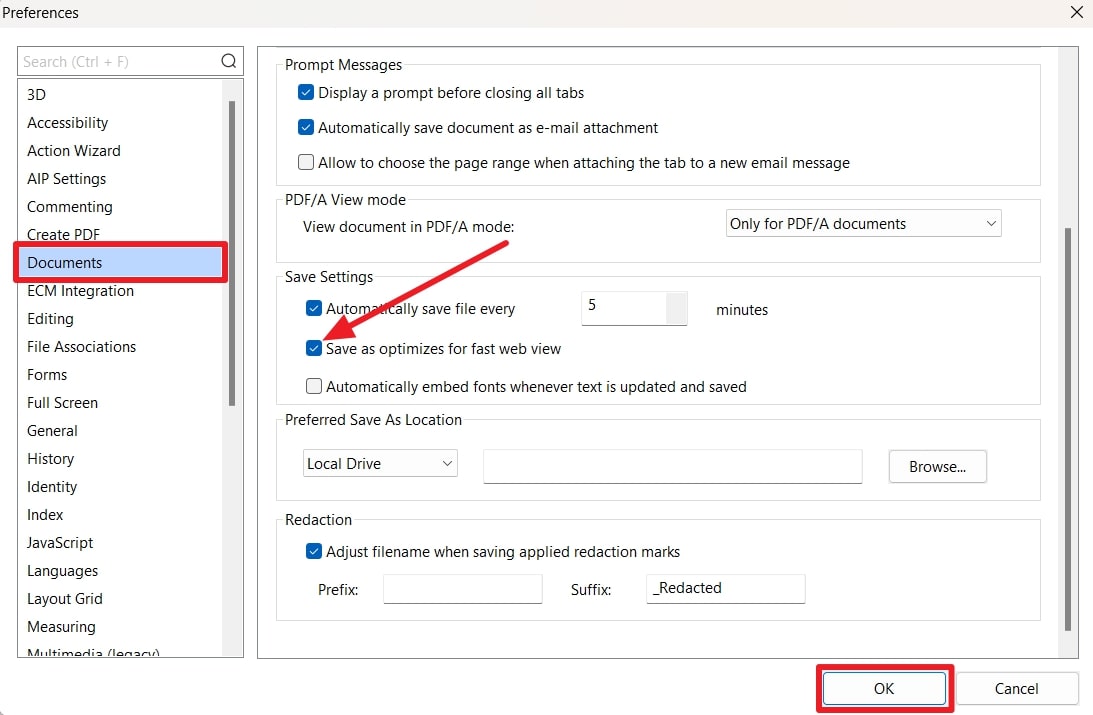
A new window for preferences will be opened, from where you can search for "Documents" or manually locate it. After selecting "Documents", scroll to the "Save Settings," where you can see the "Save as optimizes for fast web view" option. Just check this option and click on the "OK" button to effectively make your PDF linearised.
Part 3. More Convenient Methods to Optimize PDFs
We have already explained some of the best possible methods to make your PDFs linearized. However, if you are still looking for some more convenient ways to optimize your PDF files, we've got you covered. Wondershare PDFelement is a well-known PDF editor that can enable your document files to load on web browsers quite efficiently and quickly.
There are two main features of this tool that can play a role in this function: Flatten PDF and Compress PDF. You can access and use these PDFelement features without difficulty within a few clicks.
1. Flatten PDF
Sometimes, our PDF files are difficult to handle and lag while viewing due to the complexity of layers created due to added comments. In this scenario, it is wise to flatten the PDF to merge all the layers into the main content layer. Here's how you can flatten your PDFs through the PDFelement tool:
Step1Import Your PDF to PDFelement
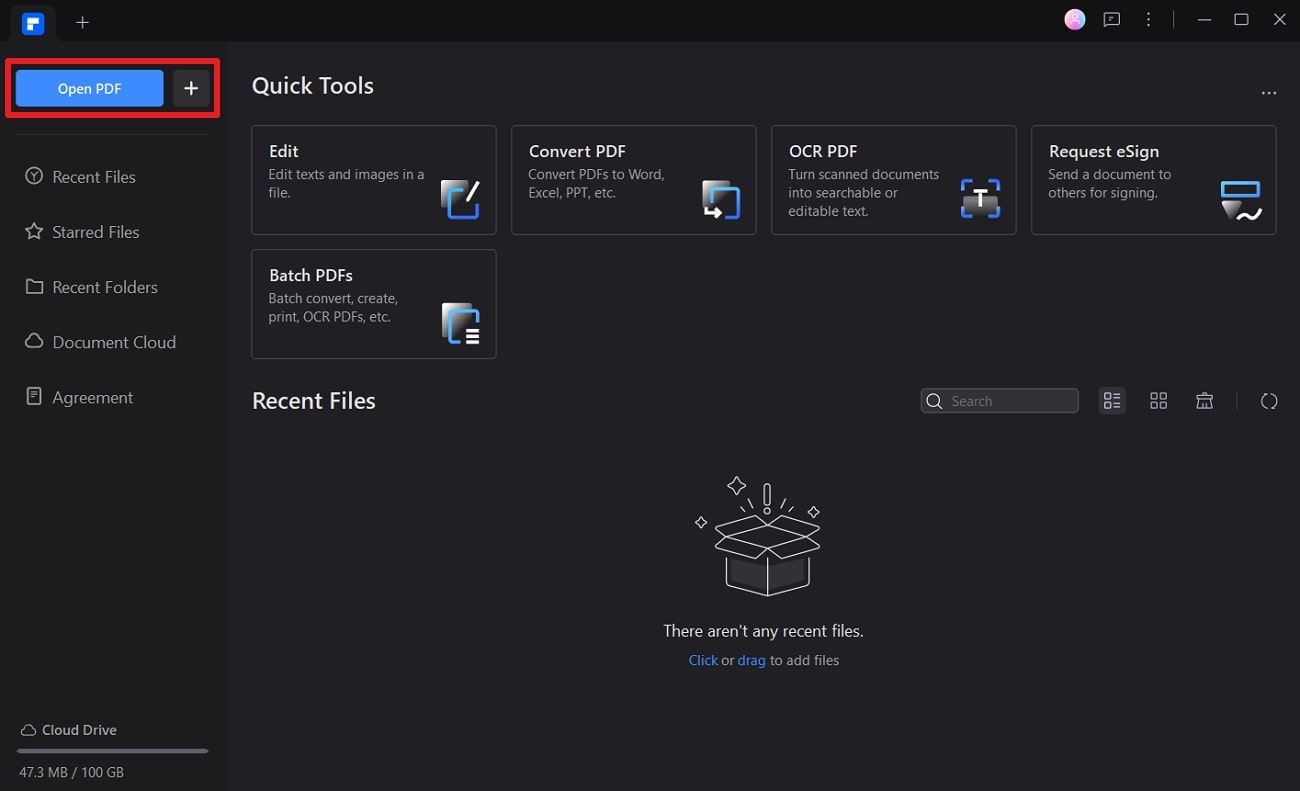
First of all, download the PDFelement tool using the download button below and install it on your device using the recommended settings. Then, launch the tool to access its interface and hit the "Open PDF" or the "+" button to import the PDF file that you want to optimize.
Step2Flatten PDF Through the Tools Section
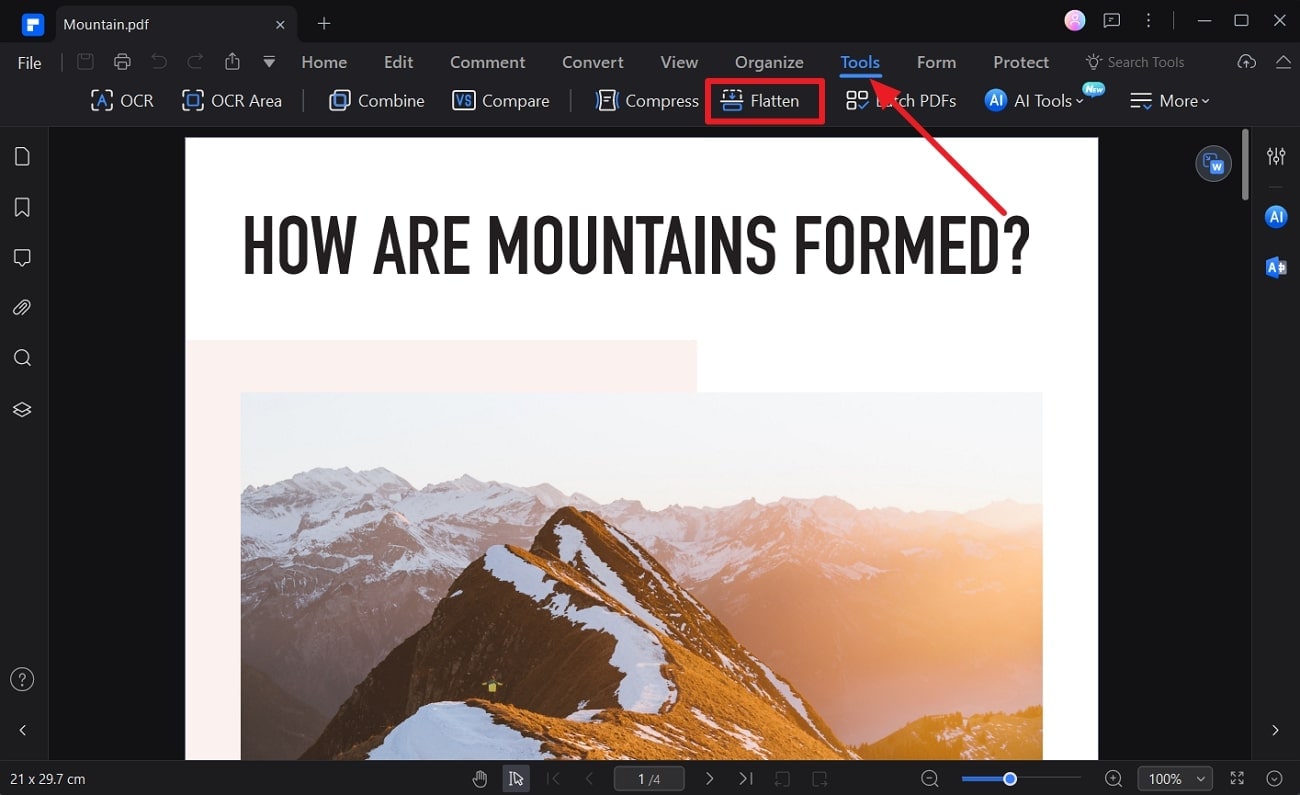
After you have imported your PDF to the tool, go to the "Tools" section from the top menu options. There, you will see several amazing tools to modify your document for various purposes. Just click on "Flatten," and the tool will automatically flatten all the layers in your PDF to optimize it for fast viewing.
2. Compress PDF
PDFs also take a longer time to load on the web due to their large file size, which may especially cause hurdles if the network connection is slow. So, one of the great ways to optimize PDF files for fast viewing is to reduce their file size by compressing them. You can use PDFelement to compress your PDF by following these steps:
Step1Select Compress from the Tools Section
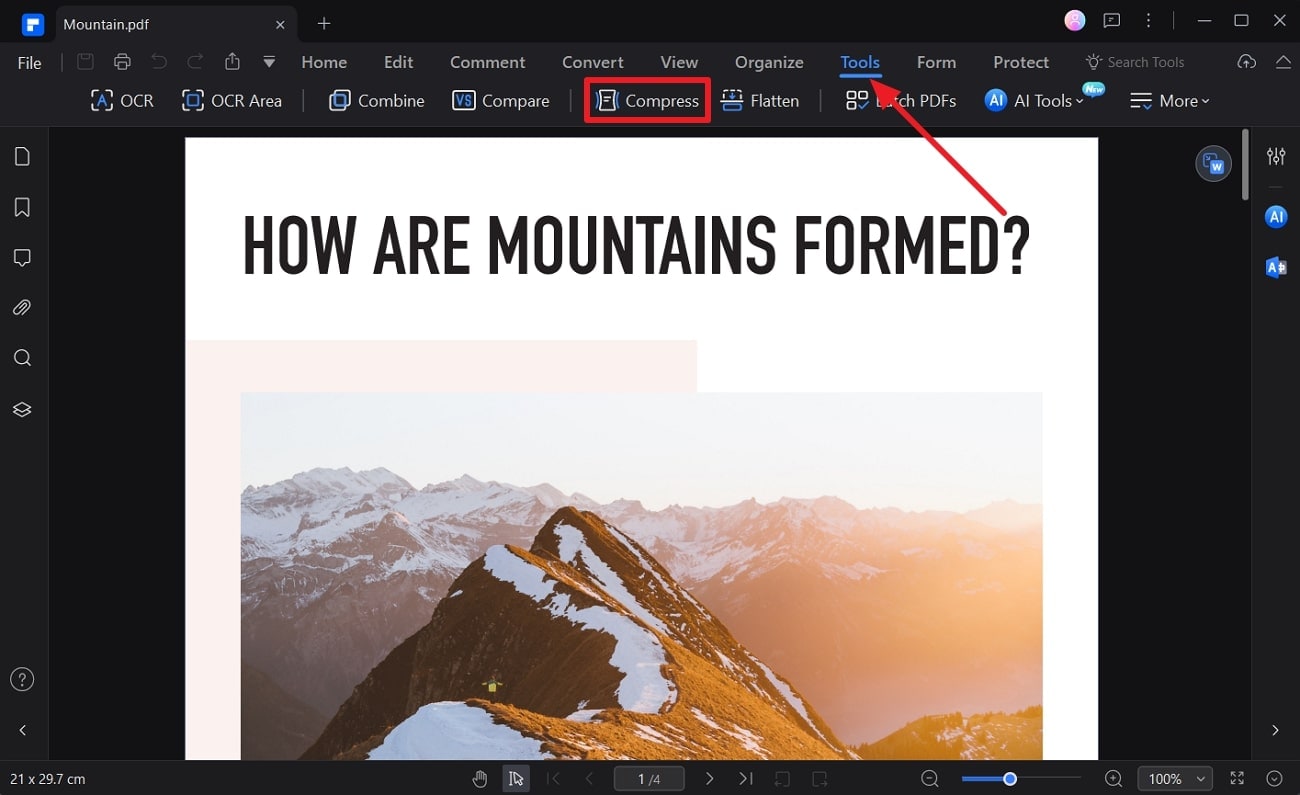
Once you open your PDF within PDFelement, look for the "Compress" option in the "Tools" tab. Simply click "Compress," which will lead you to another overlaying window.
Step2Choose the Required Compress Options
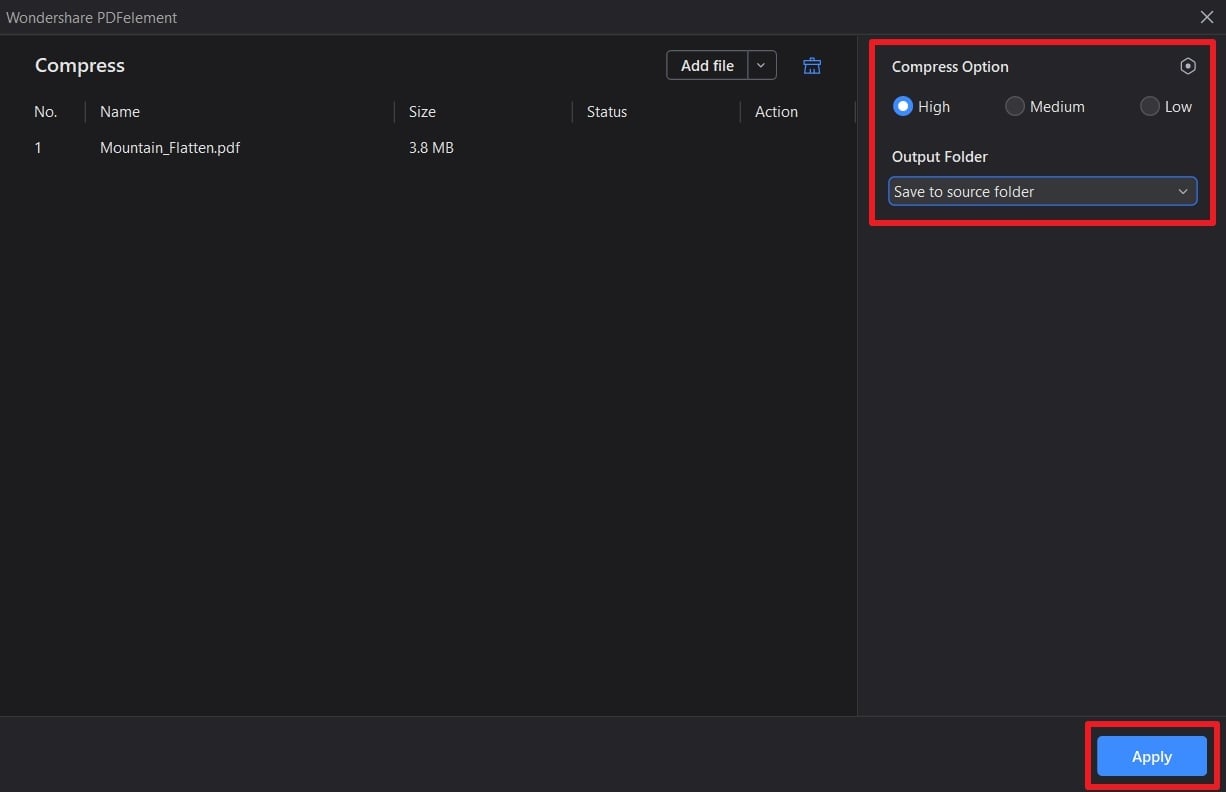
From the next window, you can choose the desired quality and extent of compression. Also, you can set the destination for saving the new file. Once you have selected your preferred settings, hit the "Apply" button to compress your PDF instantly.
Conclusion
In conclusion, advancements in technology and communication make it necessary for us to optimize PDF handling for better productivity and efficiency. That's where linearized PDFs come in handy, where they can be opened and viewed instantly without any delay in downloading the whole file.
For your help, we have discussed some of the best possible ways for you to create linearised PDFs quite easily. Also, we have shared with you a more convenient way, through Wondershare PDFelement, to optimize your PDF for faster web viewing.

 G2 Rating: 4.5/5 |
  100% Secure


