
Bleed is an essential concept in the printing world that deals with the edges of paper and how it is printed or cut. Because printers essentially grab each sheet of paper by the edges to feed it through the printer, no printer can print all the way to the material's outer edge and will most likely cut off your final product.
Bleed margins help to avoid this issue resulting in a polished and professionally finished product. And to help you understand print bleeds better, this article will unravel everything you need to know about bleed in printing.
In this article
Part 1: What Does Bleeding in Printing Mean?
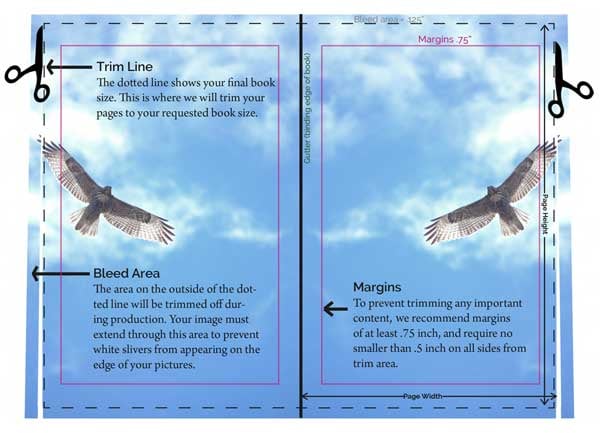
First, it's important to know what bleed in printing means. The extra space around the outside of your document that will be cut off during production is called bleed. It is required to produce almost all paper print products, including business cards, presentation folders, canvas prints, and even banners.
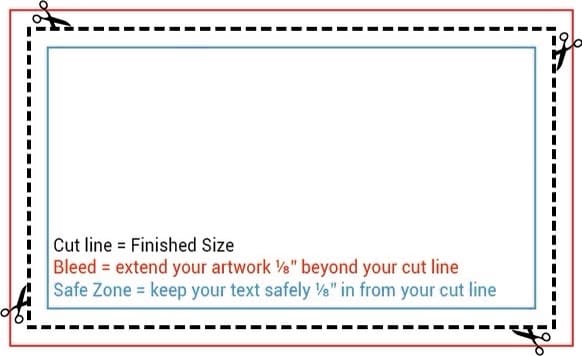
Bleed is a background color, graphic, or image that extends beyond the edge of the finished paper size. Printing equipment struggles to apply ink up to the cut edge of a sheet of paper.
As a result, an extra .125” (3mm) margin is typically added on each side of the design. The margin allows the background color, graphic, or image to extend past (i.e., “bleed off”) the paper's final trim edge, which will be cut off the printed sheet. For example, a letterhead sheet with bleed will be 8.75” x 11.25” before being trimmed to a finished size of 8.5” x 11”.
If your artwork lacks bleed, the resulting print will have thin white lines at the very edge. So how can you keep this from happening? There are PDF solutions where you can easily add bleed in your PDF, just like PDFelement's BleedBox, to work around it. It's a useful tool from a powerful yet easy-to-use PDF solution.


Part 2: How To Add Bleed to PDFs With Wondershare PDFelement
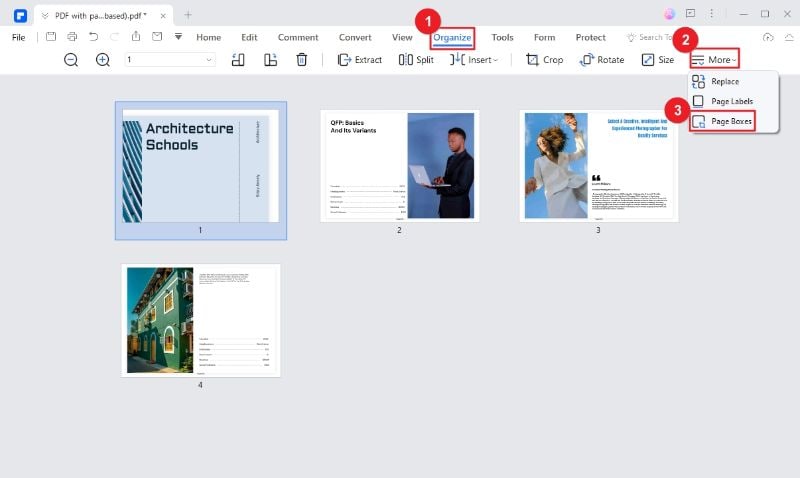
Being an all-inclusive PDF management tool, Wondershare PDFelement offers several margin control options to help you get the best outcome for your work. And among these options is the BleedBox tool. When people professionally print a page, the clipping path is defined by BleedBox to allow for paper trimming and folding. Check out the step-by-step guide below on how you can add bleed to your PDF using PDFelement:
Step1
Launch PDFelement on your device and open your file.
Step2
Navigate to the Page tab on top of the screen, then click on the More button to access the Page Boxes menu and click on it.
Step3
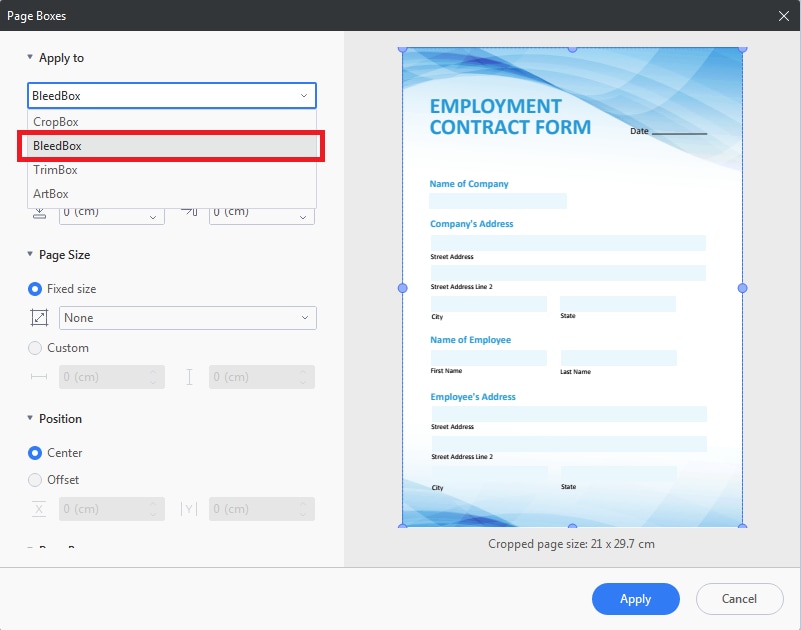
A dialog box will appear. Under the Apply to drop-down menu, click on the BleedBox option. Insert the margin values you prefer, then click Apply once done.
Key Features of PDFelement
PDFelement stands out from the crowd because, aside from its BleedBox tool, it is a full-featured PDF solution packed with numerous primary and advanced PDF editing options. Some of the excellent features provided by PDFelement include:
- View and Edit PDF documents
- Create and complete PDF forms
- Accurate OCR Tool
- Superior file conversion to and from PDFs
- Arrange and Merge PDF Pages
- Annotate PDF Files
- Built-in Cloud Storage
- PDF Password Security
Pricing
PDFelement provides a number of low-cost plans to ensure that users get the best deal possible. The following are the PDFelement's pricing details:
| Individual | Team |
|
Yearly Plan - 79.99 USD Perpetual Plan – 129.99 USD |
Annual Plan – 109 USD per user Perpetual Plan – 139 USD per user |
Supported OS
PDFelement is a PDF management tool that works on Windows, Mac, Android, and iOS. The table below shows which operating systems each one supports.
| System | Supported OS |
| Windows | Windows 11 and below |
| Mac | macOS 10.14 to macOS 13 (Apple M1 & M2 Compatible) |
| Android | Android 5.0 (Lollipop) and up |
| iOS | iOS 13 and above |
Part 3: Difference Between Full Bleed vs. No Bleed
Full-bleed printing makes sense when a project requires a printed image or document with no margins or when the printed color and images extend to the edge of the paper. Technically, no special equipment is required for full-bleed printing. Printing companies have long used a “trick” to achieve a popular printing effect with customers.
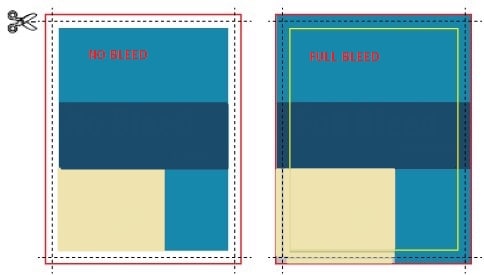
The digital file's background must be extended to 8.75” x 11.25” to produce a full bleed 8.5” x 11” color copy. After printing, a guillotine cutter will remove .125” from each side of the color copy to achieve the final dimension. This way, the finished product has been printed all the way to the edge of the sheet.
No bleed printing, on the other hand, is the kind of printing you're used to. Your home desktop printer is perfectly capable of “no bleed” printing. It leaves a thin white margin around the files when printing a standard sheet of 8.511” paper.
Part 4: How Much Bleed Should I Leave for Printing?
When it comes to printing, there are several approaches to dealing with bleed. Here are some of the methods you should consider:
- You can leave an appropriate margin around the edges of the material you're printing to allow for printing and cutting errors. The “safe zone” for printing text is 0.25 inches inside the document's edge (or cut line).
- If you want images or other graphics to extend to the material's edges, you should enlarge the image beyond the desired size into the bleed zone.
- A standard bleed area is approximately .125 inches on each side. So, if you're printing a standard 11 x 8.5-inch document, you'll want the final template to be 11.125 x 8.625 inches.
- Alternatively, if you're printing a custom background image on a standard 9 x 12-inch folder, the image should be at least 9.125 x 12.125 inches on both sides.
Most documents only require a .125-inch margin; however, documents in large sizes may necessitate a larger bleed area. For documents larger than 18 x 24 inches, the standard bleed area is .5 inches. For example, if you want to print an 18 x 24-inch document, you should create an 18.5 x 24.5-inch template. Remember to leave some space for cutting.
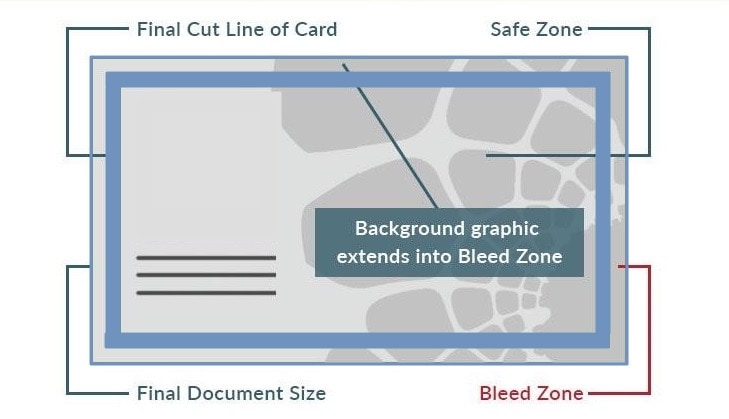
There's no way of knowing where the bleed area will be cut, so ensure you extend images beyond the final document's edge and all the way to the end of the bleed zone. To serve as a guide, check out this table of common document sizes and their bleed measurements:
| Document | Size | Size with Bleed |
| Legal Paper | 8.5” x 14” | 8.625” x 14.125” |
| Letter Paper (Standard) | 8.5” x 11” | 8.625” x 11.125” |
| Business Card | 2.3” x 2” | 2.425” x 2.125” |
| Pocket Folder | 9” x 12” | 9.125” x 12.125” |
| Postcard | 4” x 7” | 4.125” x 6.125” |
| Invitation | 5” x 7” | 5.125” x 7.125” |
Conclusion
Adding bleed to your PDFs before printing is important to ensure that your printing projects have a professional, polished look. And with PDFelement's features, you can ensure that you will get the best possible outcome for your PDFs.
As an ultimate all-in-one PDF management tool, PDFelement provides everything you'll require for your PDF needs. It's a simplified PDF solution that is quick and affordable, with an intuitive user interface to help you work faster and more efficiently than ever.