Suppose you have data in picture format. Say you took a picture/screenshot of a scanned document or web page and want to use these data in Excel. Traditionally, you would need to type all these data into an Excel worksheet. This is time-consuming, energy-draining, and vulnerable to typing errors. Furthermore, it is boring and reduces productivity.
However, your work becomes super-easy if you can automatically extract these data from images and insert them in Excel. Fortunately, this article guides you on how to insert data from a picture in Excel on Windows.

How To Insert Data From Picture to Excel
The new data from picture feature in Excel for Windows is transforming how we insert data from pictures into Excel. This feature lets you seamlessly add data from a picture without typing it on the Excel sheet.
It allows you to insert the target picture from a file or clipboard. The process is simple and accurate. You can review the results and make the necessary adjustment to boost the accuracy of extracting data from a picture.
The following steps show how to insert data from pictures into Excel in Windows.
Step 1 First, you should capture the data image. You can capture/transfer the target image and save in a suitable folder or copy it to the clipboard. Use the desired option to capture this data image for Excel.
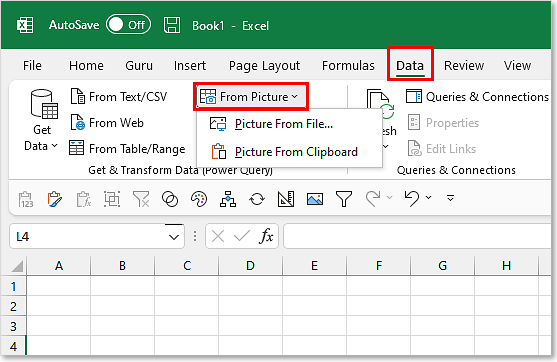
Step 2 Once you have captured the image, open Microsoft Excel on your computer. Proceed to the "Data" section on the toolbar and click the "From Picture" drop-down arrow. Select the "Picture from File" or "Picture from Clipboard" option depending on the method you used to capture the data image.
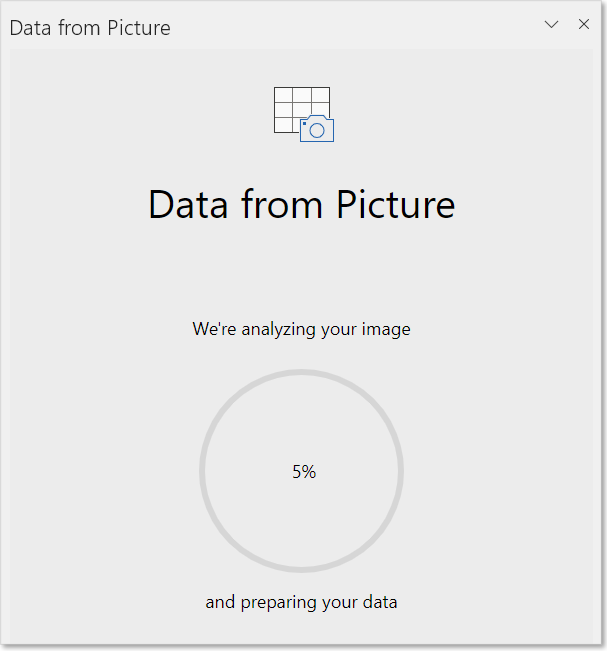
Step 3 Upon choosing to upload the image, the "Data from Picture" dialog box will appear. You will see the image processing progress on the background and a notification that the image is being analyzed.
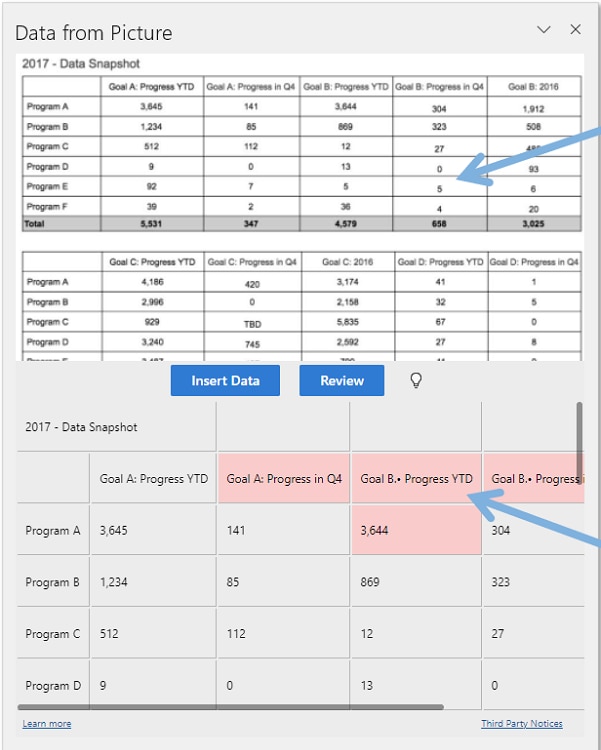
Step 4 Once the image is successfully analyzed, the "Data from Picture" window will pop up. The data will appear in an Excel sheet with areas that need revision highlighted. Click and review the highlighted data, then hit the "Insert Data" button to confirm.
What Are The Requirements?
The data from picture feature is not guaranteed to be installed in your Microsoft Excel version. You first need to confirm whether it is available or not.
The requirements for using the data from picture feature in Microsoft Excel include:
- Window 10 or Windows 11 build 1903 or greater. It also must have installed Microsoft Edge WebView2 Runtime.
- It supports only character sets from languages like English, French, Romanian, Turkish, Swedish, Czech, Hungarian, Bosnian, Italian, Croatian, Norwegian, Portuguese, Slovak, French, Spanish, Polish, Finnish, Slovenian, German, and Dutch.
- Microsoft 365 build 1573 or later. The rollout is ongoing for those who have the Microsoft Office Insider beta channel.
How To Import Data From Screenshot to Excel
Importing data from screenshots to Excel is now possible with the permitted versions of Microsoft Excel. The following steps show how to import data from the screenshot in Excel.
Pro Tip: Use Windows+Shift+S (Win) or Cmd+Shift+4 (Mac) for clean screenshots
Step 1 First, open the target data picture and take a screenshot. To take a screenshot, press the combination of Shift+ Windows + S. You can screenshot a document, web page, scanned file, etc.
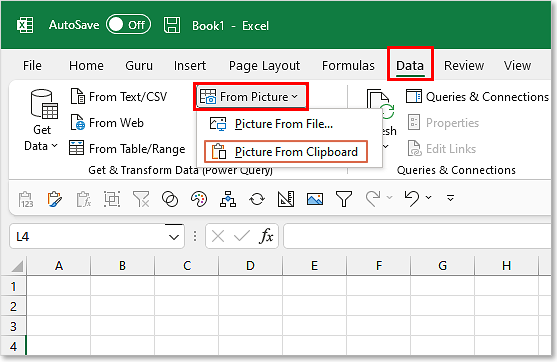
Step 2 Once you have taken the screenshot of the target data page or image, open Microsoft Excel on your computer. Go to the "Data" tab on the toolbar, then click the "From Picture" option. From the options given, choose "Picture from Clipboard."
Step 3 Excel will pop up the "Data from Picture" window showing you the percentage progress of image analysis. Wait until the image is fully analyzed.
Step 4 The preview will appear in the subsequent pop-up when the image is fully analyzed. Here, you can review the parts that require correction, then click "Insert Data" to finally import data from the screenshot to Excel.
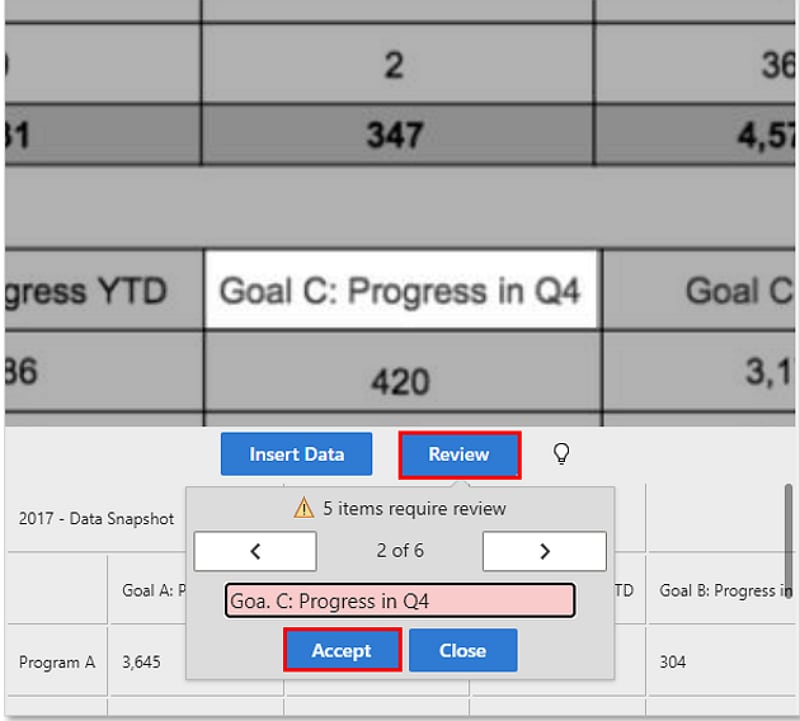
Data from Picture Button Missing on Excel, How to Fix?
Many users complain that the "Data from Picture" option is missing in Excel so they cannot insert data from pictures in Excel. The probable cause for this is that you are using the older Excel version. The insert data from picture feature is only available to Microsoft 365 subscribers running Excel Version 2210 (Build 15723) or later.
If you are using the older version of Microsoft Excel, consider upgrading it to the latest version. However, you should know that the latest version is also based on the type of license and version of your operating system.
If you are already on the latest version, go to Excel > Preferences > Privacy and make sure "Optional Connected Experiences" is turned on.
The Data from Picture feature in Excel has its challenges and requirements. Therefore, you cannot fully bank on it, especially when handling professional or important documents. Fortunately, Wondershare PDFelement - PDF Editor Wondershare PDFelement Wondershare PDFelement saves you from the nightmare of potential errors and inconveniences when inserting data from the picture is missing in Excel.

PDFelement is a powerful PDF software that handles all types of PDF tasks, including inserting data from pictures into Excel. The process is pretty simple, and any user can handle it.
You only need to create a PDF from your data picture and then use the OCR feature to recognize the data in the picture. With the data now editable and searchable, you can easily extract the data from the picture into your Excel.
The beauty of PDFelement is that it is fast, highly accurate, affordable, easy to use, feature-rich, and compatible with nearly all devices and operating systems. You can download the free trial version or upgrade to the premium version to unlock an unmatchable experience.
PDFelement lets you seamlessly insert data from pictures in Excel on Windows as follows.
Step 1 Create PDF from the Picture
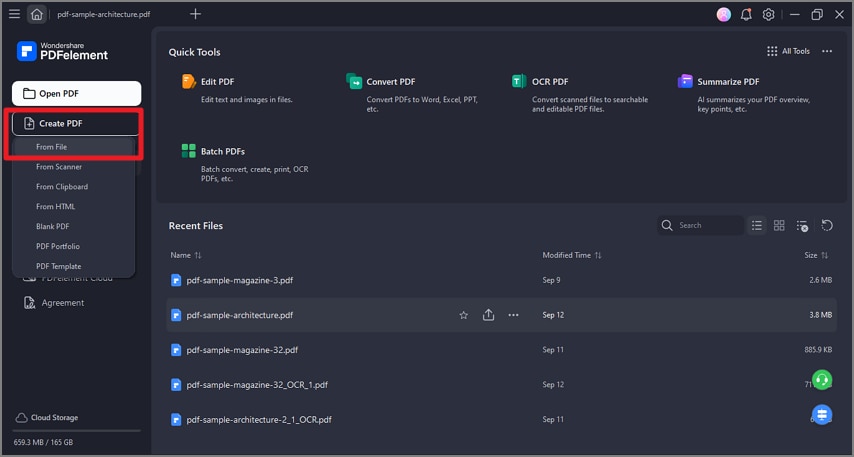
Once you have captured the data picture, run PDFelement on your computer. Click the "Create PDF" button and select the "From File" option. Choose the target data picture and hit "Open" to upload it. PDFelement will automatically convert the image file to PDF and open it on its interface.
Step 2 OCR the Picture
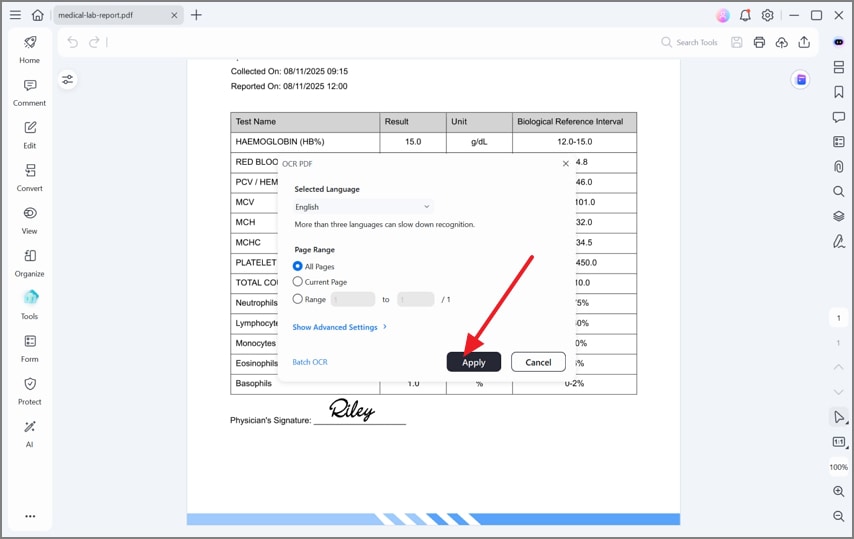
Click the "Tool" tab and the "OCR" icon in the sub-menu. From the "OCR PDF" pop-up, choose "Scan to Editable text." You can also choose the desired page range and language recognition. Once satisfied, click the "Apply" button.
Step 3 Extract data from the picture to Excel
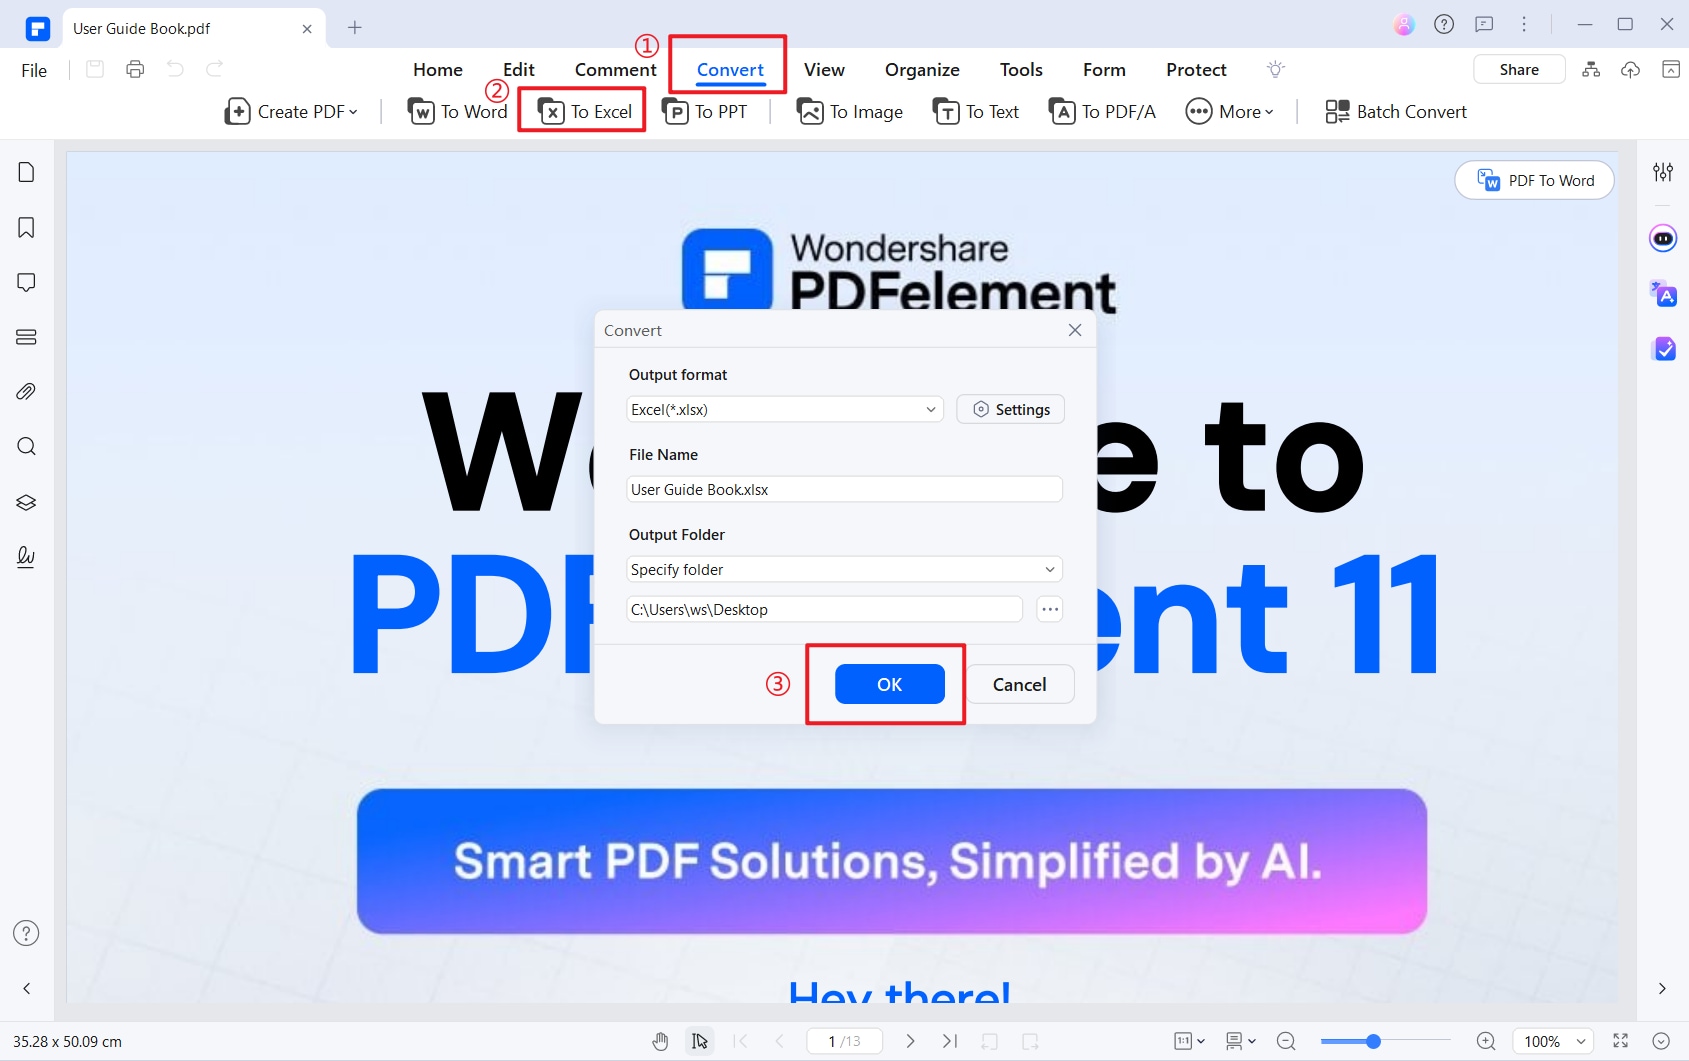
Now that the OCR feature has made your data recognizable and editable, you can extract them. With PDFelement, you can copy and paste the sheet into your Excel sheet. Alternatively, you can directly convert it to an Excel file by navigating to Convert>To Excel.
Bonus: How To Extract Data From Images on Mobile
Extracting data from an image on a mobile phone is not complex. You only need the Excel mobile app to get started. The good news is that you don't need a Microsoft 365 license or the requirements you would need to fulfill on Windows or Mac operating systems.
The following steps show how to extract data from the image on mobile.
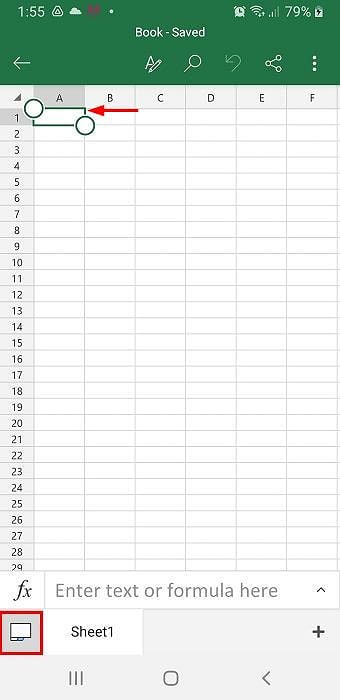
Step 1 Download the Excel mobile app on your mobile device and install it. Run the app open a blank worksheet and select an empty cell. Scroll down and hit the icon next to the sheet name at the bottom.
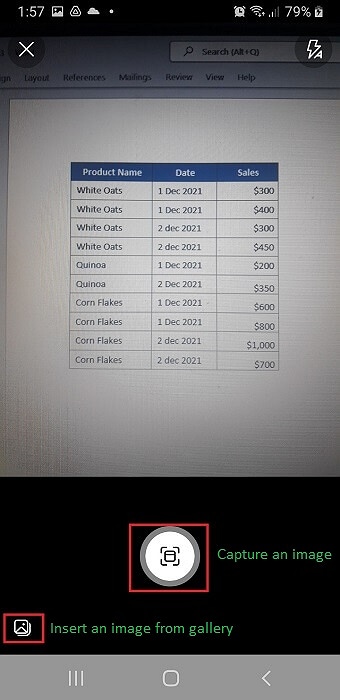
Step 2 Hit the camera icon and choose to upload or directly capture an already captured image. Tap the "Capture an image" option to capture the excel document. Alternatively, select the "Insert an image from the gallery" icon to upload an already saved data image.
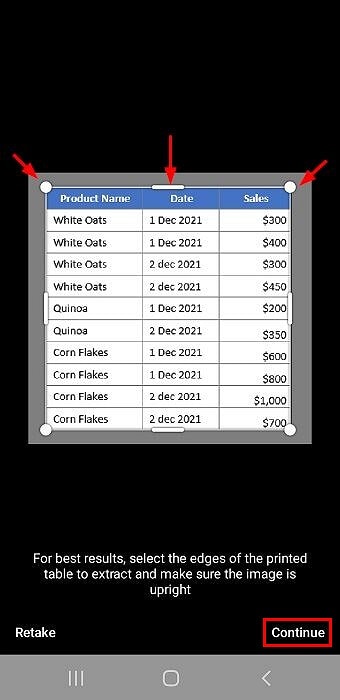
Step 3 After choosing the image, the crop handles should appear on its boundaries. Drag the handles to fit your desired size, then tap "Continue."
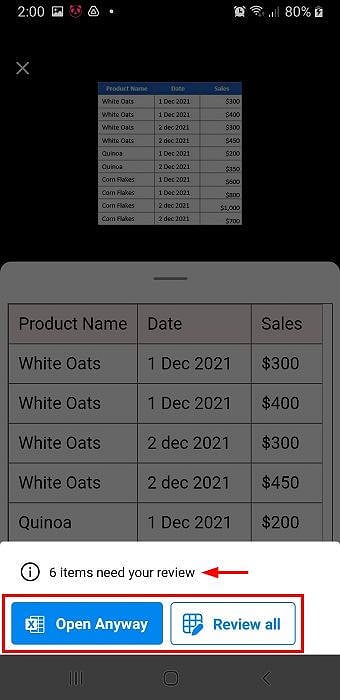
Step 4 You should now see the extracted data from the image. This window lets you select desired data and review/edit it to meet your needs. Edit and review selected data to minimize errors or make them meet your preferences. After editing any data, remember to click "Open" to confirm the changes.
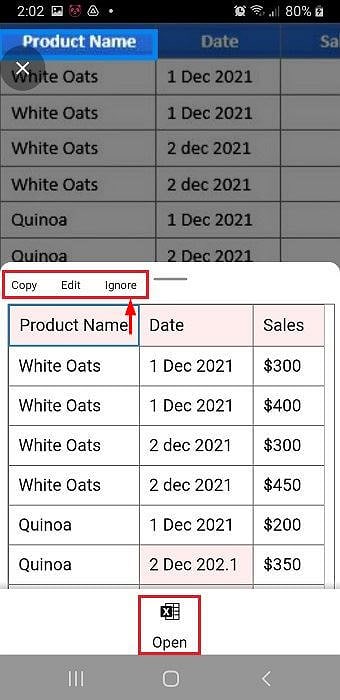
Step 5 When you are satisfied with the review, hit the "Open Anyway" tab to extract the data from the image into your Excel.
Conclusion
Microsoft Excel has made it possible to insert data from images into Excel. This has simplified how we enter data in Excel because you save both time and energy. However, this feature is not available on all versions of Excel and Windows. Therefore, these flaws can cause inconveniences.
Furthermore, you cannot fully trust it for professional or sensitive data. Fortunately, Wondershare PDFelement has proved that it is a perfect tool for inserting any data from a picture in Excel. Download Wondershare PDFelement today and get the amazing experience of inserting data from pictures in Excel on Windows.
 Home
Home
 G2 Rating: 4.5/5 |
  100% Secure


